White Chocolate Brownie Bars Recipe
If you’re a white chocolate lover like me, then you’re going to adore this White Chocolate Brownie Bars Recipe. These brownies are soft, buttery, and loaded with that creamy sweetness only white chocolate can deliver. They’re perfect when you want a twist on classic brownies that feels a little fancy but still totally easy to make. Trust me, once you try these, they’ll become your new go-to treat for any occasion.
Why This Recipe Works
- Rich White Chocolate Flavor: Using high-quality white chocolate bars melts smoothly and provides that signature creamy taste.
- Perfect Brownie Texture: The combination of eggs and extra yolks gives you a moist, tender bar that’s not cakey or crumbly.
- Simple, Straightforward Method: Melting the chocolate and butter together avoids lumps and keeps the batter silky.
- Versatility: Easily customizable with nuts or fruit add-ins, making it your own special treat.

Ingredients & Why They Work
Every ingredient in this White Chocolate Brownie Bars Recipe plays a key role in the final texture and flavor. Picking the right chocolate and measuring the flour carefully can make all the difference, so I always keep a few tips in mind when shopping.
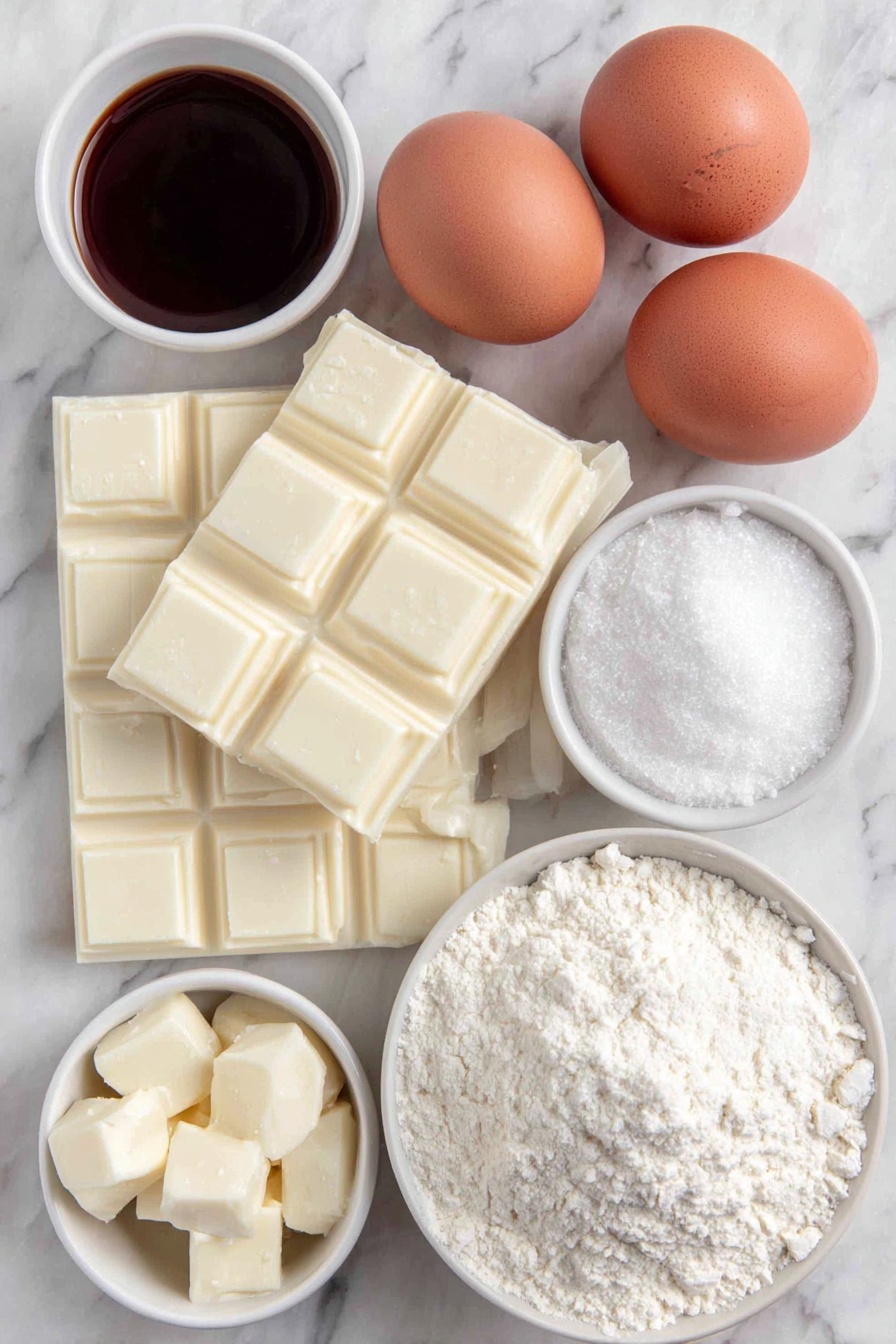
- High-quality white chocolate bars: Go for brands like Lindt or Ghirardelli — they melt evenly and give a rich, creamy taste without being overly sweet.
- Unsalted butter: Butter adds richness and moisture; unsalted lets you control the salt level perfectly.
- Eggs and egg yolks: Using both helps create a dense yet tender crumb — extra yolks boost richness.
- Granulated white sugar: Sweetens the bars and contributes to that classic chewy texture.
- Vanilla extract: Enhances the white chocolate’s flavor, making everything taste more vibrant.
- All-purpose flour: Provides structure without making the brownies dry—measure it by spooning and leveling to avoid packing.
- Salt: Just a pinch to balance sweetness and bring all the flavors together.
Make It Your Way
One of my favorite things about this White Chocolate Brownie Bars Recipe is how easy it is to switch up the flavors or textures. I often toss in chopped macadamia nuts for crunch, or swirl in some raspberry jam for a fruity surprise. You really can’t go wrong customizing it to your own taste.
- Nutty Variation: I love adding toasted pecans or walnuts—they bring a wonderful contrast to the creamy, sweet bars.
- Fruity Twist: Swirling in raspberry or strawberry preserves after pouring the batter adds a pop of color and brightness that cuts the richness.
- Dairy-Free Option: Try substituting vegan butter and egg replacers if you want to make these friendly for dairy-free diets—just keep the white chocolate dairy-free, too!
- For the Chocolate Lovers: Sprinkle bittersweet chocolate chunks on top before baking for a melty chocolate surprise in every bite.
Step-by-Step: How I Make White Chocolate Brownie Bars Recipe
Step 1: Get Your Pan Ready
First things first, preheat your oven to 325°F (160°C). I like using a 9×9 inch square pan lined with parchment paper because it makes getting the brownies out a breeze later on. If you don’t have parchment, just grease the pan very well so nothing sticks. This sets you up for a smooth baking experience right from the start.
Step 2: Melt the Chocolate and Butter
Use a double boiler or a heatproof bowl over a pot of simmering water to gently melt your white chocolate and butter together. Stir continuously so it melts evenly without burning or seizing. This step is crucial because white chocolate is delicate, and melting it slowly ensures it stays smooth and luscious in your batter.
Step 3: Whisk Together Eggs, Sugar & Vanilla
In a large bowl, whisk your eggs, extra yolks, sugar, and vanilla until pale and smooth. I usually grab my hand mixer here to save time and really get that fluffy texture. This aerates the eggs, giving your bars a nice lift and tender crumb.
Step 4: Combine and Fold in Flour
Pour the melted chocolate-butter mixture into your egg mixture and whisk everything until smooth and well combined. Then fold in the flour and salt gently with a spatula, just until no streaks remain. Be careful not to overmix here because that can make the brownies tough—gentle folding = soft, tender bars every time.
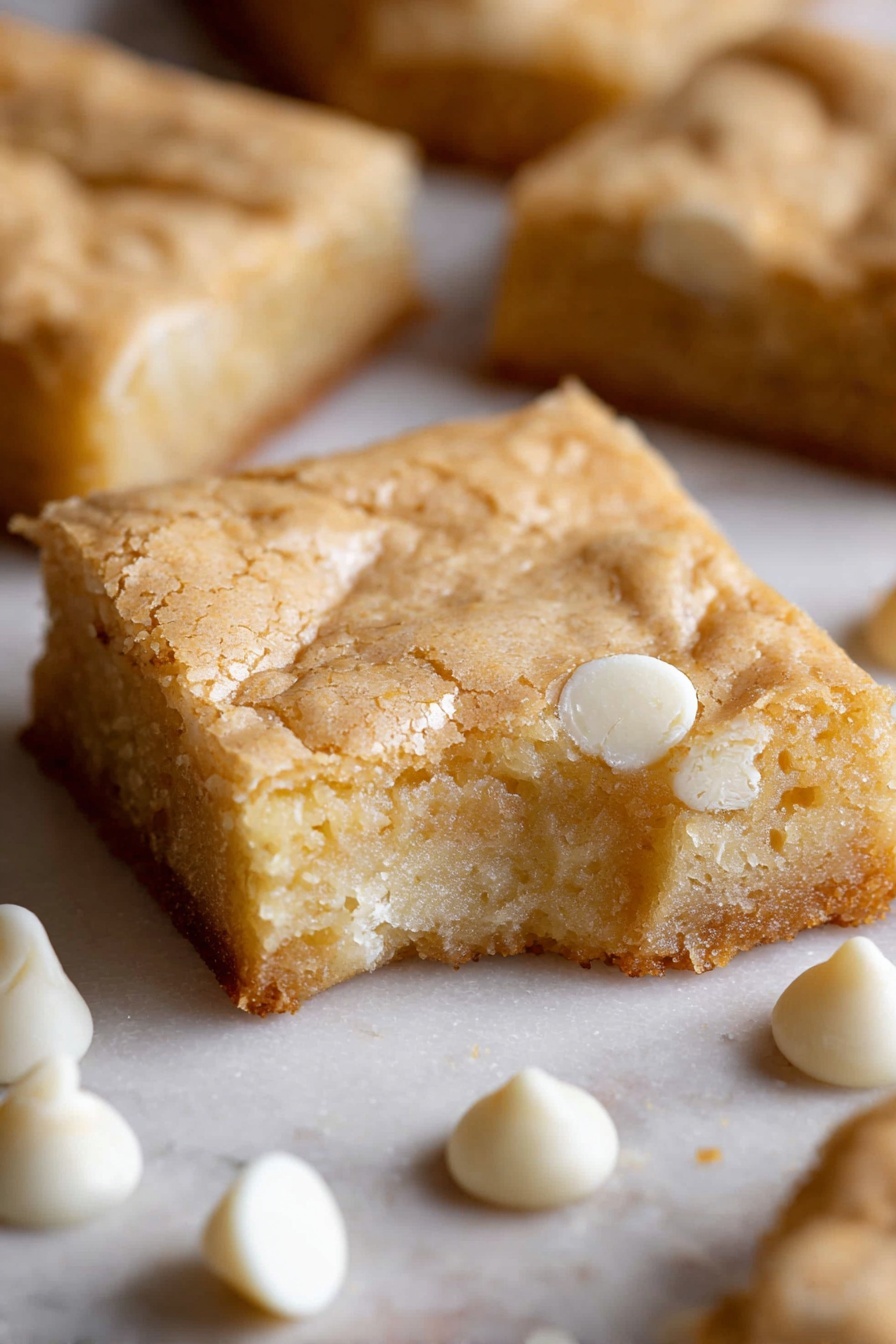
Step 5: Bake and Cool
Pour the batter into your prepared pan and smooth the top with an offset spatula. Pop it in the oven for about 29 to 33 minutes. You want to take them out when the edges look set but the center still has a slight jiggle—it finishes cooking as it cools. Cooling completely in the pan is key before cutting so they hold their shape without crumbling.
Tips from My Kitchen
- Correct Measuring: Always spoon and level flour instead of scooping directly from the bag to avoid dense brownies.
- Avoid Overbaking: Take the brownies out when the center still has a slight jiggle to keep them moist and fudgy.
- Chill for Clean Cuts: After cooling, pop the pan in the fridge for 30 minutes so the bars cut neatly without crumbling.
- Use a Sharp Knife: Wiping your knife clean between cuts helps make perfectly smooth squares every time.
How to Serve White Chocolate Brownie Bars Recipe
Garnishes
On my own kitchen table, I love dusting these bars with a light sprinkle of powdered sugar for a pretty finish. Fresh raspberries or a smear of berry coulis on the side also adds a lovely tart contrast to the sweetness. If you want to go all out, a drizzle of melted dark chocolate over the top looks stunning and tastes heavenly.
Side Dishes
Pair these brownies with a scoop of vanilla bean ice cream or a dollop of whipped cream to balance out the richness. A simple cup of coffee or a glass of cold milk is all you really need to make dessert feel complete!
Creative Ways to Present
For birthdays or special occasions, I like to cut the brownies into mini squares and serve them on a tiered dessert stand alongside fresh fruit and petit fours. They’re also great stacked with layers of berries and cream in clear glasses for an elegant parfait-style presentation.
Make Ahead and Storage
Storing Leftovers
I store leftover White Chocolate Brownie Bars in an airtight container at room temperature for up to 3 days. If your kitchen is warm, the fridge works too—you just might want to warm them up slightly before serving for that fresh-baked feel.
Freezing
These bars freeze beautifully! I wrap individual pieces tightly with plastic wrap and then place them in a freezer-safe bag. They keep well for up to 2 months. When you’re ready to enjoy, just thaw at room temperature or warm gently in the microwave.
Reheating
To bring leftovers back to life, I pop a piece into the microwave for about 15 seconds or warm it in a low oven (about 300°F) for 5 minutes. This helps revive the silky texture and makes them taste freshly baked again.
FAQs
-
Can I use white chocolate chips instead of bars for this recipe?
You can, but I prefer bars because they usually have higher cocoa butter content and melt more smoothly. If you use chips, opt for a high-quality brand, and melt gently to avoid graininess.
-
Why do I need both eggs and extra yolks?
Using both whole eggs and additional yolks adds richness and moisture, making the brownies fudgier and more tender compared to using just whole eggs.
-
Can I make this recipe gluten-free?
Absolutely! Substitute the all-purpose flour with a trusted gluten-free flour blend in a 1:1 ratio. Just make sure your blend contains xanthan gum or a binder for best texture.
-
How do I know when the White Chocolate Brownie Bars are perfectly baked?
Look for set edges and a center that still has a slight wobble. This ensures they’re moist inside without being undercooked or dry.
-
Can I add nuts or dried fruit to this recipe?
Yes! Chopped nuts like pecans, macadamia nuts, or dried fruit like cranberries make excellent mix-ins. Just fold them in gently with the flour to avoid overmixing.
Final Thoughts
Honestly, this White Chocolate Brownie Bars Recipe has become one of my absolute favorites to bake for friends and family because it’s effortlessly elegant and ridiculously tasty. I love sharing these bars because they always spark compliments and come back for seconds. I can’t wait for you to make these in your own kitchen — you’ll have happy hands and happy hearts, guaranteed!
Print
White Chocolate Brownie Bars Recipe
- Prep Time: 10 minutes
- Cook Time: 33 minutes
- Total Time: 43 minutes
- Yield: 16 brownies
- Category: Dessert
- Method: Baking
- Cuisine: American
Description
These decadent White Chocolate Brownies combine the rich, creamy sweetness of high-quality white chocolate with a tender, buttery brownie base. Perfectly balanced and baked to a soft, fudgy finish, these brownies are a delightful treat for any occasion.
Ingredients
Chocolate and Butter
- 8 oz (226 g) high quality white chocolate bars, chopped (Lindt or Ghirardelli bars)
- 3/4 cup (168 g) unsalted butter, chopped into small cubes
Wet Ingredients
- 2 eggs
- 2 egg yolks
- 1 1/4 cups (250 g) granulated white sugar
- 1 tbsp (15 ml) vanilla extract
Dry Ingredients
- 1 3/4 cups (219 g) all-purpose flour, spooned and leveled
- 3/4 tsp salt
Instructions
- Preheat and Prepare Pan: Preheat the oven to 325 degrees Fahrenheit. Lightly grease a 9×9 inch pan or line it with parchment paper for easier removal of the brownies.
- Melt Chocolate and Butter: In a double boiler over medium-low heat, melt the unsalted butter and chopped white chocolate together, stirring continuously to ensure smooth melting without burning. Remove from heat once fully melted and combined.
- Mix Wet Ingredients: In a large bowl, whisk together the eggs, egg yolks, granulated sugar, and vanilla extract until the mixture becomes pale and smooth. Using an electric hand mixer on high speed can help achieve this texture more easily.
- Combine Chocolate Mixture: Pour the melted white chocolate and butter mixture into the egg mixture and whisk until fully incorporated and smooth.
- Add Dry Ingredients: Gently fold the all-purpose flour and salt into the wet ingredients using a rubber spatula. Mix just until combined to avoid overmixing, which can toughen the brownies.
- Fill Pan and Bake: Pour the batter into the prepared 9×9 inch pan and smooth the top with a mini offset spatula for an even bake. Bake in the preheated oven for 33 minutes until set but still slightly soft in the middle.
- Cool and Serve: Allow the brownies to cool completely in the pan set on a wire rack. Once cool, loosen the edges with a butter knife and carefully invert to remove the brownies. Cut into 16 squares and enjoy.
Notes
- For easier removal, lining the baking pan with parchment paper is recommended.
- Use high-quality white chocolate bars for best flavor and texture, as lower-quality chips may not melt as smoothly.
- Be careful not to overbake to keep the brownies moist and fudgy.
- If you don’t have a double boiler, you can melt the chocolate and butter in short bursts in the microwave, stirring frequently to avoid burning.
- Storing the brownies in an airtight container at room temperature will keep them fresh for up to 3 days.
Nutrition
- Serving Size: 1 brownie
- Calories: 280 kcal
- Sugar: 25 g
- Sodium: 120 mg
- Fat: 17 g
- Saturated Fat: 10 g
- Unsaturated Fat: 6 g
- Trans Fat: 0 g
- Carbohydrates: 30 g
- Fiber: 1 g
- Protein: 3 g
- Cholesterol: 85 mg


