Viral Chicken Caesar Salad Pizza Recipe
If you’re craving something fresh, crispy, and downright addictive, you’re going to love this Viral Chicken Caesar Salad Pizza Recipe. It’s one of those delightful mashups where a savory chicken crust meets the classic Caesar salad flavors on top — a fun, low-carb twist that feels fancy but is actually super easy to pull together. Trust me, once you make it, your family and friends will be asking for this again and again. Let me walk you through how to make this fantastic recipe that’s just perfect for dinner or a casual get-together.
Why This Recipe Works
- Crispy, Flavorful Crust: Using canned chicken blended with Parmesan and seasoning makes a surprisingly sturdy, low-carb pizza base that crisps up beautifully.
- Fresh Caesar Toppings: The classic romaine, Parmesan, and tangy dressing on top add a bright crunch that balances the rich crust.
- Quick and Versatile: Whether you bake or air fry the crust, this recipe fits into your busy weeknight routine without compromising on taste.
- Crowd-Pleasing Twist: It’s impressive enough for guests but simple enough for casual meals, hitting the perfect balance for many occasions.

Ingredients & Why They Work
The secret to this Viral Chicken Caesar Salad Pizza Recipe lies in the harmony of simple, quality ingredients. The chicken crust is packed with protein and Parmesan for flavor and structure, while the fresh Caesar salad on top gives that cool, crisp contrast. Each ingredient pulls its weight to make this recipe both tasty and satisfying.
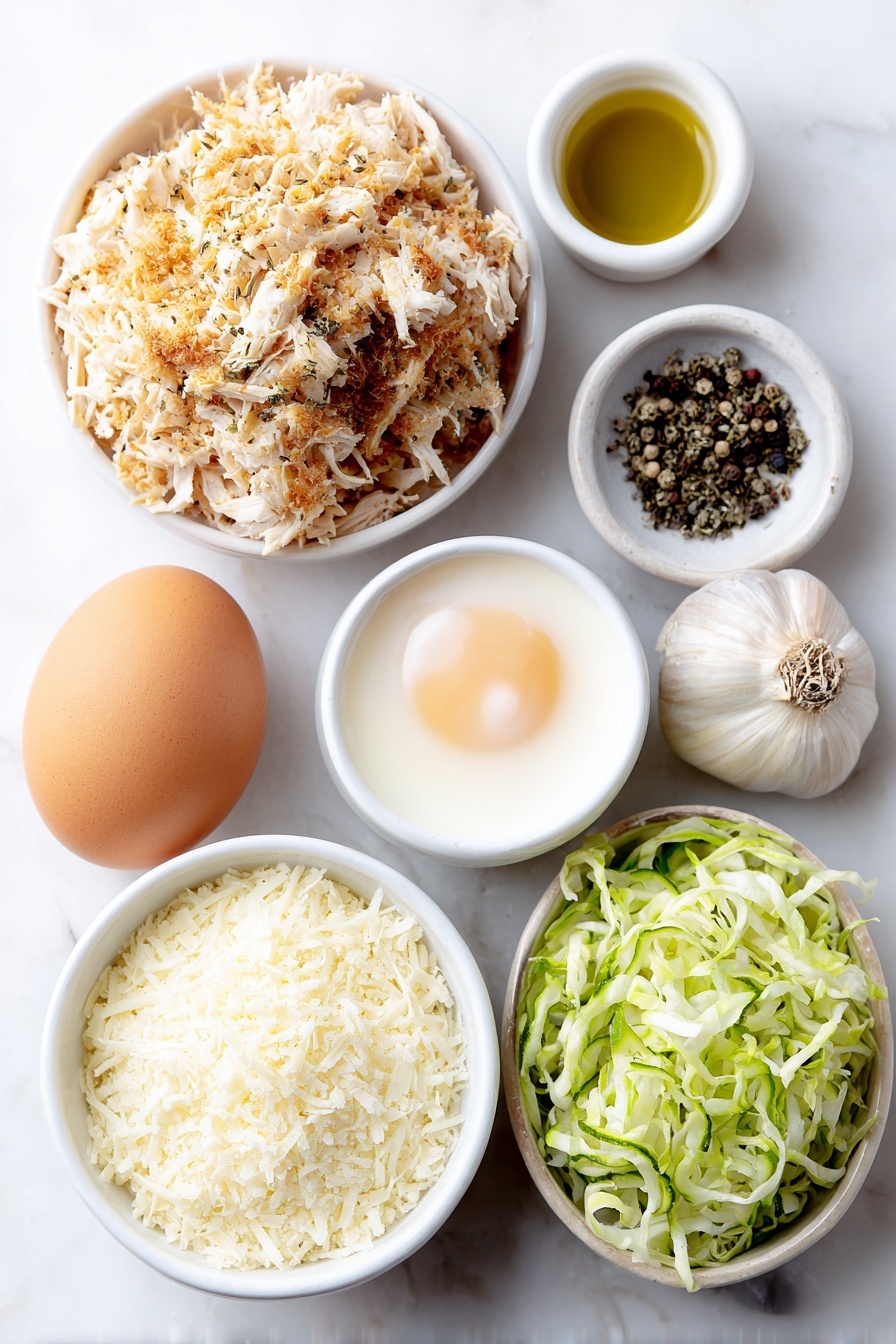
- Canned Chicken: Drained well, it forms the protein-rich base of the crust. It’s easy, accessible, and stores well in your pantry.
- Egg: Helps bind the crust mixture together so it holds its shape when baking or air frying.
- Grated Parmesan Cheese: Adds umami and helps crisp the crust as it cooks.
- Light Olive Oil: Keeps the crust moist and gives a subtle, pleasant flavor.
- Garlic: Fresh cloves bring a punch of aroma and taste that makes every bite shine.
- Italian Seasoning: A blend of herbs that elevates the flavor perfectly without overpowering.
- Romaine Lettuce: Crisp and fresh, it creates the classic Caesar salad base you know and love.
- Caesar Dressing: Creamy with a tang, it dresses the salad beautifully and doubles as a spread for extra flavor on the crust.
- Mini Cucumbers: Adds crunch and a refreshing contrast to the savory crust and creamy dressing.
Make It Your Way
One of the things I love about the Viral Chicken Caesar Salad Pizza Recipe is how adaptable it is. I usually stick to the classic Caesar elements, but you can easily make it your own with simple tweaks and substitutions.
- Variation: I sometimes add a pinch of red pepper flakes to the crust mix for a subtle kick — it brings a delicious heat that my family enjoys.
- Greens Swap: If romaine isn’t your favorite, baby kale or arugula work great for a peppery twist.
- Dress It Up: Try making your own Caesar dressing or swapping in a vegan alternative to suit dietary needs.
- Cooking Method: I’ve had great results with both air frying and baking, so choose based on your kitchen setup and timing.
Step-by-Step: How I Make Viral Chicken Caesar Salad Pizza Recipe
Step 1: Blend Your Crust Ingredients
Start by combining the canned chicken (make sure it’s well drained!), grated Parmesan, egg, garlic cloves, Italian seasoning, salt, and pepper in a food processor or an upright blender. Pulse everything together until it forms a thick, sticky dough. The key here is not to over-blend — you want the ingredients mixed but still maintaining some texture so the crust isn’t rubbery.
Step 2: Shape and Cook the Crust
If you’re air frying, cut a round piece of parchment paper to fit your basket. Spread about half of the chicken mixture (or adjust depending on your basket size) about 1/4 inch thick on the parchment, leaving a small margin at the edges. Use oiled fingers to prevent sticking — a little trick that helped me so much! Then air fry at 385°F for 10-12 minutes, flipping halfway through, until it’s golden and crispy.
If you prefer the oven, preheat to 400°F and line a baking sheet or pizza pan with parchment paper. Spread the dough 1/4 inch thick, and bake for about 25-30 minutes until golden and crispy. Let it cool slightly before topping.
Step 3: Toss the Caesar Salad
While the crust cools, shred your romaine lettuce and slice the mini cucumbers. In a medium bowl, gently toss the greens with Caesar dressing and Parmesan cheese until evenly coated. This step is all about freshness — toss it just before assembling to keep the salad crisp and vibrant.
Step 4: Assemble and Serve
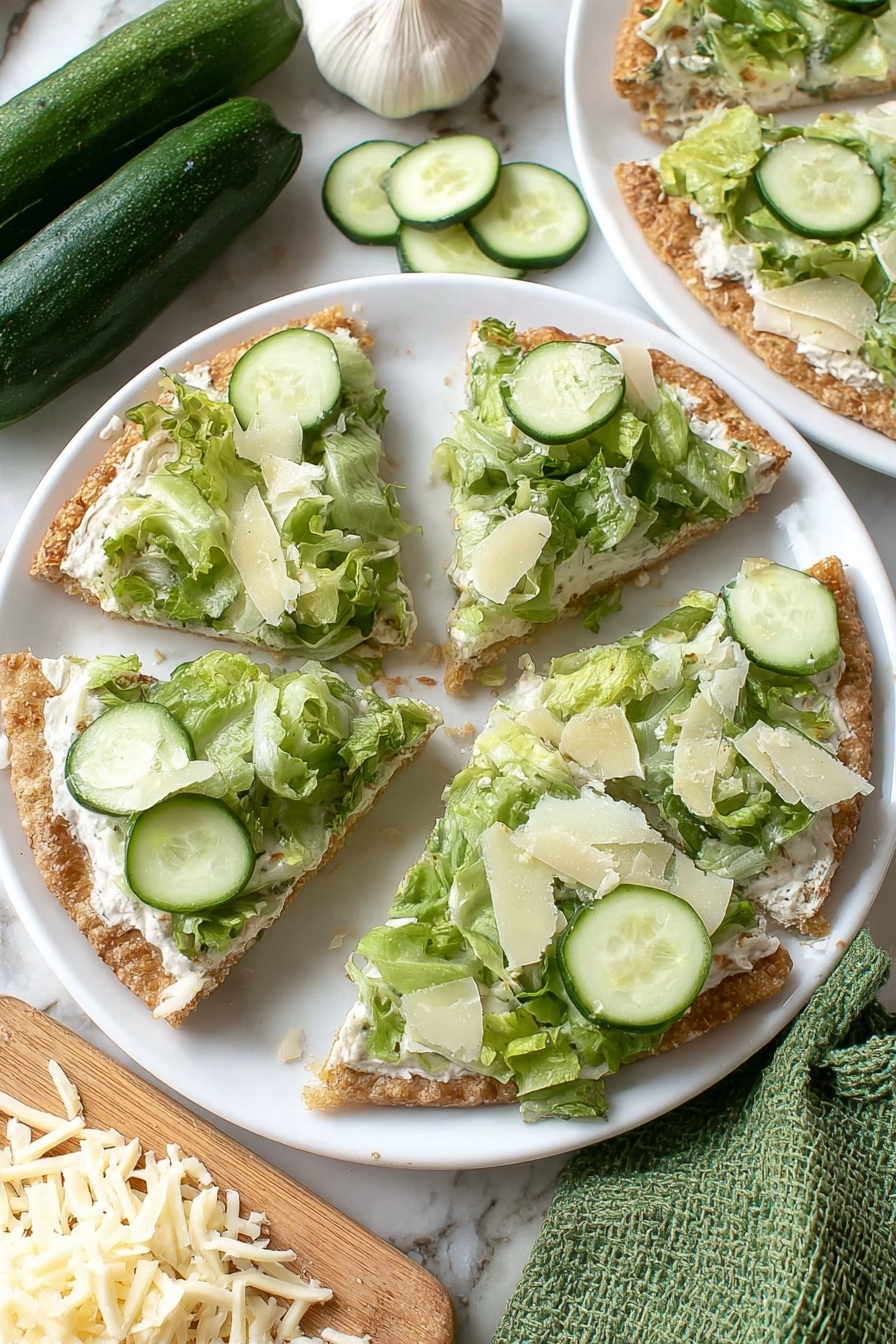
Spread a tablespoon of Caesar dressing over the slightly cooled crust to give a creamy base. Then pile on the tossed Caesar salad and sprinkle some extra shaved Parmesan on top. Slice it up and serve immediately to enjoy that perfect contrast between the crisp crust and the fresh salad.
Tips from My Kitchen
- Drain That Chicken Well: Removing as much moisture as possible from the canned chicken helps the crust get crispier and less soggy.
- Oil Your Fingers: When spreading the dough, a little oil on your hands prevents sticking and keeps the crust smooth and evenly thin.
- Don’t Overload the Salad: Keep the salad portion moderate so the pizza slices hold together and the crust stays crispy.
- Fresh Is Best: Assemble just before serving – the salad dressing will wilt the greens and soften the crust if made too early.
How to Serve Viral Chicken Caesar Salad Pizza Recipe
Garnishes
I love topping mine with a few extra shavings of Parmesan and freshly cracked black pepper to boost the savory notes. Sometimes I add a sprinkle of lemon zest for a subtle zing that brightens up the whole dish. If you’re feeling fancy, some chopped fresh parsley works beautifully too.
Side Dishes
This pizza is pretty hearty, but I like pairing it with a light tomato basil soup or a simple roasted veggie medley. A crisp white wine or a sparkling water with lemon also complements the flavors perfectly if you’re serving guests.
Creative Ways to Present
For special occasions, I’ve arranged these pizzas on large wooden boards alongside bowls of extra Caesar salad and lemon wedges so guests can customize their slices. Another fun idea is to make mini versions in muffin tins — perfect for finger food at parties!
Make Ahead and Storage
Storing Leftovers
I recommend storing leftover crust and salad components separately in airtight containers. The crust keeps best in the fridge for up to two days, but be aware it loses some crispness. The salad can get soggy quickly, so I only mix that when ready to eat.
Freezing
While I haven’t personally frozen the whole assembled pizza, I have frozen the crust alone. Just wrap it tightly in plastic wrap and foil, and bake or air fry from frozen for a few extra minutes. It’s a great way to prep crusts in advance for busy days.
Reheating
To bring back some crispness, I reheat leftover crust in a toaster oven or air fryer at 350°F for about 5 minutes. Avoid the microwave if you want to keep that crunchy texture intact. Always add fresh salad and dressing after warming.
FAQs
-
Can I make the crust ahead of time?
Absolutely! You can prepare the chicken crust a day or two in advance. Just store it wrapped tightly in the refrigerator and reheat in the oven or air fryer before adding the salad topping.
-
Is there a substitute for canned chicken?
If you prefer fresh chicken, you can use cooked, shredded chicken breast instead — just make sure it’s drained and patted dry to prevent excess moisture in the crust.
-
Can I make this recipe dairy-free?
Yes! Swap the Parmesan cheese for a dairy-free alternative or nutritional yeast, and use a vegan Caesar dressing to keep the flavors while making it dairy-free.
-
What if I don’t have an air fryer?
No worries! Just use your oven to bake the crust as described in the recipe — it takes a bit longer but the results are just as tasty.
-
How can I keep the crust crispy?
Serving the pizza immediately after assembly is best. If you need to store it, keep the crust and salad separate and reheat the crust before topping to refresh the crispiness.
Final Thoughts
This Viral Chicken Caesar Salad Pizza Recipe is one of those surprisingly addictive combos that feels special but comes together quickly — exactly what busy weeknights or casual dinner parties call for. I love making this when I want a change from typical pizza or salad, and the feedback I get always makes me smile. Give it a try, play around with your favorite ingredients, and I’m sure it’ll become a favorite in your kitchen, just like it is in mine!
Print
Viral Chicken Caesar Salad Pizza Recipe
- Prep Time: 10 minutes
- Cook Time: 15 minutes
- Total Time: 25 minutes
- Yield: 4 servings
- Category: Main Course
- Method: Air Frying
- Cuisine: American
- Diet: Low Carb
Description
This Viral Chicken Crust Caesar Salad Pizza is a unique low-carb recipe featuring a crispy chicken-based pizza crust topped with a fresh Caesar salad mix. Perfect for a healthy and protein-packed meal that combines the flavors of classic Caesar salad with a flavorful, gluten-free chicken crust, either air fried or oven baked for convenience.
Ingredients
Chicken Pizza Crust:
- 20 ounces canned chicken
- 1 egg
- 1/2 cup grated parmesan cheese
- 2 tablespoons light olive oil
- 3 cloves garlic
- 2 teaspoons Italian seasoning
- 1/2 teaspoon salt
- dash pepper
Caesar Salad:
- 4 cups romaine lettuce (shredded)
- 1/4 cup Caesar dressing
- 1/4 cup parmesan cheese
- 1/2 cup mini cucumbers (sliced)
Instructions
- Prepare the crust mixture: In an upright blender or food processor, combine the canned chicken, grated parmesan cheese, egg, garlic cloves, Italian seasoning, salt, and pepper. Blend until well combined to form the crust mixture.
- Form and cook the crust (Air Fryer Method): Cut a round piece of parchment paper to fit inside your air fryer. Place approximately half of the chicken mixture onto the parchment paper. With oiled fingers, spread the dough about 1/4 inch thick and 1/2 inch inside the edge of the parchment. Carefully place the parchment paper with crust inside the air fryer basket. Air fry at 385°F for 12 minutes, flipping halfway through, until the crust is golden and crispy. Remove and let cool slightly.
- Form and cook the crust (Oven Method): Preheat oven to 400°F. Line a baking sheet or pizza pan with parchment paper. Using oiled fingers, spread the chicken mixture about 1/4 inch thick on the parchment. Bake for 30 minutes or until golden brown and crispy. Remove and let cool slightly.
- Prepare the Caesar salad: In a medium bowl, combine shredded romaine lettuce, sliced mini cucumbers, Caesar dressing, and parmesan cheese. Gently toss to mix well.
- Assemble the pizza: Spread one tablespoon of Caesar dressing evenly over the cooked chicken crust. Top with the tossed salad mixture and sprinkle with additional shaved parmesan cheese.
- Serve: Slice the pizza and serve immediately to enjoy the fresh, crispy texture and flavors.
Notes
- Drain canned chicken thoroughly to remove excess moisture for a crispier crust.
- If you prefer a crispier crust, extend cooking time by a few minutes as needed.
- Adjust seasoning to taste; consider adding red pepper flakes or cayenne for heat.
- Only make the salad amount that will be eaten immediately as the dressed salad will become soggy if stored.
- You can use either air fryer or oven method depending on your preference and appliance availability.
Nutrition
- Serving Size: 1 slice
- Calories: 320 kcal
- Sugar: 3 g
- Sodium: 700 mg
- Fat: 18 g
- Saturated Fat: 6 g
- Unsaturated Fat: 10 g
- Trans Fat: 0 g
- Carbohydrates: 7 g
- Fiber: 2 g
- Protein: 35 g
- Cholesterol: 120 mg

