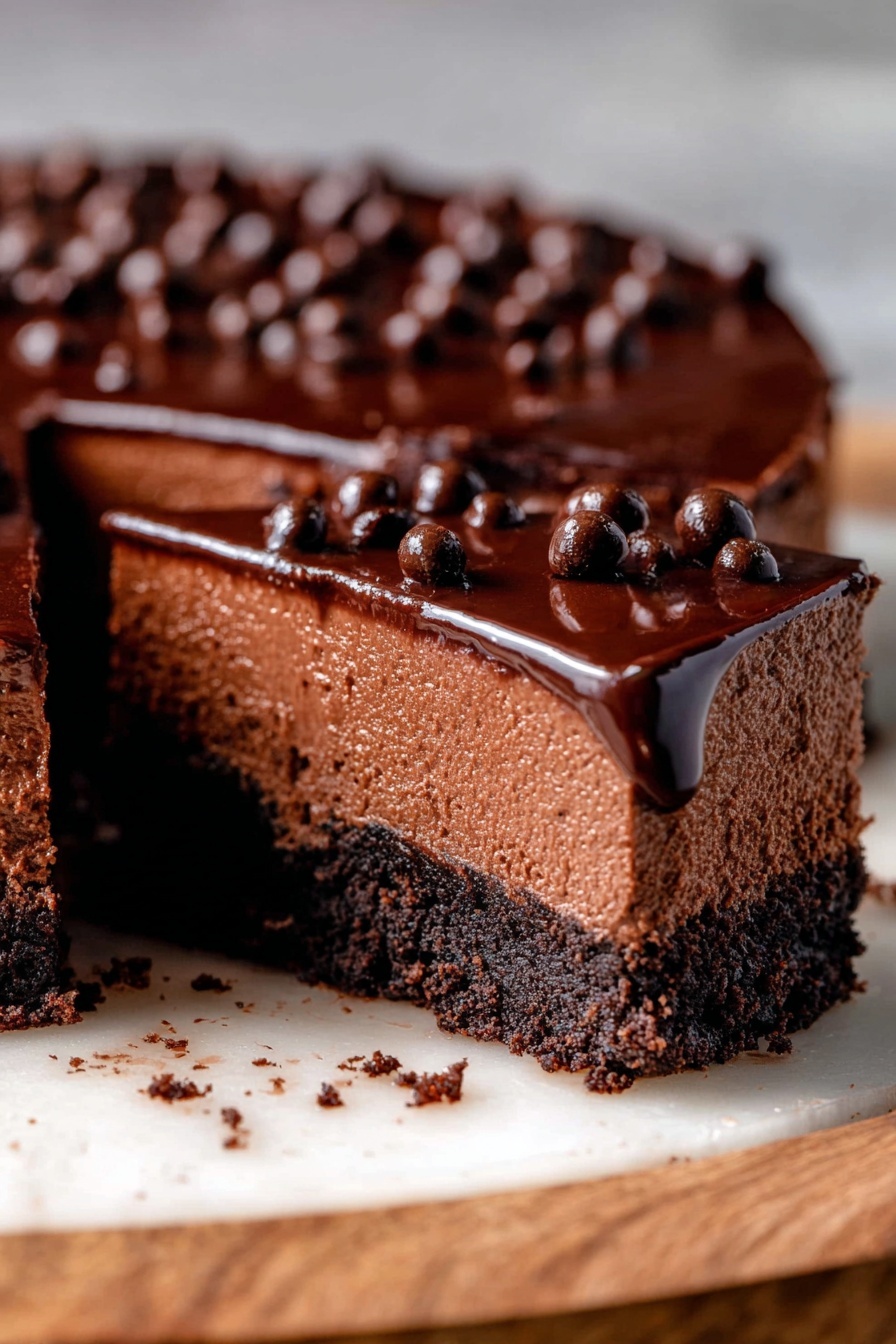
Ultimate Chocolate Cheesecake Bars Recipe
If you’re like me and crave chocolate in every form, then get ready to fall in love with the Ultimate Chocolate Cheesecake Bars Recipe. This dessert is just the right balance of rich chocolate, creamy cheesecake, and a crunchy Oreo crust that’ll have you sneaking seconds (or thirds!) in no time. Trust me, this isn’t your average cheesecake—it’s fudgy, dreamy, and perfect for any occasion where you want to impress without the fuss. Stick around and I’ll walk you through every step so you can make these bars your new go-to treat!
Why This Recipe Works
- Perfect Texture Balance: A creamy, fudgy cheesecake layer contrasts beautifully with a crisp Oreo crust.
- Rich Chocolate Flavor: Using both cocoa powder and melted high-quality chocolate amps up the chocolate goodness.
- Simple Ingredients: You probably already have most of these staples at home, making it super accessible.
- Easy Assembly: Minimal steps but stunning results – perfect for bakers of all skill levels.

Ingredients & Why They Work
Every ingredient in the Ultimate Chocolate Cheesecake Bars Recipe holds its own special place. From the Oreo crust that gives just the right crunch, to the luscious cream cheese filling enriched with real chocolate, this combination is pure magic. Here’s why I choose each and what to look for when shopping.

- Oreo crumbs: These create a crunchy, flavorful base with a hint of sweetness and bitterness—no need for extra sugar here, just make sure to crush them finely.
- Unsalted butter: Melted and mixed with the Oreo crumbs, it binds the crust together and adds richness without overpowering.
- Cream cheese: The creamy heart of cheesecake; softened at room temperature for smooth blending without lumps.
- White granulated sugar: Balances the tartness of cream cheese and dark chocolate perfectly.
- Dutch process cocoa powder: Gives a deep, mellow chocolate flavor that’s less acidic, enhancing the overall richness.
- High-quality chocolate bar: I love using Lindt 70% because it melts smoothly and adds complex chocolate notes that powder alone can’t provide.
- Heavy cream: This keeps the filling extra smooth and adds a velvety texture.
- Pure vanilla extract: Just a splash brightens up the chocolate notes and rounds out the flavor.
- Large eggs: Room temperature eggs help bind everything together without curdling, ensuring a silky texture.
- Semi-sweet chocolate chips: For the ganache topping – they melt easily and bring that glossy finish with rich chocolate taste.
Make It Your Way
One of the best parts about this Ultimate Chocolate Cheesecake Bars Recipe is how adaptable it is — you can swap and tweak it to fit your taste or dietary needs. I’ve played around with a few variations myself and love sharing ideas so you can make this dessert truly yours.
- Nutty Twist: Adding chopped toasted pecans or walnuts to the crust gives an extra crunch and a lovely nutty aroma; I added these once for a holiday party, and they were devoured first!
- Dairy-Free Version: Swap cream cheese with a dairy-free alternative like cashew cream and use coconut cream instead of heavy cream – it won’t be quite the same, but still delicious.
- Extra Chocolate Layer: Stir in mini chocolate chips into the cheesecake batter for little bursts of melty chocolate surprises.
- Seasonal Flavors: In colder months, a pinch of cinnamon or espresso powder in the filling can elevate the chocolate and create cozy vibes.
Step-by-Step: How I Make Ultimate Chocolate Cheesecake Bars Recipe
Step 1: Nail the Oreo crust setup
First things first, preheat your oven to 325°F (160°C). I like to spray a 9×9-inch square pan with nonstick spray, then line the bottom plus two sides with parchment paper—trust me, this makes lifting out the bars so much easier. Next, finely pulse your Oreos in a food processor until they become a fine crumb (no big chunks). Stir in melted unsalted butter with a fork until every crumb is coated. Press this mixture firmly and evenly into the pan using the bottom of a measuring cup — this helps compact the crust so it won’t crumble. Bake for 12 minutes, then let it cool while you prepare the cheesecake filling. It’s this step that gives your bars that perfect crunchy base.
Step 2: Make the luscious chocolate cheesecake filling
While the crust is baking, melt your chocolate bar carefully in the microwave (I do 30 seconds at a time, stirring in between to avoid burning). In your mixer, beat softened cream cheese, sugar, and cocoa powder on high for about 2 minutes until smooth and silky, scraping down the sides as you go. Next, add in that melted chocolate, heavy cream, and vanilla extract — mix on medium speed until everything blends perfectly. Finally, add eggs one at a time on low speed, mixing just enough to combine. Overmixing eggs is a common rookie mistake — too much air means cracks later! Pour this dreamy batter over your baked crust and pop it into the oven to bake for 40-50 minutes. The edges should look set while the center jiggles slightly — that’s your cue to turn off the oven, crack the door open, and let it cool gently for 20 minutes before transferring to a rack. Then cover and chill in the fridge for at least 6 hours or overnight. This chilling step is crucial for the creaminess to fully develop.
Step 3: Top with silky chocolate ganache
Once the bars are fully chilled, it’s time for the grand finale—the ganache. Heat heavy cream in a small saucepan over medium-low until it just starts steaming (don’t boil!). Pour the hot cream over your semi-sweet chocolate chips in a bowl and let it sit for 2 minutes. Then gently stir until glossy and smooth. Pour this shiny ganache over your cheesecake bars, spreading evenly with an offset spatula. For the cleanest cuts, I recommend putting the bars in the freezer for 10 minutes before slicing. If you’re prepping ahead, just store them in the fridge until ready to serve.
Tips from My Kitchen
- Room Temperature Ingredients: Always bring cream cheese, eggs, and heavy cream to room temp before baking to avoid lumps and cracking.
- Slow Cooling: Let the cheesecake cool gradually in the open oven post-bake to prevent sudden temperature change that causes cracks.
- Compacting the Crust: Use a measuring cup bottom for firm pressing—this creates a stable base that holds up when cutting.
- Cutting Clean Bars: Warm your knife under hot water and wipe between each cut for perfect, clean edges every time.
How to Serve Ultimate Chocolate Cheesecake Bars Recipe
Garnishes
My absolute favorite way to garnish these cheesecake bars is with a few fresh raspberries or sliced strawberries on top — their tartness cuts through the rich chocolate beautifully. Alternatively, a sprinkle of flaky sea salt just before serving adds a lovely salty crunch that contrasts the sweet ganache. Sometimes I add shaved dark chocolate curls for a fancy touch when guests come over. The choices are endless, but keep it simple to let the bars shine.
Side Dishes
While these bars are a dessert all on their own, I like pairing them with something light and fresh like a small scoop of vanilla bean ice cream or whipped cream to balance the intensity. A cup of freshly brewed coffee or a creamy latte also complements the chocolate flavor wonderfully, making this dessert perfect for an afternoon treat or dinner party finale.
Creative Ways to Present
For birthdays or special occasions, I’ve arranged these bars on decorative platters lined with parchment paper and scattered edible gold leaf flakes on top — instantly elevates the look without much effort. You can also drizzle white chocolate in zigzags for contrast or serve the bars in elegant cupcake liners for individual portions. If you’re feeling adventurous, top each square with a mini dollop of raspberry coulis for that wow factor!
Make Ahead and Storage
Storing Leftovers
These cheesecake bars keep really well in the fridge when stored in an airtight container. I like to cut them into squares first and layer them with parchment paper between each layer to prevent sticking. They stay fresh for about 4-5 days, though honestly, they never last that long in my kitchen!
Freezing
Freezing these bars works great if you want to make ahead for events. After baking and fully chilling, cut into bars, wrap each piece tightly in plastic wrap, then place them in a freezer-safe container or bag. They keep well for up to 3 months. When you’re ready to enjoy, thaw overnight in the fridge — this keeps the texture perfect.
Reheating
I usually enjoy these bars chilled, but if you want to serve them slightly warmed, just let them sit at room temperature for 15-20 minutes. Avoid microwaving directly, as it can change the texture. A gentle warm-up on a low heat oven (around 200°F) for 5 minutes can refresh the ganache’s shine without melting the cheesecake.
FAQs
-
Can I use a regular cocoa powder instead of Dutch process in the Ultimate Chocolate Cheesecake Bars Recipe?
Yes, you can, but keep in mind that Dutch process cocoa has a smoother, less acidic flavor which better complements this cheesecake. Using regular cocoa might result in a slightly more bitter or tangy taste, but it will still be delicious.
-
How do I prevent cracks in my cheesecake bars?
Bringing all dairy ingredients to room temperature before mixing helps avoid lumps that can cause cracks. Also, don’t overmix the eggs and cool the cheesecake slowly by leaving the oven door ajar before cooling completely. These tricks help keep your bars perfectly smooth.
-
Can I make the crust gluten-free?
Absolutely! Replace the Oreo crumbs with gluten-free chocolate cookie crumbs or gluten-free sandwich cookies crushed finely. Just make sure the crust packs tightly and bakes as instructed.
-
What’s the best way to cut these bars cleanly?
Warm your knife under hot water and wipe it dry before each cut. This helps slice through the ganache smoothly without dragging or breaking the bars apart. Chilling or freezing the bars for a few minutes before cutting also yields crisp edges.
Final Thoughts
This Ultimate Chocolate Cheesecake Bars Recipe has become one of my all-time favorites to bake for friends and family – it’s reliably rich, decadent, and always makes everyone smile. The best part? It looks fancy but comes together without a fuss. If you give it a try, I’d bet you’ll find yourself making it over and over, too. So go ahead, grab those Oreos, and treat yourself to this chocolatey dream – you deserve it!
Print
Ultimate Chocolate Cheesecake Bars Recipe
- Prep Time: 40 minutes
- Cook Time: 50 minutes
- Total Time: 7 hours 25 minutes
- Yield: 16 squares
- Category: Dessert
- Method: Baking
- Cuisine: American
- Diet: Vegetarian
Description
Decadent chocolate cheesecake bars featuring a crunchy Oreo crust, rich chocolate cheesecake filling, and a smooth chocolate ganache topping. Perfectly baked to achieve a creamy texture with a slight jiggle in the center, these bars are a chocolate lover’s dream dessert.
Ingredients
Oreo Crust
- 2 cups Oreo crumbs (about 2 rows of Oreos)
- 4 tablespoons unsalted butter, melted
Chocolate Cheesecake
- 24 ounces cream cheese, room temperature
- 1 cup white granulated sugar
- 1/2 cup unsweetened cocoa powder (Dutch process)
- 8 ounces chocolate bar (70% cocoa), melted
- 1/2 cup heavy cream, room temperature
- 1 teaspoon pure vanilla extract
- 4 large eggs, room temperature
Chocolate Ganache
- 1 cup semi-sweet chocolate chips
- 1/2 cup heavy cream
Instructions
- Prepare the Oreo crust: Preheat your oven to 325℉. Spray a 9×9-inch square pan with nonstick baking spray, then line the bottom and two sides with parchment paper. Spray the parchment paper again to ensure easy removal.
- Make the crumbs: Use a food processor to blend the Oreos into fine crumbs. In a small bowl, combine the Oreo crumbs and melted butter, mixing well with a fork until fully incorporated.
- Form and bake crust: Press the Oreo crumb mixture firmly into the bottom of the prepared pan using the bottom of a measuring cup. Make sure the crust covers only the bottom and not the sides. Bake for 12 minutes, then set aside to cool while preparing the cheesecake batter.
- Melt the chocolate: Place the chocolate bar pieces in a microwave-safe bowl and melt in intervals: 30 seconds, stir; 20 seconds, stir; then 15 seconds at a time, stirring well after each interval until fully melted and smooth.
- Mix the cheesecake batter: Using a mixer, beat the cream cheese, sugar, and cocoa powder on high speed for 2 minutes until creamy. Scrape down the sides of the bowl.
- Add melted chocolate and liquids: Mix in the melted chocolate, heavy cream, and vanilla extract on medium speed until the mixture is smooth and evenly combined.
- Incorporate the eggs: Add the eggs one at a time, mixing on low speed just until combined to avoid overmixing.
- Bake the cheesecake: Pour the cheesecake batter over the baked crust. Bake for 50 minutes or until the edges are set but the center still jiggles slightly when the pan is gently shaken.
- Cool the cheesecake: Turn off the oven, crack the oven door open, and let the cheesecake rest inside for 20 minutes to cool gradually. Remove from the oven and transfer to a cooling rack to cool completely.
- Chill: Cover the cheesecake with foil and refrigerate for at least 6 hours or overnight to set fully.
- Prepare the ganache: In a small bowl, place the semi-sweet chocolate chips. Heat the heavy cream in a small saucepan over medium-low heat until steaming but not boiling. Pour the hot cream over the chocolate chips and let sit for 2 minutes, then stir until smooth.
- Assemble the bars: Remove the cheesecake from the pan by lifting the parchment paper. Pour the ganache over the top and spread evenly using an offset spatula.
- Set and serve: If serving immediately, place the assembled bars in the freezer for 10 minutes before slicing to ensure clean cuts. Otherwise, store the bars in the refrigerator until ready to serve.
Notes
- Bring all dairy ingredients to room temperature 2 hours before starting for a smooth batter.
- Use Dutch process cocoa powder for a richer chocolate flavor.
- Melt the chocolate slowly in intervals to prevent burning.
- Do not overmix once eggs are added to avoid cracks in the cheesecake.
- Allow the cheesecake to cool gradually in the oven to prevent sinking or cracking.
- Chilling overnight yields the best texture and flavor.
- For easier slicing, chill the bars well before cutting.
Nutrition
- Serving Size: 1 square
- Calories: 350 kcal
- Sugar: 28 g
- Sodium: 210 mg
- Fat: 25 g
- Saturated Fat: 15 g
- Unsaturated Fat: 8 g
- Trans Fat: 0.2 g
- Carbohydrates: 28 g
- Fiber: 3 g
- Protein: 6 g
- Cholesterol: 90 mg

