Thumbprint Cookies with Jam Recipe
If you’ve been searching for a warm, nostalgic treat that’s as easy to make as it is to love, you’re in the right place. This Thumbprint Cookies with Jam Recipe is my go-to when I want something buttery, sweet, and perfectly jammy—plus, they’re ridiculously fun to make. I’m talking about those classic little cookies with that cute little indentation filled with vibrant jam that just melts in your mouth. Trust me, once you try these, you’ll want to make them again and again.
Why This Recipe Works
- Perfect Balance of Butter and Sugar: Creaming the butter and sugar just right makes these cookies tender but sturdy enough to hold the jam.
- Room Temperature Egg Yolks: Helps the dough come together smoothly without overheating or curdling.
- Jam Filled Just Right: Using only a small dollop stops the cookies from getting soggy, giving you a brilliant burst of flavor every bite.

Ingredients & Why They Work
Each ingredient here plays a role in creating the perfect thumbprint cookie. I’ve chosen them carefully to keep the texture soft and buttery, while the jam brings that fruity punch. When shopping, pick quality butter and your favorite jam flavor to make these truly shine.

- Unsalted Butter: Softened butter adds richness and tenderness without extra salt controlling the flavor.
- Granulated Sugar: Provides sweetness and a bit of crunch, especially when rolling dough balls before baking.
- Egg Yolks: Using yolks adds moisture and richness without adding too much rise or fluffiness.
- Vanilla Extract: Boosts overall flavor and adds a lovely depth.
- Salt: Balances the sweetness and enhances all other flavors.
- All-Purpose Flour: The structure that holds these cookies together — spooned and leveled to ensure you don’t add too much and risk dry cookies.
- Strawberry or Apricot Jam: Feel free to pick your favorite! The little spoonful gives a bright burst of flavor and color.
Make It Your Way
I love mixing things up with this Thumbprint Cookies with Jam Recipe—sometimes I swap jams depending on the season or add a sprinkle of cinnamon to the dough. The best part? You can make these your own with very little effort, so don’t be shy about experimenting!
- Variation: I once tried lemon curd instead of jam for a bright, tangy twist—delicious! You can also use raspberry or blueberry jam for a different fruity kick.
- Dietary Modifications: For gluten-free options, try substituting with a gluten-free flour blend—but remember, the texture may vary slightly.
- Seasonal Changes: Around the holidays, I add a pinch of nutmeg or ginger to give that festive flair.
Step-by-Step: How I Make Thumbprint Cookies with Jam Recipe
Step 1: Cream Butter and Sugar to Perfection
Start by softening your butter at room temperature—it should be just soft enough to press a finger into without it melting. Then, using your stand mixer or handheld mixer, beat the butter and sugar together for about 1-2 minutes until they’re fully combined: creamy, but not fluffy. This step creates the base that makes your cookies tender yet crumbly just right. If you skip this step or don’t cream fully, the cookies might turn out too dense.
Step 2: Incorporate Egg Yolks, Vanilla, Salt, and Flour
Next, add the egg yolks—you want these at room temperature so they blend seamlessly without causing the mixture to seize up. Mix in the vanilla extract and salt until everything looks smooth, then sift in your flour. The dough will seem crumbly at first; keep mixing, and it will come together beautifully. If it feels too dry, don’t worry—you can gently knead it with your hands to bring it all together.
Step 3: Scoop, Roll, and Create That Iconic Thumbprint
Using a one-tablespoon cookie scoop (or just a tablespoon), scoop out balls of dough. Roll each ball in some extra granulated sugar for a slight crunch on the outside—this is totally optional, but I love the extra sparkle it adds. Place the dough balls on your parchment-lined baking sheets, then press your thumb (or the back of a wooden spoon handle) firmly into the center of each ball to create the classic indentation. This is the moment that makes these “thumbprint” cookies so special, so don’t be shy about making a good deep dip.
Step 4: Fill with Jam and Bake
Spoon about a half teaspoon of your favorite jam into each indentation—don’t overfill, or the jam may bubble over while baking. Pop them into your preheated oven at 350°F (177°C) and bake for 12-14 minutes. You want the cookies to be just set, with lightly browned bottoms. After baking, I like to let them cool on the baking sheet for ten minutes before transferring to a wire rack. This way, they firm up perfectly without falling apart.
Tips from My Kitchen
- Soft Butter Matters: I learned the hard way that cold butter won’t cream well, so always plan ahead for softening.
- Room Temp Egg Yolks: Warm egg yolks mix in so much easier and prevent the dough from curdling.
- Don’t Overfill Jam: I’ve seen the jam run over before—it’s prettier and tastier to keep a modest dollop.
- Chill Dough If Needed: If your kitchen is warm or dough feels sticky, a quick 20-minute chill helps the cookies keep their shape.
How to Serve Thumbprint Cookies with Jam Recipe

Garnishes
I typically keep garnishes simple since these cookies are already pretty. A light dusting of powdered sugar right before serving adds a delicate touch and a bit of extra sweetness. Sometimes I throw on a few finely chopped pistachios or almonds around the jam center—adds a lovely crunch and color contrast that always makes guests ask for the recipe.
Side Dishes
These cookies are perfect alongside a cup of strong coffee or a comforting tea. If I’m serving for brunch, I’ll pair them with fresh fruit and a spread of cheeses for a lovely balance. They also make a charming addition to dessert platters with macarons or simple chocolate-dipped treats.
Creative Ways to Present
For parties, I’ve arranged thumbprint cookies in a circle on a pretty platter and placed edible flowers or fresh mint sprigs in the center—instantly elevates the look. Another favorite is stacking them with parchment paper between layers in a clear glass jar tied with a ribbon for gifting. Trust me, these always wow people, and they’re so easy to ship, too!
Make Ahead and Storage
Storing Leftovers
I store leftover thumbprint cookies in an airtight container at room temperature, and honestly, they’re at their best within the first 2-3 days. After that, they stay safe to eat up to 4 days but might lose some of that fresh crisp edge on the outside. If your kitchen is hot or humid, I like to pop the container into the fridge to keep them from becoming too soft.
Freezing
I’ve frozen both the baked cookies and the raw cookie dough. For baked cookies, I lay them out in a single layer on a baking sheet, freeze them until firm, then transfer to a zip-top bag or container—this prevents sticking. They freeze beautifully for up to three months. For dough, I shape balls, freeze on a tray, then store in a resealable bag; when ready to bake, let thaw overnight in the fridge, then roll in sugar and fill with jam just before baking.
Reheating
If you want to warm leftover thumbprint cookies, I pop them in a preheated 300°F oven for 5-7 minutes. This gently revives their crisp edges without drying out the jam. Avoid microwaving if you want to keep that crunchy texture, but if you’re in a hurry, just do 15-20 seconds and eat immediately.
FAQs
-
Can I use whole eggs instead of just egg yolks in the Thumbprint Cookies with Jam Recipe?
While the recipe calls for egg yolks specifically to keep the cookies tender and crumbly without too much lift, you can use whole eggs if you want a slightly cakier texture. I’ve tried it, and the cookies turn out a bit puffier, which might be nice depending on your preference. Just expect a small texture difference.
-
What types of jam work best for Thumbprint Cookies?
Honestly, any jam you love will work well. I usually use Bonne Maman strawberry or apricot jam for their balance of sweetness and natural fruit flavor, but raspberry, blueberry, or mixed berry jams are fantastic too. Just avoid overly runny jams that might leak too much while baking.
-
How do I prevent the jam from spilling over while baking?
The key is not to overfill the thumbprint indentation. I use about half a teaspoon of jam per cookie, which keeps it contained and neat. Also, make sure to press a deep enough indentation—if it’s too shallow, the jam tends to bubble over.
-
Can I make the dough ahead of time?
Absolutely! The dough freezes very well and can be kept up to three months in the freezer. Just thaw it overnight in the refrigerator, then roll in sugar and add jam right before baking for best results.
Final Thoughts
There’s something truly comforting about Thumbprint Cookies with Jam Recipe—they remind me of holiday gatherings and simple kitchen moments with my family. They’re easy enough for beginners but special enough for impressing guests. I hope you enjoy making these as much as I do, and that they bring a little extra sweetness to your day, just like they do in mine. Give them a try—you might just find your new favorite cookie!
Print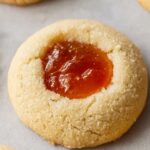
Thumbprint Cookies with Jam Recipe
- Prep Time: 30 minutes
- Cook Time: 14 minutes
- Total Time: 44 minutes
- Yield: 42 cookies
- Category: Dessert
- Method: Baking
- Cuisine: American
Description
Delicious and classic thumbprint cookies made with a buttery dough and filled with your favorite jam. These soft, crumbly cookies are perfect for any occasion and easy to prepare with simple ingredients.
Ingredients
Cookie Dough
- 1 cup (230 grams) unsalted butter softened
- 2/3 cup (135 grams) granulated sugar plus 3 tablespoons (40 grams) for rolling the cookies
- 2 large egg yolks room temperature
- 1 teaspoon pure vanilla extract
- 1/4 teaspoon salt
- 2 and 1/3 cups (290 grams) all-purpose flour spooned & leveled
Filling
- 1/2 cup strawberry or apricot jam
Instructions
- Preheat Oven: Preheat your oven to 350°F (177°C). Line two large baking sheets with parchment paper or silicone baking mats and set aside.
- Cream Butter and Sugar: In a stand mixer bowl fitted with the paddle attachment or a large mixing bowl with a handheld mixer, cream together the softened butter and 2/3 cup granulated sugar for 1-2 minutes until well combined and fluffy.
- Mix Wet Ingredients: Add the egg yolks, vanilla extract, and salt to the creamed mixture. Mix until fully incorporated.
- Add Flour: Gradually mix in the all-purpose flour. The dough will initially be crumbly but will come together as you continue mixing.
- Form Cookies: Using a one-tablespoon cookie scoop or measuring tablespoon, scoop out the dough, roll into balls, then roll each ball in the remaining 3 tablespoons of granulated sugar for a slight crunchy coating.
- Create Indentations: Place the dough balls onto the prepared baking sheets. Use your thumb or the handle of a wooden spoon to press an indentation in the center of each cookie ball.
- Fill with Jam: Spoon 1/2 teaspoon of strawberry or apricot jam into each indentation carefully without overfilling.
- Bake Cookies: Bake in the preheated oven for 14 minutes or until the cookies are set and the bottoms just begin to lightly brown.
- Cool Cookies: Remove from the oven and allow the cookies to cool on the baking sheets for 10 minutes. Then transfer them carefully to a wire rack to cool completely.
Notes
- Store cookies in an airtight container at room temperature or refrigerated for up to 4 days to maintain freshness.
- Baked cookies can be frozen for up to 3 months; thaw at room temperature before serving.
- Cookie dough freezes well up to 3 months. Thaw overnight in the refrigerator, then roll in sugar and add jam just before baking.
- For room temperature egg yolks quickly, place eggs in a bowl of warm water for 5-10 minutes before separating.
- Use your favorite jam flavor and brand, such as Bonne Maman Strawberry or Apricot jam, for best results.
Nutrition
- Serving Size: 1 cookie
- Calories: 110 kcal
- Sugar: 7 g
- Sodium: 40 mg
- Fat: 6 g
- Saturated Fat: 3.7 g
- Unsaturated Fat: 2.3 g
- Trans Fat: 0 g
- Carbohydrates: 13 g
- Fiber: 0.2 g
- Protein: 1 g
- Cholesterol: 30 mg


