Spooky Halloween Chocolate-Covered Oreos Recipe
If you’re looking for an irresistible treat that’s as fun to make as it is to eat, you’re in for a real treat with this Spooky Halloween Chocolate-Covered Oreos Recipe. These festive cookies are perfect for your Halloween celebrations — they’re easy, playful, and absolutely delicious. Trust me, whether you’re hosting a party or just want a sweet snack with a seasonal twist, this recipe will be your new go-to favorite. Let’s dive in and turn some classic Oreos into spooky masterpieces!
Why This Recipe Works
- Simple Ingredients: Using candy melts and Oreos makes this a fuss-free, no-bake treat anyone can whip up quickly.
- Fun Decorations: Sprinkles, candy eyes, and drizzles add personality that really capture that spooky Halloween vibe.
- Customizable: You can play with colors and designs — ghosts, mummies, pumpkins — the possibilities are endless!
- Kid-Friendly: It’s a great hands-on project for kids and grown-ups alike, making Halloween memories in the kitchen.

Ingredients & Why They Work
The magic behind this Spooky Halloween Chocolate-Covered Oreos Recipe is all in the balance of classic cookies and vibrant candy melts. Each ingredient not only adds flavor but plays a role in the fun, decorative aspect too. When shopping, look for good quality candy melts that melt smoothly and set quickly, and don’t forget to grab a variety of Halloween sprinkles to amp up the spooky factor.
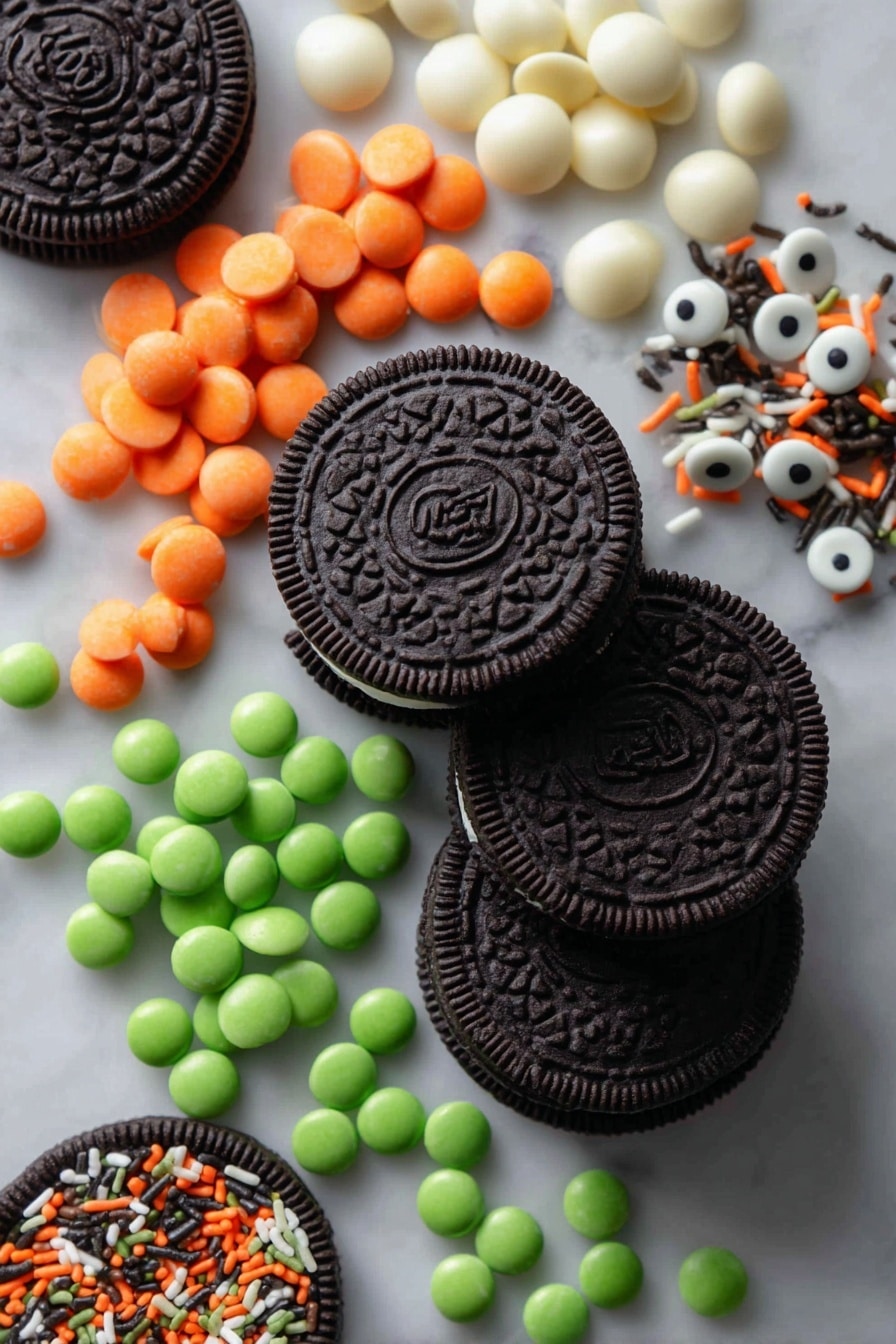
- Oreos: These classic cookies bring that signature crunch and creaminess, perfect for dipping.
- White candy melts or white chocolate: Ideal for mummy wraps and ghost designs—they melt beautifully for smooth coverage.
- Orange candy melts: Perfect for pumpkin-inspired Oreos, adding seasonal color and sweetness.
- Chocolate chips or black candy melts: These create dark, rich backgrounds or spooky effects like bat wings or spider webs.
- Green candy melts: Great for witchy and monster vibes, plus a striking color contrast for the Halloween theme.
- Assorted Halloween sprinkles and candy eyes: These fun extras elevate your Oreos from ordinary to festive and eerie in moments.
Make It Your Way
I love how this Spooky Halloween Chocolate-Covered Oreos Recipe lets you get creative — and I encourage you to do just that! Whether you want to switch up your color palette, try different sprinkles, or create a whole spooky scene on each cookie, go for it. This recipe invites customization, so make it your own and have fun with the process!
- Variation: One Halloween, I swapped orange candy melts for purple ones, and the kids thought the “witchy” purple Oreos were the coolest! It’s a quick tweak that really changes the vibe.
- Allergy-Friendly: If you’re avoiding dairy, there are great vegan candy melts out there — just check those labels to keep things safe.
- Theme Variations: Try using edible gold dust or shimmer powder for a glamorous “magic potion” cookie look that wows your guests.
Step-by-Step: How I Make Spooky Halloween Chocolate-Covered Oreos Recipe
Step 1: Prepare Your Space
Start by lining a baking sheet with parchment paper — this is your landing zone for all those dipped Oreos. It helps prevent sticking and makes cleanup a breeze. Gather your candy melts and Oreos so everything’s within arm’s reach before melting your candy. This recipe is best done by melting one color at a time and dipping all Oreos for that color before moving to the next. Trust me, this keeps your chocolate smooth and easy to work with.
Step 2: Melt the Candy Melts
Use a microwave-safe bowl — start by melting your first candy color in 30-second bursts, stirring between each, until completely smooth. Candy melts can be temperamental if overheated, so short increments keep you in control. I often give them a quick stir and add a tiny splash of vegetable oil if they seem too thick, which helps them coat those Oreos beautifully.
Step 3: Dip and Decorate
Grab a chocolate dipping fork or a regular fork if that’s what you have, and carefully dip your Oreo into the melted candy, flipping it to coat both sides. Lift it out, gently tapping the fork on the bowl’s edge to shake off excess candy. Flaunt those clean edges! Then place it on your parchment-lined sheet. This is where you add your spooky sprinkles or candy eyes right away so they stick while the chocolate’s still wet — timing is everything here! For mummies, dip in white candy melts, add eyeballs, chill, then drizzle more white melts for that wrapped look.
Step 4: Chill to Set
Pop your decorated Oreos into the fridge for about 10-15 minutes to let the coating harden. This step is crucial, especially for layered designs like mummies. It keeps everything neat and makes them easier to handle and serve. Once set, they’re ready for your Halloween party or just a fun snack!
Tips from My Kitchen
- Use Candy Melts in Batches: I always melt one color at a time because candy melts set quickly, and reheating multiple times dulls the shine.
- Work Quickly, But Calmly: Once the candy melts are melted, move fast so they don’t harden on you. But don’t rush so much that you spill — balance is key.
- Keep Oreos Dry: Any moisture ruins the coating. I store my Oreos in a cool, dry place and avoid dipping if they’ve been refrigerated too long.
- Decorate Before Set: Adding sprinkles and candy eyes immediately after dipping prevents them from sliding off or sticking unevenly.
How to Serve Spooky Halloween Chocolate-Covered Oreos Recipe
Garnishes
I usually top mine with a mix of candy eyes (they add instant creep factor), orange and black sprinkles for that Halloween punch, and sometimes a drizzle of contrasting colored candy melts for texture and flair. These simple garnishes make the cookies feel extra special and playful — they’re always a hit with guests.
Side Dishes
These chocolate-covered Oreos shine as a standalone treat but if you’re setting up a Halloween dessert table, pair them with pumpkin cupcakes, caramel apples, or even a spooky punch to balance the rich sweetness. They’re a fantastic small bite that pairs with just about any sweet Halloween spread.
Creative Ways to Present
One year, I arranged mine on a black platter with faux spider webbing underneath, nestled in between small plastic spiders and flickering battery-operated candles — it looked spooky and inviting. Using a tiered serving tray can help show off all your different designs too. Wrapping individual Oreos in clear treat bags tied with orange or black ribbons is perfect for giveaways or party favors.
Make Ahead and Storage
Storing Leftovers
I keep any leftover Spooky Halloween Chocolate-Covered Oreos in an airtight container at room temperature for up to 3 days. This preserves the crisp texture of the cookie and keeps the candy coating shiny and intact. Refrigerating can cause condensation, which sometimes dulls the candy melts and softens the cookie.
Freezing
Freezing is totally doable! I wrap individual Oreos in parchment paper and place them in a freezer-safe bag, then pull out small batches as needed. When ready, just let them thaw at room temperature to avoid moisture buildup. They keep their shape and flavor well through freezing.
Reheating
Since these Oreos are best enjoyed at room temp, I typically don’t reheat them. If the candy melts get too firm, gentle warming in a warm (not hot) oven for a couple of minutes softens them just right, but usually, they’re perfect straight from storage.
FAQs
-
Can I use regular chocolate instead of candy melts for this Spooky Halloween Chocolate-Covered Oreos Recipe?
While you can use regular chocolate, candy melts are specially formulated to melt smoothly and set quickly without tempering, which helps create a flawless coating on your Oreos. Regular chocolate might take longer to harden and can be trickier to work with, but if you temper it properly, it can still work.
-
How do I prevent the candy melts from clumping when melting?
Melting candy melts in short 30-second bursts and stirring between each increment helps avoid overheating and clumping. Adding a small amount of vegetable oil or shortening can also improve the texture, making the candy melts smoother and easier to dip with.
-
What’s the best way to attach candy eyes or sprinkles?
Place your candy eyes or sprinkles on your Oreos immediately after dipping and while the candy melts are still wet. This ensures they stick well as the coating hardens, giving you a clean, secure decoration.
-
Can I make these Spooky Halloween Chocolate-Covered Oreos ahead of time?
Absolutely! You can make them a day or two ahead and store them properly in an airtight container at room temperature to keep them fresh. Just be mindful of humidity to maintain that nice crisp texture.
Final Thoughts
This Spooky Halloween Chocolate-Covered Oreos Recipe is one of those fun, no-fail treats that brings joy and a little spooky magic to the kitchen. I love how simple it is to personalize and how it never fails to impress both kids and adults. Whether you’re a seasoned baker or just in it for a quick Halloween craft, I promise you’ll enjoy every step — and every bite! So grab those Oreos, melt some candy, and get ready to create some tasty, spooky fun. You’re going to want to make these every Halloween!
Print
Spooky Halloween Chocolate-Covered Oreos Recipe
- Prep Time: 20 minutes
- Cook Time: 0 minutes
- Total Time: 20 minutes
- Yield: 36 servings
- Category: Dessert
- Method: No-Cook
- Cuisine: American
Description
Create festive Spooky Halloween chocolate covered Oreos using colorful candy melts and fun Halloween-themed decorations. Perfect for holiday parties or treats that kids and adults will love, these dipped Oreos are easy to make and look impressive with spooky designs like mummies and eyeballs.
Ingredients
Oreos
- 1 package (36) Oreos
Candy Melts and Chocolate
- 6 oz white candy melts or white chocolate
- 6 oz orange candy melts
- 6 oz chocolate chips or black candy melts
- 6 oz green candy melts
Decorations
- Assorted Halloween sprinkles like candy eyes and sprinkles
Instructions
- Prepare Baking Sheet: Line a baking sheet with parchment paper and set it aside for drying the dipped Oreos.
- Melt Candy Melts: In a microwave-safe bowl, melt one color of candy melts or chocolate at a time by microwaving in 30-second increments, stirring between intervals until smooth.
- Dip Oreos: Using a chocolate dipping fork, dip each Oreo into the melted candy melts, flipping to coat both sides completely. Lift and tap the fork on the bowl edge to remove excess coating.
- Decorate: Place the coated Oreo on the lined baking sheet. Add spooky decorations like candy eyes or sprinkles while the coating is still wet.
- Make Mummy Oreo: For the mummy design, dip Oreo in white candy melts, decorate with candy eyes, chill until firm, then drizzle with extra melted white candy melts to create a bandage effect. Chill again to set.
- Repeat Process: Continue dipping, decorating, and chilling until all Oreos are coated and decorated.
- Chill Until Set: Place the baking sheet in the refrigerator for about 10 minutes or until the candy melts harden completely before serving.
Notes
- Use a chocolate dipping fork or a fork with thin tines for easy dipping and removing excess coating.
- Melting candy melts slowly in short bursts prevents burning and ensures smooth texture.
- Decorate quickly after dipping before the coating hardens to ensure sprinkles stick well.
- Chill Oreos in the refrigerator to speed up the hardening process of the candy melts.
- Substitute colored candy melts with colored white chocolate if preferred.
- Store decorated Oreos in an airtight container at room temperature for up to 3 days.
Nutrition
- Serving Size: 1 Oreo
- Calories: 110 kcal
- Sugar: 15 g
- Sodium: 90 mg
- Fat: 5 g
- Saturated Fat: 3 g
- Unsaturated Fat: 1 g
- Trans Fat: 0 g
- Carbohydrates: 18 g
- Fiber: 1 g
- Protein: 1 g
- Cholesterol: 0 mg


