Snowman Face Cookies Recipe
If you’re on the hunt for a festive, fun, and absolutely delightful cookie to brighten up your holiday baking, look no further than my Snowman Face Cookies Recipe. These charming treats aren’t just adorable—they’re surprisingly simple to make and absolutely scrumptious. Whether you’re baking with kids or want a sweet centerpiece for your holiday cookie platter, these snowman cookies bring out that cozy, joyful vibe we all love this season. Trust me, once you try them, they’ll become your go-to winter dessert!
Why This Recipe Works
- Cake Mix Base: Using white cake mix makes the dough tender and creates soft, flavorful cookies without fuss.
- Simple Buttercream: A homemade buttercream frosting adds creamy sweetness and holds the decorations perfectly.
- Creative Decoration: Using candies for the eyes, nose, and mouth keeps decorating fun and quick—no piping skills required!
- Kid-Friendly Fun: These cookies encourage creativity, making them a perfect holiday activity for the whole family.

Ingredients & Why They Work
The magic in this Snowman Face Cookies Recipe is in the simple combo of a cake mix base and creamy buttercream frosting that acts as an edible glue for the fun decorations. Each ingredient is easy to find and essential for achieving that perfect balance of soft cookie texture and festive snowman charm.
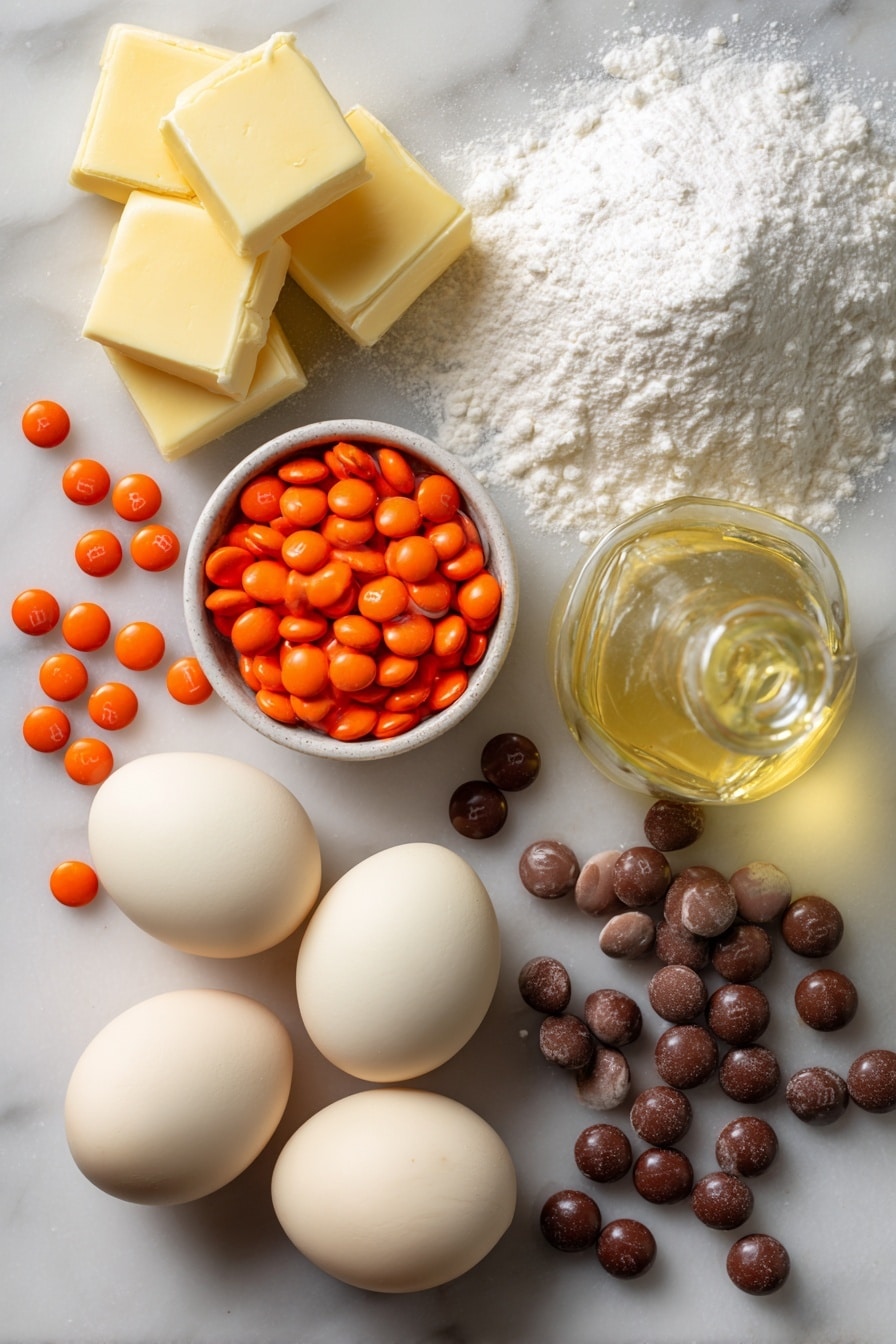
- White cake mix: This is the foundation of your cookie dough and ensures a light, soft texture every time.
- Eggs: Help bind the dough together so your cookies hold their shape.
- Canola oil: Adds moisture without overpowering flavor, and keeps cookies tender.
- Unsalted butter: Essential for smooth buttercream and a rich taste—you want control over salt levels here.
- Powdered sugar: Sweetens the buttercream and gives it a smooth texture for easy spreading.
- Vanilla extract: Adds warm, familiar flavor that deepens the sweetness of the frosting.
- Milk or cream: Adjusts buttercream consistency—start with a little, add more if you need it creamier.
- White sanding sugar: Gives the cookies a frosty sparkle that looks like fresh snow.
- Orange Dot candies: Perfectly sized and bright orange for snowman noses!
- Regular brown M&Ms: Work great as eyes—a simple and tasty choice.
- Mini brown M&Ms: Tiny morsels that make the cutest mouths—curved just right.
Make It Your Way
I love how this Snowman Face Cookies Recipe invites you to get creative! I usually stick to the classic decorations, but sometimes I swap in different candies or even add little scarves with fruit leather strips. Don’t be afraid to personalize these cookies with your family’s favorite colorful treats.
- Variation: Once, I used mini chocolate chips instead of mini M&Ms for the mouth—gave it a cute rustic vibe and everyone loved the extra chocolate punch.
- Dietary tweaks: You can swap in a dairy-free butter for the frosting to make these cookies vegan-friendly without losing that creamy frosting charm.
- Seasonal turns: While snowmen are winter stars, I’ve made these cookies with smiley faces year-round—just change the decorations to fit the occasion!
Step-by-Step: How I Make Snowman Face Cookies Recipe
Step 1: Prepare the Cookie Dough
Start by preheating your oven to 350°F (175°C) and lining two baking sheets with parchment paper—you want to avoid sticky messes later! In a large bowl, whisk together the white cake mix, eggs, and canola oil until a smooth dough forms. It’s super quick and honestly fun to mix by hand or with a mixer—either way works. The dough will be soft, but not runny, perfect for scooping.
Step 2: Scoop and Bake
I use a medium cookie scoop to portion even rounds of dough onto the baking sheets, spacing them about 2 inches apart. This step is key since the cookies spread a bit during baking, and you want them neat and cozy. Bake for 9-11 minutes, watching closely near the end. You’ll know they’re ready when the edges are just set but the center still looks soft. Let them cool a few minutes on the sheet before moving them to a wire rack.
Step 3: Whip Up the Buttercream
While the cookies cool, beat the unsalted butter with an electric mixer until creamy and smooth. Gradually add powdered sugar, vanilla extract, a pinch of salt, and 1 tablespoon of milk or cream, mixing until velvety. If your buttercream feels too stiff, add milk a little at a time until it spreads easily—this little trick helped me turn a crumbly frosting into pure cloud-like goodness.
Step 4: Decorate Your Snowmen
Use a small offset spatula or a butter knife to gently spread a generous layer of buttercream over each cooled cookie. Immediately after spreading, sprinkle white sanding sugar on top—that frosty sparkle gives these cookies their winter magic. Then, bring out the candies: place one orange Dot candy for the nose, two regular brown M&Ms for the eyes, and curve mini brown M&Ms into a happy mouth. Let the frosting set for about 30 minutes before serving to avoid smudging your adorable snowman faces.
Tips from My Kitchen
- Scooping Consistency: Use a medium cookie scoop to get evenly sized cookies that bake uniformly every time.
- Don’t Overbake: The cookies will be soft when out of the oven but firm up as they cool—this keeps them tender, not crunchy.
- Frost While Cool: Make sure cookies are completely cool before frosting to prevent melting and runny decorations.
- Candy Placement: Press candies gently into the frosting so they stick but don’t sink or fall off after frosting sets.
How to Serve Snowman Face Cookies Recipe
Garnishes
I tend to keep garnishes simple to let the snowman faces shine—just a dusting of white sanding sugar atop the buttercream gives that chilly sparkle that reminds me of real snow. Sometimes, I sprinkle a few edible glitter flakes for a little holiday glam. A mint leaf placed beside the cookie looks like a little holly accent, adding a subtle festive touch.
Side Dishes
Serving these cookies next to a warm cup of hot cocoa or creamy eggnog is a classic combo that always wins over guests. I also love pairing them with a simple cheese platter or a cozy winter fruit salad—something fresh and easy so the cookies stay the center of attention.
Creative Ways to Present
For holiday parties, I’ve arranged these snowmen on a platter lined with fresh evergreen sprigs and cranberries to create a winter wonderland effect. Another favorite is stacking them in a “cookie snowman tower” with little iced sugar cookies as scarves and hats. Kids especially love the cookie decorating station where they can personalize their snowmen—turning baking into a festive experience.
Make Ahead and Storage
Storing Leftovers
After eating my fill (which is never the whole batch), I keep leftovers in an airtight container at room temperature where they stay fresh for 3-4 days. Make sure to layer cookies between parchment paper to keep the frosting intact and prevent sticking—it’s a little trick I picked up after a frosting mishap!
Freezing
I’ve successfully frozen the undecorated cookies for up to three months. I store them in a freezer-safe container or bag, and when I’m ready to enjoy them again, I thaw at room temperature before throwing on fresh frosting and decorations. This way, you get that just-made freshness without the last-minute rush.
Reheating
Snowman Face Cookies don’t really need reheating since they’re best enjoyed soft and frosted cool. But if you want to warm them slightly, I recommend just 5-6 seconds in the microwave—not more—or else the frosting may melt and your snowman’s face could turn into a little snow puddle.
FAQs
-
Can I use a different cake mix flavor for the Snowman Face Cookies Recipe?
Absolutely! While white cake mix offers a neutral, soft base perfect for snowy cookies, you can experiment with vanilla or even funfetti cake mixes for a colorful twist. Just keep in mind the final look might be less “snowy” but still delicious.
-
What if I don’t have orange Dot candies for the noses?
No worries! You can substitute with mini orange M&Ms, candy-coated chocolate drops, or even tiny pieces of orange fruit leather. The key is a bright orange pop for the snowman’s carrot nose.
-
How do I make sure the frosting doesn’t melt too quickly?
Make sure your cookies are completely cooled before applying buttercream, and keep them stored in a cool, dry place. Avoid storing in warm or humid areas to keep frosting firm and decorations neat.
-
Can I prepare the dough ahead of time?
You sure can! Chill the formed dough balls in the fridge for about 30 minutes before baking, which can help with even baking and prevent spreading. For longer storage, freeze the dough balls and bake directly from frozen, adding a couple of minutes to baking time.
Final Thoughts
These Snowman Face Cookies aren’t just another cookie recipe—they’re a little bit of holiday magic in every bite. I always get smiles when I bring them out, not just because they’re tasty, but because decorating them feels like making memories. Give this recipe a whirl, grab some fun candies, and don’t forget to share the joy with friends and family. Honestly, baking these together might just be my favorite part of winter!
Print
Snowman Face Cookies Recipe
- Prep Time: 20 minutes
- Cook Time: 11 minutes
- Total Time: 31 minutes
- Yield: 18 cookies
- Category: Dessert
- Method: Baking
- Cuisine: American
Description
Delightfully festive Snowman Face Cookies made from a simple white cake mix dough, topped with creamy buttercream frosting and decorated with colorful candies to create charming snowman faces. Perfect for holiday celebrations and winter parties.
Ingredients
Cookies
- 1 (15.25 ounce) box white cake mix
- 2 large eggs
- 1/2 cup canola oil
Buttercream
- 1/2 cup unsalted butter softened
- 2 cups powdered sugar
- 1 teaspoon vanilla extract
- 1/4 teaspoon salt
- 1-2 tablespoons milk or cream
Decoration
- 1/2 cup white sanding sugar
- 18 orange Dot candies for noses
- 36 regular brown M&Ms for eyes
- 90 mini brown M&Ms for mouths
Instructions
- Preheat oven: Preheat the oven to 350 degrees Fahrenheit and line two baking sheets with parchment paper to prevent sticking and ensure even baking.
- Prepare dough: In a large bowl, combine the white cake mix, eggs, and canola oil until a uniform dough forms, making sure all ingredients are thoroughly blended.
- Portion cookies: Use a medium cookie scoop to portion the dough onto the prepared baking sheets, spacing the cookies about 2 inches apart to allow room for spreading.
- Bake cookies: Bake the cookies for 11 minutes or until the edges are set and lightly golden; then remove from oven and allow them to cool for a few minutes on the sheets before transferring to a wire rack to cool completely.
- Make buttercream: In a large bowl, beat the softened unsalted butter with an electric mixer until smooth and creamy. Gradually add powdered sugar, vanilla extract, salt, and 1 tablespoon of milk or cream, mixing until smooth and spreadable. Add the additional tablespoon of milk if needed to adjust the consistency.
- Frost cookies: Using a knife or small offset spatula, spread a layer of buttercream evenly on each cooled cookie to act as the base for decoration.
- Add sanding sugar: Immediately sprinkle white sanding sugar over the frosted cookies to give a frosty, snowy effect.
- Decorate faces: Place one orange Dot candy in the center of each cookie as the snowman’s nose, add two regular brown M&Ms for the eyes above the nose, and arrange mini brown M&Ms in a curved line below to create a smiling mouth.
- Set frosting: Allow the frosting to set at room temperature before serving or storing the cookies to ensure decorations stay intact.
Notes
- Store the decorated cookies in an airtight container at room temperature for 3-4 days to maintain freshness.
- Undecorated cookies can be frozen for up to 3 months in an airtight container or freezer bag; thaw at room temperature before decorating and serving.
- Use parchment paper on baking sheets to prevent sticking and make cleanup easier.
- You can substitute canola oil with vegetable oil or melted butter if preferred.
- For a dairy-free version, use a vegan butter substitute and plant-based milk in the buttercream.
Nutrition
- Serving Size: 1 cookie
- Calories: 150 kcal
- Sugar: 15 g
- Sodium: 110 mg
- Fat: 7 g
- Saturated Fat: 3 g
- Unsaturated Fat: 4 g
- Trans Fat: 0 g
- Carbohydrates: 22 g
- Fiber: 0 g
- Protein: 1 g
- Cholesterol: 15 mg


