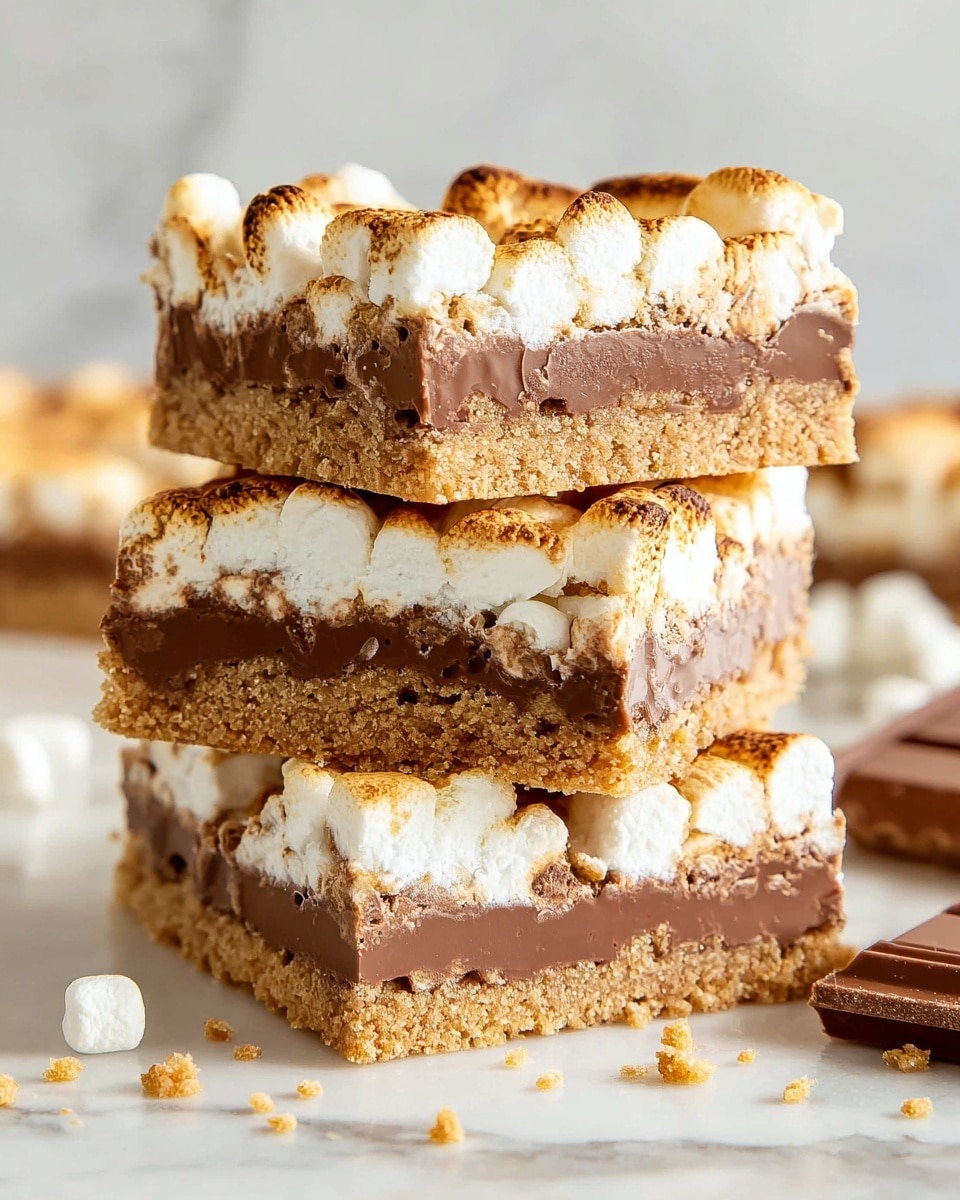
S’mores Bars Recipe
If you ve ever loved the classic campfire treat, you re going to adore this S mores Bars Recipe. It takes all the best parts of a campfire s more-the crunchy graham crust, rich melted chocolate, and toasted marshmallows-and puts them into a simple, no-fuss baking pan dessert. I ve made these countless times, especially when I want a crowd-pleaser without the hassle of a bonfire. Whether it s a casual family night or a potluck with friends, these bars always vanish fast!
What s fantastic about this S mores Bars Recipe is how adaptable and foolproof it is. You don t need special equipment or outdoor fire-you just need your oven and a little patience. Plus, the recipe s clear steps and handy tips will help you avoid the common marshmallow meltdown problems (been there, burnt those!). Once you make these bars, I guarantee they ll become your go-to for sweet cravings.
Why You’ll Love This Recipe
- Campfire Flavor Indoors: Enjoy that nostalgic s mores taste any time without needing a fire pit or outdoor space.
- Simple Ingredients: You probably already have everything in your pantry and fridge, making it super convenient.
- Crowd-Pleaser: These bars are easy to make in big batches, perfect for gatherings and sharing.
- Fun & Interactive: The process of watching marshmallows toast under the broiler is a treat for both kids and adults.

Ingredients You’ll Need
These ingredients blend perfectly to create that crispy, melty, gooey texture you expect from s mores, but in bar form. When shopping, try to get fresh graham crackers and quality chocolate bars for the best results.
- Graham cracker crumbs: Use fine crumbs for a sturdy crust that holds together well; fresh crumbs make a big difference.
- Butter: Melted butter helps bind the crust; I like unsalted so I can control the saltiness.
- Powdered sugar: Adds a subtle sweetness and helps the crust stick nicely.
- Hershey chocolate bars: The classic milk chocolate flavor is perfect here, but feel free to try dark chocolate if you prefer.
- Mini marshmallows: Tiny marshmallows are easier to spread evenly and toast quickly under the broiler.
Variations
One of my favorite things about this S mores Bars Recipe is that it s an easy canvas to make your own. I love swapping the chocolate or adding a twist with different toppings depending on my mood or season.
- Using Dark or Flavored Chocolate: I once tried almond bark chocolate and it added a nice nutty dimension-don t be afraid to experiment!
- Adding Nuts: Sprinkle chopped pecans or walnuts on the crust before placing the chocolate for an added crunch.
- Peanut Butter Swirl: Before adding the chocolate bars, swirling melted peanut butter into the crust was a game-changer in my kitchen.
- Seasonal Toppings: I like adding crushed peppermint candies during the holidays for a festive touch.
How to Make S mores Bars Recipe
Step 1: Prepare and Bake the Crust
Start by preheating your oven to 350°F (175°C) and greasing a 9×13 pan generously with non-stick butter spray-that way, your bars won t stick when you cut them. In a medium bowl, mix graham cracker crumbs, powdered sugar, and melted butter with a spoon until everything is evenly combined. Press this mixture firmly with your fingers into the pan, making sure you pack the crust firmly along the edges and bottom to prevent crumbling later. Bake it for 5-8 minutes, just until the sides start to turn golden. You’ll notice the crust firms up as it cools, so don t worry if it feels a bit soft coming out of the oven.
Step 2: Layer the Chocolate Bars
Once your crust has cooled slightly, lay the Hershey chocolate bars closely over the surface, covering as much of the graham cracker base as possible. Pop the pan back into the oven for 3 minutes-just until the chocolate starts melting and gets shiny. Timing here is key because you want melty chocolate, not a full puddle, so keep an eye on it. Let it cool for a minute or two before the next step.
Step 3: Toast the Marshmallows
Now comes the fun part: piling on the mini marshmallows. Spread them tightly so the whole surface is covered. Switch your oven to the broil setting and place the pan on the top rack. Here s my personal advice: do not walk away! The marshmallows toast fast-usually within 2 minutes. Watch them like a hawk and pull them out as soon as they brown lightly. I ve made the mistake of letting them burn, and trust me, it s not pretty (and very smoky!). After broiling, let the bars cool completely, then pop them in the fridge for a bit if you want them to set up nicely before cutting.
Step 4: Cut and Serve
When you re ready to serve, grab a sharp knife and warm it under hot water, then dry it off before slicing. This little trick helps cut through the sticky marshmallows without dragging or tearing the bars. You might need to rewarm the knife between cuts if things start sticking, but it s worth it for neat pieces. Serve them up and watch everyone swoon-they really are that good!
Pro Tips for Making S mores Bars Recipe
- Watch the Marshmallows Close: The broiler is powerful, and marshmallows can go from toasted to burnt in seconds-stay nearby and keep an eye.
- Firm Crust Matters: Press the crust firmly into the pan so the bars hold together well when cut.
- Chocolate Melting Trick: Letting the chocolate soften without fully melting helps it stay layered nicely without sinking into the crust.
- Cutting Clean Bars: Warm your knife between slices to prevent the gooey marshmallows from sticking and ripping the bars apart.
How to Serve S mores Bars Recipe
Garnishes
I usually keep it classic and simple-those toasted marshmallows are the star, but sometimes I sprinkle a pinch of crushed graham crackers or a dusting of cocoa powder on top after they cool for an extra touch. You can also drizzle a little caramel sauce right before serving if you re feeling indulgent.
Side Dishes
Because these bars are rich and sweet, I often serve them with a glass of cold milk or a cup of hot coffee to balance everything out. If it s a party, fresh berries or a light fruit salad on the side cuts through the richness beautifully.
Creative Ways to Present
For special occasions, I ve layered the bars in glass jars with whipped cream and berries to create s mores parfaits, which were a hit at a summer barbecue. Another fun presentation is cutting the bars into bite-sized squares and serving them on a rustic wooden board with extra marshmallows and chocolate nearby for visual flair and extra snacking.
Make Ahead and Storage
Storing Leftovers
I store leftover S mores Bars in an airtight container in the refrigerator-it keeps the marshmallows from getting overly sticky, and the bars hold their shape nicely this way. They usually last about 3-4 days, which is plenty of time if you ve made a big batch!
Freezing
If you want to freeze them, wrap individual bars tightly in plastic wrap and place them in a freezer-safe container or bag. I find they freeze well for up to a month. Just thaw them overnight in the fridge before serving for the best texture.
Reheating
When reheating, I pop a bar into the microwave for about 10-15 seconds to soften up the chocolate and marshmallow again-but don t overdo it or the marshmallow can get tough. Another favorite is warming them briefly in a toaster oven at a low setting; it revives that fresh-from-the-oven vibe perfectly.
FAQs
-
Can I use chocolate chips instead of Hershey bars in the S mores Bars Recipe?
Yes! Chocolate chips can work as a substitute. Just sprinkle them evenly over the crust and let them melt slightly in the oven before adding marshmallows. Keep in mind, they might melt more quickly and settle differently than bars, so watch the baking closely to avoid over-melting.
-
How do I prevent marshmallows from burning under the broiler?
Marshmallows toast super fast under the broiler, so the best way to prevent burning is to stay right by the oven and watch them closely. Keep the pan on the top rack but not too close to the heating element, and remove the pan as soon as they turn golden brown. Every oven broiler is different, so err on the side of caution.
-
Can I make these bars ahead of time?
Absolutely, you can prepare the bars a day or two in advance. Store them in an airtight container in the refrigerator to keep the marshmallows from becoming too sticky. Bring them to room temperature before serving, or gently warm them to refresh the gooey texture.
-
What s the best way to cut sticky S mores Bars?
Use a sharp knife warmed under hot water before slicing, then dry it quickly. This melts through the marshmallow stickiness and gives you clean cuts. You might need to warm the knife multiple times as you cut through the batch.
Final Thoughts
I honestly can t recommend this S mores Bars Recipe enough-it’s one of those desserts that brings back cozy memories and creates new ones. It s easy enough to make any night, but special enough to impress your guests. Once you try this recipe, I have no doubt it ll become a staple in your dessert rotation, perfect for sharing or savoring quietly with a cup of coffee. Give it a go-you ll be so glad you did!
Print
S’mores Bars Recipe
- Prep Time: 10 minutes
- Cook Time: 15 minutes
- Total Time: 25 minutes
- Yield: 16 servings
- Category: Dessert
- Method: Baking
- Cuisine: American
Description
S’mores Bars are a delightful twist on the classic campfire treat, combining a crunchy graham cracker crust, melted Hershey’s chocolate, and toasted mini marshmallows. Baked and then broiled to achieve the perfect gooey, slightly caramelized marshmallow topping, these bars are easy to prepare and perfect for parties or a cozy dessert.
Ingredients
Crust
- 2 cups graham cracker crumbs
- 8-12 Tablespoons butter, melted
- 1/2 cup powdered sugar
Topping
- 4 Hershey Chocolate Bars (4.4 ounce bars each)
- 1 package mini marshmallows
Instructions
- Preheat Oven: Preheat your oven to 350 degrees Fahrenheit to prepare for baking the crust.
- Prepare Pan: Grease a 9×13 inch baking pan with non-stick butter spray to prevent sticking.
- Make Crust Mixture: In a medium-sized bowl, combine the graham cracker crumbs, powdered sugar, and melted butter. Stir well with a spoon until fully mixed.
- Press Crust: Spread the graham cracker mixture evenly in the bottom of the prepared pan. Firmly press it down and along the sides using your fingers to pack it tightly.
- Bake Crust: Place the pan in the oven and bake for about 5-8 minutes, or until the crust edges start to turn golden brown. The crust will harden further as it cools.
- Cool Crust: Remove the crust from the oven and allow it to cool completely.
- Add Chocolate Layer: Lay the Hershey bars evenly over the cooled crust, covering it as completely as possible.
- Melt Chocolate: Return the pan to the oven for approximately 3 minutes, or until the chocolate just begins to melt and becomes shiny. Remove and let it cool for 1-2 minutes.
- Top with Marshmallows: Arrange the mini marshmallows closely together over the melted chocolate layer.
- Broil Marshmallows: Switch the oven setting to broil. Place the pan back into the oven and watch carefully; broil for about 2 minutes until the marshmallows are golden brown. Be cautious as they can burn or catch fire quickly.
- Cool Bars: Allow the bars to cool completely. For easier cutting and firmer bars, refrigerate after the initial cooling.
- Cut and Serve: Use a sharp knife warmed under hot water and dried to slice through the bars easily. Repeat warming the knife if it becomes sticky.
Notes
- The butter quantity can be adjusted between 8 to 12 tablespoons depending on desired crust firmness and richness.
- Pressing the crust firmly ensures it holds together well after baking.
- Watch the marshmallows closely during broiling to prevent burning or fire hazards.
- Chilling the bars after cooking helps them set better and makes cutting easier.
- Warming the knife between cuts prevents marshmallows and chocolate from sticking.
Nutrition
- Serving Size: 1 bar (1/16th of recipe)
- Calories: 250
- Sugar: 20g
- Sodium: 120mg
- Fat: 14g
- Saturated Fat: 8g
- Unsaturated Fat: 6g
- Trans Fat: 0g
- Carbohydrates: 30g
- Fiber: 1g
- Protein: 3g
- Cholesterol: 35mg


