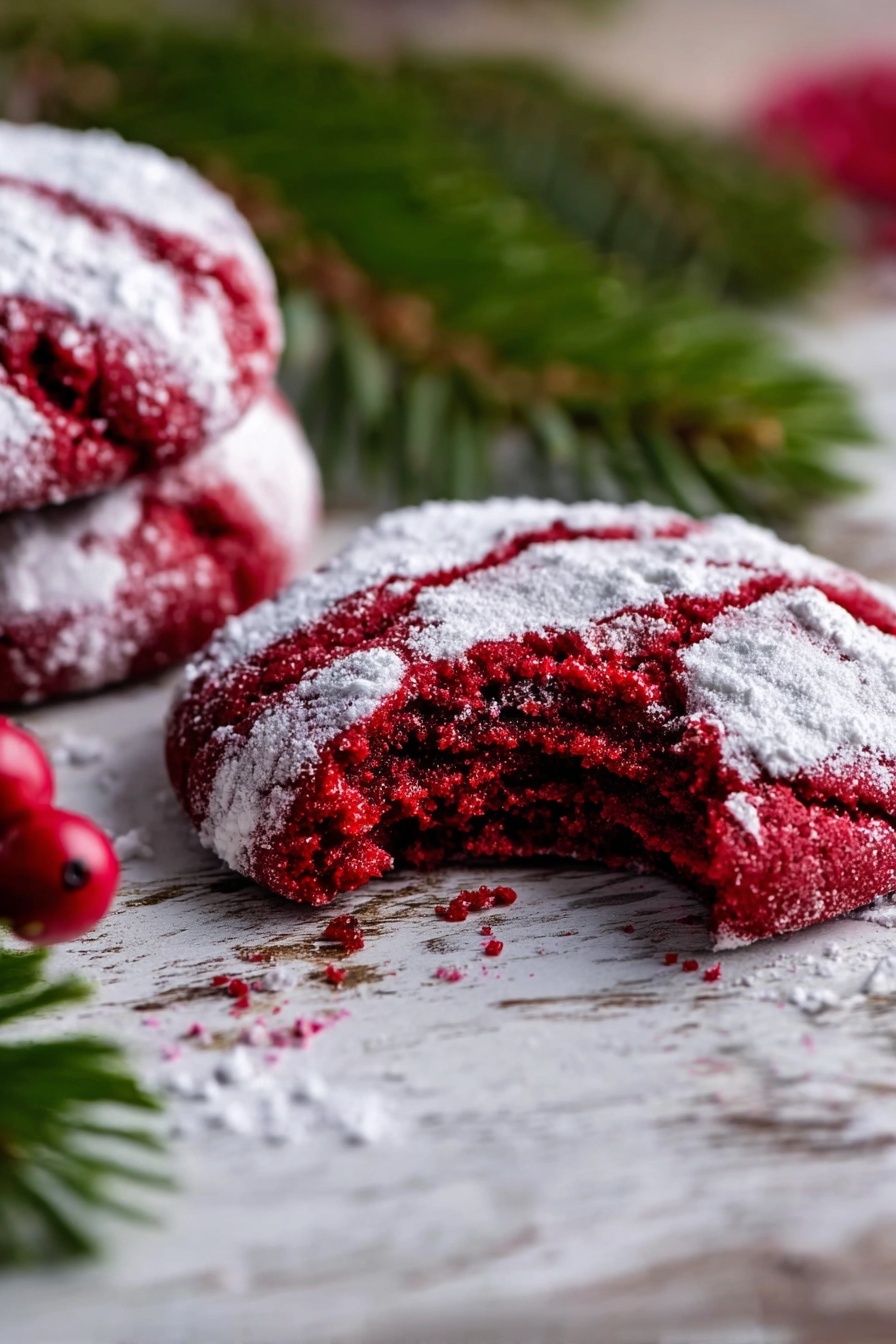
Red Velvet Cookies with Crinkle Coating Recipe
If you’re searching for a cookie that’s as visually stunning as it is delicious, well, I’ve got just the thing for you. This Red Velvet Cookies with Crinkle Coating Recipe has become one of my absolute favorites — thanks to that gorgeous crinkle effect and the tender, rich flavor in every bite. Trust me, once you try these cookies, you’ll want to bake them over and over, whether for a holiday, special gathering, or just because. Ready to dive into cookie heaven? Let me show you how to make these beauties step-by-step!
Why This Recipe Works
- Moist & Tender Texture: The combination of butter, eggs, and a touch of milk ensures these cookies stay soft and melt-in-your-mouth every time.
- That Iconic Crinkle Coat: Rolling the dough balls in powdered sugar creates that delightful crackled finish while locking in moisture.
- Vibrant Red Velvet Color: A generous amount of red food coloring gives these cookies that classic, eye-catching hue that’s perfect for any occasion.
- Balanced Flavors: Cocoa powder and vanilla blend beautifully with the sweet, rich base for a cookie you won’t forget.

Ingredients & Why They Work
Every ingredient in this Red Velvet Cookies with Crinkle Coating Recipe serves a purpose—from structure to flavor to texture. I always recommend using the best quality cocoa and fresh eggs to make sure your cookies taste as wonderful as they look.

- All-purpose flour: This is your cookie’s backbone, providing just enough structure without making them tough.
- Unsweetened cocoa powder: Adds that subtle chocolate depth that makes red velvet unforgettable. Use Dutch-process cocoa for a richer color.
- Baking powder & baking soda: These help the cookies rise nicely and develop their characteristic texture.
- Salt: Enhances the flavors and balances the sweetness.
- Unsalted butter (softened): Adds creaminess and keeps the cookies tender—make sure it’s softened, not melted.
- Granulated sugar: Sweetens and contributes to the cookies’ structure and chewiness.
- Eggs: Bind everything together and add moisture for softness.
- Milk: Just a splash to keep the dough smooth and tender.
- Vanilla extract: Elevates the flavor profile, rounding out the cocoa and red velvet notes.
- Red food coloring: The star of the show that gives your cookies that festive, vibrant red color. Gel or liquid works, but gel is more concentrated.
- Powdered sugar: Creates the iconic crinkle coating and adds a melt-in-your-mouth sweetness on the outside.
Make It Your Way
These cookies are so flexible—once you get comfortable with the basics, you can easily play around with flavors and textures to make this recipe uniquely yours. I often like adding a little cream cheese frosting dip on the side for a creamy contrast.
- Variation: Adding white chocolate chips makes for an extra sweet surprise inside each cookie—my family loves this twist during the holidays!
- Dietary Modifications: For a dairy-free version, swap butter for coconut oil and milk for almond or oat milk; the texture changes slightly, but it’s still fantastic.
- Color Swaps: Want something seasonal? Try orange or green food coloring to make this cookie fun all year round.
Step-by-Step: How I Make Red Velvet Cookies with Crinkle Coating Recipe
Step 1: Prepping the Dry Ingredients
Start by whisking together your flour, unsweetened cocoa powder, baking powder, baking soda, and salt in a bowl. This ensures everything is well combined and evenly distributed, so your cookies bake evenly. I like to set this aside while I cream the butter and sugar—making the process smooth and organized.
Step 2: Cream Butter and Sugar
In your mixer bowl, beat the softened butter and granulated sugar until fluffy—this usually takes about 3-4 minutes on medium speed. You’ll know it’s ready when the mixture looks light and a bit pale. This step is key for that tender crumb.
Step 3: Add Eggs, Milk, Vanilla & Red Coloring
Gradually add the eggs one at a time, beating well after each addition to prevent curdling. Then stir in the milk, vanilla, and give your cookies their signature pop of color with the red food coloring. I like to add an extra half teaspoon of vanilla sometimes—it just makes the flavor a little richer.
Step 4: Mix in Dry Ingredients and Chill
Slowly add your dry mixture on low speed, mixing just until combined—don’t overmix here or your cookies could turn out dense. Cover the dough with plastic wrap and pop it into the fridge for about 1 ½ hours. This chilling step is crucial—it helps the dough firm up so that the cookies keep their shape and get that perfect crinkle coat.
Step 5: Shape, Coat, and Bake
Preheat your oven to 350°F (175°C). Place powdered sugar in a small bowl. Once the dough is chilled, scoop out about 2 tablespoons with buttery hands (this helps prevent sticking) and roll into balls. Then roll each ball generously in powdered sugar to coat thoroughly—which helps form those beautiful cracks as the cookies bake.
Place the coated balls on baking sheets lined with parchment or a silicone mat, flatten them slightly (but not too much), and bake for about 13–14 minutes. Don’t overbake; the edges should be set but the centers remain soft.
Step 6: Cool & Store
Let your Red Velvet Cookies with Crinkle Coating rest on the baking sheet for about 5 minutes to firm up, then move them onto a wire rack to cool completely. Once cooled, store in an airtight container to keep them soft and lovely for several days.
Tips from My Kitchen
- Butter Consistency Matters: Make sure your butter is softened to room temperature—not melted—for proper creaming and texture.
- Measure Flour Accurately: Spoon flour into your measuring cup and level it off; too much flour can make cookies dry.
- Don’t Skip Chilling: Chilling the dough is key for that signature crinkle pattern and prevents spreading.
- Watch Your Bake Time: Remove cookies as soon as edges set to keep centers soft and chewy.
How to Serve Red Velvet Cookies with Crinkle Coating Recipe
Garnishes
I love sprinkling a little extra powdered sugar over the cookies right before serving to freshen up their crinkle look. For an extra-special touch, a dollop of cream cheese frosting or a drizzle of melted white chocolate complements these cookies brilliantly.
Side Dishes
These cookies pair wonderfully with a tall glass of cold milk, a cup of rich coffee, or even a creamy hot chocolate. For holiday parties, I like serving them alongside slices of classic red velvet cake or a bowl of fresh berries to balance the sweetness.
Creative Ways to Present
For festive occasions, I’ve arranged these cookies on tiered cake stands adorned with holly leaves or edible flowers. You could also sandwich a bit of frosting between two cookies for a red velvet cookie sandwich that’s sure to impress guests.
Make Ahead and Storage
Storing Leftovers
I usually keep leftover cookies in an airtight container at room temperature for up to 5 days. To maintain moisture, I add a slice of bread to the container—it’s an old trick that really works to keep cookies soft.
Freezing
Got extra dough? Freeze it shaped into balls (rolled in powdered sugar) on a baking sheet first, then transfer to a freezer bag. When you want cookies fresh, bake straight from frozen adding about 2 additional minutes to the baking time—super convenient for impromptu treats!
Reheating
If you have leftover cookies that need reviving, I pop them in the oven at 300°F for 5 minutes just before serving. This refreshes their softness and crunch on the edges—much better than microwaving, which can make them rubbery.
FAQs
-
Can I make these Red Velvet Cookies with Crinkle Coating Recipe vegan?
Absolutely! You can replace the butter with a vegan plant-based alternative like margarine or coconut oil, use flax or chia eggs (1 tablespoon of ground seed plus 3 tablespoons water per egg), and swap dairy milk for any plant milk. Just be sure to test bake a small batch first to adjust for texture and moisture.
-
Why do my cookies spread too much and lose the crinkle look?
This usually happens if the dough wasn’t chilled long enough or your butter was too warm/melted before mixing. Chilling the dough firms it up to minimize spreading, and soft (not melted) butter creates the right dough consistency. Also, be sure to flatten the dough balls just a little before baking.
-
Does the amount of red food coloring matter?
Yes! The recipe calls for 5 teaspoons to get that rich red shade. Using less will make the cookies duller in color, but you can adjust based on dietary preferences or food coloring type. Gel colors tend to be more vibrant and require less than liquid ones.
-
Can I use this dough to make red velvet cake instead of cookies?
This dough is designed specifically for cookies and won’t work for cake because of differences in moisture and leavening. For a cake, it’s best to find a dedicated red velvet cake recipe for the best results.
-
What’s the best way to store and keep crinkle cookies fresh?
Store them in an airtight container at room temperature with a slice of bread to maintain softness. For longer storage, freezing baked cookies works great as well and they can be thawed or gently reheated later.
Final Thoughts
This Red Velvet Cookies with Crinkle Coating Recipe has truly become a staple in my kitchen and one I’m always excited to share with friends. It’s that perfect balance of fun to make and heavenly to eat—plus, the crinkle effect adds an extra wow factor every time. Whether you’re baking for a crowd or just treating yourself, I promise you’ll love how these cookies look and taste. Grab your ingredients and give this recipe a try—then watch your cookie game soar!
Print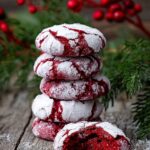
Red Velvet Cookies with Crinkle Coating Recipe
- Prep Time: 15 minutes
- Cook Time: 15 minutes
- Total Time: 2 hours
- Yield: 24 cookies
- Category: Dessert
- Method: Baking
- Cuisine: American
Description
Delight in these soft, chewy Red Velvet Crinkle Cookies featuring a rich cocoa flavor with a vibrant red hue, coated in powdered sugar for a festive crinkled finish. Perfect for holiday treats or anytime you want a colorful, flavorful cookie.
Ingredients
Dry Ingredients
- 3 cups all-purpose flour
- 1/4 cup unsweetened cocoa powder
- 2 tsp baking powder
- 1/4 tsp baking soda
- 3/4 tsp salt
Wet Ingredients
- 3/4 cup unsalted butter, softened
- 1 1/3 cups granulated sugar
- 3 large eggs
- 1 Tbsp milk
- 1 1/2 tsp vanilla extract
- 5 tsp red food coloring
Coating
- 1 cup powdered sugar
Instructions
- Combine dry ingredients: In a small mixing bowl, whisk together the flour, cocoa powder, baking powder, baking soda, and salt. Set aside.
- Cream butter and sugar: In the bowl of a standing mixer or using a hand mixer, whip the softened butter and granulated sugar together until the mixture is fluffy and pale.
- Add eggs and flavorings: Mix in the eggs one at a time, fully combining each before adding the next. Then stir in the milk, vanilla extract, and red food coloring until well blended.
- Incorporate dry ingredients: Gradually add the dry ingredients to the wet ingredients on low speed, mixing just until combined. Avoid overmixing to keep cookies tender. Cover the dough with plastic wrap and refrigerate for 1 hour 30 minutes until firm enough to shape.
- Preheat oven and prepare coating: Preheat your oven to 350 degrees Fahrenheit. Pour the powdered sugar into a small bowl for coating the cookie dough balls.
- Shape and coat dough: Remove the dough from the refrigerator. Using buttered hands, scoop approximately 2 tablespoons of dough and roll each into a ball. Roll each ball thoroughly in powdered sugar to coat evenly.
- Arrange and flatten: Place the coated dough balls on a baking sheet lined with Silpat or parchment paper. Flatten each ball slightly to help them spread evenly during baking.
- Bake the cookies: Bake in the preheated oven for 14 minutes until the cookies have spread and the crinkle effect appears on the surface.
- Cool the cookies: Allow the cookies to rest on the baking sheet for 5 minutes after removing from the oven. Then transfer to a wire rack to cool completely, ensuring they firm up to the perfect texture.
- Store properly: Once cooled, store the cookies in an airtight container to maintain freshness and softness.
Notes
- Butter the hands before shaping dough to prevent sticking.
- Chilling the dough is essential for easy shaping and a thicker cookie texture.
- Use gel or liquid red food coloring for vibrant color; adjust quantity if desired.
- Do not overmix the dough once dry ingredients are added to avoid tough cookies.
- Cookies may be stored at room temperature for up to 5 days in an airtight container.
- To keep cookies soft longer, add a slice of bread to the container to maintain moisture.
Nutrition
- Serving Size: 1 cookie
- Calories: 160 kcal
- Sugar: 15 g
- Sodium: 120 mg
- Fat: 7 g
- Saturated Fat: 4 g
- Unsaturated Fat: 3 g
- Trans Fat: 0 g
- Carbohydrates: 22 g
- Fiber: 1 g
- Protein: 2 g
- Cholesterol: 40 mg


