Pumpkin Dump Cake Recipe
If you’re looking for a dessert that’s insanely easy but tastes like it took hours to make, you’ve hit the jackpot with my Pumpkin Dump Cake Recipe. Seriously, this recipe is one of those magical kitchen shortcuts that still delivers big on flavor and fall vibes—it’s sweet, spiced just right, and comforting in every bite. Trust me, once you try this, you’ll want to keep it on rotation all autumn long.
Why This Recipe Works
- Simplicity at its best: Few ingredients and zero fuss make this cake perfect for busy days or last-minute guests.
- Perfect texture balance: Moist pumpkin filling under a crumbly, buttery cake topping keeps each bite dreamy.
- Customizable toppings: From graham crackers to nuts to toffee, you can change it up to suit your taste or pantry.
- Great for all skill levels: Even beginners will nail this dessert without breaking a sweat.

Ingredients & Why They Work
The ingredients here combine pantry staples with seasonal pumpkin goodness. They come together easily but make this cake feel special. Here are a few tips to help you shop smart and bake with confidence.
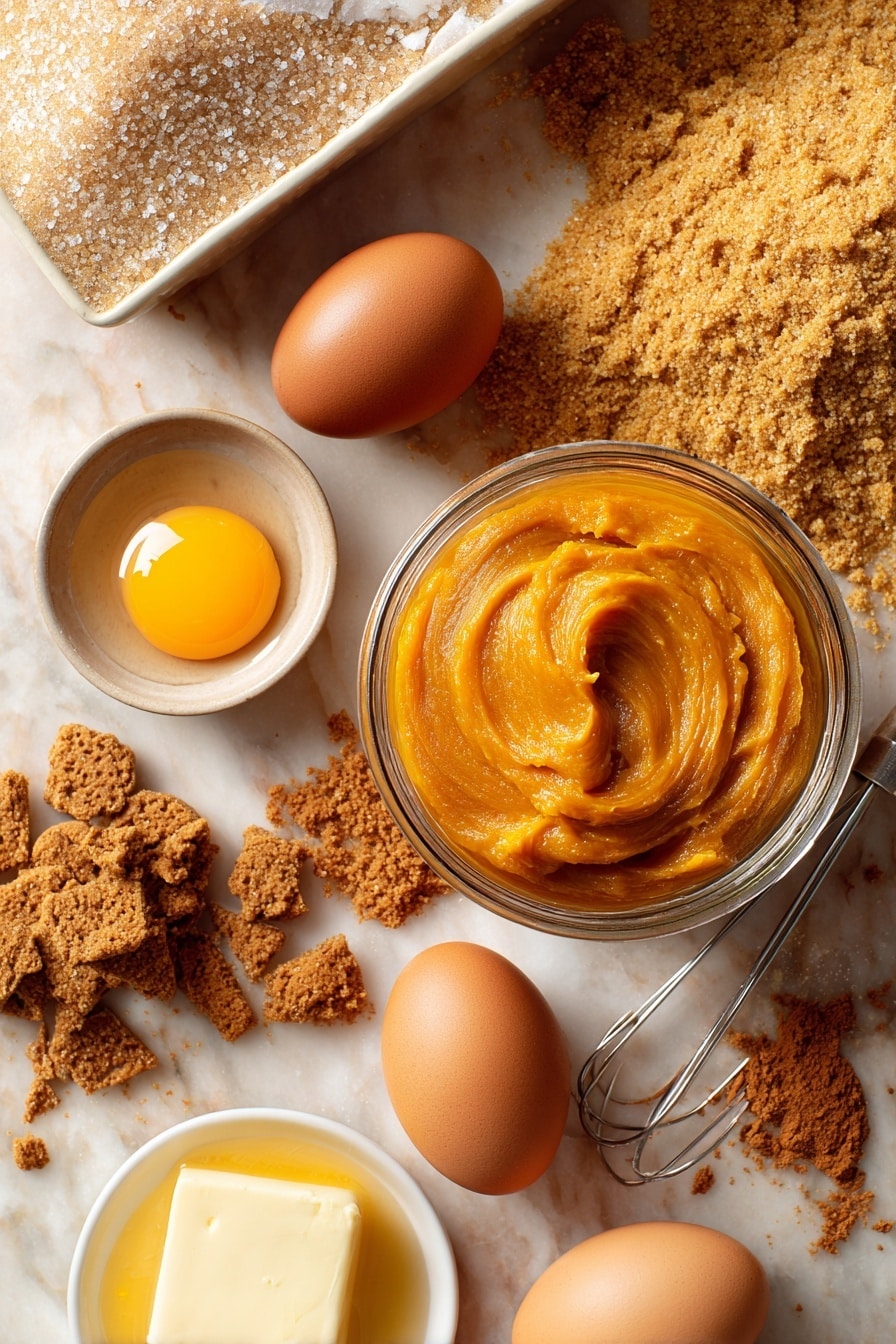
- Pure pumpkin: Go for canned pure pumpkin, not pie filling, because it’s smooth and perfectly neutral to build flavor.
- Evaporated milk: Adds creaminess without extra wateriness—don’t swap it for regular milk or you’ll lose that rich texture.
- Light brown sugar: Gives just the right amount of caramel undertone to balance the spices.
- Eggs: Your binder, helping the pumpkin filling set just right.
- Pumpkin pie spice: The cozy blend of cinnamon, nutmeg, and cloves that makes pumpkin desserts sing.
- Yellow cake mix: This is your shortcut to the cake topping—no need to mix batter from scratch!
- Butter: Melted butter poured over the top creates that amazing golden crust you’ll swoon over.
- Crushed graham crackers or pecans: These add delightful crunch and flavor contrast—you pick your favorite or do a combo.
- Toffee bits (optional): Toss these on for an extra sweet crunch that’s pretty irresistible if you like a bit of decadence.
Make It Your Way
I love how forgiving the Pumpkin Dump Cake Recipe is, so I often make it a little differently depending on what I have on hand or my mood. The best part is that you can tweak the toppings or spices and still get delicious results.
- Nut-free variation: I sometimes swap out the graham crackers for crushed pretzels or gluten-free crackers for a salty sweet vibe perfect for allergy diets.
- Extra spice kick: I like to add a pinch of ground ginger or cardamom to the pumpkin mix when I want a bit more warmth and complexity.
- Healthier swaps: Using a sugar substitute for the brown sugar or losing the toffee bits works if you want to lighten this up a bit.
- Seasonal extras: During holiday seasons, a handful of dried cranberries or chopped apples stirred into the pumpkin filling adds a fresh fruity twist.
Step-by-Step: How I Make Pumpkin Dump Cake Recipe
Step 1: Prep Your Pan Like a Pro
First things first: preheat your oven to 350°F (175°C). I always use a 9×13 inch baking pan because it’s the perfect size for this recipe to spread out evenly. Spray it thoroughly with nonstick cooking spray or grease it lightly with butter. This step saves you from any cake sticking and makes cleanup easier.
Step 2: Mix the Pumpkin Filling
In a large bowl, combine the pure pumpkin, evaporated milk, brown sugar, eggs, and pumpkin pie spice. Stir all this until smooth and fully blended. Make sure to scrape the sides well so the sugar gets nicely mixed in. Once it looks consistent, pour this filling right into your prepared pan. It’s thick and luscious—your cake will be super moist from this.
Step 3: Layer on the Cake Mix and Toppings
Next, sprinkle the entire box of yellow cake mix evenly over the pumpkin filling. Don’t worry about stirring it in—that’s the genius of a dump cake! On top of that, add your crushed graham crackers or pecans, and if you’re feeling adventurous, scatter the toffee bits around. These little layers of texture bring the whole dessert to life.
Step 4: Butter It Up and Bake
Now, pour the melted butter evenly across the entire top. This butter melts into the cake mix and crisps everything up perfectly as it bakes. Pop the pan into your preheated oven and bake for about 45-50 minutes. You’ll know it’s ready when the edges turn golden brown and the center sets—give the pan a gentle jiggle to check.
Step 5: Serve Warm and Enjoy
This cake is fantastic warm, fresh out of the oven, but also delicious at room temperature. I often serve it with a scoop of vanilla ice cream or a dollop of whipped cream—it’s like dessert magic. Just a friendly heads-up: the toffee bits stay crunchier if you serve it right away, so if you love that texture, don’t wait too long!
Tips from My Kitchen
- Don’t Overmix: Keep the pumpkin filling gentle—overmixing can let air in, making the texture less dense.
- Even Butter Distribution: Use a spoon to drizzle the butter in small amounts all over the cake mix to avoid soggy or dry patches.
- Watch Your Oven: Ovens vary, so start checking at 40 minutes to prevent overbaking and maintain moisture.
- Use Fresh Spices: Fresh pumpkin pie spice blend makes a noticeable flavor difference—store your spices in a cool, dark place.
How to Serve Pumpkin Dump Cake Recipe
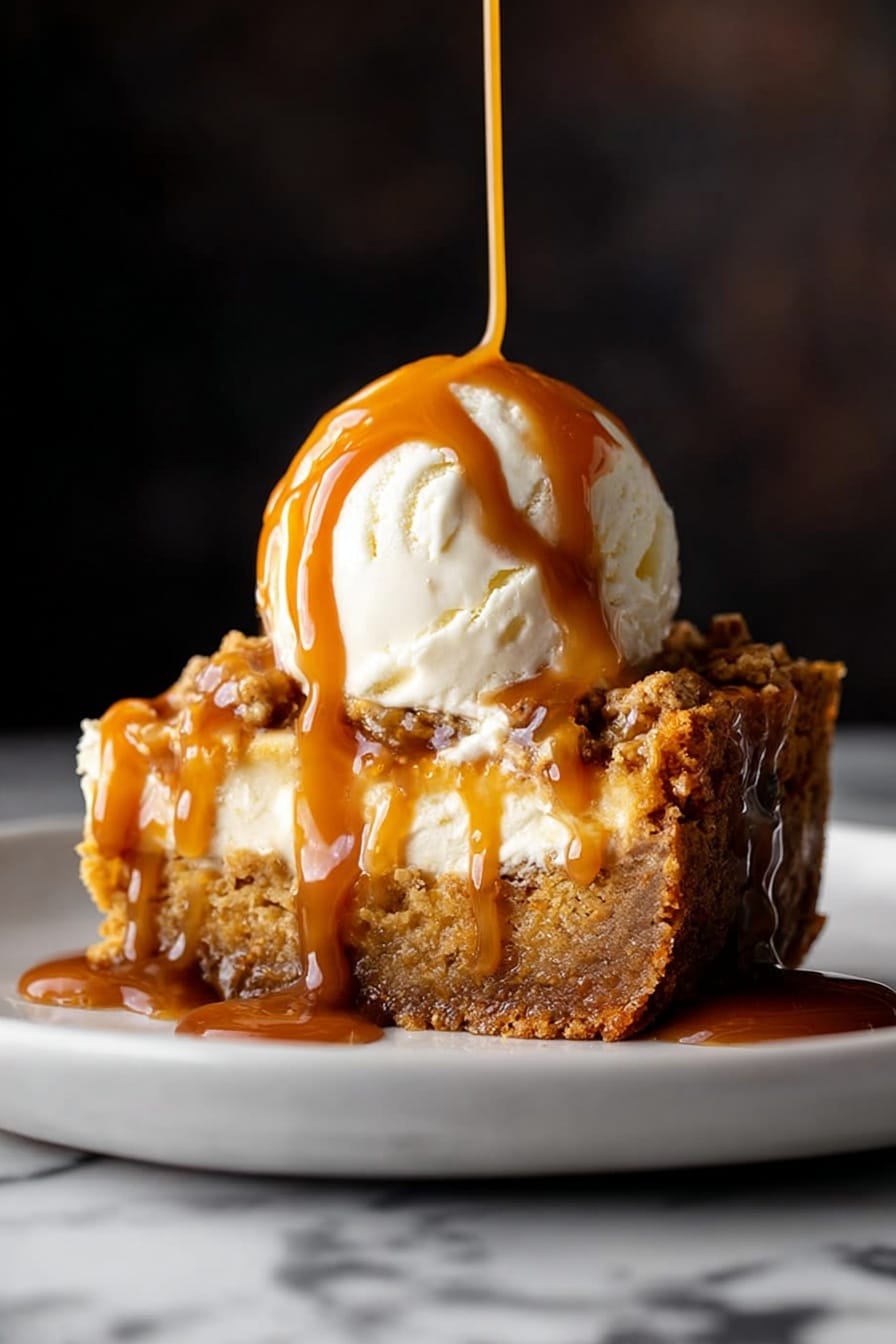
Garnishes
I’m a sucker for simplicity and usually keep it classic with a scoop of vanilla ice cream or lightly sweetened whipped cream. Sometimes I sprinkle a pinch of cinnamon or nutmeg on top for a little extra festive flair. If you want to get fancy, chopped toasted pecans or a drizzle of caramel sauce complements this dessert beautifully.
Side Dishes
Because this cake is rich and flavorful, I like pairing it with light sides like a simple green salad with tangy vinaigrette during dinner parties. A cup of hot apple cider or pumpkin spice latte is also perfect for a cozy fall afternoon treat alongside your slice.
Creative Ways to Present
For holiday gatherings, I’ve served this dump cake in individual ramekins topped with whipped cream and a sprinkle of crushed gingersnap cookies. It makes a charming single-serving dessert that feels extra thoughtful without extra work. You can also layer it in a trifle bowl with whipped cream and toasted nuts for a fun twist.
Make Ahead and Storage
Storing Leftovers
Store your leftover pumpkin dump cake in an airtight container in the fridge for up to 3 days. I usually cover my baking dish tightly with foil or plastic wrap to keep it fresh. The flavor actually deepens a bit overnight, and it still tastes amazing cold or warmed up.
Freezing
I’ve frozen this cake a couple of times with good success. I cut it into individual squares, wrap each piece tightly in plastic wrap, then foil, and freeze. When you want a treat, thaw overnight in the fridge, then warm gently in the oven. The texture holds up pretty well, though the toffee bits might lose some crunch.
Reheating
To reheat leftovers, I pop a slice in the microwave for about 30 seconds or warm it in a 300°F oven for 10-15 minutes. Cover loosely so it doesn’t dry out, and consider adding a little whipped cream or ice cream to revive that fresh-baked feeling.
FAQs
-
Can I use homemade pumpkin puree for this Pumpkin Dump Cake Recipe?
Absolutely! Homemade pumpkin puree works wonderfully. Just make sure it’s well cooked and smooth. Keep the moisture level similar to canned pumpkin to maintain the right filling texture.
-
What can I substitute for pumpkin pie spice?
If you don’t have pumpkin pie spice on hand, you can mix cinnamon, nutmeg, ginger, and a pinch of cloves or allspice to create a similar warm spice blend that’s perfect for this cake.
-
Can I make this recipe vegan or dairy-free?
You can try swapping eggs for flax or chia eggs and use dairy-free evaporated milk alternatives. Replace butter with melted coconut oil or a vegan butter substitute. The texture might vary slightly but still tasty!
-
Why is it called dump cake?
“Dump cake” gets its name because you simply ‘dump’ the ingredients layered in a pan—no fancy mixing or beating required. It’s a super easy, throw-it-all-together dessert.
-
Can I use a different cake mix instead of yellow?
Yes! Yellow cake mix is traditional here for its subtle flavor, but you can experiment with spice cake or even white cake mixes for a different spin.
Final Thoughts
This Pumpkin Dump Cake Recipe has been such a dependable favorite in my kitchen, especially during busy fall weekends and holiday dinners. Its effortless assembly and melt-in-your-mouth goodness make it one of those recipes I’ll happily share with anyone who wants to impress with minimal effort. So go ahead, give it a try—you’ll be so glad you did, and you’ll probably find yourself making it again and again just like I do.
Print
Pumpkin Dump Cake Recipe
- Prep Time: 10 minutes
- Cook Time: 50 minutes
- Total Time: 1 hour
- Yield: 12 servings
- Category: Dessert
- Method: Baking
- Cuisine: American
Description
This Pumpkin Dump Cake is an easy, delicious fall dessert combining creamy pumpkin filling with a crunchy, buttery cake topping. Perfect for holidays or cozy gatherings, this effortless recipe requires minimal prep and yields a comforting treat that pairs wonderfully with ice cream or whipped cream.
Ingredients
Pumpkin Filling
- 1 (15 ounce) can pure Pumpkin
- 1 (10 ounce) can Evaporated Milk
- 1 cup light brown sugar
- 3 eggs
- 3 teaspoons pumpkin pie spice
Topping
- 1 box yellow cake mix
- 1 cup (2 sticks) butter, melted
- 1 cup coarsely crushed graham crackers or pecans
- 1/2 cup toffee bits (optional)
Instructions
- Preheat the Oven: Preheat your oven to 350°F. Grease a 9×13 inch baking pan with nonstick spray and set it aside to ensure the cake won’t stick.
- Mix the Pumpkin Filling: In a large bowl, combine the canned pumpkin, evaporated milk, light brown sugar, eggs, and pumpkin pie spice. Stir well until fully blended.
- Assemble the Cake: Pour the pumpkin mixture evenly into the prepared baking pan. Evenly sprinkle the entire box of yellow cake mix over the pumpkin layer. Then sprinkle the crushed graham crackers or pecans and the optional toffee bits on top.
- Add the Butter: Drizzle the melted butter evenly over the entire top of the cake mix and toppings, which will help create a rich, crispy crust as it bakes.
- Bake the Cake: Place the pan in the preheated oven and bake for 50 minutes or until the center is set and the edges are lightly browned.
- Cool and Serve: Allow the cake to cool slightly. Serve warm or at room temperature, ideally with ice cream or whipped cream for extra indulgence.
Notes
- For added richness, serve warm with a scoop of vanilla ice cream or a dollop of whipped cream.
- Store leftovers in an airtight container in the refrigerator for up to 3 days.
- You can substitute pecans with walnuts if preferred.
- To make the cake nut-free, omit the nuts and graham crackers or use only one of them.
- Ensure the melted butter is poured evenly to guarantee an even, crunchy topping.
Nutrition
- Serving Size: 1 slice
- Calories: 320 kcal
- Sugar: 24 g
- Sodium: 220 mg
- Fat: 16 g
- Saturated Fat: 9 g
- Unsaturated Fat: 6 g
- Trans Fat: 0 g
- Carbohydrates: 38 g
- Fiber: 2 g
- Protein: 4 g
- Cholesterol: 90 mg


