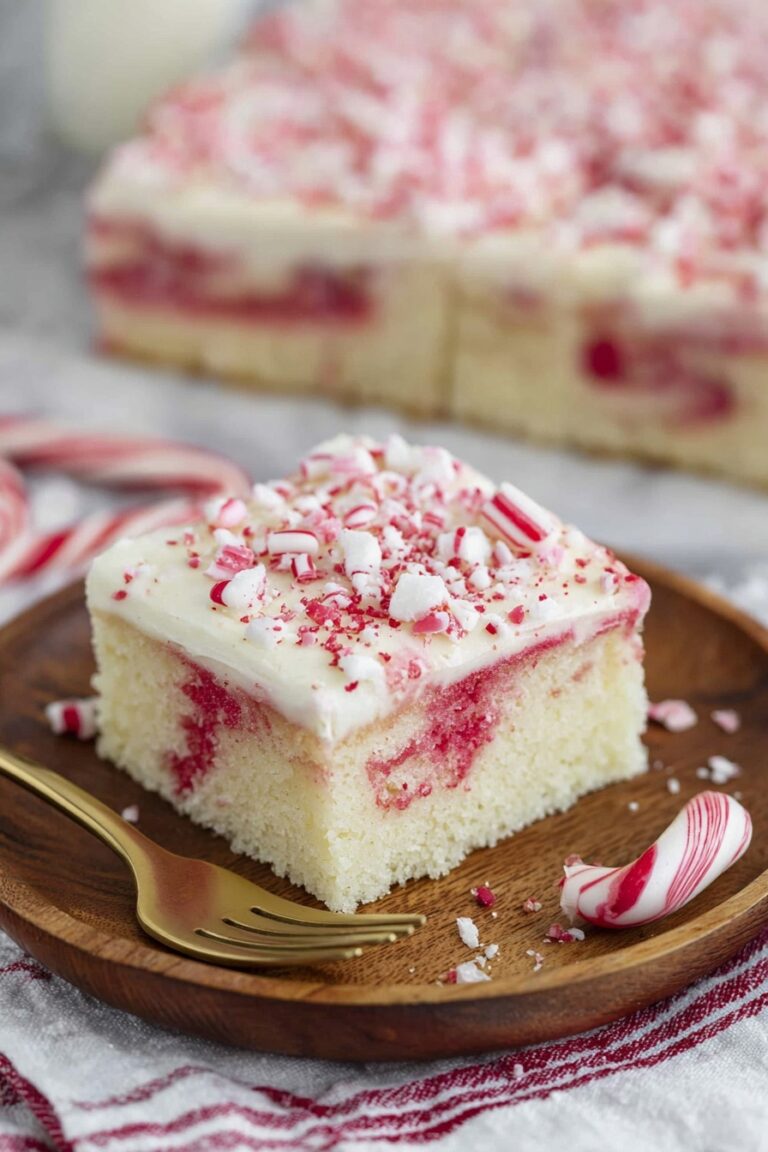
Peppermint Swirl Sugar Cookies Recipe
If you’re craving a festive, fun twist on a classic treat, you’re going to love this Peppermint Swirl Sugar Cookies Recipe. Trust me, I’ve made dozens of sugar cookie recipes, and this one stands out because it’s both beautiful and delicious — plus that refreshing peppermint kick just makes every bite feel like a celebration. Stick with me, and I’ll walk you through making these gorgeous, swirly gems that are perfect for the holidays or whenever your sweet tooth calls!
Why This Recipe Works
- Perfect Texture: Creaming the butter and sugar until fluffy ensures a soft yet chewy cookie that’s just right.
- Eye-Catching Swirls: The clever red and white dough combination gives you that gorgeous peppermint swirl that’s as fun to make as it is to eat.
- Flavor Balance: Peppermint extract adds a refreshing cool note without overpowering the buttery sweetness.
- User-Friendly: No tricky rolling or complicated steps — just mix, shape, chill, and bake. It’s approachable for all skill levels.

Ingredients & Why They Work
Every ingredient in this Peppermint Swirl Sugar Cookies Recipe plays a crucial role in delivering flavor, texture, and that signature swirl. Here’s a quick dive into why these are the essentials you’ll want on hand when you bake!

- Unsalted Butter: Room temperature butter helps create that creamy base and tender crumb in your cookies.
- Granulated Sugar: It dissolves into the dough, giving sweetness and that slight crunch, especially when you coat the dough balls in extra sugar.
- Large Eggs & Egg Yolk: Eggs provide structure and richness; the extra yolk keeps cookies soft and chewy.
- Peppermint or Almond Extract: I love peppermint here for the holiday vibe, but almond’s a neat swap if you’re feeling adventurous.
- Vanilla Extract or Vanilla Bean Paste: The warm vanilla balance is what makes the sugar cookie flavor so classic and comforting.
- All-Purpose Flour: The backbone of the cookie, giving it the right amount of structure without toughness.
- Cornstarch: Just a touch for that soft, melt-in-your-mouth texture.
- Fine Salt: It rounds out the sweetness and enhances all those flavors.
- Baking Soda: Gives a tiny lift and helps keep the dough from getting too dense.
- Red Gel Food Coloring: Gel colors won’t change your dough’s texture like liquids would — essential for those crisp peppermint swirls.
- Coating Sugar: Optional, but tossing your dough balls in sugar before baking adds a sparkly, crunchy finish.
Make It Your Way
I love encouraging a little creativity with this Peppermint Swirl Sugar Cookies Recipe. While the peppermint flavor is my personal favorite, these cookies are a perfect canvas for your flavor ideas and dietary tweaks.
- Variation: Sub out peppermint extract for almond or even orange extract for a fun seasonal twist — I tried almond once and loved the subtle nutty aroma.
- Dietary Modification: I’ve experimented with swapping a bit of flour for gluten-free flour blends — just ensure your blend includes xanthan gum for structure.
- Color Play: Feel free to swap red food coloring for green at Christmas or pastels for spring — the swirl effect looks amazing with any color contrast.
Step-by-Step: How I Make Peppermint Swirl Sugar Cookies Recipe
Step 1: Cream the Butter and Sugar to Fluffy Perfection
Start by preheating your oven to 350°F (175°C) and prepping your baking sheets with parchment or silicone mats — trust me, nonstick surfaces make cleanup so much easier. Using a hand or stand mixer, beat your softened butter and sugar together at medium-high speed for a couple of minutes. You’re aiming for a light, fluffy texture that looks almost whipped — this step makes all the difference for cookie texture, so don’t rush it. If the mixture looks gritty or dull, keep going a little longer until it brightens up.
Step 2: Add Eggs and Extracts Then Mix the Dry Ingredients
Next, beat in your egg and yolk, along with the peppermint and vanilla extracts. I always scrape the bowl sides with a spatula to make sure everything’s well incorporated and you get that smooth batter. Then, on low speed, add your flour, cornstarch, salt, and baking soda just until the dough comes together. Give it a few extra seconds on medium speed to fully combine, but don’t overmix — you want tender cookies, not tough ones!
Step 3: Divide Dough and Create Your Swirl
Divide your dough into two equal parts. Dye one half red with gel food coloring—gel is key here because it won’t make your dough sticky or watery like liquid colors can. I usually start mixing with a spatula, then finish kneading with my hands to make sure the color is even. Pro tip: wear gloves if you hate stained fingers! Then, scoop out tiny teaspoon-sized balls of each color — you’ll be combining them to form that signature swirl.
Step 4: Assemble and Swirl the Dough Balls
Take three little balls of red and three of white and arrange them alternating in a small circle. Press the colors together gently so there’s no gap and cup your hand to smooth the edges. Now the fun part — lightly drag your forefinger across the dough balls to swirl the colors just a bit, not blending them, but creating that beautiful peppermint effect. If you want, toss your newly formed dough balls in granulated or sanding sugar for a sparkly crunch after baking.
Step 5: Chill, Bake, and Cool
Pop the cookie dough balls in the fridge for 30 minutes, or freezer for 15 if you’re tight on time — chilling helps them hold their shape in the oven. When you bake, place cookies a few inches apart because these babies spread. Bake one tray at a time on the middle rack for 11–13 minutes. Watch for set edges and avoid browning since the color can hide doneness. Let them cool on the tray 15 minutes before transferring to a wire rack. These cookies keep soft inside and have just the right snap outside.
Tips from My Kitchen
- Don’t Skip Chilling: Chilling keeps your swirls tight; without it, cookies can spread and lose the beautiful pattern.
- Use Gel Coloring Only: I’ve learned that liquid food coloring makes the dough too soft, causing you to lose those perfect swirls.
- Watch the Bake Time: The dough’s dark color can trick you—check for edges setting instead of color as a doneness sign.
- Mix by Hand for Even Color: Kneading the red dough by hand lets you control the color intensity without overworking the dough.
How to Serve Peppermint Swirl Sugar Cookies Recipe

Garnishes
I usually serve these cookies plain because the sugar coating already makes them sparkle, but sometimes I like a light dusting of powdered sugar to mimic freshly fallen snow. Crushed peppermint candy sprinkled on top before baking is another festive option I’ve tried and adore — it adds a little extra crunch and intensifies the peppermint flavor.
Side Dishes
These cookies pair beautifully with a hot cocoa bar or a cold glass of milk—especially with a peppermint stick on the side for dunking. Around the holidays, I serve them alongside spiced cider or mulled wine, making for an indulgent, cozy treat spread.
Creative Ways to Present
For gift-giving or parties, I stack these cookies in clear jars layered with red and white ribbons tied around the lid. I’ve also arranged them on a platter with other red-and-white-themed desserts for a peppermint party tray — guests always comment on how festive and pretty it looks!
Make Ahead and Storage
Storing Leftovers
I keep leftover cookies in an airtight container at room temperature for up to five days. I make sure to layer them between parchment paper sheets to avoid sticking, and honestly, they stay just as soft and delicious as when fresh.
Freezing
If I’m prepping for holiday baking ahead, I freeze shaped dough balls in a single layer on a parchment-lined tray. Once frozen solid, I transfer them to freezer bags for up to two months. When I’m ready, I bake these straight from the freezer, adding a couple of extra minutes to the baking time — this method preserves that beautiful swirl perfectly.
Reheating
To warm up leftover cookies without drying them out, I pop them in a 300°F oven for just 3-4 minutes. This brings back that fresh-baked softness and lets the peppermint aroma come back alive.
FAQs
-
Can I omit the peppermint extract in the Peppermint Swirl Sugar Cookies Recipe?
Absolutely! While peppermint gives these cookies their signature flavor, you can leave it out or substitute with almond or vanilla extract for a milder, classic sugar cookie flavor. Just make sure to adjust the amount so the cookies don’t taste flat.
-
Why is gel food coloring recommended instead of liquid?
Gel food coloring contains less moisture than liquid, so it won’t alter the dough’s consistency or cause it to become too sticky. This helps maintain the texture and makes the swirling process much easier.
-
How should I store these cookies to keep them fresh?
Store cooled cookies in an airtight container at room temperature for up to five days. Separating layers with parchment paper prevents sticking and keeps them soft.
-
Can I freeze the dough or baked cookies?
Yes! Freeze unbaked dough balls for up to two months, baking straight from frozen with a slightly longer baking time. Baked cookies freeze well too — just thaw them at room temperature or warm briefly in the oven before enjoying.
-
How do I know when the Peppermint Swirl Sugar Cookies are done?
Because of the dark red dough, color is tricky to judge. Instead, look for edges that are set but not browned and a slightly soft top. The cookies will firm up as they cool on the tray.
Final Thoughts
Making this Peppermint Swirl Sugar Cookies Recipe has become a cozy tradition of mine, especially when I want to impress family or friends without fussing over complicated techniques. The swirl pattern always gets compliments, and pairing that refreshing peppermint flavor with a tender sugar cookie is just pure magic. You’ll enjoy seeing these festive beauties come together and tasting that perfect balance of sweet and minty. So go ahead — try this recipe, tweak it your way, and share the love (and cookies)!
Print
Peppermint Swirl Sugar Cookies Recipe
- Prep Time: 30 minutes
- Cook Time: 13 minutes
- Total Time: 43 minutes
- Yield: 24 cookies
- Category: Dessert
- Method: Baking
- Cuisine: American
- Diet: Vegetarian
Description
These Peppermint Swirl Sugar Cookies are festive, chewy, and perfect for the holiday season. Featuring a delightful swirl of classic sugar cookie dough and vibrant red peppermint-flavored dough, they’re coated in sanding sugar for a sweet crunch. With a soft, light texture and subtle peppermint and vanilla flavors, these cookies make a charming treat for any occasion.
Ingredients
Peppermint Swirl Sugar Cookies
- 1 cup unsalted butter, room temperature (226g)
- 1 3/4 cups granulated sugar (350g)
- 1 large egg + 1 large egg yolk (80g)
- 1 1/2 tsp peppermint or almond extract (optional) (8g)
- 1 tsp vanilla extract or vanilla bean paste (5g)
- 2 1/2 cups all purpose flour (325g)
- 1 Tbsp cornstarch (8g)
- 1 tsp fine salt (6g)
- 1/2 tsp baking soda (3g)
- Red gel food coloring
Coating
- 1 cup granulated sugar or white sanding sugar
Instructions
- Preheat Oven and Prepare Baking Sheets: Preheat your oven to 350°F (175°C) and line two large baking sheets with parchment paper or silicone baking mats. Set aside.
- Cream Butter and Sugar: In a large bowl, use a hand mixer or stand mixer with paddle attachment to beat 1 cup of room temperature butter and 1 3/4 cups granulated sugar on medium-high speed for about 2 minutes until the mixture is light and fluffy.
- Add Eggs and Extracts: Add 1 large egg plus 1 large egg yolk, 1 1/2 tsp peppermint extract (optional), and 1 tsp vanilla extract. Beat on medium-high speed until well combined, scraping down the bowl sides as needed.
- Mix Dry Ingredients: On low speed, add 2 1/2 cups flour, 1 Tbsp cornstarch, 1 tsp fine salt, and 1/2 tsp baking soda. Mix until mostly combined, then scrape bowl sides and increase speed to medium for a few seconds to fully incorporate.
- Divide and Color Dough: Split the dough evenly into two portions (approximately 490g each). Place one portion in a bowl and color it red using gel food coloring, kneading by hand or with a spatula (gloves recommended to prevent staining) until the color is uniform.
- Form Dough Balls: Using a teaspoon, scoop teaspoon-sized portions from each dough and roll into balls. Set aside.
- Create Swirled Cookies: Take three balls of each color (six in total) and arrange them alternately in a small circle. Press gently with your fingers to seal gaps, then cup your hand to round the edges. Use your forefinger to push the colors to create a subtle swirl effect.
- Coat with Sugar (Optional): If desired, pour 1 cup granulated or sanding sugar into a bowl and gently roll the dough balls in the sugar until fully coated for extra texture after baking.
- Chill Dough: Chill the shaped cookies in the refrigerator for 30 minutes or in the freezer for 15 minutes.
- Bake Cookies: Place cookies spaced a few inches apart on prepared baking sheets. Bake one tray at a time on the middle oven rack for 13 minutes or until the edges are set but not browned.
- Cool Cookies: Remove the tray from the oven and let cookies cool for 15 minutes on the baking sheet, then transfer to a wire rack to cool completely.
- Storage: Store cooled cookies in an airtight container at room temperature for up to 5 days.
Notes
- This recipe is inspired by Alice Fevronia’s beautifully swirled cookies.
- The recipe yields about 24 cookies and can be doubled to make more.
- The dough can be refrigerated for up to 2 days before baking and shaped cookies can be refrigerated for 2 days as well.
- Cookie dough balls and baked cookies can be frozen for up to 2 months and baked cookies can be reheated.
- When freezing dough, bake directly from the freezer adding a couple of minutes to bake time.
- Creaming butter and sugar thoroughly is key to chewy, light texture.
- Space cookies at least 2 inches apart because they spread during baking.
- Do not over-bake; cookies will firm up as they cool even if slightly soft when removed.
- Use gel food coloring instead of liquid to avoid altering dough consistency.
Nutrition
- Serving Size: 1 cookie
- Calories: 140 kcal
- Sugar: 10 g
- Sodium: 80 mg
- Fat: 7 g
- Saturated Fat: 4 g
- Unsaturated Fat: 3 g
- Trans Fat: 0 g
- Carbohydrates: 18 g
- Fiber: 0.5 g
- Protein: 1.5 g
- Cholesterol: 30 mg


