Peppermint Swirl Chocolate Fudge Recipe
If you’re someone who loves the festive flavors of mint and rich chocolate combined, then you’re going to absolutely adore this Peppermint Swirl Chocolate Fudge Recipe. It’s the perfect balance of creamy, chocolatey goodness with a refreshing peppermint kick that melts in your mouth. Seriously, every time I bring this fudge to a holiday party or just make a batch for myself, it disappears way too fast. Stick around, because I’m going to walk you through everything you need to make this fan-freaking-tastic treat happen in your kitchen.
Why This Recipe Works
- Creamy texture: Using sweetened condensed milk creates a smooth, luscious fudge that’s not grainy or dry.
- Perfect peppermint balance: The peppermint extract and crushed candies give just the right minty pop without overpowering the chocolate.
- Visual wow factor: The red peppermint swirl layered with chocolate creates a festive and inviting look.
- Simple double boiler method: Melting the chocolate gently prevents seizing and keeps the fudge silky smooth.

Ingredients & Why They Work
Each ingredient in this Peppermint Swirl Chocolate Fudge Recipe plays a key role in making the fudge both irresistible and easy to make. I always recommend using high-quality chocolate chips and real peppermint extract for the best flavor and texture.
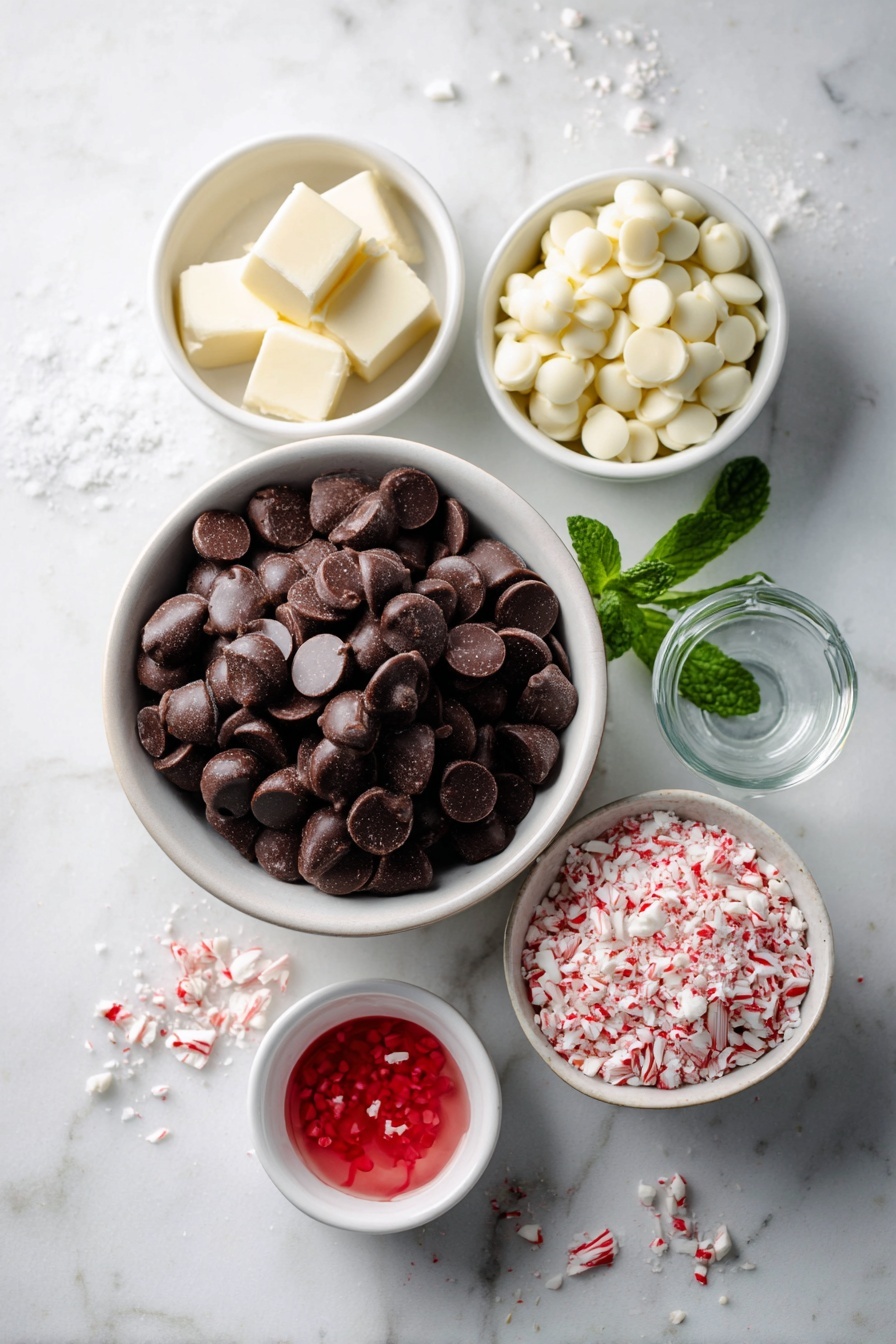
- Semi-sweet or dark chocolate chips: Choose good quality chocolate for rich, deep chocolate flavor that melts smoothly.
- Unsalted butter: Adds creaminess and helps create that perfect fudge consistency.
- Sweetened condensed milk: The secret weapon in fudge-making; it sweetens and smooths out the texture effortlessly.
- Peppermint extract: Pure peppermint extract is far superior to artificial flavor for that fresh minty kick.
- Salt: Just a pinch enhances the chocolate and balances the sweetness.
- White chocolate chips: Use real white chocolate (not almond bark) for creamy sweetness and proper melting.
- Red gel food coloring: A couple of drops create vibrant peppermint swirls without thinning the fudge mixture.
- Crushed peppermint candies or candy canes: Adds texture and crunch on top, plus festive flair.
Make It Your Way
I love how flexible this Peppermint Swirl Chocolate Fudge Recipe is—there’s room to make it uniquely yours. Whether you want it extra minty, add nuts for crunch, or go dairy-free, you can tweak it to fit your cravings or dietary needs.
- Extra minty: Double the peppermint extract for a more intense mint flavor—great if you’re a peppermint fanatic like me!
- Add crunch: Stir in chopped toasted almonds or pecans to the chocolate layer for a nutty surprise.
- Make it vegan: Try dairy-free chocolate chips and canned coconut milk instead of sweetened condensed milk; the texture will be different but still tasty.
- Festive colors: Swap the red gel food coloring for green or even a mix for a holiday rainbow swirl.
Step-by-Step: How I Make Peppermint Swirl Chocolate Fudge Recipe
Step 1: Prep the Pan With Love
First things first, line an 8×8-inch square pan with parchment paper—make sure to leave some overhang on two sides. This trick makes lifting out the fudge super easy when it’s set. Then, give the parchment a light spritz with nonstick spray so nothing sticks. Setting your pan aside, you’re ready for the gooey chocolate magic.
Step 2: Melt the Chocolate Fudge Base Gently
In a heatproof bowl, combine your semi-sweet or dark chocolate chips, a tablespoon of unsalted butter, and your room-temperature sweetened condensed milk. Place this bowl over a pot of simmering water (a double boiler), stirring constantly until it’s melted silky smooth. Here’s a key tip: be patient and keep stirring so the chocolate doesn’t seize or burn. After removing from heat, stir in the peppermint extract and a pinch of salt. Trust me, that little salt pinch makes all the difference by lifting the chocolate’s flavor.
Step 3: Create the Peppermint Swirl Layer
Using a separate heatproof bowl, melt your white chocolate chips with butter and condensed milk over the same double boiler, stirring gently until smooth. Then mix in peppermint extract and 1–2 drops of red gel food coloring. Don’t overmix here; you want those beautiful red swirls that peek through rather than a solid pink color. This contrast is what makes the fudge visually stunning.
Step 4: Layer, Swirl, And Add Peppermint Crunch
Pour about three-quarters of the chocolate mixture into the prepared pan and spread it evenly with a spatula. Then dollop spoonfuls of the red peppermint mixture on top, followed by the remaining chocolate fudge mixture filling the gaps. Grab a knife or skewer and gently swirl through the layers using figure-eight motions to create beautiful marbled patterns. Don’t overdo it though—you want distinct swirls, not mud! Finally, sprinkle the crushed peppermint candies evenly over the top and press lightly to help them stick.
Step 5: Chill and Cut
Pop the pan into your fridge and chill for at least 3 hours. I usually leave it overnight because patience pays off with fudge like this. Once fully set and firm, use the parchment overhang to lift the whole slab out. Then, cut into neat little 25 squares with a sharp knife—you want clean edges that show off those peppermint swirls.
Tips from My Kitchen
- Use a sturdy double boiler setup: I like using a metal mixing bowl over a pot with gently simmering water so the chocolate melts evenly without overheating.
- Don’t rush the melting process: Stir slowly and patiently; fast melting can cause the chocolate to seize or become grainy.
- Gel food coloring is your friend: It creates vibrant swirls without making your white chocolate runny.
- Perfect your swirl technique: Use gentle figure-eight movements with a skewer—too vigorous and you’ll lose the pretty marble effect.
How to Serve Peppermint Swirl Chocolate Fudge Recipe

Garnishes
I always top this fudge with crushed peppermint candies or finely chipped candy canes because they add a delightful crunch and make the fudge instantly festive and inviting. Sometimes, I like to sprinkle a bit of edible silver glitter or crushed freeze-dried raspberries for a fun holiday twist.
Side Dishes
This peppermint swirl fudge pairs wonderfully with a warm cup of hot cocoa or coffee—trust me, you’ll want a beverage that complements those cool mint and rich chocolate notes. It’s also a perfect finish to any holiday meal alongside gingerbread cookies or fruitcake.
Creative Ways to Present
For gift-giving or parties, I like to cut the fudge into small bite-sized pieces and layer them in a pretty tin lined with festive tissue paper. You can also stack them on a platter and dust with powdered sugar or cocoa for an elegant look. For kids’ parties, try placing the fudge squares inside mini cupcake liners and topping with a peppermint stick for a fun presentation.
Make Ahead and Storage
Storing Leftovers
After making this fudge, I store leftovers in an airtight container in the refrigerator. It stays fresh and maintains its texture for up to one week, though – full disclosure – it rarely lasts that long in my house!
Freezing
If you want to prep ahead or save extra batches, this fudge freezes beautifully. I wrap portions tightly in plastic wrap and then place them in a freezer-safe container. When thawed, the texture is just as good, and the flavors remain vibrant—perfect for holiday prep or last-minute treats.
Reheating
Because this fudge is best enjoyed cool and firm, I don’t recommend reheating it. If it’s been frozen, just let it thaw in the fridge overnight, and it’ll be ready to slice and enjoy. Room temperature is perfect for that creamy melt-in-your-mouth experience.
FAQs
-
Can I use microwave to melt the chocolate for this Peppermint Swirl Chocolate Fudge Recipe?
While microwaving chocolate is common, I find that for this fudge recipe, the double boiler method yields smoother and creamier results. Microwaves can easily overheat and seize chocolate if not carefully monitored. If you do choose the microwave, heat in short 20-second bursts and stir thoroughly between bursts.
-
What if I don’t have gel food coloring; can I use liquid instead?
You can use liquid food coloring, but I recommend only a few drops because it may thin the white chocolate mixture and affect its consistency. Gel food coloring provides more vibrant color without adding extra liquid, which is why it’s my preferred choice for this recipe.
-
How long will Peppermint Swirl Chocolate Fudge keep?
Stored properly in an airtight container in the refrigerator, this fudge will stay fresh for about one week. Freezing extends the shelf life up to several months, and it thaws nicely without losing flavor or texture.
-
Can I make this fudge without peppermint extract?
Absolutely! If peppermint isn’t your thing, you can omit the extract and the crushed candies. The fudge will still be rich and delicious. Alternatively, try substituting vanilla or orange extract for a different twist.
Final Thoughts
This Peppermint Swirl Chocolate Fudge Recipe is one of those special treats that makes the holidays feel a little more magical. It’s my go-to when I want to impress friends or just indulge in something decadent and nostalgic. I hope you enjoy making and sharing it as much as I do—it’s the kind of fudge that turns casual snacking into a memorable moment. So, grab your ingredients, put on some cozy music, and get ready to create a batch of magic your whole family (and your taste buds) will thank you for.
Print
Peppermint Swirl Chocolate Fudge Recipe
- Prep Time: 25 minutes
- Cook Time: 0 minutes
- Total Time: 3 hours 25 minutes
- Yield: 25 squares
- Category: Dessert
- Method: Stovetop
- Cuisine: American
Description
This Peppermint Swirl Fudge recipe combines rich semi-sweet chocolate with creamy white chocolate swirled together with peppermint flavor and topped with crushed peppermint candies. Perfect for holiday treats, this fudge is smooth, festive, and easy to make using a double boiler melting method.
Ingredients
For the Chocolate Layer
- 2 cups semi-sweet or dark chocolate chips
- 1 tablespoon unsalted butter
- 1 (14 oz) can sweetened condensed milk, room temperature
- ½ teaspoon peppermint extract
- Pinch of salt
For the Peppermint Swirl Layer
- 1 ½ cups white chocolate chips (use real white chocolate, not almond bark)
- ½ tablespoon unsalted butter
- ⅓ cup sweetened condensed milk, room temperature
- ½ teaspoon peppermint extract
- 1–2 drops red gel food coloring
For the Topping
- ½ cup crushed peppermint candies or candy canes
Instructions
- Prep the Pan: Line an 8×8-inch square pan with parchment paper, leaving overhang on two sides to lift the fudge easily. Lightly coat with nonstick spray and place on a flat surface.
- Make the Chocolate Fudge Base: In a heatproof bowl, combine chocolate chips, butter, and room temperature sweetened condensed milk. Set the bowl over a pot of simmering water, stirring constantly until melted and smooth. Remove from heat and stir in peppermint extract and a pinch of salt.
- Make the Peppermint Swirl Layer: In a separate heatproof bowl, combine white chocolate chips, butter, and condensed milk. Melt gently over a double boiler, stirring until fully smooth. Stir in peppermint extract and 1–2 drops of red gel food coloring. Swirl gently with a spoon to create streaks without blending the color completely.
- Layer and Swirl: Pour about three-quarters of the chocolate mixture into the prepared pan and spread it evenly. Drop spoonfuls of the red peppermint mixture across the surface, then add the remaining chocolate mixture in the gaps. Use a knife or skewer to gently swirl the two mixtures together, creating figure-eight patterns without overmixing.
- Add the Topping: Sprinkle the crushed peppermint candies evenly over the surface of the swirled fudge. Press gently to help them adhere to the top layer.
- Chill and Set: Place the pan in the refrigerator and chill for at least 3 hours, or until fully set and firm. Once chilled, lift the fudge out of the pan using the parchment overhang and cut into 25 squares with a sharp knife.
Notes
- Use gel food coloring for best color intensity without thinning the chocolate.
- Avoid using the microwave to melt chocolate; direct heat via double boiler prevents seizing.
- Store fudge in an airtight container in the refrigerator for up to 1 week.
- Freeze fudge for longer storage, wrapped tightly to prevent freezer burn.
Nutrition
- Serving Size: 1 square
- Calories: 150 kcal
- Sugar: 20 g
- Sodium: 45 mg
- Fat: 8 g
- Saturated Fat: 5 g
- Unsaturated Fat: 2 g
- Trans Fat: 0 g
- Carbohydrates: 22 g
- Fiber: 1 g
- Protein: 2 g
- Cholesterol: 10 mg


