Peppermint Oreo Cookie Cups Recipe
If you’re anything like me and crazy about festive treats, you’re going to love this one. The Peppermint Oreo Cookie Cups Recipe I’m sharing will have your kitchen smelling divine and your taste buds dancing. These little cookie cups are soft, minty, and packed full of peppermint crunch and Oreo goodness—perfect for holiday parties, gift-giving, or just because. Trust me, once you try this recipe, you’ll be making it again and again.
Why This Recipe Works
- Perfect Texture: The combination of cake mix and cream cheese creates soft, tender cookie cups that melt in your mouth.
- Mint & Chocolate Harmony: Peppermint extract, Andes Peppermint Crunch, and dark chocolate chips deliver layers of refreshing minty chocolate flavor.
- Easy Prep: Using a white cake mix keeps this recipe simple and foolproof, even if you’re not a seasoned baker.
- Crowd-Pleaser: Everyone I’ve shared these cookies with asks for the recipe—they’re irresistibly festive and fun.

Ingredients & Why They Work
Each ingredient in this Peppermint Oreo Cookie Cups Recipe is thoughtfully chosen to build that signature soft texture and festive flavor. Let me break down why these pair so well and what to look for when you shop.
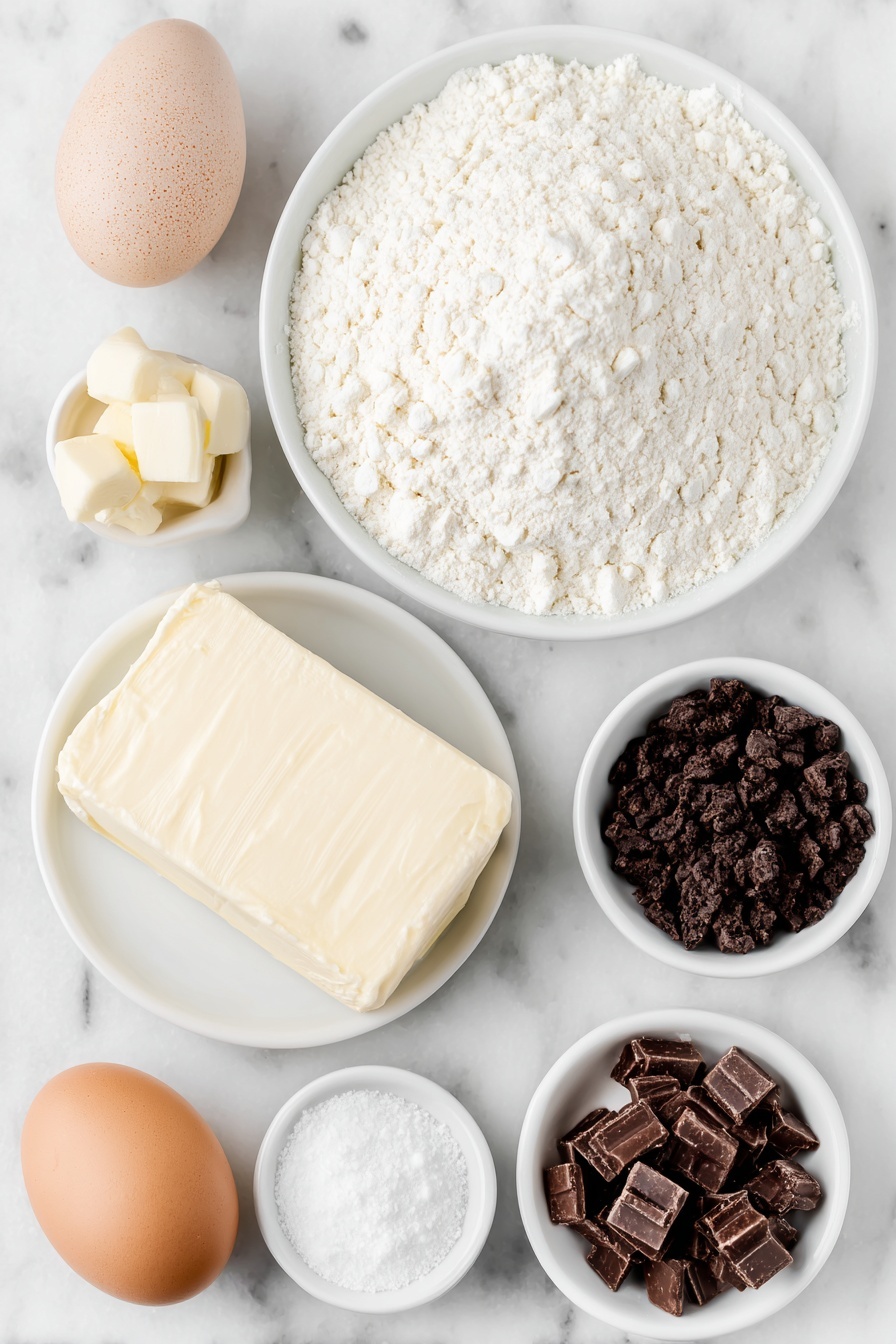
- White cake mix: The base of these cookie cups, providing structure with a delicate crumb that’s not too dense.
- Unsalted butter: Adds richness and helps with a tender texture; make sure it’s softened but not melted.
- Large egg: Binds ingredients together for that classic cookie consistency.
- Peppermint extract: The star mint flavor; be careful not to overdo it, as it’s potent.
- Vanilla extract: Rounds out the flavors beautifully and enhances sweetness.
- Cream cheese: Adds moisture and a slight tang that makes these cookie cups extra soft and lush.
- Oreo cookie chunks: Adds crunchy texture and chocolate flavor with every bite.
- Andes Peppermint Crunch pieces: The mint and chocolate candy bits that give these cookie cups their festive flair. Can substitute with chopped peppermint bark.
- Dark chocolate chips: For pockets of rich, melty chocolate that contrast with the cool peppermint.
Make It Your Way
I love how versatile this Peppermint Oreo Cookie Cups Recipe is—you can tweak it a bit depending on what you have on hand or your flavor preferences. It’s a great base recipe to make your own.
- Variation: I’ve sometimes swapped regular Oreos for mint Oreos to double down on the peppermint vibe. It’s a fun twist if you want to amp up the mintiness.
- Dairy-Free Option: You can use dairy-free cream cheese and vegan butter to make these cookie cups dairy-free, and they still turn out soft and delicious.
- Seasonal Changes: Outside the holidays, swap peppermint extract for orange or almond extract and replace Andes pieces with white chocolate chips for a fresh twist.
Step-by-Step: How I Make Peppermint Oreo Cookie Cups Recipe
Step 1: Mix It All Together
Start by adding your dry white cake mix, softened butter, egg, peppermint and vanilla extracts, and cream cheese to a large mixing bowl. I use my stand mixer on low to medium speed, but a hand mixer works just fine—just give yourself a bit more time. Beat everything together until a soft dough forms without any streaks of butter or cream cheese left. If your butter is too soft, your dough might be overly sticky, so keep an eye on texture here.
Step 2: Stir in the Minty Goodness
Now, gently fold in the Oreo chunks, Andes Peppermint Crunch pieces, and dark chocolate chips. Be careful not to overmix—you want to maintain those chunks so you get a bit of crunch in every cookie cup.
Step 3: Chill, Chill, Chill
This step is key for success! Refrigerate your cookie dough for at least an hour. The longer the better, honestly — I find that chilling helps the dough firm up so your cookie cups hold their shape and don’t spread too much. Plus, the dough won’t stick to your hands when you roll it out.
Step 4: Shape and Bake
Preheat the oven to 350°F. Scoop or roll the dough into 24 cookie balls. Place 12 on a baking sheet lined with parchment paper and pop the other 12 back in the fridge. Bake the first batch for 10-11 minutes—don’t worry if they look soft or slightly undone when you take them out, they’ll set as they cool.
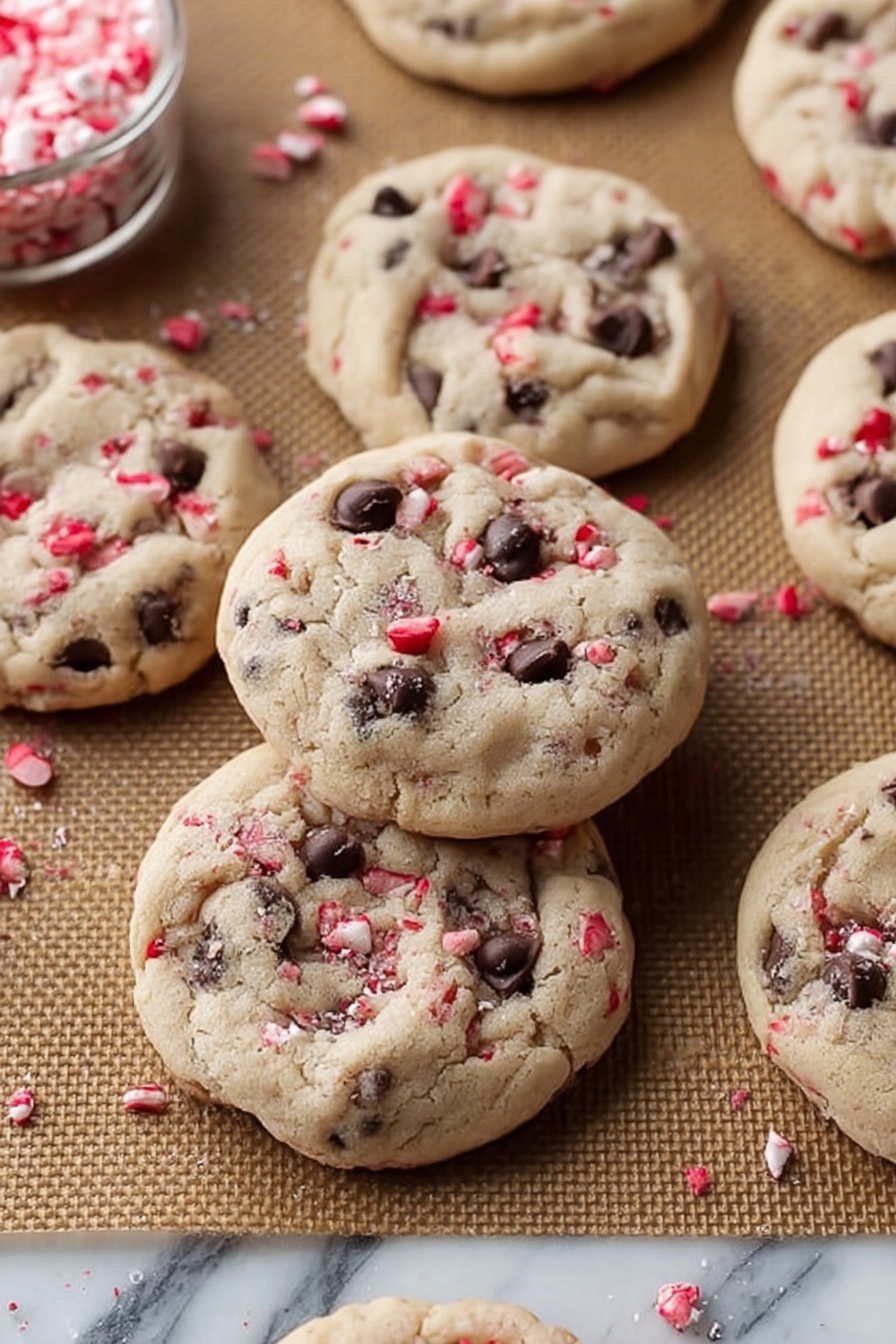
Step 5: The Finishing Touch
Let the cookies sit on the hot baking sheet for 2-3 minutes. Then, carefully transfer them to parchment paper to cool completely. If some cookies puff up extra, a gentle tap with the bottom of your spatula helps flatten them nicely. While the cookies are still warm, press extra chocolate chips or peppermint pieces on top for an extra festive finish.
Tips from My Kitchen
- Chill the Dough Thoroughly: Trust me on this—refrigerating the dough overnight makes rolling and baking so much easier and results in better texture.
- Don’t Overbake: The cookies will be soft when you pull them out; they firm up as they cool, so remove them at 10 minutes for that tender bite.
- Add Mix-ins Last: Fold in the Oreos and peppermint carefully to keep bites of texture intact, rather than pulverizing the mix-ins.
- Use a Thin Spatula for Transfer: This helps lift soft cookies without breaking them, especially while they’re warm and delicate.
How to Serve Peppermint Oreo Cookie Cups Recipe
Garnishes
I love topping these with a few extra peppermint pieces or mini chocolate chips right after baking so they stick as the cookie cools. Sometimes I’ll sprinkle crushed candy canes on top for an extra crunch and that lovely holiday look—it’s simple but so effective.
Side Dishes
These cookie cups pair beautifully with a warm cup of hot cocoa or peppermint tea. For holiday gatherings, they’re a perfect counterpoint to richer desserts like cheesecake or a dark chocolate tart.
Creative Ways to Present
For parties, I like arranging these cookie cups in mini cupcake liners on a festive tray, sprinkled with powdered sugar to mimic snow. Wrapping a few in cellophane tied with a red or green ribbon makes a wonderful homemade gift for friends and neighbors too.
Make Ahead and Storage
Storing Leftovers
I store leftover Peppermint Oreo Cookie Cups in an airtight container at room temperature for up to five days. This keeps them perfectly soft yet chewy—just make sure to layer them with parchment paper to avoid sticking.
Freezing
These cookie cups freeze surprisingly well. I lay them out on a baking sheet to freeze individually first, then transfer to a freezer-safe bag for up to three months. This way, you can enjoy fresh-tasting cookies anytime.
Reheating
To reheat, pop the cookie cups in the microwave for 10-15 seconds or until just warm—I find this awakens the melty chocolate chips without drying out the cookie. Avoid reheating too long or they lose their tenderness.
FAQs
-
Can I use a different cake mix instead of white cake mix in this recipe?
While white cake mix yields the best texture and flavor balance for this recipe, you can experiment with yellow or vanilla cake mixes. Just keep in mind the flavor profile will change slightly, and the dough might behave a bit differently, so chilling longer may be necessary.
-
What if I can’t find Andes Peppermint Crunch for the cookie cups?
No worries! You can substitute with chopped peppermint bark, candy canes, or any chocolate peppermint candy bar. Just chop them finely so they mix well into the dough and sprinkle on top for garnish.
- Why do I need to chill the cookie dough?
Chilling the dough firms it up, making it easier to scoop and roll without sticking. It also prevents spreading during baking, helping you get those perfect, thick cookie cups with soft centers.
-
Can I make these cookie cups ahead of time for a party?
Absolutely! You can prepare the dough up to a day ahead and keep it covered in the refrigerator. You can also bake the cookie cups in advance and store them in an airtight container; they’ll be just as delicious on the party day.
Final Thoughts
This Peppermint Oreo Cookie Cups Recipe has become one of my go-to holiday treats—it’s easy, festive, and absolutely crowd-pleasing. If you want a cookie that’s soft, mint-chocolatey, and irresistibly fun to eat, this recipe will not disappoint. I can’t wait for you to try it and hear how it becomes a new favorite in your kitchen too.
Print
Peppermint Oreo Cookie Cups Recipe
- Prep Time: 20 minutes
- Cook Time: 11 minutes
- Total Time: 31 minutes
- Yield: 24 cookies
- Category: Dessert
- Method: Baking
- Cuisine: American
Description
Delightfully festive Peppermint Oreo Cookies made with white cake mix, cream cheese, and peppermint extract, loaded with Oreo chunks, Andes Peppermint Crunch pieces, and dark chocolate chips for a soft, melt-in-your-mouth holiday treat.
Ingredients
Cookie Dough
- 1 box white cake mix
- 8 tablespoons unsalted butter, softened
- 1 large egg
- ½ teaspoon peppermint extract
- ½ teaspoon vanilla extract
- 4 ounces cream cheese, softened
Add-ins
- 1 cup Oreo cookie chunks
- 1 cup Andes Peppermint Crunch pieces, plus extra for topping
- ½ cup dark chocolate chips, plus extra for topping
Instructions
- Mix dough: Add the dry cake mix, softened butter, egg, peppermint extract, vanilla extract, and softened cream cheese to a mixing bowl. Beat with a mixer until a soft dough forms without streaks of butter or cream cheese.
- Add mix-ins: Gently stir in the Oreo cookie chunks, Andes Peppermint Crunch pieces, and dark chocolate chips ensuring they are evenly distributed through the dough.
- Chill dough: Refrigerate the dough for at least 60 minutes. Chilling longer improves consistency and ensures the dough does not stick when rolled.
- Preheat oven: Set the oven temperature to 350 degrees Fahrenheit to prepare for baking.
- Form cookies: Scoop or roll the chilled dough into 24 equal balls. Arrange 12 cookie balls on a baking sheet and place the remaining 12 in the refrigerator until ready to bake.
- Bake: Bake the cookies on the prepared sheet for 11 minutes. Avoid overbaking; cookies will appear very soft and slightly underdone upon removal.
- Cool cookies: Let the cookies rest on the hot baking sheet for 2 to 3 minutes. Then, gently transfer them using a thin metal spatula onto parchment paper on the counter.
- Shape and top: If any cookies are extra puffy, gently press down their tops with the bottom of a flat spatula. Press extra dark chocolate chips or peppermint pieces into the warm cookies for added decoration.
- Final cooling and storage: Allow cookies to cool completely on the counter. Store them in a sealed container to maintain freshness.
Notes
- Use a Pillsbury or Aldi white cake mix for best results.
- Ensure butter and cream cheese are softened but not overly soft to help the dough set properly.
- A hand mixer may require extra mixing time to fully combine ingredients without streaks.
- Chilling the dough longer improves handling and texture.
- If Andes Peppermint Crunch pieces are unavailable, substitute with any chocolate peppermint candy bar cut into small pieces.
- These cookies taste best after cooling on the counter for a few hours, allowing them to set fully.
Nutrition
- Serving Size: 1 cookie
- Calories: 180 kcal
- Sugar: 15 g
- Sodium: 120 mg
- Fat: 9 g
- Saturated Fat: 5 g
- Unsaturated Fat: 3 g
- Trans Fat: 0 g
- Carbohydrates: 22 g
- Fiber: 1 g
- Protein: 2 g
- Cholesterol: 25 mg

