Peanut Butter Oreo Bars Recipe
If you have a sweet tooth that loves a crunchy, peanut buttery, and chocolaty combo, you’re in for a treat with this Peanut Butter Oreo Bars Recipe. I’ve made these bars more times than I can count, and every single bite feels like a little party in your mouth. The mix of creamy peanut butter, classic Oreo cookies, and rich chocolate topping is so addictive, and the best part? It’s super easy to whip up, even if you’re just learning your way around the kitchen. Stick around, because once you make these, you’ll want to keep them in your baking arsenal forever.
Why This Recipe Works
- Perfect Texture Balance: The Oreo crust gives a crunchy base, while the peanut butter layer is silky and soft, and the chocolate topping adds a smooth finish.
- Simple Ingredients: You only need a handful of easy-to-find pantry staples, and no baking required.
- Customizable Sweetness: Adjust the powdered sugar or type of chocolate to suit your taste buds.
- Make-Ahead Friendly: Prep it in no time and keep it ready for any time you crave a quick, crowd-pleasing dessert.

Ingredients & Why They Work
Every ingredient in my Peanut Butter Oreo Bars Recipe plays a star role. I love how the classic Oreo cookies create that ideal sturdy yet crumbly crust, while the peanut butter layer is rich without being overly sweet. Choosing the right butter and chocolate can make a big difference, so I’ll share my tips to make sure you get the best results with what you have at home.

- Oreo cookies: Use regular Oreos (not double stuffed) for the perfect crumb texture—too much filling can make the crust too soft.
- Unsalted butter: Melted for the crust, softened for the peanut butter layer—be sure they’re at the right temperature to avoid lumps or greasiness.
- Brown sugar: Adds a subtle molasses depth to balance the sweetness without overpowering.
- Salt: Just a pinch, unless your butter’s salted, to enhance all the flavors.
- Smooth peanut butter: Crucial! Use a commercial smooth peanut butter so the bars set correctly and stay creamy.
- Powdered sugar: Sift it to avoid clumps and achieve that desirable thick but spreadable texture.
- Semi-sweet chocolate: Choose your favorite type—you can experiment with milk or dark chocolate, but I find semi-sweet the perfect balance.
- Shortening or vegetable oil: Helps keep the chocolate topping smooth and shiny after it hardens.
Make It Your Way
I love playing around with this Peanut Butter Oreo Bars Recipe depending on my mood or what’s in my pantry. You can absolutely tweak the chocolate layer or swap the peanut butter for another nut butter. Don’t be shy to make it your own!
- Peanut Butter Variations: I’ve tried almond butter and even sunflower seed butter when allergies come into play, and each brings its own unique flavor.
- Chocolate Topping Tweaks: Dark chocolate adds a richer bitterness if you prefer less sweetness; white chocolate is a decadent alternative too.
- Extra Crunch Boost: Sprinkle crushed peanuts or chopped Oreos over the chocolate before it hardens for a fun twist.
- Salted Caramel Drizzle: My personal favorite recent addition—makes these bars next-level indulgent.
Step-by-Step: How I Make Peanut Butter Oreo Bars Recipe
Step 1: Creating the Oreo Crust
Start by lining an 8×8 inch pan with parchment paper or foil—this makes lifting out the bars a breeze later. Then, crush those 15 Oreos into fine crumbs. I usually toss them in a freezer bag and smash with a rolling pin if I don’t want to dirty my food processor. Mix the crumbs with the melted butter until everything is combined, then press the mixture firmly into the pan’s bottom. I use the bottom of a glass to get an even, compact layer—this helps the crust hold together when you slice the bars.
Step 2: Whipping Up the Peanut Butter Layer
Next up, beat softened butter and brown sugar together until smooth and slightly fluffy. Then, mix in your smooth peanut butter along with salt (unless your butter’s salted). This step is so satisfying because the mixture thickens beautifully. Slowly incorporate sifted powdered sugar, half a cup at a time, making sure it mixes in well. You’ll want it thick enough that it won’t stick to your fingers but still easy to spread. Spread or press this peanut butter layer right over the Oreo crust. If you want to avoid a sticky mess, I like to use a piece of wax paper pressed on top to smooth it out evenly.
Step 3: Melting and Spreading the Chocolate
Chop your chocolate finely—that helps it melt evenly. Either microwave on medium power for 45 seconds at a time, stirring in between, or melt gently in a double boiler. Stir in shortening or vegetable oil until smooth and glossy. Pour this delicious chocolate over the peanut butter layer and spread it out evenly. I’ve noticed letting it sit at room temperature helps avoid white streaks on top, but popping it in the fridge works too if you’re in a rush. Just be aware the chocolate may discolor slightly when chilled.
Step 4: Easier Slicing and Serving
Once the chocolate has mostly set (about 90%), use a sharp, thin knife to score where you want to cut. This prevents cracking and crumbly edges later. After full hardening, lift the bars out with the parchment edges and slice into squares. A hot, clean knife works wonders for neat cuts—I warm mine under hot water and wipe dry before each slice to keep things tidy.
Tips from My Kitchen
- Use Fresh Oreo Cookies: Stale Oreos can make your crust less crunchy, so I always grab a fresh pack or keep them sealed tight.
- Measure Powdered Sugar with Care: Too much can make the peanut butter mixture gritty, so sift and add gradually.
- Chocolate Melting Patience: Microwave in intervals, stirring each time to avoid burning or seizing the chocolate.
- Keep Knife Warm for Cleaner Cuts: Running your knife under hot water before slicing helps slice neat bars without dragging chocolate chunks.
How to Serve Peanut Butter Oreo Bars Recipe

Garnishes
I usually keep these bars simple with just that luscious chocolate topping, but if I’m feeling fancy, a sprinkle of crushed Oreos or a light dusting of flaky sea salt adds such a nice contrast. Sometimes, a drizzle of peanut butter or caramel sauce just takes it over the edge in the best way.
Side Dishes
These bars shine as a dessert on their own, but I love serving them alongside a cold glass of milk or a scoop of vanilla ice cream. They also pair beautifully with coffee or hot cocoa—perfect for cozy afternoons or after-dinner treats.
Creative Ways to Present
For parties, I like to cut the bars into mini bite-sized squares and arrange them on a pretty platter with some fresh berries and mint leaves for a pop of color. Wrapping individual bars in parchment and tying with twine makes a sweet gift if you’re bringing these to a friend’s house.
Make Ahead and Storage
Storing Leftovers
I usually keep leftover bars in an airtight container at room temperature—they last up to 4 days this way and stay perfectly chewy and moist. If your kitchen is warm, the fridge works too, but serve them at room temp for the best flavor and texture.
Freezing
I’ve frozen these bars wrapped tightly in plastic wrap and then in a freezer bag. They freeze beautifully for up to 2 months. When you’re ready, just thaw overnight in the fridge and bring to room temperature before serving.
Reheating
I prefer to enjoy these bars cold or room temperature, but if you like them a bit gooier, you can microwave a single piece for 10-15 seconds. Just don’t overdo it or the chocolate may melt too much and get messy!
FAQs
-
Can I use crunchy peanut butter instead of smooth in this Peanut Butter Oreo Bars Recipe?
It’s best to stick with smooth peanut butter for this recipe because it helps the peanut butter layer set properly and keeps the texture silky. Crunchy peanut butter can create lumps and might prevent the bars from holding together as nicely.
-
Do I have to use shortening in the chocolate topping?
The shortening or vegetable oil helps the chocolate harden with a shine and smooth texture. If you leave it out, the chocolate might still harden but can be a bit dull or more prone to cracking. It’s a small addition that really uplifts the finish.
-
How long do Peanut Butter Oreo Bars last?
Stored in an airtight container at room temperature, these bars last about 4 days. Refrigerated, they can keep up to one week, but let them warm up a bit before enjoying for the best taste.
-
Can I make these bars gluten-free?
To make a gluten-free version, opt for gluten-free chocolate sandwich cookies as the base. Just make sure your other ingredients are gluten-free certified, and you’ll still have a delicious treat without the gluten.
Final Thoughts
Honestly, these Peanut Butter Oreo Bars have become one of my go-to comfort desserts—nothing beats that layered combo of cookie crunch, creamy peanut butter, and chocolatey goodness. I often find myself making a batch “just because” and then sharing them with friends who always ask for the recipe. If you try this out, I bet you’ll love these bars as much as I do. So, grab your Oreos and peanut butter, and let’s get baking—your new favorite treat awaits!
Print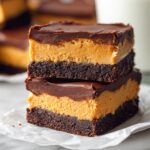
Peanut Butter Oreo Bars Recipe
- Prep Time: 20 minutes
- Cook Time: 1 hour
- Total Time: 1 hour 20 minutes
- Yield: 16 squares
- Category: Dessert
- Method: No-Cook
- Cuisine: American
Description
Peanut Butter Oreo Bars combine a crunchy Oreo cookie base with a creamy peanut butter layer and a rich chocolate topping. These no-bake bars are perfect for a sweet treat or dessert with a delightful balance of flavors and textures.
Ingredients
Oreo Base
- 15 Oreo cookies, not double stuffed
- 3 tablespoons unsalted butter, melted
Peanut Butter Layer
- 1/4 cup unsalted butter, softened
- 3 tablespoons brown sugar, light or dark
- 1/4 teaspoon salt (omit if using salted butter)
- 1 cup smooth peanut butter
- 1 2/3 cup powdered sugar, sifted
Chocolate Topping
- 6 ounces semi-sweet chocolate
- 2 teaspoons shortening or 1/2 teaspoon vegetable oil
Instructions
- Prepare Pan: Line an 8×8 inch (20×20 cm) pan with parchment paper or aluminum foil, leaving an overhang on the sides for easy removal.
- Make Oreo Crust: Crush Oreo cookies into fine crumbs using a food processor or by placing them in a freezer bag and crushing with a rolling pin. Mix the crushed Oreos with melted butter and press the mixture firmly into the bottom of the prepared pan.
- Prepare Peanut Butter Layer: Beat softened butter and brown sugar together until smooth. Add peanut butter and salt, continuing to beat until no butter lumps remain. Gradually mix in powdered sugar about half a cup at a time until well combined and the mixture does not stick to fingers.
- Assemble Peanut Butter Layer: Spoon the peanut butter mixture evenly over the Oreo crust and press or spread it into an even layer, using wax paper if desired to smooth the surface.
- Make Chocolate Topping: Chop chocolate finely and place in a heat-proof bowl. Melt the chocolate by microwaving on medium power for 45 seconds at a time, stirring between intervals until fully melted, or melt using a double boiler over low heat. Stir in shortening or vegetable oil until smooth.
- Pour Chocolate Over Peanut Butter Layer: Pour the melted chocolate evenly over the peanut butter layer and smooth the top with a spatula.
- Set Bars: Let the chocolate harden at room temperature or place in the fridge. Note that refrigerating may cause slight discoloration of the chocolate.
- Slice Bars: When the chocolate is about 90% hardened, score the top lightly with a sharp knife where you plan to cut. Once fully hardened, lift the bars using the parchment paper overhang and slice into 16 squares with a sharp, thin knife.
Notes
- Use smooth, commercially prepared peanut butter that is well mixed to avoid oil separation.
- Nutrition information is approximate, based on slicing the pan into 16 squares.
- Store bars in an airtight container at room temperature or in the refrigerator for longer freshness.
- Press the Oreo crust firmly to ensure the base holds together well.
- Use wax paper to smooth the peanut butter layer to achieve a neat, even finish.
Nutrition
- Serving Size: 1 bar
- Calories: 280 kcal
- Sugar: 22 g
- Sodium: 120 mg
- Fat: 18 g
- Saturated Fat: 6 g
- Unsaturated Fat: 10 g
- Trans Fat: 0 g
- Carbohydrates: 25 g
- Fiber: 1 g
- Protein: 5 g
- Cholesterol: 15 mg


