Oreo Eyeballs Halloween Treats Recipe
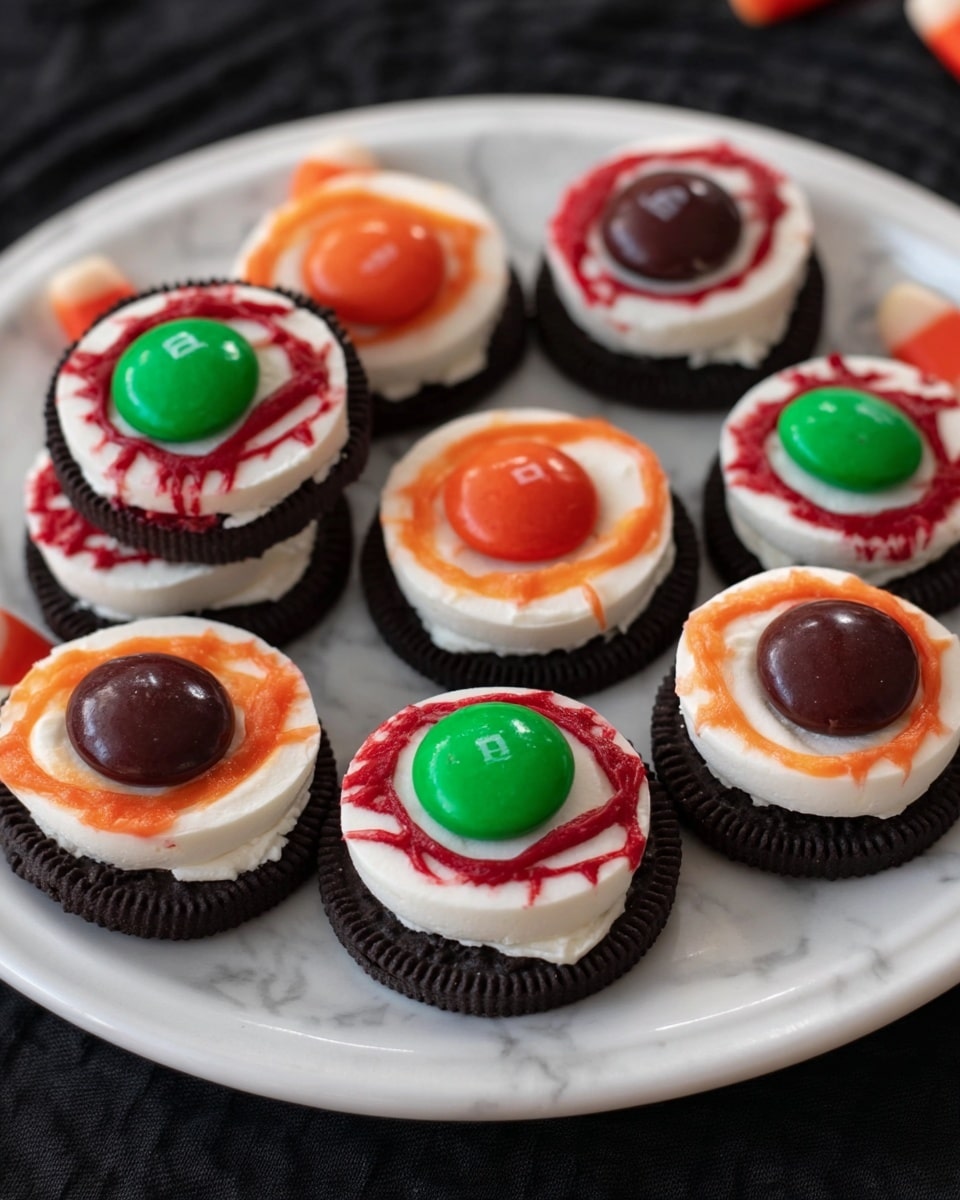
If you’re on the hunt for a spooky yet super simple treat that’ll wow your Halloween guests, you’re in the right place. This Oreo Eyeballs Halloween Treats Recipe is hands down one of my favorite no-bake, last-minute party snacks. The creepy eyeball look is such a fun twist on classic Oreos, and the gooey red “blood vessels” make it just delightfully gruesome without being tricky to pull off. Stick with me and I’ll walk you through every step so your Oreo eyeballs come out looking as eerie and delicious as mine do every year.
Why This Recipe Works
- Simple Ingredients: You only need a handful of store-bought treats that work perfectly together to create that eerie eyeball effect.
- Quick Assembly: The recipe requires minimal prep and no baking, making it ideal for last-minute Halloween fun.
- Visually Striking: The red piping and chocolate chip pupils create realistic “bloodshot” eyes that are sure to grab attention.
- Kid-Friendly & Customizable: Kids love helping assemble these, and you can customize colors and candies based on your stash.

Ingredients & Why They Work
Every ingredient in this Oreo Eyeballs Halloween Treats Recipe is chosen for effect and simplicity — no fuss, just fun. Each component plays a role to bring the creepy eyeball look to life, while staying easy enough to find at your local grocery store.
- Oreos: The perfect ‘eyeball base’ with their cream center and firm cookie/cream combo. Separating the tops lets you save them for other treats and focuses the eyeballs on the creamy flat side.
- Life Saver Gummies: These act as the colorful iris with their translucent look; I love using red or green for maximum creepiness!
- Chocolate Chips: The flat top makes the ideal pupil, giving the eyeball depth and that creepy stare.
- Red Candy Melting Chips: These melt smoothly for piping fine “bloodshot” veins around the iris, adding a realistic spooky touch.
Make It Your Way
One of the things I adore about this Oreo Eyeballs Halloween Treats Recipe is how easy it is to tweak according to your style or pantry. Feel free to swap candy colors or even add glittery sugar for an extra eerie effect. I’ve also swapped red piping for black when I wanted a different vibe, and it totally transformed the look!
- Variation: I once used green Life Saver Gummies for the iris and paired them with white candy melts piped like spider legs—which was a hit at a Halloween party.
- Dietary Mods: For gluten-free options, you can use gluten-free sandwich cookies instead of Oreos to keep everyone happy.
- Seasonal Twists: Around Christmas, I swapped the red for green and white candy melts to create festive eyeballs that were just as cute.
Step-by-Step: How I Make Oreo Eyeballs Halloween Treats Recipe
Step 1: Carefully Separate the Oreos
Start by gently twisting the Oreo cookies apart, saving the tops for another snack or recipe to avoid any waste. I like to focus on the cream side as the “eye white.” Lay them out flat on a cookie sheet or plate to prep for decorating. Be gentle! You want the cream intact so your eyeball base stays solid.
Step 2: Melt the Red Candy Melting Chips
Pop about a quarter cup of red candy melting chips into a microwave-safe bowl. Heat for 30 seconds, then stir well. If chunks remain, heat in additional 15-second bursts, stirring each time until smooth. The smoother your red candy, the easier it will be to pipe those bloodshot veins in the next step.
Step 3: Pipe the “Bloodshot” Veins
Transfer the melted candy to a zippered sandwich bag and snip off a tiny tip to create a piping bag. Starting from the center cream, pipe thin zigzag red lines radiating outward toward the edges — like spooky blood vessels in the eye. This step is where your eyeballs really start coming alive, so no rushing here!
Step 4: Add the Iris and Pupil
Place one Life Saver gummy right in the center of each Oreo cream base—this forms the iris. Then, pipe a tiny dab of red candy on top of the gummy; this acts like glue to secure the chocolate chip “pupil.” Place a chocolate chip flat side up on top of each gummy, pressing lightly so it sticks.
Step 5: Chill and Set
Pop your finished Oreo eyeballs into the fridge for about 10 minutes to set everything up nicely. This chilling step is key—without it, your “veins” and candy pieces might slip or look messy. After chilling, they’re ready to wow your Halloween crowd!
Tips from My Kitchen
- Gummy Placement: Make sure Life Saver Gummies are dry and at room temp to stick well with the melted candy “glue.”
- Piping Precision: Use a tiny tip snip on your piping bag for thin, delicate “vein” lines to keep it realistic.
- Keep It Cool: Keeping the treats cold while assembling prevents the candy from melting or sliding off.
- Save the Cookie Tops: I always save the Oreo tops for crumbled toppings on ice cream or in milkshakes—waste not!
How to Serve Oreo Eyeballs Halloween Treats Recipe
Garnishes
I like to serve these eyeballs on a bed of fake spiderweb cotton candy or surrounded by candy corn for that Halloween vibe. Sometimes, I dust powdered sugar lightly to give a ghostly “fog” effect on the tray that makes the eyeballs pop visually even more.
Side Dishes
If you’re setting up a party table, pair these Oreo eyeballs with other simple Halloween snacks like pumpkin-shaped cheese balls, caramel popcorn, or witch’s fingers made from cookie sticks. The contrast of crunchy, chewy, and creamy really amps up the fun.
Creative Ways to Present
One year, I arranged the eyeballs in a “puzzle” pattern on a cracked mirror tray for a haunted look that guests loved. You can also serve them inside clear glass jars labeled “Eyeballs for Sale,” or even pop a tiny LED tea light underneath for a glowing, eerie table centerpiece.
Make Ahead and Storage
Storing Leftovers
I keep any leftover Oreo eyeballs in an airtight container in the fridge, where they stay fresh and firm for 3-4 days. Just make sure they’re chilled — otherwise, the candy melts can soften and get sticky.
Freezing
Freezing Oreo eyeballs isn’t my go-to since the candy melts can become a bit grainy after thawing, but if you must, wrap each eyeball individually and store in a freezer-safe container for up to 2 weeks. Thaw in the fridge before serving for best results.
Reheating
Since these treats are meant to be served cold, reheating isn’t really necessary or recommended. If your candy melts harden too much in the fridge, just let them sit at room temp for 10 minutes before serving for easier biting.
FAQs
-
Can I use other cookies besides Oreos for this recipe?
Absolutely! While Oreos are classic and work great due to their size and cream filling, you can try similar sandwich cookies or gluten-free versions if needed. Just make sure they have a sturdy cream surface to hold the decorations.
-
What if I can’t find Life Saver Gummies in my store?
No worries! You can substitute with mini jelly candies, gummy rings, or even colorful candy buttons for the iris. The key is to pick something flat and translucent to mimic an iris shape.
-
How long do the Oreo eyeballs last once made?
Stored properly in an airtight container in the fridge, they stay fresh and tasty for about 3-4 days. Beyond that, the candy may start losing its crisp texture.
-
Can kids help with this Oreo Eyeballs Halloween Treats Recipe?
For sure! Kids love piping the red veins and placing gummy irises. Just supervise around the melted candy since it’s hot, and allow them to get creative with colors and placements.
Final Thoughts
This Oreo Eyeballs Halloween Treats Recipe has become my go-to for quick Halloween parties because it’s so fun, easy, and gets everyone in the spooky spirit without any fuss. I hope you enjoy making these creepy little treats as much as I do — they’re perfect for sharing with friends and family, or just sneaking a few when no one’s looking! Give it a try and watch the smiles (and maybe the playful screams) roll in.
Print
Oreo Eyeballs Halloween Treats Recipe
- Prep Time: 15 minutes
- Cook Time: 5 minutes
- Total Time: 20 minutes
- Yield: 12 servings
- Category: Dessert
- Method: No-Cook
- Cuisine: American
Description
These spooky Oreo Eyeballs are a fun and easy Halloween treat that combine classic Oreos with colorful candy melts and gummies to create bloodshot edible eyeballs. Perfect for Halloween parties or festive snacks, this recipe uses simple ingredients and minimal prep for a quick, creepy delight.
Ingredients
Eyeball Components
- 12 Oreos
- 12 Life Saver Gummies
- 12 Chocolate Chips
Red Bloodshot Detailing
- 1/4 cup Red Candy Melting Chips
Instructions
- Separate Oreos: Carefully remove the tops of the Oreos, setting aside the bottoms for your eyeballs and saving the tops for another treat or eating later.
- Prepare the Base: Arrange the Oreo bottoms on a cookie sheet to create a stable workspace for decorating.
- Melt Red Candy Chips: Heat the red candy melting chips in a microwave-safe bowl for 30 seconds, stir, then continue heating in 10-15 second intervals, stirring after each, until completely smooth and melted.
- Prepare Piping Bag: Transfer the melted red candy into a zippered sandwich bag and snip a tiny tip off one corner to create a piping bag for decorating.
- Create Bloodshot Lines: Pipe thin red zigzag lines radiating from the center of each Oreo to the edges, simulating bloodshot veins in the eyeballs.
- Add Iris: Place one Life Saver gummy candy in the center of each Oreo as the iris of the eyeball.
- Attach Pupil: Pipe a small dot of melted red candy onto the center of each gummy, then immediately press a chocolate chip (flat side up) onto the red candy to serve as the pupil.
- Set the Eyeballs: Place the decorated Oreos in the refrigerator for 10 minutes to allow the candy to firm up and hold the decorations in place.
Notes
- You can use different colored gummy candies for varied eye colors.
- If you don’t have a piping bag, use a toothpick to carefully draw the bloodshot lines.
- The Oreo tops can be crushed and sprinkled over ice cream or used in other dessert recipes to avoid waste.
- Store the eyeballs in an airtight container in the refrigerator for up to 3 days.
- For a dairy-free version, substitute chocolate chips with dairy-free alternatives.
Nutrition
- Serving Size: 1 eyeball
- Calories: 150 kcal
- Sugar: 14 g
- Sodium: 90 mg
- Fat: 7 g
- Saturated Fat: 3.5 g
- Unsaturated Fat: 2 g
- Trans Fat: 0 g
- Carbohydrates: 22 g
- Fiber: 1 g
- Protein: 1 g
- Cholesterol: 0 mg


