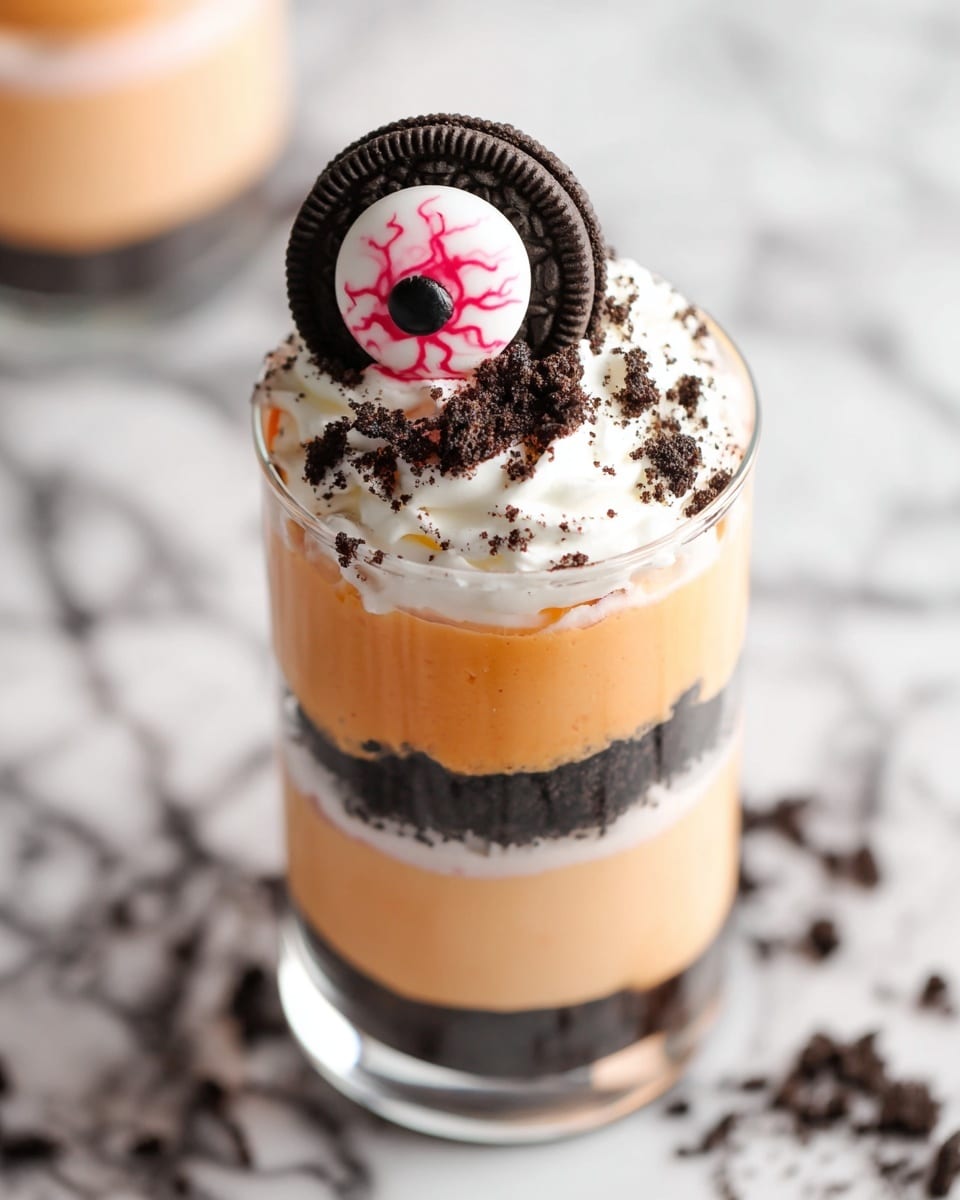
No Bake Oreo Cheesecake Parfait Recipe
If you’re anything like me and love desserts that are creamy, dreamy, and totally fuss-free, you’re going to fall head over heels for this No Bake Oreo Cheesecake Parfait Recipe. Imagine layers of rich, velvety cheesecake mingling with crunchy Oreo crumbs and a playful splash of orange—this dessert is not just delicious but also a total crowd-pleaser. Stick with me, and I’ll walk you through every step to nail this parfait perfectly, even if you’re short on time or baking skills!
Why This Recipe Works
- No Bake Convenience: Skip the oven and still get that luscious cheesecake texture that everyone loves.
- Layered Flavors and Textures: Crunchy Oreo crust, creamy cheesecake, and a hint of orange bring an exciting flavor combo.
- Visually Fun: The playful “spooky eyes” add a whimsical touch that’s perfect for parties or anytime you want to wow your guests.
- Easy Assembly: Minimal ingredients, straightforward steps, and no complicated equipment make this recipe beginner-friendly.

Ingredients & Why They Work
This No Bake Oreo Cheesecake Parfait Recipe is all about balance. The smooth, rich cream cheese base pairs perfectly with airy whipped cream, while the crushed Oreos add just the right amount of chocolatey crunch. And that splash of Fanta orange? It gives the parfait a subtle citrus twist that’ll surprise and delight your taste buds—perfect for making this dessert extra special.
- Cream cheese: Room temperature cream cheese blends beautifully into a smooth cheesecake base without lumps.
- Clear vanilla extract: Keeps the cheesecake batter bright white, enhancing the orange color contrast without muddiness.
- Granulated white sugar: Sweetens the batter without overpowering the other flavors.
- Heavy cream: When whipped, it adds the perfect lightness to balance the richness of the cream cheese.
- Fanta orange: A fun, lightly fizzy addition that adds both sweetness and a hint of citrus aroma.
- Oreo crumbs: Adds that classic chocolate crunch and contrast against the creamy layers.
- Unsalted butter: Binds the Oreo crust so it holds firm in your parfait glass and adds richness.
- Candy eyeballs and red food color marker: For those playful spooky eyes that turn this dessert into a party hit!
Make It Your Way
I always encourage mixing things up to suit your taste buds and occasion. For instance, I sometimes swap the Fanta orange for lemon soda or even flavored extract if I want a twist. You can also add a little espresso powder in the crust for a mocha vibe. The beauty of this No Bake Oreo Cheesecake Parfait Recipe is how flexible it is—so go ahead and personalize your layers!
- Variation: I once added crushed peppermint candies during the holidays for a festive crunch that totally wowed my friends.
- Dairy-Free Option: Use vegan cream cheese and coconut whipped cream to make this recipe approachable for friends with dietary restrictions.
- Seasonal Touch: Swap out the orange with fresh berry purees to make a colorful summer parfait.
Step-by-Step: How I Make No Bake Oreo Cheesecake Parfait Recipe
Step 1: Whip Up That Creamy Cheesecake Batter
Start by beating cream cheese until it’s luxuriously smooth — this is the foundation of the parfait. I use my stand mixer with the paddle attachment for the best texture, but a hand mixer works just fine too. Be patient here; you don’t want lumps! Then, add sugar and clear vanilla extract and beat again till everything is blended seamlessly. Divide this batter into two bowls. To half of it, I mix in a few tablespoons of Fanta orange and a tiny drop of orange food coloring for that vibrant Halloween vibe. Then, whip your heavy cream (pro tip: chill your bowl and whisk beforehand for fluffier peaks) and fold the whipped cream gently into both the orange and white cream cheese mixtures. Keep these chilled while you prep the rest.
Step 2: Craft the Perfect Oreo Crust
Next, blitz your Oreo cookies in a food processor until you get fine crumbs. I always eyeball about 10 Oreos for this step to get the perfect amount. Stir in melted unsalted butter to bind the crumbs — it should feel like damp sand, not soggy. Spoon half of this mixture into your serving glasses to create a firm crust at the bottom. Pop those glasses into the freezer for 15-20 minutes to set the crust nicely before layering.
Step 3: Assemble the Spooky Eyes
Okay, this part’s fun and adds that memorable twist! Gently twist apart each Oreo cookie, and stick candy eyeballs on the creamy side using a dab of store-bought caramel sauce—it works like magic as edible glue. Use a red food color marker to draw tiny veins around each eyeball for an extra spooky effect. I usually prepare 3 or 4 eyes, and my kids love helping here—such a fun activity before dessert time!
Step 4: Layer, Chill, and Enjoy
Time to bring it all together! Using piping bags or spoons, layer the orange cheesecake batter on top of the chilled Oreo crust, followed by a layer of white cheesecake batter. Sprinkle some reserved Oreo crumbs on top to add texture and repeat these layers until your glass is full, finishing with white batter on top. Garnish with crushed Oreos and your carefully crafted spooky eyes. Pop the entire parfait into your fridge for 3-4 hours to chill and set. This pause is important—it really lets the flavors meld and the texture firm up beautifully.
Tips from My Kitchen
- Use Clear Vanilla Extract: It keeps your cheesecake batter beautifully white, making the orange layers pop visually.
- Chill Tools Before Whipping Cream: A cold bowl and whisk help you get those perfect fluffy peaks fast.
- Freeze Crust Layers: Firm crust layers prevent soggy bottoms and keep each parfait crisp and fresh.
- Gentle Folding: Fold whipped cream carefully into the cream cheese mix to keep the batter light and airy.
How to Serve No Bake Oreo Cheesecake Parfait Recipe
Garnishes
I love to sprinkle a few more crushed Oreos on top for extra crunch and a dramatic finish. The handmade spooky eyes are a must—they bring a smile and a fun theme, especially around Halloween. If I’m feeling fancy, a little dollop of whipped cream or a drizzle of caramel sauce adds a touch of indulgence too.
Side Dishes
This parfait shines as a stand-alone dessert, but if you want to turn it into a party spread, pairing it with light fruit salads or citrus-y sorbets works beautifully. I’ve also served it alongside coffee or dark chocolate for a more decadent dessert plate.
Creative Ways to Present
Once, for a birthday party, I layered the parfaits in clear mini mason jars with twine tied around the lids—guests loved the personal touch and portability. For Halloween, I placed eyeball-topped parfaits in a chalkboard tray labeled “Bewitching Treats” and added flickering candles nearby for ambiance. Presentation really amps up the fun!
Make Ahead and Storage
Storing Leftovers
If you’re lucky enough to have leftovers, cover the parfaits tightly with plastic wrap or lids and store them in the fridge. They keep beautifully for up to 3 days, and the flavors actually deepen a bit as they sit. Just give them a gentle stir before serving to revive the creaminess.
Freezing
I’ve frozen this parfait once in a pinch by transferring the layers into a freezer-safe container. It worked fine, but I noticed the texture changes slightly—the Oreos soften and the cream can be a bit less fluffy. If you freeze it, let it thaw overnight in the fridge for best results.
Reheating
This dessert is best served chilled, so reheating isn’t necessary or recommended. Just pop it out of the fridge about 10-15 minutes before enjoying to let it soften a little for creamier spoonfuls.
FAQs
-
Can I use a different type of cookie instead of Oreos?
Absolutely! While Oreos add that classic chocolate flavor and creaminess, you can substitute with any chocolate sandwich cookie or even graham crackers for a different taste and texture in your parfait.
-
What if I don’t have Fanta orange—can I skip it or use something else?
You can definitely skip the Fanta or replace it with any orange soda or juice to add citrus notes. If you prefer to avoid soda, a splash of fresh orange juice with a bit of zest works nicely too, but your batter may be less fizzy.
-
How long should I let the parfait chill before serving?
Chilling for at least 3-4 hours is key to letting the layers set properly and for the cheesecake flavors to meld. If you can, overnight chilling is even better for that perfect texture.
-
Can I prepare this parfait in advance for a party?
Yes! This parfait is perfect for make-ahead prepping. Assemble it up to 24 hours before your event and keep it covered in the fridge. Just add the garnish right before serving for the freshest look.
Final Thoughts
This No Bake Oreo Cheesecake Parfait Recipe holds a special place in my heart—it’s the kind of treat I whip up when I want to impress without stress. The layers are fun to build, the flavors bright and creamy, and the Oreo “spooky eyes” bring joy for kids and adults alike. Trust me, you’ll want to make this again and again whether for a special occasion or just because you deserve a delicious and easy dessert. Give it a try—I promise you’ll love how simple, satisfying, and downright fun it is!
Print
No Bake Oreo Cheesecake Parfait Recipe
- Prep Time: 45 minutes
- Cook Time: 0 minutes
- Total Time: 4 hours 45 minutes
- Yield: 4 servings
- Category: Dessert
- Method: No-Cook
- Cuisine: American
- Diet: Vegetarian
Description
This No Bake Oreo Cheesecake Parfait is a delightful dessert featuring layers of creamy cheesecake batter with a twist of orange flavor, crumbly Oreo crust, and spooky Oreo eyes for a fun presentation. Perfect for parties or a quick no-bake treat, it combines smooth textures and rich flavors with minimal effort and chilling time.
Ingredients
Cheesecake Batter
- 8 oz cream cheese at room temperature
- ½ teaspoon clear vanilla extract
- ½ cup granulated white sugar
- 1 cup heavy cream
- 3 tablespoons Fanta orange soda
- 1 drop orange food color (optional)
Oreo Crust/Base
- ¾ cup Oreo crumbs (from about 10 Oreo sandwich cookies)
- 1.5 tablespoons unsalted butter melted
Spooky Eyes Decoration
- 4 Oreos
- Candy eyeballs
- Red food color marker
Instructions
- Make the cheesecake batter: Beat cream cheese with a paddle or hand mixer until smooth. Add sugar and clear vanilla extract, then beat until well combined. Divide the mixture equally into two bowls. Add 3 tablespoons of Fanta orange to one bowl and mix well; optionally add orange food color to intensify the color. Whisk heavy cream in a chilled bowl and whisk attachment until whipped. Divide whipped cream into two equal parts and gently fold each part into the respective cream cheese mixtures to create two batters, one white and one orange. Chill these mixtures in the refrigerator.
- Make the Oreo crust: Crush Oreo cookies into fine crumbs using a food processor. Mix in melted butter thoroughly. Divide the Oreo mixture equally and place half into the bottom of 2 serving glasses (or use 4 small glasses). Reserve the remaining crumbs for layering and topping. Freeze the glasses for 15 to 20 minutes.
- Create the spooky Oreo eyes: Twist apart each Oreo cookie and place a candy eyeball on the cream side using caramel sauce as glue. Use a red food color marker to draw veins around the eyeballs on each Oreo half. Prepare 3 to 4 of these spooky eyes and set aside.
- Assemble the parfait: Transfer the white and orange cheesecake batters into separate piping bags. Remove the frozen glasses from the freezer and pipe orange cheesecake batter over the Oreo base. Follow with a layer of white cheesecake batter, then sprinkle some reserved Oreo crumbs on top. Repeat the layering process, ending with a white cheesecake batter layer. Garnish with additional crushed Oreos and the prepared spooky eyes for decoration.
- Chill and serve: Refrigerate the parfaits for 3 to 4 hours to set fully before serving.
Notes
- Use clear vanilla extract to keep the cheesecake batter white and prevent color change.
- Chilling the mixing bowl and whisk attachment helps achieve better whipped cream.
- If Fanta orange is unavailable, substitute with an orange soda or orange juice concentrate for flavor.
- To stick candy eyeballs, caramel sauce or melted white chocolate works well as adhesive.
- The orange food color is optional and depends on the desired visual effect.
- Freezing the glasses before layering helps set the crust firmly and prevents mixing of layers.
Nutrition
- Serving Size: 1 serving
- Calories: 420 kcal
- Sugar: 30 g
- Sodium: 210 mg
- Fat: 30 g
- Saturated Fat: 18 g
- Unsaturated Fat: 10 g
- Trans Fat: 0.5 g
- Carbohydrates: 28 g
- Fiber: 2 g
- Protein: 5 g
- Cholesterol: 90 mg


