No Bake Biscoff Cheesecake Minis Recipe
If you’re craving something utterly delightful yet ridiculously easy, you have to try this No Bake Biscoff Cheesecake Minis Recipe. These little cheesecakes pack a punch of rich, creamy Biscoff flavor wrapped in a buttery cookie crust—and the best part? No oven needed! I promise, once you make these, you’ll want to whip up batches for every occasion because they’re seriously addictive.
Why This Recipe Works
- No Oven Needed: Perfect for hot days or quick treats without heating up your kitchen.
- Biscoff Bliss: Using both Biscoff cookies and cookie butter layers in the crust and filling elevates the flavor to addictively spiced sweetness.
- Mini Size Convenience: These morsels are perfect for parties or as little personal indulgences that you can grab right from the fridge.
- Smooth & Creamy Texture: Folding in whipped cream gives the filling lightness without compromising that creamy cheesecake feel.

Ingredients & Why They Work
Every ingredient in this No Bake Biscoff Cheesecake Minis Recipe plays its role in creating the perfect balance of texture and flavor. Knowing how each component contributes helps you feel confident while whipping them up.

- Biscoff cookies: They make an irresistibly crunchy and flavorful crust with just the right cinnamon-spiced notes.
- Melted butter: Binds the cookie crumbs together into a firm crust that holds up well without baking.
- Heavy cream: Whipped to stiff peaks, it lightens the dense cream cheese filling into a fluffy, dreamy texture.
- Cream cheese: The rich base that gives cheesecake its classic taste and body—make sure it’s softened for easy mixing!
- Powdered sugar: Sweetens gently without graininess, blending flawlessly into the creamy filling.
- Creamy Biscoff cookie butter: Adds a luscious spreadable layer of Biscoff flavor inside and on top.
- Sour cream: Brings subtle tanginess that balances the sweetness and adds silkiness.
- Vanilla extract: Enhances overall flavor with warm, aromatic notes.
- Pinch of salt: Always important—it sharpens flavors and keeps everything from tasting flat.
- Additional garnishes (Biscoff cookies, whipped cream): For that perfect finishing touch that makes each bite feel special.
Make It Your Way
I love how this No Bake Biscoff Cheesecake Minis Recipe invites little tweaks that make it feel fresh every time. Feel free to play with toppings or even spice up the filling to suit your mood or season.
- Swirl in Chocolate: One time, I mixed a little melted dark chocolate into the filling and oh wow—it gave the whole thing a mocha vibe that everyone raved about.
- Nutty Crunch: Sometimes I sprinkle crushed toasted pecans or walnuts on top, adding a lovely texture contrast.
- Vegan Twist: You can swap cream cheese and heavy cream for vegan alternatives like cashew cream and coconut cream, but keep an eye on consistency.
- Seasonal Flair: Around fall, adding a pinch of cinnamon or nutmeg to the filling amps up the cozy factor.
Step-by-Step: How I Make No Bake Biscoff Cheesecake Minis Recipe
Step 1: Making the Perfect Biscoff Cookie Crust
First thing, blitz your Biscoff cookies in a food processor until they’re finely ground—like sandy texture, not powdery. Then, slowly stream in the melted butter while pulsing so it all combines evenly. The secret here is to get your crumbs able to hold shape when pressed; if they’re too dry, the mini cheesecakes can fall apart later. Press about a tablespoon of this mixture firmly into each mini cheesecake pan or cupcake liner, creating a sturdy base. Pop them in the fridge or freezer to set while you prepare the filling—trust me, a chilled crust keeps everything neat and tidy!
Step 2: Whipping the Cream to Cloud-Like Peaks
Next up, whip your cold heavy cream until stiff peaks form—usually about 2 minutes with a hand mixer or stand mixer on high. Be vigilant here: stop whipping right when the peaks hold their shape; anything beyond that and you’ll end up with butter! The whipped cream is what transforms the dense cream cheese combo into fluffy, melt-in-your-mouth magic.
Step 3: Creating That Dreamy Biscoff Filling
In another bowl, beat together softened cream cheese, powdered sugar, creamy Biscoff cookie butter, sour cream, vanilla extract, and a pinch of salt until totally smooth and lump-free. This step is the heart of the recipe—take your time to get a perfectly silky texture. Once that’s done, gently fold in the whipped cream using a rubber spatula—fold, don’t stir—to preserve that airy texture you just worked for. When you see no more white streaks, you’re good!
Step 4: Filling and Chilling for Maximum Yum
Spoon your filling into a piping bag fitted with a round 1A tip to get a neat finish (no piping? No stress—just dollop and smooth with the back of a spoon). Pipe the filling onto each cookie crust and smooth the tops out evenly. Then comes the hard part: chill these beauties in the fridge for at least 6 hours or overnight. This gives the filling time to set just right, so your minis hold their shape while still tasting ultra-creamy.
Step 5: The Final Biscoff Touch
Once chilled, melt the remaining Biscoff cookie butter for 20-30 seconds in the microwave until soft and spreadable. Gently spoon and spread it on top of each mini cheesecake—it’s okay if it drips down the edges; that’s part of the charm. Pop them back in the fridge for about 15-20 minutes to let the topping firm up. Finish with a little garnish, like a whole or crushed Biscoff cookie or a dollop of whipped cream, and voilà, you’ve got treats that steal the show.
Tips from My Kitchen
- Use Room Temperature Cream Cheese: It mixes in smoother and prevents lumps in your filling.
- Don’t Overwhip the Cream: Overdoing it turns it grainy and separates—watch for stiff but still shiny peaks.
- Press Crust Firmly: This ensures the crust won’t crumble when you bite into these minis.
- Chill Long Enough: Trust the resting time; it’s the difference between gooey filling and that perfect cheesecake texture.
How to Serve No Bake Biscoff Cheesecake Minis Recipe

Garnishes
I usually keep the topping simple—just a thin layer of warmed Biscoff cookie butter and a single whole cookie perched at a jaunty angle. Sometimes I swirl a bit of whipped cream on top for extra luxury. Crushed Biscoff crumbs scattered over the top add a lovely texture and look so inviting. Honestly, it’s all about balancing that gorgeous Biscoff flavor without overpowering it.
Side Dishes
These minis are perfect as a stand-alone treat, but if you’re serving them at a gathering, try pairing them with fresh berries or a light fruit salad to cut through the richness. A cup of strong coffee or chai tea complements the warm spices in Biscoff like a dream—I always serve them together!
Creative Ways to Present
For parties, I like displaying these cheesecake minis on a tiered dessert stand with fresh mint leaves scattered around. For holidays, add edible gold dust or a dusting of cinnamon on the cookie butter topping. Another time, I served them in mini mason jars layered with fresh whipped cream and crushed cookies for an elegant twist that wowed guests.
Make Ahead and Storage
Storing Leftovers
I keep leftover No Bake Biscoff Cheesecake Minis tightly covered in the fridge, usually for up to 4 days. Keeping them chilled ensures they stay firm and fresh. Sometimes I use airtight containers or wrap the pans tightly with plastic wrap to prevent any fridge odors from sneaking in.
Freezing
If you want to store these for longer, freezing works wonderfully! I freeze them on a tray first to keep them separate, then transfer to a sealed freezer bag or container. They stay good for up to 3 months. When you’re ready, thaw them overnight in the fridge for best texture.
Reheating
Because they’re no bake and chilled, reheating isn’t really necessary or recommended—these minis shine cold and creamy. But if you’d like to warm them slightly, let them sit at room temperature for 10-15 minutes. This way, you keep that luscious texture without melting the cookie butter topping.
FAQs
-
Can I make No Bake Biscoff Cheesecake Minis Recipe without a food processor?
Yes! You can place the Biscoff cookies in a sealed plastic bag and crush them finely using a rolling pin or a heavy pan until they reach a sandy consistency. It takes a bit more elbow grease but works just as well for the crust.
-
What if my cream cheese isn’t fully softened?
It’s best to let cream cheese sit at room temperature for about 30-60 minutes before mixing to avoid lumps. If you start with cold cream cheese, the filling can become uneven and hard to mix smoothly.
-
Can I substitute sour cream with Greek yogurt?
Absolutely! Greek yogurt provides a similar tang and texture, just use full-fat for best results to keep that creamy consistency in the filling.
-
How long should I chill the cheesecakes if I’m short on time?
While 6 hours or overnight is ideal to set the filling perfectly, at minimum chill for 4 hours to achieve a good firmness, though the texture might be a bit softer.
-
What if my whipped cream deflates when I fold it in?
Be gentle when folding the whipped cream to keep it airy. Use a rubber spatula and fold slowly from the bottom up a few times rather than stirring. This keeps the filling light and fluffy.
Final Thoughts
This No Bake Biscoff Cheesecake Minis Recipe has become one of my go-to treats whenever I want something delicious yet fuss-free. The rich Biscoff flavor combined with a creamy filling and crisp cookie crust makes every bite feel like a little celebration. If you’re looking to impress friends, indulge your sweet tooth, or just enjoy a quick, no-bake cheesecake fix, this recipe is your best bet. I’m excited for you to try it and make it your own—you’re going to love how easy and delicious these minis are!
Print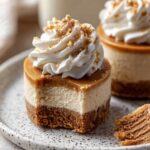
No Bake Biscoff Cheesecake Minis Recipe
- Prep Time: 30 minutes
- Cook Time: 0 minutes
- Total Time: 6 hours 30 minutes
- Yield: 24 mini cheesecakes
- Category: Dessert
- Method: No-Cook
- Cuisine: American
Description
These No Bake Mini Biscoff Cheesecakes are creamy, rich, and bursting with the distinct caramelized flavor of Biscoff cookies and cookie butter. Perfectly portioned as mini cheesecakes, they feature a crunchy Biscoff cookie crust, a luscious Biscoff-infused cream cheese filling, and a glossy Biscoff spread topping. No oven required, these delightful treats can be made ahead and chilled, making them an easy dessert option for any occasion.
Ingredients
Crust
- 1 (8.8 oz) package Biscoff cookies
- 1/2 cup melted unsalted butter
Filling
- 1 cup cold heavy cream
- 3 (8 oz) blocks full-fat cream cheese, softened to room temperature
- 1 cup powdered sugar
- 1 cup creamy Biscoff cookie butter
- 1/3 cup sour cream, room temperature
- 2 tsp pure vanilla extract
- Pinch of salt
Topping
- 1/2 cup creamy Biscoff cookie butter
- Additional Biscoff cookies for garnish, whole or crushed
- Whipped cream for garnish
Instructions
- Prepare the crust: Blitz the Biscoff cookies in a food processor until finely ground. Gradually stream in the melted butter and mix until combined and sandy but able to hold shape when pressed.
- Form the crusts: Spray 2 mini cheesecake pans or two 12-count muffin pans lined with cupcake liners with non-stick spray. Press about 1 tablespoon of the crumb mixture into each mold firmly. Freeze or refrigerate while preparing the filling.
- Whip the cream: Using a hand mixer or stand mixer fitted with a whisk attachment, beat the cold heavy cream in a chilled bowl until stiff peaks form, about 2 minutes. Take care not to overbeat. Refrigerate until needed.
- Mix the filling: In a separate medium-large bowl, beat the softened cream cheese, powdered sugar, Biscoff cookie butter, sour cream, vanilla extract, and salt together until smooth and fully combined.
- Fold in whipped cream: Gently fold the whipped heavy cream into the cream cheese mixture using a rubber spatula until no white streaks remain.
- Assemble cheesecakes: Spoon the filling into a piping bag fitted with a round 1A tip and pipe it evenly into the chilled crusts. Smooth the tops with a spatula.
- Chill to set: Refrigerate the mini cheesecakes for at least 6 hours or overnight, loosely covered.
- Add topping: Microwave the Biscoff cookie butter for 20-30 seconds until melted. Spread evenly over the tops of the chilled cheesecakes (allow drips down sides if desired) and return to the fridge for 15-20 minutes to set.
- Garnish and serve: Decorate with additional Biscoff cookies, crushed or whole, and dollops of whipped cream. Serve chilled and enjoy!
Notes
- Storage: Keep the mini cheesecakes refrigerated for up to 4 days or freeze for up to 3 months.
- Ensure cream cheese is fully softened to room temperature for a smooth filling.
- Use chilled bowl and beaters when whipping heavy cream for best results.
- If you don’t have a piping bag, you can spoon the filling directly into the crusts and smooth out with a spatula.
- For easier removal from pans, consider lining with cupcake liners if using muffin tins.
Nutrition
- Serving Size: 1 mini cheesecake
- Calories: 240 kcal
- Sugar: 18 g
- Sodium: 90 mg
- Fat: 18 g
- Saturated Fat: 9 g
- Unsaturated Fat: 7 g
- Trans Fat: 0 g
- Carbohydrates: 16 g
- Fiber: 1 g
- Protein: 3 g
- Cholesterol: 55 mg


