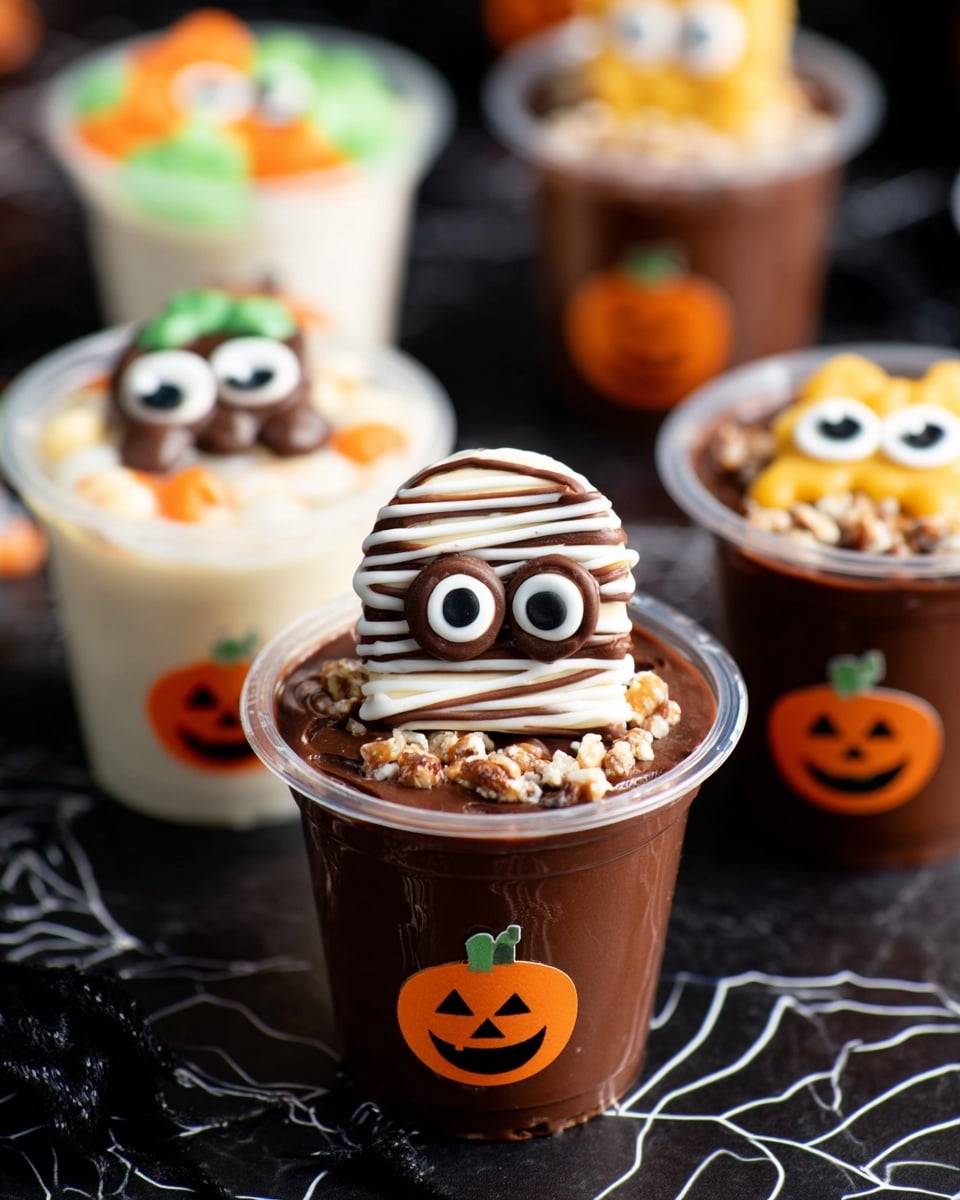
Mummy Pretzels with Spooky Pudding Cups Recipe
Hey friend, if you’re looking for an easy yet show-stopping Halloween treat, you’ve got to try this Mummy Pretzels with Spooky Pudding Cups Recipe. It’s the perfect blend of sweet, salty, and playful all wrapped up in a fun mummy theme. Seriously, kids and adults alike will be begging for more—every bite is a little celebration! Stick around, I’m gonna walk you through how to make these adorable spooky snacks, share my best tips, and even how to customize them just the way you like.
Why This Recipe Works
- Simple Ingredients: Uses easy-to-find pantry staples and store-bought puddings, making Halloween prep stress-free.
- Fun & Interactive: The dipping and decorating let you get creative—perfect for cooking with kids!
- Balanced Flavors: Sweet candy melts contrast beautifully with salty pretzels, and the pudding cups add creamy texture.
- Customizable & Kid-Friendly: You can swap flavors or add toppings to fit your family’s tastes or dietary needs.

Ingredients & Why They Work
Every ingredient in this Mummy Pretzels with Spooky Pudding Cups Recipe plays a role in creating a kid-friendly snack that’s both spooky and delicious. I’ll share tips on what to look for when you shop, so you’re totally set up for success before you even start.
- Pretzels: Go for sturdy pretzels like rods or twists that’ll hold up to dipping and decorating without breaking.
- White, orange, and green candy melts: These melt smoothly and add beautiful Halloween colors—make sure to melt gently so they don’t seize.
- Chocolate candy melts: Perfect for drizzling and “gluing” candy eyeballs in place—choose good-quality for best shine.
- Candy eyeballs: These instantly transform each pretzel into a spooky mummy! Find ones that are edible and easy to stick on.
- Snack Pack puddings (vanilla and chocolate): Store-bought puddings keep things simple and creamy, a base that kids adore.
- Apple (diced): Adds fresh crunch and balances sweetness in the vanilla pudding cups. Use a crisp variety like Fuji or Honeycrisp.
- Crushed pretzels: Sprinkle on top for extra texture and a fun salty twist.
- Peter Pan peanut butter: Just a touch adds richness and depth—feel free to swap for your favorite nut or seed butter.
Make It Your Way
I love to mix things up with this Mummy Pretzels with Spooky Pudding Cups Recipe depending on who I’m serving and what I have on hand. It’s really flexible, so don’t hesitate to personalize it—trust me, it’s part of the fun!
- Variation: Sometimes I swap out the candy melts for dark chocolate or peanut butter chips to change the flavor while still getting that melty coating.
- Allergy-Friendly: Use sunflower seed butter instead of peanut butter and check the candy melts for dairy-free options.
- Seasonal Twist: Add a sprinkle of edible glitter or colored sugar on the pretzels for extra Halloween sparkle.
- Difficulty Level: If you’re short on time, just dip the pretzels once and skip the drizzle—still tasty and quick!
Step-by-Step: How I Make Mummy Pretzels with Spooky Pudding Cups Recipe
Step 1: Melting Magic
First things first: melt your candy melts separately according to the package instructions. I like to do this gently in the microwave in 20-second bursts, stirring often so the melts don’t burn or seize up. Trust me, burned candy melts are no fun. Use shallow bowls so you can easily dip the pretzels later.
Step 2: Dipping the Pretzels
Line a baking sheet with parchment or wax paper — this saves you from sticky messes later. Start dipping each pretzel in one of the colored candy melts, letting any excess drip off before placing it on the paper. Spread the pretzels out so they don’t touch, and then pop them in the fridge or let them sit at room temp until the candy hardens, about 15 minutes.
Step 3: Dressing Up the Mummies
If your melted candy has hardened a bit, just re-melt it gently. Use a fork to drizzle contrasting colors over the pretzels to create that signature mummy-wrap look. Don’t forget to add candy eyeballs! If they don’t stick right away, use a dab of melted chocolate as glue. Let them set again for 15 minutes until firm.
Step 4: Preparing the Pudding Cups
Take your pudding cups and place your favorite Halloween stickers on the outside—it’s a simple way to bring the spooky vibe to these creamy treats! For the chocolate pudding, stir in a teaspoon of peanut butter and some crushed pretzels. For the vanilla, mix in diced apples for a fresh, crunchy surprise. Then top each with one of your adorable mummy pretzels and give a final sprinkle of crushed pretzels or apples depending on the cup. Done and done!
Tips from My Kitchen
- Use Room Temperature Candy Melts: Cold candy melts can clump and won’t coat pretzels smoothly—warming helps with better coverage.
- Don’t Rush the Setting Time: Patience is key so your pretzels don’t smudge or lose their shape when adding drizzle and eyes.
- Store in a Cool Place: Keep your mummy pretzels at room temp but away from humidity to stay crisp and not sticky.
- Prep the Pudding Cups Last: This way, your mummy pretzels stay fresh and crunchy when served.
How to Serve Mummy Pretzels with Spooky Pudding Cups Recipe
Garnishes
I love to finish off the pudding cups with a little extra crushed pretzels on the chocolate ones for added crunch—and diced apple on vanilla puddings gives a nice fresh pop. If you want to get fancy, a few mini chocolate chips or edible glitter can add festive charm.
Side Dishes
This duo pairs well with simple sides like carrot sticks or celery for a crunch that balances the sweet, plus a warm apple cider or hot chocolate to keep everyone cozy.
Creative Ways to Present
For Halloween parties, I’ve arranged the pudding cups on a platter surrounded by candy corn and mini pumpkins—super cute for a centerpiece! You can also stick a little mummy pretzel on top of each cup’s lid to really amp up the “spooky snack” look.
Make Ahead and Storage
Storing Leftovers
If you happen to have leftovers (lucky you!), store the mummy pretzels in an airtight container at room temperature—avoid the fridge to keep them crispy. Pudding cups should be refrigerated and covered tightly to prevent drying out.
Freezing
I haven’t frozen the mummy pretzels because the candy coating can get sticky when thawed, but the pudding cups freeze okay if you’re desperate—just thaw them overnight in the fridge and stir well before serving.
Reheating
Since these are mostly cold or room-temp treats, reheating isn’t necessary. But if your candy melts got a little hard in the fridge, just let the pretzels sit out for 20 minutes to soften slightly before serving.
FAQs
-
Can I use regular chocolate instead of candy melts for mummy pretzels?
You can substitute regular chocolate, but keep in mind it won’t harden as quickly or brightly as candy melts. Also, candy melts are designed to drip smoothly and set with a glossy finish, which helps achieve that mummy look more easily.
-
How long do mummy pretzels stay fresh?
Stored properly in an airtight container at room temperature, the pretzels stay fresh and crispy for up to 4-5 days. Keep them away from heat and humidity for best results.
-
Can I make these without peanut butter?
Absolutely! The peanut butter adds richness but you can omit it or substitute with sunflower seed butter or almond butter if allergies are a concern or if you want a different flavor profile.
-
What’s the best way to stick candy eyeballs on the pretzels?
Melt a little bit of chocolate candy melts and use it like glue to attach the eyes while the pretzels are still slightly tacky. This keeps everything firmly in place once set.
Final Thoughts
So there it is, my go-to Mummy Pretzels with Spooky Pudding Cups Recipe that brings a little magic and fun to your Halloween table. I’ve made these countless times, and what I love most is how easy they are to customize and how they instantly make everyone smile. Whether you’re cooking with kids or just want a festive treat to impress your friends, this recipe hits the spot every single time. Give it a try, and I promise you’ll be planning this again next Halloween!
Print
Mummy Pretzels with Spooky Pudding Cups Recipe
- Prep Time: 15 minutes
- Cook Time: 30 minutes
- Total Time: 45 minutes
- Yield: 8 servings
- Category: Dessert
- Method: No-Cook
- Cuisine: American
Description
Fun and festive Halloween mummy pretzels paired with creamy chocolate and vanilla pudding cups, topped with diced apples, peanut butter, and crushed pretzels for a delightful seasonal treat perfect for parties and family gatherings.
Ingredients
For the mummy pretzels:
- 3-4 cups pretzels
- 1 cup white candy melts
- 1 cup orange candy melts
- 1 cup green candy melts
- 1/2 cup chocolate candy melts
- Candy eyeballs
- Bowls to melt the candy in
For the pudding cups:
- 4 Snack Pack vanilla puddings
- 4 Snack Pack chocolate puddings
- 1 apple, diced
- Crushed pretzels
- 4 tsp Peter Pan peanut butter
Other:
- Halloween stickers of your choice
Instructions
- Melt candy melts: Melt the white, orange, green, and chocolate candy melts separately according to package instructions, using bowls suitable for melting.
- Prepare baking sheet: Line a baking sheet with parchment paper or wax paper to place the pretzels on after dipping.
- Dip pretzels: Dip the pretzels in the different colors of melted candy melts and place them onto the lined baking sheet. Allow the chocolate to set for 15 minutes.
- Drizzle and add eyes: If the melted chocolate hardens before all pretzels are decorated, re-melt it. Using a fork, drizzle different colors of melted chocolate over the pretzels to create mummy bandages. Attach candy eyeballs to the pretzels using melted chocolate as glue if necessary. Let pretzels set for another 15 minutes.
- Decorate pudding cups: Place Halloween stickers on the outside of each pudding cup for festive decoration.
- Prepare chocolate pudding cups: Add 1 teaspoon of peanut butter and a sprinkle of crushed pretzels to each chocolate pudding cup, then mix to combine.
- Prepare vanilla pudding cups: Add 1/4 cup of diced apple to each vanilla pudding cup and mix well.
- Top pudding cups: Place one mummy pretzel on top of each pudding cup. Sprinkle additional crushed pretzels over chocolate pudding cups and diced apple over vanilla pudding cups for garnish.
Notes
- If candy melts harden quickly during decorating, gently re-melt in short intervals to avoid overheating.
- Candy eyeballs can be found in baking or craft stores or substituted with small white and black icing dots.
- You can use any type of pretzels, but small or medium-sized work best for easy dipping and decorating.
- For a nut-free version, omit peanut butter or substitute with sunflower seed butter if allergy concerns exist.
- Prepare pudding cups just before serving to keep pretzels crisp.
- Store mummy pretzels in an airtight container at room temperature to maintain crunch.
Nutrition
- Serving Size: 1 cup pudding with pretzel
- Calories: 250 kcal
- Sugar: 22 g
- Sodium: 180 mg
- Fat: 11 g
- Saturated Fat: 4 g
- Unsaturated Fat: 5 g
- Trans Fat: 0 g
- Carbohydrates: 32 g
- Fiber: 2 g
- Protein: 4 g
- Cholesterol: 10 mg


