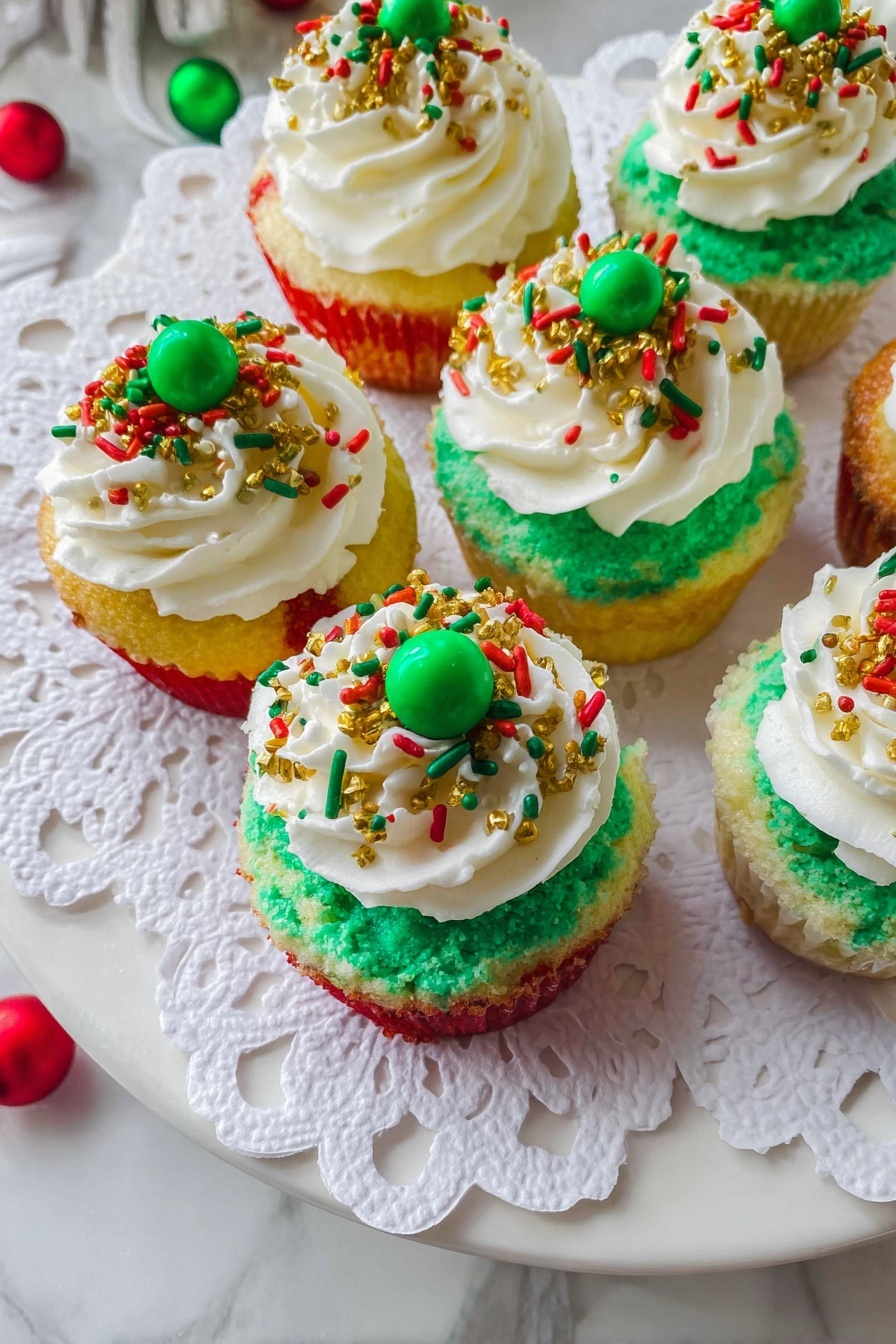
Mini Christmas Oreo Cheesecakes Recipe
If you’re looking to add a little festive magic to your holiday dessert lineup, I can’t recommend this Mini Christmas Oreo Cheesecakes Recipe enough. These bite-sized beauties are creamy, indulgent, and have just the right hint of holiday colors and fun. Seriously, the marbled red and green swirls with that crumbly Oreo crust? They’re a total crowd-pleaser. Stick around—I’ll walk you through every step, share tips that’ll make your life easier, and help you nail the perfect festive treat for your next Christmas gathering.
Why This Recipe Works
- Perfect Bite-Sized Portions: These mini cheesecakes are easy to serve, making them ideal for parties and family gatherings where finger foods shine.
- Oreo Crust Adds Crunch: Using Oreo cookies with the filling creates a rich and flavorful base that perfectly complements the creamy cheesecake.
- Festive Marbled Batter: Splitting the batter and adding red and green food coloring gives you a beautiful holiday look without extra fuss.
- Moist Baking Environment: Baking with a water bath keeps the cheesecakes smooth and crack-free every time.

Ingredients & Why They Work
Each ingredient in the Mini Christmas Oreo Cheesecakes Recipe plays a key role in getting that lush texture and irresistible flavor. From the creamy cream cheese to the zesty lemon and the crunch of Oreo crusts—these components work together to make your dessert unforgettable. Here are some little insights before you shop or prep.
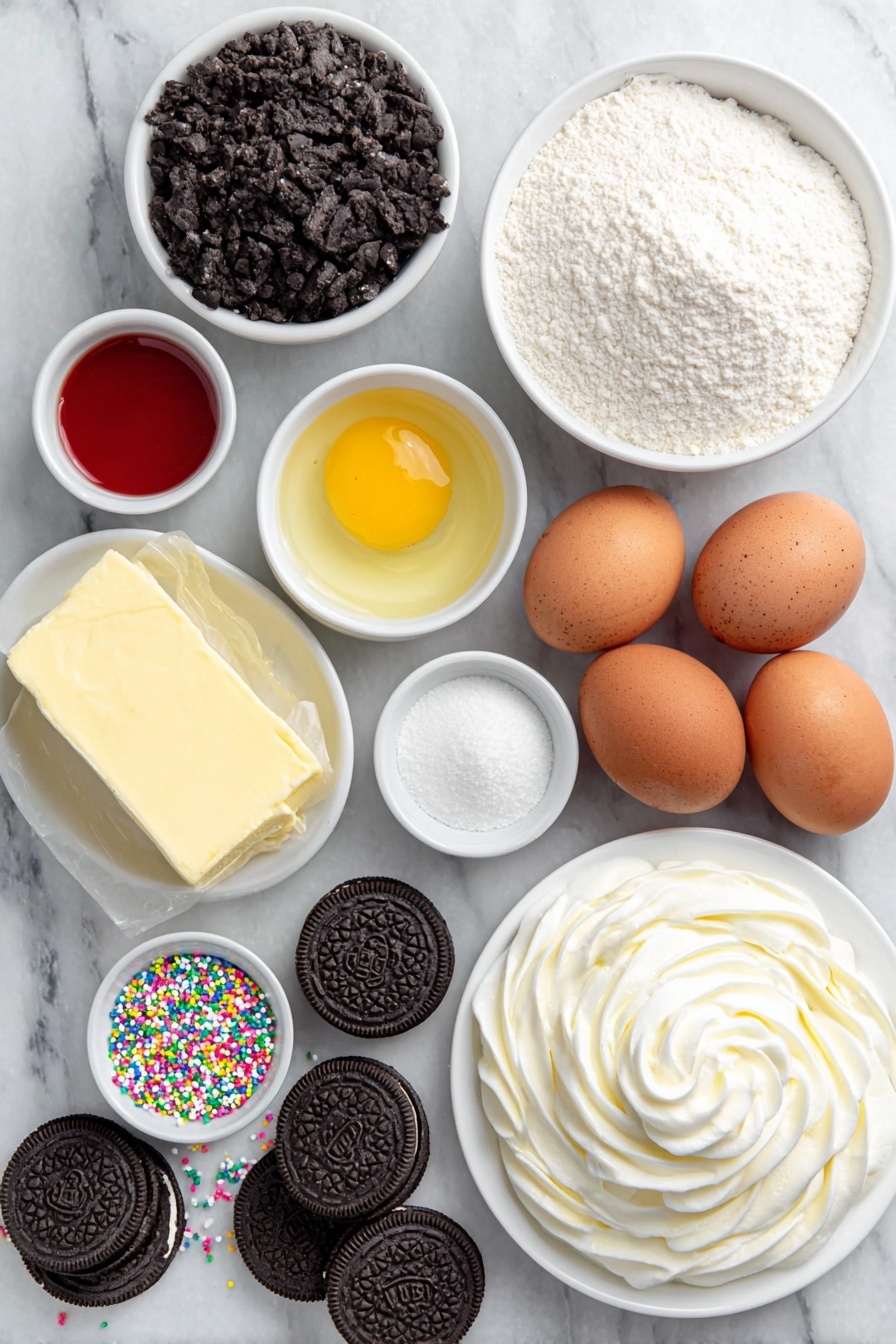
- Oreo Cookies: Use the full cookie, filling and all, for a sweeter, richer crust that pairs perfectly with the creamy cheesecake filling.
- Butter: Melted butter helps bind those cookie crumbs, creating a firm crust that won’t crumble apart when you bite in.
- Cream Cheese: Make sure it’s room temperature so it blends smoothly with the other ingredients and avoids lumps.
- Granulated Sugar: Adds the just-right sweetness without overpowering the cheesecake’s natural tang.
- All-Purpose Flour: A touch of flour stabilizes the texture so you get that classic dense cheesecake feel.
- Vanilla Extract: A splash brings out the flavors beautifully, softening the sharpness of the cream cheese.
- Lemon Zest: Adds a subtle brightness that elevates the entire cheesecake — trust me, it’s worth it.
- Heavy Cream: Folding this in makes the filling silkier and more luscious; don’t skip it!
- Eggs: They’re the natural binder, holding everything together while adding richness.
- Red & Green Food Coloring: For that festive swirl that screams “Christmas!” And you only need a few drops for vibrant color.
- Whipped Cream & Sprinkles: The final touch to add some whimsy and a creamy crown on these mini delights.
Make It Your Way
I love how this Mini Christmas Oreo Cheesecakes Recipe invites personalization — from different colors to mix-ins and toppings. Don’t hesitate to experiment a bit; it’s what makes baking more fun and your treats uniquely yours.
- Variation: One year, I added finely chopped peppermint candies into the batter for an extra festive crunch, and it was a hit! You could also try using different colored sprinkles or swirl in some crushed candy canes on top.
- Dietary Modifications: To make this dairy-free, try swapping cream cheese and heavy cream for coconut-based alternatives, but keep in mind the texture will vary slightly.
- Seasonal Flavors: This recipe is perfect for Christmas, but you could switch the colors and zest out lemon for orange to create mini cheesecakes for other holidays or seasons.
Step-by-Step: How I Make Mini Christmas Oreo Cheesecakes Recipe
Step 1: Prep Your Crust with Oreo Magic
First things first, preheat your oven to 150°C (that’s about 300°F). Line your cupcake tray with cases — this makes handling much easier later. Crush your Oreo cookies, including all that delicious filling. I like to toss them in a ziplock bag and bash away with a rolling pin until they’re fine crumbs. It’s satisfying and mess-free! Then, mix in melted butter until all crumbs are evenly moistened. Spoon about a tablespoon of this mixture into each case and firmly press it down — a small rolling pin or the bottom of a glass can help! This step creates the perfect base that holds together when you bite in.
Step 2: Beat Your Batter to Silky Perfection
Now, the cheesecake filling: Beat the cream cheese until it’s totally smooth. Don’t rush this; scraping the bowl often really helps avoid lumps. Add in sugar, flour, and lemon zest, and beat again briefly. Then, crack in both eggs at once with the vanilla extract and gently combine – over-beating can add too much air, which leads to cracks in your cheesecake, so keep it smooth and creamy but don’t whip it too much. Finally, fold in the heavy cream to get that luscious texture.
Step 3: Create Your Festive Red and Green Swirls
Divide about a third of your batter into two smaller bowls. Add green food coloring to one and red to the other, and mix well until you get those vibrant holiday hues. Pour the plain batter into the cupcake cases first, then alternate dollops of the colored batter on top. Take a skewer and gently swirl in a circular motion through the batter to create a marble effect — just be careful not to disturb the Oreo crust at the bottom!
Step 4: Bake and Chill Like a Pro
Place your tray in the oven and put a baking dish filled with water on the rack below – this adds moisture to the oven and prevents cracks on your cheesecake surface. Bake for 20 minutes, then leave the cheesecakes inside the warm oven for another 5 minutes to set gradually. Once out, let them cool at room temperature for 15 minutes, then chill in the refrigerator for at least 4 hours or preferably overnight. Trust me, this resting time is essential — it firm ups the cheesecakes and deepens their flavors.
Step 5: Garnish and Enjoy
After chilling, carefully peel the cupcake liners off – this step takes a little patience but shows off those gorgeous mini cheesecakes perfectly. Top with fluffy whipped cream and sprinkle with your favorite festive sprinkles. Now, get ready for compliments because these are absolute showstoppers!
Tips from My Kitchen
- Room Temperature Ingredients: Always use cream cheese and eggs at room temp to avoid lumps in your batter.
- Don’t Overbeat the Eggs: Overmixing incorporates air and can cause cracked, puffy cheesecakes; gentle mixing is key.
- Water Bath Baking: The water tray inside the oven keeps the heat gentle and moisture high, preventing cracks and drying out.
- Peeling Liners Smoothly: Once chilled, use a small knife to loosen edges before peeling liners off to avoid crumbs sticking.
How to Serve Mini Christmas Oreo Cheesecakes Recipe
Garnishes
I usually keep it simple with fluffy homemade whipped cream and colorful Christmas sprinkles — they add that perfect festive flair without overpowering the creamy cheesecake. You can also dust a little powdered sugar or even top with mini candy canes for a crunchy contrast. I love how the whipped cream balances the rich cheesecake flavors and makes each bite feel a little extra special.
Side Dishes
Since these are mini desserts, I like pairing them with a light hot drink like peppermint tea or a cozy cup of hot cocoa. They also go wonderfully alongside a fresh fruit platter or a simple arugula salad with candied pecans to balance sweetness with something fresh and savory.
Creative Ways to Present
For parties, I arrange these mini cheesecakes on a festive platter with some holly sprigs and mini candy canes scattered around. You could also serve them in clear mini jars with a dollop of whipped cream on top for a chic look. If you’re gifting, package them carefully in holiday-themed boxes or wrap them individually with a ribbon — I guarantee they’ll delight whoever receives them.
Make Ahead and Storage
Storing Leftovers
Leftover Mini Christmas Oreo Cheesecakes keep best in an airtight container in the fridge. I usually cover them loosely with plastic wrap and they stay fresh for up to 3 days. If you plan to devour them quicker, an airtight container without additional wrapping does the job just fine.
Freezing
I’ve frozen these mini cheesecakes before by placing them on a baking tray to flash freeze individually, then transferring them to a freezer-safe container. They keep well for about a month. When you’re ready to enjoy, thaw them in the fridge overnight to maintain texture and creaminess.
Reheating
Because these are best served chilled, I don’t recommend reheating. But if you want to enjoy them at room temperature, just leave them out for 15 to 20 minutes from the fridge. That way, the flavors open up and the texture softens just a bit without losing their integrity.
FAQs
-
Can I make the Mini Christmas Oreo Cheesecakes Recipe without food coloring?
Absolutely! The food coloring adds festive flair, but the cheesecake tastes just as delicious without it. You can also swap the colors for pastel shades or leave the batter plain if you prefer a subtler look.
-
What if I don’t have a cupcake tray? Can I bake these in another dish?
You can bake the batter in a regular round cake pan, too. Just adjust the baking time accordingly—usually about 55-70 minutes depending on the size—and keep an eye on the center, which should be a little wobbly when done. Let it chill thoroughly before slicing.
-
Why is my cheesecake cracking on top?
Cracks typically form when the batter is overmixed or the oven is too hot/dry. To minimize cracking, gently mix to avoid excess air and bake with a water bath to keep the environment moist, just like in this recipe.
-
How do I remove the cupcake liners without breaking the cheesecakes?
Once chilled, gently run a small knife or offset spatula around the edges of each cheesecake to loosen it before peeling away the liner. This helps them come off cleanly without sticking or breaking.
Final Thoughts
This Mini Christmas Oreo Cheesecakes Recipe has become one of my absolute favorites every holiday season because it’s festive, flavorsome, and just plain fun to make. I love how easy it is to pull together and how it always impresses guests without needing tons of fancy ingredients or skills. If you’re looking for a holiday treat that delivers wow-factor in a small, delightful package, this recipe’s got you covered. So go ahead—bake, chill, and share these adorable cheesecakes with your loved ones, and watch those smiles light up the room!
Print
Mini Christmas Oreo Cheesecakes Recipe
- Prep Time: 30 minutes
- Cook Time: 20 minutes
- Total Time: 4 hours 50 minutes
- Yield: 12 servings
- Category: Dessert
- Method: Baking
- Cuisine: American
Description
Celebrate the holidays with these festive Mini Christmas Cheesecakes featuring a marbled red and green batter on a crunchy Oreo crust, topped with whipped cream and sprinkles. Perfectly portioned and visually stunning, these cheesecakes are a delightful treat for Christmas gatherings.
Ingredients
Cheesecake Crust
- 100 g Oreo Cookies crushed with the filling
- 30 g butter melted
Cheesecake Batter
- 450 g cream cheese
- 150 g granulated sugar
- 20 g all purpose flour
- ½ teaspoon vanilla extract
- 1 tablespoon lemon zest
- 60 g heavy cream
- 2 eggs
- red food coloring
- green food coloring
Topping & Garnish
- Whipped cream
- Sprinkles
Instructions
- Preheat the oven: Preheat oven to 150°Celsius. Place cupcake casings into a cupcake tray to prepare for the crust.
- Prepare the crust: Process Oreo cookies into fine crumbs with the filling using a food processor or crush with a rolling pin in a zip lock bag. Transfer crumbs to a bowl, add melted butter, and mix until fully moistened.
- Form the crust base: Place one tablespoon of cookie crumbs into each cupcake casing. Press down firmly with the side of a small rolling pin to compact the crust. Set aside.
- Beat cream cheese: In a separate bowl, beat the cream cheese until smooth for 30 to 60 seconds, scraping the bowl often to avoid lumps.
- Add sugar, flour, and zest: Add granulated sugar, all-purpose flour, and lemon zest to the cream cheese. Beat again for 20 seconds to combine.
- Incorporate eggs and vanilla: Scrape the bowl, then add both eggs and vanilla extract. Beat for 10 seconds to combine, scrape the bowl, then beat another 10 seconds until smooth and creamy. Avoid overbeating to prevent excess air in batter.
- Fold in heavy cream: Gently fold the heavy cream into the batter until fully incorporated.
- Divide and color batter: Transfer one-third of the batter into two smaller bowls. Add green food coloring to one bowl and red food coloring to the other, mixing each thoroughly.
- Assemble cheesecakes: Pour batter into prepared cupcake casings starting with plain batter, then alternate red and green batters. Use a skewer in a circular motion through the batter to create a marbled effect, avoiding the crust.
- Bake with moisture: Bake mini cheesecakes at 150°Celsius for 20 minutes. Place a baking dish with water in the oven to keep the environment moist during baking.
- Rest in oven: After baking, leave the cheesecakes inside the oven for an additional 5 minutes to gently finish cooking.
- Cool before chilling: Remove from oven and let cool for 15 minutes on a wire rack.
- Chill thoroughly: Refrigerate cheesecakes for at least 4 hours or overnight to set firmly.
- Remove casings: Once fully chilled, carefully peel cupcake casings off each cheesecake.
- Garnish and serve: Top with whipped cream and sprinkles before serving for a festive finish.
- Store leftovers: Keep any leftovers refrigerated to maintain freshness.
Notes
- For a full large cheesecake, pour the batter into a 7-inch round cake tin and bake for 55 to 60 minutes at 150°Celsius.
- For a 9-inch round cake, double the recipe and bake for 65 to 70 minutes until sides are firm but center still slightly wobbly.
- Do not overbeat the batter to prevent excess air which can cause cracks during baking.
- The water bath during baking helps keep the cheesecakes moist and prevents cracking.
- Use quality cream cheese at room temperature for a smooth batter.
- Allow adequate chilling time for the best texture and flavor.
Nutrition
- Serving Size: 1 mini cheesecake
- Calories: 320 kcal
- Sugar: 20 g
- Sodium: 150 mg
- Fat: 22 g
- Saturated Fat: 13 g
- Unsaturated Fat: 7 g
- Trans Fat: 0 g
- Carbohydrates: 25 g
- Fiber: 1 g
- Protein: 5 g
- Cholesterol: 85 mg


