Maple Glazed Donuts Recipe
If you’ve ever dreamed of biting into a homemade donut that’s perfectly soft, fluffy, and coated with a sweet, shiny glaze, then you’re going to love this Maple Glazed Donuts Recipe. I promise, once you make these, you’ll understand why I’m obsessed. They’re nothing like the store-bought kind, with a tender dough and that unmistakable maple flavor that just makes you want to come back for one more. Stick around—I’m sharing all my tips and secrets so you can nail these donuts right in your own kitchen.
Why This Recipe Works
- Perfect Yeast Activation: Starting with warm water and honey-like sugar gives your yeast the best chance to bloom, ensuring fluffy, airy donuts.
- Tender Yet Chewy Dough: Using bread flour and just the right amount of shortening keeps the donuts soft but with a nice bite.
- Homemade Maple Glaze: A blend of powdered sugar, maple extract, and corn syrup offers a luscious glaze that hardens just enough for that classic maple bar experience.
- Double Rise Method: This step builds flavor and ensures your donuts are light and puffy—no dense donuts here.

Ingredients & Why They Work
Each ingredient in this Maple Glazed Donuts Recipe plays a crucial role. From yeast to flour, and the magic touch of maple extract, the components come together to create the ideal balance of soft dough and sweet glaze. When shopping, pick good-quality yeast and real maple extract if you can—it really elevates the flavor.

- Warm water: Activates the yeast gently without killing it—think cozy bath temperature, not hot tap.
- Active dry yeast: The key to that airy, fluffy texture you crave in a donut.
- Granulated sugar: Feeds the yeast and sweetens the dough a bit for balanced flavor.
- Shortening: Adds tenderness and helps produce a light crumb, with a classic donut texture.
- Egg yolks: Enrich the dough, lending that golden color and soft mouthfeel.
- Vanilla extract: Brings warmth and depth to the flavor profile.
- Bread flour: Provides the gluten structure needed for chewiness without toughness.
- Kosher salt: Enhances all the flavors without overpowering.
- Baking powder: Gives a little extra lift, making sure the donuts stay light.
- Peanut oil: Ideal for frying with a high smoke point and neutral flavor.
- Powdered sugar (for glaze): Creates that smooth, glossy finish on the donuts.
- Light corn syrup: Prevents the glaze from crystallizing and keeps it shiny.
- Maple extract: The star ingredient for that authentic maple glaze flavor.
- Hot water (for glaze): Adjusts glaze consistency so you can dip your donuts perfectly.
Make It Your Way
I love personalizing this Maple Glazed Donuts Recipe depending on the season and who I’m serving. Sometimes I add a pinch of cinnamon to the dough for a cozy twist, or sprinkle chopped pecans on the glaze for a little crunch. The best part? You can totally make these donuts your own.
- Variation: I once swapped in whole wheat flour for half the bread flour to add nuttiness, creating a heartier donut that still stayed soft. It’s a great way to sneak in some whole grains without sacrificing texture.
- Dietary tweak: For a dairy-free version, I’ve had success replacing the shortening with coconut oil. It changes the flavor slightly but gives a lovely richness.
Step-by-Step: How I Make Maple Glazed Donuts Recipe
Step 1: Let the Yeast Bloom Like Magic
Start by warming your water to a perfect ~105°F—warm, not hot. I use a kitchen thermometer here because the yeast is a delicate diva; too hot and it dies, too cold and it won’t activate. Stir in the yeast and a tablespoon of sugar, then wait about 5 minutes until it’s frothy and bubbly. If it doesn’t bubble, don’t sweat it—just start again with fresh yeast. This is your “proof” that it’s alive and kicking.
Step 2: Mix in the Sweet and Rich Ingredients
To your yeast mixture, add the remaining sugar, shortening, egg yolks, and vanilla. Beat these together using a paddle attachment or a sturdy spoon. You’ll want the shortening broken up but not fully blended, which helps give those donuts their tender crumb. Then add in a cup of your bread flour with salt and baking powder stirred in. Beat for about a minute.
Step 3: Build Your Dough with Flour and Kneading
Add the rest of the flour gradually, up to 4 cups if your dough is sticky. Sticky dough means soft donuts, so feel free to keep it on the wetter side! Switch to a dough hook if you have one, or get your hands in there and knead on a floured surface for about 5 minutes until smooth and elastic.
Step 4: The Cozy Proofing Box
Shape your dough into a 6×6 square and place it on a floured baking sheet. Sprinkle the top with a dust of flour and cover with a towel. Then, turn your oven on briefly to 350°F, then off—this creates a warm, cozy environment perfect for dough rising without cooking it. Place a 9×13 pan filled with boiling water inside below your dough to add humidity. Let the dough rise for about an hour until it doubles in size. Trust me, this step is the difference between a so-so donut and an unforgettable bite.
Step 5: Roll, Cut, and Rise Again
Gently turn the dough out and roll it lightly to preserve its fluffiness—no heavy-handed rolling here. Cut into 12 rectangles, trimming the rounded edges for a perfect bar shape. Place these on floured baking sheets, and back into your warm oven proofing box for another 45 minutes to rise again.
Step 6: Frying to Golden Perfection
Heat your peanut oil to a steady 350°F. I use a candy thermometer for keeping it perfect. Fry the donuts carefully in small batches, flipping after 30-40 seconds, until golden. Drain them briefly on paper towels, but you want to glaze them only when completely cool, or the icing won’t stick.
Step 7: Whisk Up That Irresistible Maple Glaze
Mix powdered sugar, corn syrup, salt, vanilla, maple extract, and hot water until you get a dipping glaze that’s just thin enough to coat your donuts beautifully. I always taste mine to decide if it needs a little more maple goodness—it’s your call! Dip each donut, let glaze drip off, and set on a wire rack to harden for 15-20 minutes.
Tips from My Kitchen
- Don’t Rush the Rise: Giving your dough the full rise time is worth the wait—your donuts will be fluffier and more flavorful.
- Temperature Is Key: Use a thermometer to keep water and oil at their ideal temps—it makes or breaks the texture.
- Work Quickly When Frying: Move swiftly to dunk donuts; handling them gently keeps their airy softness intact.
- Cool Completely Before Icing: Warm donuts melt the glaze and make a mess—patience here pays off with that perfect finish.
How to Serve Maple Glazed Donuts Recipe

Garnishes
I like to keep it classic with just the maple glaze, but occasionally I sprinkle a touch of flaky sea salt on the top. That little salty pop balances the sweetness so nicely. For parties, a light dusting of chopped toasted pecans or even some cinnamon sugar on top of the glaze adds a fun twist that everyone loves.
Side Dishes
These donuts are a treat on their own but pair beautifully with a simple cup of coffee or chai tea. For brunch, I like serving them alongside fresh fruit or a creamy yogurt parfait to balance all that indulgence.
Creative Ways to Present
For special occasions, I’ve arranged these donuts on a rustic wooden board with little bowls of extra glaze for dipping—so fun for guests. Another time, I created a “donut wall” hanging them on hooks and decorating with fresh flowers; it was a showstopper at a spring party.
Make Ahead and Storage
Storing Leftovers
Once glazed, I store the donuts in an airtight container at room temperature. They stay fresh and soft for 2-3 days—rarely any leftovers, though, since everyone fights over them!
Freezing
If you want to save some for later, these donuts freeze beautifully. Just freeze them without glaze in a single layer on a baking sheet, then transfer to a zip-top bag. When you’re ready, thaw and dip them fresh in the glaze—it keeps that freshly-made vibe intact.
Reheating
To warm up leftovers, pop them in a 300°F oven for about 5 minutes. Then dip or drizzle them with glaze again for that just-made experience. Microwave reheating makes donuts soggy, so I avoid it whenever I can.
FAQs
-
Can I make these donuts without a deep fryer?
Absolutely! A large, heavy-bottomed pot or Dutch oven works great. Just use a candy thermometer to keep the oil temperature steady at 350°F for even frying and safe cooking.
-
What if I don’t have bread flour—can I use all-purpose flour?
Yes, all-purpose flour will work! Your donuts might be a little softer and less chewy, but they’ll still be delicious. I use bread flour for that slight chewiness that mimics doughnuts you’d get from a bakery.
-
How important is the maple extract in the glaze?
Maple extract is key to achieving the authentic flavor that sets this glaze apart. If you can’t find it, you could try maple syrup, but it might change the glaze consistency. I’d recommend the extract for the best taste.
-
Can I bake these donuts instead of frying?
You can try baking, but frying is what gives these donuts their signature texture and crust. Baking yields a different result—more like a cake donut. If you bake, adjust the recipe and expect a less crispy exterior.
-
How should I handle the dough if it feels too sticky?
Don’t panic if it’s sticky—that’s normal! Add flour a little bit at a time until it’s manageable, but keep it on the wet side for fluffiness. You’ll get a nicer donut texture this way.
Final Thoughts
Making homemade donuts might sound intimidating, but this Maple Glazed Donuts Recipe breaks it down into simple, fun steps that anyone can follow. I love how these donuts bring a little magic to my mornings and smiles all around the table. Once you try them, I have a feeling they’ll become your go-to treat for sharing, gifting, or just treating yourself. Happy frying—and don’t forget to save me one!
Print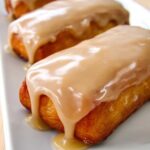
Maple Glazed Donuts Recipe
- Prep Time: 30 minutes
- Cook Time: 2 minutes
- Total Time: 2 hours 32 minutes
- Yield: 12 servings
- Category: Breakfast
- Method: Frying
- Cuisine: American
Description
This Maple Bar Donut recipe creates tender, fluffy rectangular donuts fried to golden perfection and coated in a sweet maple glaze. The dough is enriched with egg yolks and vanilla, proofed twice for a light texture, and fried in peanut oil to ensure crispiness. The homemade maple icing is smooth, glossy, and intensely flavorful, providing a perfect balance to the rich doughnut base. Ideal for breakfast or a sweet snack, these donuts bring homemade charm and classic flavors to your kitchen.
Ingredients
For the Dough
- 1 cup warm water, about 105 degrees F
- 3 tablespoons active dry yeast
- 1 tablespoon granulated sugar
- 1/2 cup granulated sugar
- 1/4 cup butter-flavored shortening or regular shortening
- 3 large egg yolks
- 1 teaspoon vanilla extract
- 3 1/2 cups bread flour, spooned and leveled (up to 4 cups if needed)
- 2 1/2 teaspoons kosher salt
- 1/2 teaspoon baking powder
- Peanut oil for frying (about two 24-ounce bottles)
For the Maple Icing
- 4 cups powdered sugar, plus an extra 1/2 cup (1 pound total)
- 2 teaspoons light corn syrup
- 1/4 teaspoon kosher salt
- 1/2 teaspoon vanilla extract
- 1 teaspoon maple extract, or more to taste
- 1/3 cup hot water, plus more if needed
Instructions
- Activate Yeast: In a large bowl or stand mixer, combine 1 cup of warm water (105-110 degrees F), 3 tablespoons of active dry yeast, and 1 tablespoon of granulated sugar. Let the mixture sit for 5 minutes until it becomes bubbly and frothy, indicating the yeast is active.
- Mix Dough Ingredients: Add 1/2 cup granulated sugar, 1/4 cup shortening, 3 large egg yolks, and 1 teaspoon vanilla extract to the yeast mixture. Beat with the paddle attachment until the shortening is broken up but not fully blended.
- Add Initial Flour and Seasonings: Stir in 1 cup bread flour, then sprinkle 2 1/2 teaspoons kosher salt and 1/2 teaspoon baking powder on top. Lightly mix the salt and baking powder into the flour before beating for about 1 minute until well combined.
- Incorporate Remaining Flour and Knead: Add the remaining flour, 1 cup at a time, up to 3 1/2 to 4 cups total depending on dough stickiness. Switch to the dough hook or knead by hand until the dough pulls away from the bowl sides. Knead for about 5 minutes until smooth and elastic.
- First Rise in Proofing Box: Shape the dough into a ball and place it on a lightly floured baking sheet, forming a 6×6 inch square. Cover with a lightly floured cloth. Warm the oven to 350 degrees F for 30 seconds, then turn it off. Place the dough on the top rack. Put a glass 9×13 inch pan filled with boiling water on the rack below to create humidity, close oven door, and let the dough rise for 1 hour until doubled in size.
- Prepare for Frying: Boil approximately 2 quarts of water in a pot. Remove the risen dough from the oven and gently turn it out onto a floured work surface without deflating it. Dust two baking sheets with flour.
- Shape Donuts: Roll dough gently into an 11×12 inch rectangle without pressing too hard to maintain puffiness. Cut into 12 rectangles about 5×2 inches by first dividing into quarters, then each quarter into 3 pieces. Trim rounded corners for neat rectangles if desired, and transfer pieces to the floured baking sheets, spacing them about 2 inches apart.
- Second Rise: Repeat the warm humid environment proofing in the oven as before with the baking sheets uncovered. Let dough rise for 45 minutes until doubled.
- Heat Oil: About 15 minutes before the second rise ends, heat 2 inches of peanut oil in a deep, heavy pot over medium heat until it reaches 350 degrees F. Maintain this temperature using a candy thermometer.
- Fry Donuts: Working in batches of 2 or 3, carefully transfer dough rectangles into hot oil using a flexible bench scraper or rubber spatula. Fry each side for 30-40 seconds then flip and cook for an additional 20 seconds until golden brown. Remove with a slotted spoon and drain on paper towels. Cool completely before glazing.
- Prepare Maple Icing: In a large bowl or stand mixer, whisk together 4 cups powdered sugar, 2 teaspoons light corn syrup, 1/4 teaspoon kosher salt, 1/2 teaspoon vanilla extract, 1 teaspoon maple extract, and 1/3 cup hot water. Adjust consistency by adding hot water a teaspoon at a time or more powdered sugar until glaze is smooth and dip-friendly.
- Glaze Donuts: Dip the roundest side of each cooled donut into the maple glaze and let excess drip off. Place on a wire rack and allow the glaze to harden for 15-20 minutes before serving.
- Store: Keep glazed donuts in a sealed container at room temperature for 2-3 days for best freshness.
Notes
- All-purpose flour can be used instead of bread flour for a slightly less chewy texture.
- Save and reuse the peanut oil after frying by filtering and storing in bottles for future use.
- Ensure the oil temperature remains steady at 350 degrees F to avoid greasy or undercooked donuts.
- Do not ice warm donuts as the glaze will not adhere properly.
- The homemade proofing box with warm oven and boiling water creates ideal humidity for dough rising.
- Trimmed edges can be used to make an extra small or irregular-shaped donut, minimizing waste.
Nutrition
- Serving Size: 1 donut
- Calories: 320 kcal
- Sugar: 25 g
- Sodium: 220 mg
- Fat: 14 g
- Saturated Fat: 3.5 g
- Unsaturated Fat: 8 g
- Trans Fat: 0 g
- Carbohydrates: 42 g
- Fiber: 1 g
- Protein: 4 g
- Cholesterol: 45 mg
