Homemade Peanut Butter Cupswith Chocolate Recipe
If you’ve ever craved those indulgent, sweet-and-salty bites from your favorite candy aisle, wait till you try this Homemade Peanut Butter Cupswith Chocolate Recipe. I promise, once you make this at home, you’ll never want to buy from the store again. It’s rich, creamy, and the perfect balance of peanut butter and chocolate that melts in your mouth—all without any funky preservatives or mystery ingredients. Stick with me, and I’ll walk you through every step so your peanut butter cups come out absolutely perfect and irresistible.
Why This Recipe Works
- Simple Ingredients, Big Flavor: Only a handful of pantry staples create a rich, homemade taste far superior to store-bought versions.
- Easy Assembly: No fancy molds or tempering chocolate—just melt, mix, and layer for foolproof results.
- Customizable Sweetness and Texture: You control how sweet, salty, or creamy your peanut butter cups turn out.
- Perfect Texture Balance: The chocolate almond bark sets smoothly while the peanut butter filling stays luscious and soft.

Ingredients & Why They Work
Every ingredient here partners beautifully to achieve those classic peanut butter cups we all adore. The creamy peanut butter gives that signature flavor, the butter softens it up, and confectioners sugar adds just the right touch of sweetness—all wrapped in a smooth chocolate coating. Here are some quick tips about each ingredient so you get the best results.
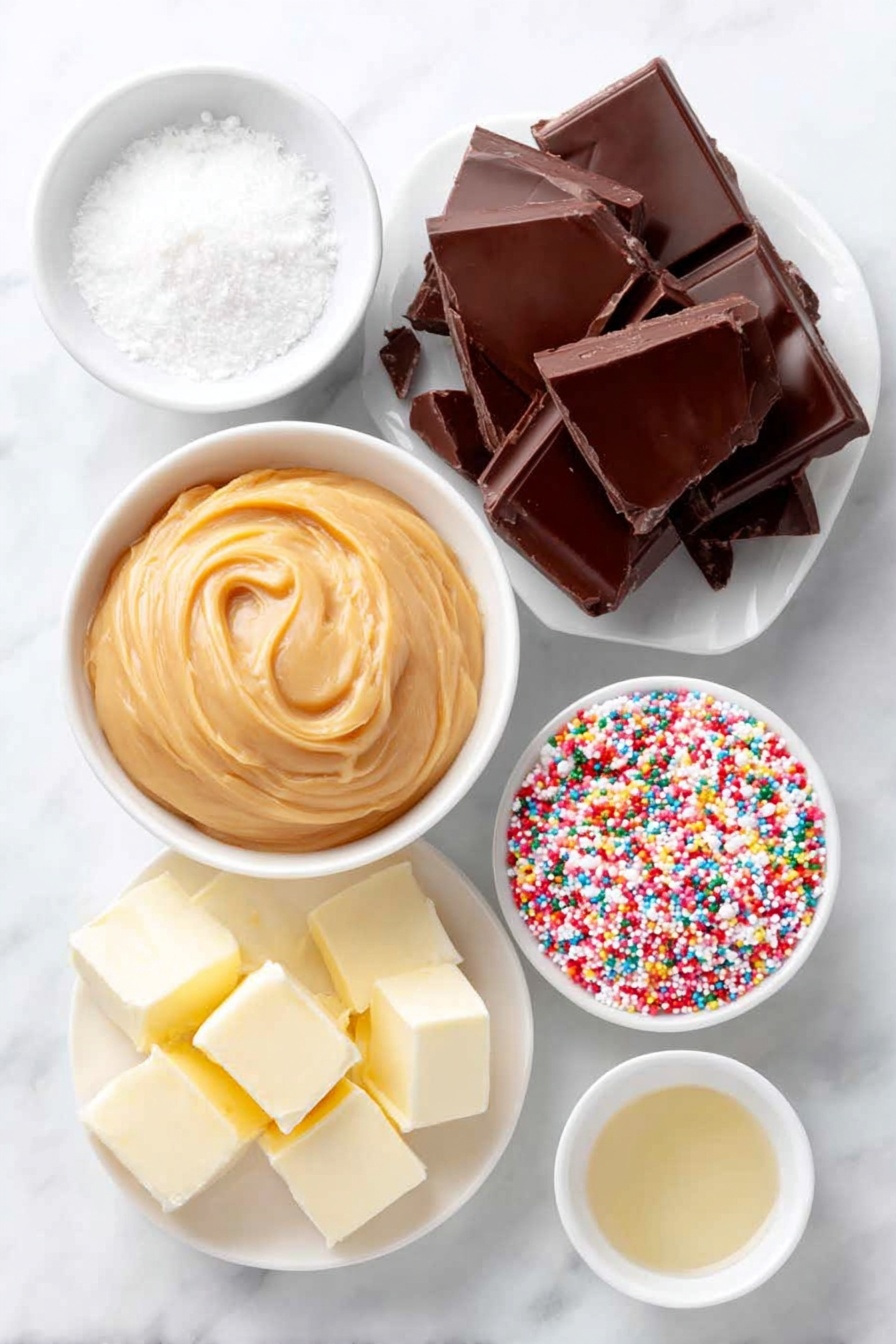
- Creamy peanut butter: Make sure it’s smooth—not chunky—for easy mixing and a creamy filling texture.
- Unsalted butter: Bringing it to room temperature helps it blend seamlessly with the peanut butter.
- Vanilla extract: Just a teaspoon adds lovely depth and a subtle warmth to the filling.
- Confectioners sugar: It sweetens without grit and helps stiffen the filling so it holds shape.
- Chocolate almond bark: This melts smoothly and sets firmly; I prefer the vanilla or classic chocolate variety for richness and shine.
- Sprinkles (optional): Fun for dressing up your cups for holidays or celebrations.
Make It Your Way
One of the reasons I love this Homemade Peanut Butter Cupswith Chocolate Recipe is how easy it is to tweak to your taste buds or occasion. Whether you want to make them less sweet, add a bit of crunch, or make a festive batch for the holidays, it’s super flexible.
- Crunch it up: I like mixing in a handful of crushed pretzels or salted nuts into the peanut butter filling for a salty crunch surprise.
- Dairy-free option: Swap the butter for coconut oil to make these vegan-friendly without sacrificing creaminess.
- Spiced up: A pinch of cinnamon or even chili powder in the filling adds a surprising warmth I enjoy for cooler months.
- Fancy flavors: Try flavor extracts like almond or maple instead of vanilla to switch things up.
Step-by-Step: How I Make Homemade Peanut Butter Cupswith Chocolate Recipe
Step 1: Preparing the Peanut Butter Filling
Start by lining a muffin pan with 18 cupcake liners—trust me, these liners save you a sticky cleanup later. Then, in a large bowl, blend the creamy peanut butter and room temperature butter with a mixer until you get a smooth, silky consistency. This is the base of that melt-in-your-mouth texture. Next, add the vanilla extract and sift in the confectioners sugar to avoid lumps, mixing until it combines evenly. It’ll look crumbly at first, but that’s exactly the right consistency for shaping the filling. If it feels too dry, a tiny splash of milk helps smooth it out without making it runny.
Step 2: Melting the Chocolate Almond Bark
Gently melt your chocolate almond bark in the microwave using 30-second intervals, stirring thoroughly after each one. This step is important because it prevents the chocolate from burning or seizing up. Watch closely for when almost all the chunks have melted—then give it a final stir to smooth it out completely. The chocolate should be glossy and easy to spread.
Step 3: Forming the Cups and Filling
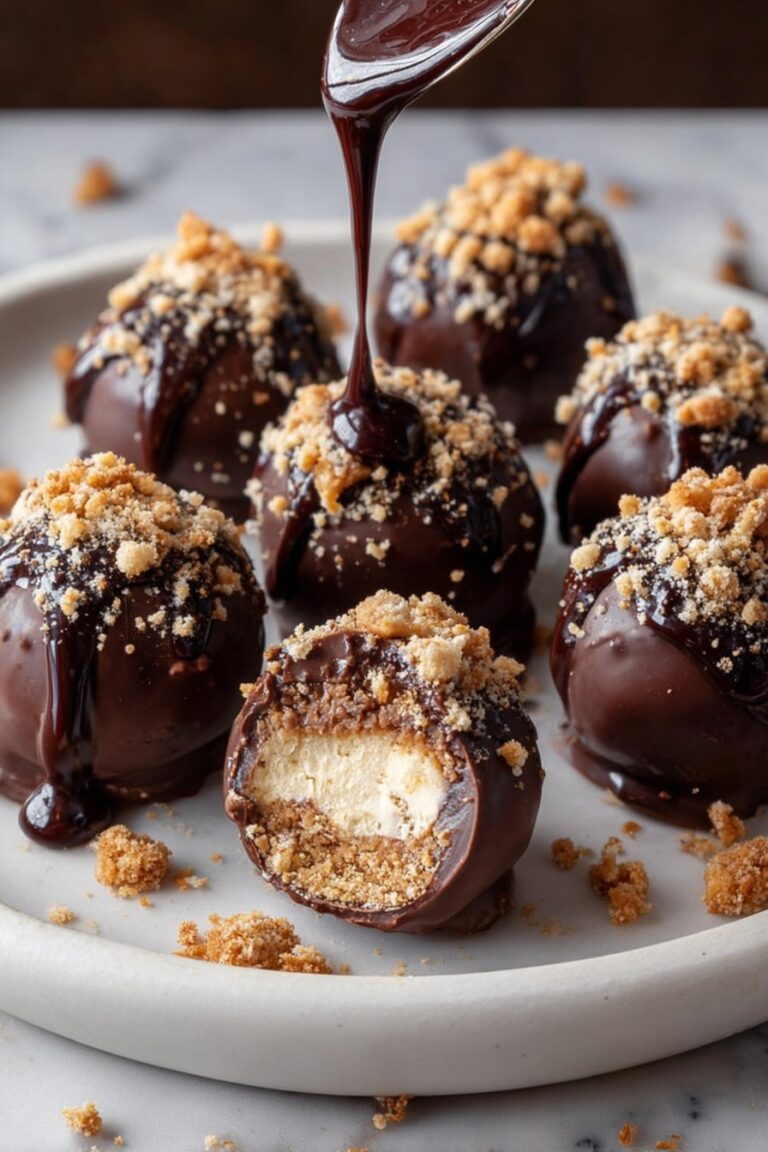
Spoon a small amount of the melted chocolate into the bottom of each cupcake liner. Tilt and spread it a bit up the sides to form a chocolate “shell.” This thin layer prevents peanut butter from soaking through and gives you that classic cup shape. Pop the pan in the fridge for a few minutes if you want the chocolate to firm faster. Meanwhile, scoop heaping tablespoons of the peanut butter mixture, roll each into balls, and then gently press into thick discs that will fit nicely inside the cups.
Step 4: Assembling and Setting
Place one peanut butter disc in each chocolate-lined cupcake. Cover each with more melted chocolate, making sure the filling is completely sealed. If you want to add sprinkles or festive candy toppings, sprinkle them right away before the chocolate sets. Now, let your cups rest at room temperature for about an hour or pop them in the refrigerator for 30 minutes if you’re eager to dig in sooner. This gives the chocolate time to firm up beautifully around the creamy peanut butter center.
Tips from My Kitchen
- Room Temperature Butter: Cold butter won’t blend well; make sure it’s soft but not melted for a silky filling.
- Melting Chocolate: Don’t rush! Stirring after short microwave bursts prevents burning and keeps the shine.
- Filling Shape: Rolling into balls then flattening helps the peanut butter layer fit perfectly and avoid breaking through chocolate.
- Store Smart: Use cupcake liners even when storing—you’ll thank me when you want one without the mess.
How to Serve Homemade Peanut Butter Cupswith Chocolate Recipe

Garnishes
For everyday treats, I keep my peanut butter cups simple—just the chocolate and peanut butter. But for celebrations, I love adding colorful sprinkles or crushed peppermint around Christmas to brighten them up. You can even drizzle a bit of caramel or sea salt flakes on top for an extra special twist.
Side Dishes
These peanut butter cups are perfect on their own but pair beautifully with a cold glass of milk, a scoop of vanilla ice cream, or alongside fresh fruit like sliced strawberries for a balanced dessert platter.
Creative Ways to Present
When I’m gifting these homemade delights, I like to place them in small cupcake boxes with tissue paper, tied with rustic twine or ribbon. For parties, arranging them on a decorative platter sprinkled with chopped nuts or edible gold dust always gets compliments. These presentation touches make the treats feel extra special and festive.
Make Ahead and Storage
Storing Leftovers
I store leftover peanut butter cups in an airtight container in the refrigerator—it keeps them fresh for up to two weeks. Be sure to keep the cupcake liners on or place parchment paper between layers to prevent sticking or moisture buildup.
Freezing
Freezing works wonderfully if you want to prep in bulk. I freeze mine in a single layer on a baking sheet, then transfer to a freezer-safe bag or container. When you’re ready to enjoy, just thaw in the fridge for a few hours—still creamy and delicious, just like freshly made!
Reheating
Since these are no-bake treats, reheating isn’t really necessary. If you prefer your peanut butter cups at room temperature, just leave them out on the counter for about 15 minutes before eating—they soften up nicely without melting.
FAQs
-
Can I use natural peanut butter for this recipe?
Natural peanut butter can be used, but it tends to be more oily and less stable because it lacks added stabilizers. You might find the filling a bit softer or oilier. To balance this, chill your mixture before shaping or consider stirring it thoroughly to keep it firm.
-
What’s the best way to melt the chocolate almond bark?
Melting in short 30-second bursts in the microwave, stirring well between each interval, prevents the chocolate from burning or becoming grainy. Alternatively, a double boiler works great to gently melt the bark while maintaining smoothness and shine.
-
Can I make these peanut butter cups nut-free?
You can try substituting the peanut butter with seed butters like sunflower seed or soy nut butters to accommodate nut allergies. Keep in mind, texture and flavor will change but the basic method remains the same.
-
Why do my peanut butter cups turn out crumbly or dry?
This is usually due to too much confectioners sugar or not enough butter or peanut butter. Make sure your butter is softened well and consider adding a tiny bit of milk or cream to keep the filling moist and pliable. Also, don’t overmix once sugar is added; mix just until combined.
-
Can I use regular chocolate bars instead of almond bark?
Regular chocolate bars can work but almond bark is formulated to stay firm and smooth without tempering, making it easier for beginners. If you use regular chocolate, melt carefully and consider tempering for the best texture and shine.
Final Thoughts
This Homemade Peanut Butter Cupswith Chocolate Recipe has become a staple whenever I have guests or want a quick, satisfying treat. There’s something so rewarding about biting into a cup you made from scratch, knowing exactly what’s inside, without any preservatives or fillers. I hope you’ll give it a whirl and discover how surprisingly easy it is to make your own candy classics at home. Trust me, once you try it, your sweet tooth will be thanking you for a long time!
Print
Homemade Peanut Butter Cupswith Chocolate Recipe
- Prep Time: 20 minutes
- Cook Time: 0 minutes
- Total Time: 1 hour 20 minutes
- Yield: 18 servings
- Category: Dessert
- Method: No-Cook
- Cuisine: American
- Diet: Vegetarian
Description
Delicious homemade peanut butter cups made with creamy peanut butter and rich almond bark chocolate, perfect for a sweet treat or gift. Easy to prepare and customize with optional sprinkles.
Ingredients
Peanut Butter Mixture
- 1 cup creamy peanut butter
- ¼ cup unsalted butter room temperature
- 1 teaspoon vanilla extract
- 1½ cups confectioners sugar
Chocolate Coating
- 1 pound chocolate almond bark or vanilla almond bark
- sprinkles optional
Instructions
- Prepare the Muffin Pan: Line a muffin pan with 18 cupcake liners to create individual molds for the peanut butter cups.
- Mix Peanut Butter Filling: In a large bowl, use a mixer to blend the creamy peanut butter and unsalted butter until smooth and well combined.
- Add Vanilla and Sugar: Mix in the vanilla extract and confectioners sugar until the mixture forms a crumbly but combined dough.
- Melt Chocolate Almond Bark: Place the almond bark in a microwave-safe bowl and melt in 30-second intervals, stirring between each until completely smooth.
- Coat Cupcake Liners: Spoon a small amount of melted almond bark into the bottom of each cupcake liner, spreading it across the bottom and slightly up the sides to create a chocolate shell.
- Shape Peanut Butter Discs: Scoop heaping tablespoons of the peanut butter mixture, roll into balls, and flatten them into thick discs that will fit nicely inside the chocolate-lined cups.
- Assemble Peanut Butter Cups: Place one peanut butter disc into each chocolate-lined cup, then cover the peanut butter layer with the remaining melted chocolate, spreading it evenly.
- Add Sprinkles: If desired, add sprinkles or candy decorations on top of the chocolate layer immediately before it sets.
- Set the Cups: Let the peanut butter cups set at room temperature for about 1 hour or refrigerate for 30 minutes until firm before serving or storing.
Notes
- Store the peanut butter cups in an airtight container in the refrigerator for up to 2 weeks to maintain freshness.
- You can customize your peanut butter cups by adding sprinkles or candy decorations for festive occasions like Christmas.
- Ensure the peanut butter mixture is well chilled or firm enough to handle while shaping into discs for easier assembly.
- If almond bark is not available, use good quality melting chocolate or chocolate chips as substitutes.
- Use cupcake liners that are sturdy enough to hold the weight of the peanut butter and chocolate layers.
Nutrition
- Serving Size: 1 peanut butter cup
- Calories: 200 kcal
- Sugar: 18 g
- Sodium: 70 mg
- Fat: 14 g
- Saturated Fat: 6 g
- Unsaturated Fat: 7 g
- Trans Fat: 0 g
- Carbohydrates: 18 g
- Fiber: 2 g
- Protein: 5 g
- Cholesterol: 15 mg
