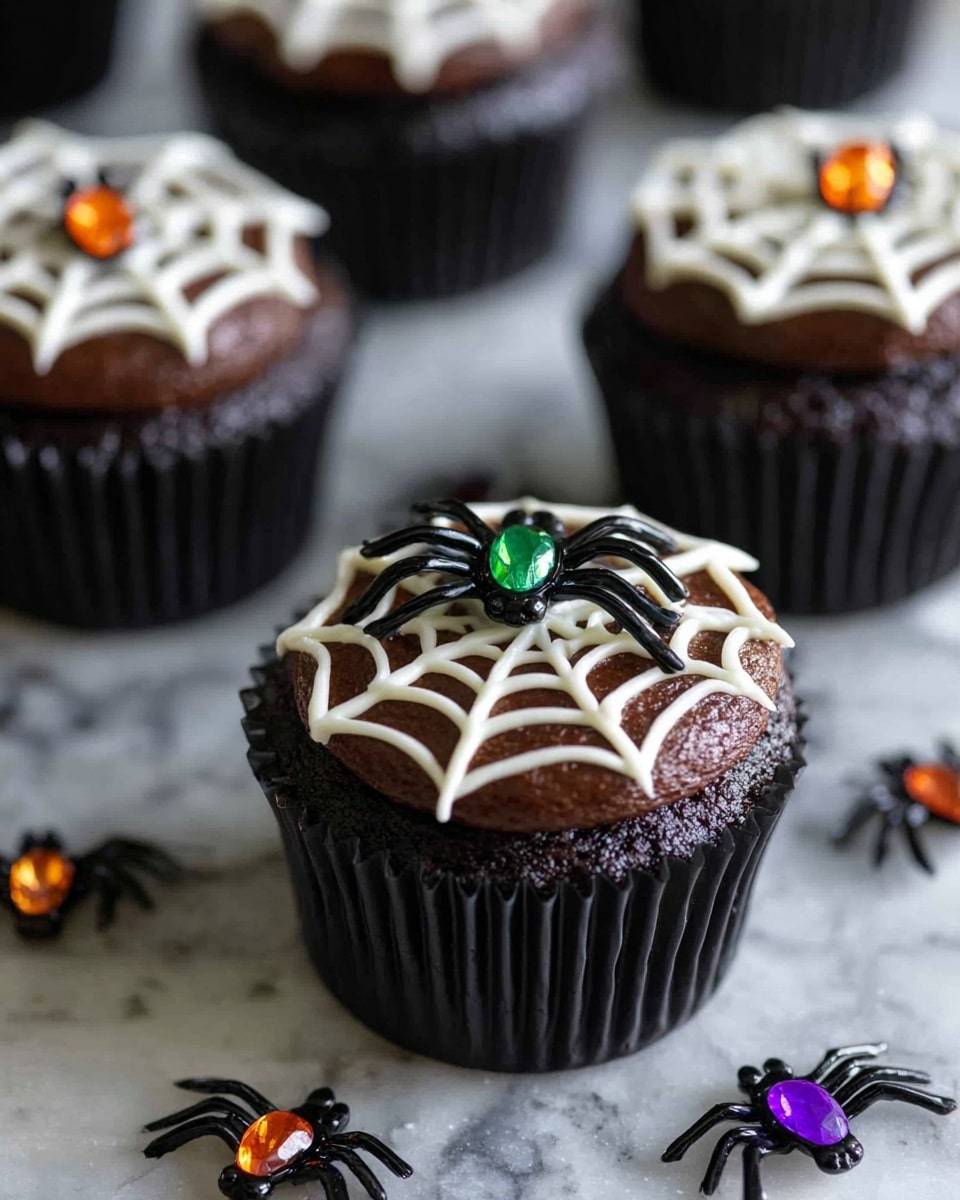
Halloween Spider Cupcakes Recipe
If you’re looking for a fun and spook-tacular treat to wow your guests this season, this Halloween Spider Cupcakes Recipe is an absolute must-try. I whipped these up last year for a kids’ Halloween party, and trust me, they were a total hit – spooky, sweet, and delightfully creepy-cute! Stick around because I’m going to share all my best tips to get these perfect spider cupcakes looking amazing and tasting even better.
Why This Recipe Works
- Simple Ingredients: Uses common baking staples plus a few fun extras like toy spider rings.
- Easy Decoration: The spiderweb effect is quick to pipe and looks stunning every time.
- Kid-Friendly Fun: Great for little helpers or a crowd-pleaser at any Halloween gathering.
- Customizable: You can switch up frosting colors or cupcake flavors for your own twist.

Ingredients & Why They Work
When it comes to this Halloween Spider Cupcakes Recipe, the ingredients come together perfectly to give a rich chocolatey base with eyes that really pop thanks to clever frosting choices. I prefer to use black cupcake liners to keep everything visually cohesive and extra spooky.
- Chocolate Cupcakes: I like to bake mine from scratch or use a quality mix for consistent moistness and a deep chocolate flavor.
- Chocolate Frosting: The base for the spider “web” background—the deeper and creamier, the better for sticking the design.
- White Frosting: For the spider eyes, it creates awesome contrast and makes your web really stand out.
- Black Food Coloring: This is the secret to turning your chocolate frosting into “inky black” webs and spider spots.
- Toy Spider Rings: These add a playful touch and are perfect for kids to “catch” their spider before eating.
Make It Your Way
I love how versatile this Halloween Spider Cupcakes Recipe is — you can easily tweak the flavors or decorations to match your own vibe. For example, sometimes I swap chocolate cupcakes for red velvet when I want a splash of color under the black “web.” Feel free to let your creativity run wild!
- Variation: I once added a little cinnamon to the cupcake batter for a warm spicy twist that everyone complimented.
- Gluten-Free: Using a gluten-free chocolate cake mix works wonderfully and keeps all the fun intact.
- Vegan Option: I’ve successfully replaced eggs and dairy with plant-based alternatives—just be sure to check your cupcake mix compatibility.
Step-by-Step: How I Make Halloween Spider Cupcakes Recipe
Step 1: Bake and Cool Your Cupcakes
Start by filling your cupcake liners a little less than two-thirds full of batter—this helps the cupcakes bake up flat and sturdy, perfect for decorating. I like using black cupcake liners to amp up the Halloween mood. Once baked, let them cool completely before moving on. Rushing this step will make frosting a sticky mess!
Step 2: Tint and Frost
Mix your chocolate frosting until smooth, then add black food coloring a drop at a time—trust me, it takes quite a bit to get that perfect midnight black. Frost each cupcake with a thin, even layer so your spiderweb design really pops. Don’t worry about perfection here; the web will steal the show.
Step 3: Pipe the Eyes with White Frosting
Using a small frosting tip or a ziplock bag with a tiny corner snipped off, pipe two small white circles for eyes on each cupcake. Then add a little dot in the center of each eye with leftover black frosting or a small dab of black food coloring mixed in white frosting. This contrast is key to making those creepy-cute spiders come alive!
Step 4: Create the Spiderweb Design
Grab a toothpick and gently drag straight lines out from the dot in the center of each eye to the edge of the cupcake, repeating all the way around to create your spiderweb effect. Take your time here—it’s the trickiest part, but once you nail it, your cupcakes look incredible. Finally, pop the toy spider ring right on top and you’re done!
Tips from My Kitchen
- Perfect Flat Tops: Filling liners just under two-thirds full avoids dome tops, giving you a smooth canvas for decoration.
- Black Frosting Magic: Use gel food coloring instead of liquid for richer black and less impact on frosting texture.
- Steady Hands Win: When making spiderweb lines, steady your hand on the counter for better control with your toothpick.
- Spider Placement: Set toy rings gently without pressing too hard to avoid disturbing your delicate web design.
How to Serve Halloween Spider Cupcakes Recipe
Garnishes
I usually keep garnishes simple so the spiders stay front and center. But sometimes I add a dusting of edible silver shimmer or a tiny sprinkle of black sanding sugar around the edges for that eerie nighttime sparkle. A few fake spider webs strewn across the serving tray add an extra wow factor!
Side Dishes
These cupcakes shine on their own, but if you want to create a full Halloween spread, pairing them with pumpkin spice latte or a blood-red cranberry punch works beautifully. For savory sides, think mini “mummy” hot dogs or stuffed pepper jack-o’-lanterns – fun bites that complement the cupcake’s playful vibe.
Creative Ways to Present
Last Halloween, I arranged these cupcakes on a black serving tray lined with faux spiderweb fabric, with battery-operated candles for spooky lighting. Another idea I love is placing handfuls of dry ice in the serving bowl for a misty, otherworldly effect—just be sure to keep kids safe from direct contact!
Make Ahead and Storage
Storing Leftovers
I store any leftover Halloween Spider Cupcakes in an airtight container in the fridge for up to 3 days. To avoid the frosting getting soggy or smushed, I place toothpicks around the cupcakes inside the container to create a little “stand” space before sealing it.
Freezing
Freezing fully decorated cupcakes can be tricky, so I prefer to freeze the baked cupcakes without frosting. After thawing, I frost and decorate them fresh. If you’re short on time, you can freeze fully decorated cupcakes with rings off, wrapped well in plastic wrap and foil – but I find the texture sometimes changes a bit.
Reheating
I never heat these cupcakes because the frosting can melt, but if you prefer a warm cupcake, I’ll gently warm the cupcake portion in the microwave for 10 seconds and then add frosting and decorations cold. Works like a charm!
FAQs
-
Can I use store-bought cupcakes for this Halloween Spider Cupcakes Recipe?
Absolutely! Store-bought chocolate cupcakes work just fine. Just make sure they’re completely cooled before decorating, and choose ones with flat tops if possible for easier frosting and spiderweb design.
-
What if I don’t have black food coloring?
You can make a very dark chocolate frosting using cocoa powder and a small pinch of blue or purple gel food coloring to deepen the color. It won’t be jet black but still looks spooky and delicious.
-
Are the toy spider rings safe for all ages?
They’re great for older kids who understand not to swallow small toys. For toddlers, consider using edible spider decorations or omit the rings to ensure safety.
-
Can I make this recipe gluten-free or vegan?
Yes! Use gluten-free cupcake mixes and ensure frostings are free of dairy for a vegan adaptation. I’ve had success with several brands and recipes that make this easy while keeping that spooky fun intact.
Final Thoughts
This Halloween Spider Cupcakes Recipe holds such a special place in my holiday baking arsenal—not just because they’re so fun to make, but because watching kids (and adults!) laugh and marvel over these creepy little critters never gets old. Whether it’s your first time decorating or you’re a veteran cupcake artist, these spiders are a guaranteed crowd-pleaser you’ll want to make again and again. Give them a shot and let me know how your spooky creations turn out—I bet you’ll love them as much as I do!
Print
Halloween Spider Cupcakes Recipe
- Prep Time: 30 minutes
- Cook Time: 20 minutes
- Total Time: 50 minutes
- Yield: 24 servings
- Category: Dessert
- Method: Baking
- Cuisine: American
Description
These Halloween Spider Cupcakes are a spooky and fun treat featuring rich chocolate cupcakes topped with black chocolate frosting decorated like spiderwebs and finished with playful toy spider rings. Perfect for Halloween parties and festive gatherings.
Ingredients
Cupcakes
- 24 baked chocolate cupcakes (preferably in black cupcake liners)
Frosting and Decoration
- 3 cups chocolate frosting
- 1 cup white frosting
- black food coloring
- 24 toy spider rings
Instructions
- Prepare the Cupcakes: Fill your cupcake liners a little less than two-thirds full with chocolate cupcake batter to ensure flat tops after baking. Bake according to your chocolate cupcake recipe and allow them to cool completely before frosting.
- Color and Frost: Mix black food coloring into the chocolate frosting to turn it black. Spread a thin layer of this black frosting evenly on the top of each cooled cupcake.
- Create Spiderweb Eyes: Using a small frosting tip or a ziplock bag with a corner snipped, pipe two white circles on each cupcake to resemble eyes. Add a small dot of black or chocolate frosting in the center of each white circle to complete the eyes.
- Make the Spiderweb: Starting from the center dot of the eye, use a toothpick to drag straight lines outward to the edges of the cupcake, repeating the process around the cupcake to simulate a spiderweb pattern.
- Add the Toy Spiders: Place one toy spider ring on top of each cupcake as a festive decoration to complete the Halloween theme.
Notes
- Use black cupcake liners to enhance the spooky appearance.
- Allow cupcakes to cool completely before frosting to prevent melting or sliding.
- If you do not have black food coloring, mix blue and red food colorings with a little green to achieve a near-black shade.
- Use a toothpick or a skewer to make spiderweb lines carefully for the best effect.
- Toy spider rings can be found at party supply stores or online for a fun and safe decoration.
Nutrition
- Serving Size: 1 cupcake
- Calories: 250 kcal
- Sugar: 22 g
- Sodium: 150 mg
- Fat: 12 g
- Saturated Fat: 5 g
- Unsaturated Fat: 6 g
- Trans Fat: 0 g
- Carbohydrates: 32 g
- Fiber: 2 g
- Protein: 3 g
- Cholesterol: 25 mg


