Halloween Peanut Butter Cookie Cups Recipe
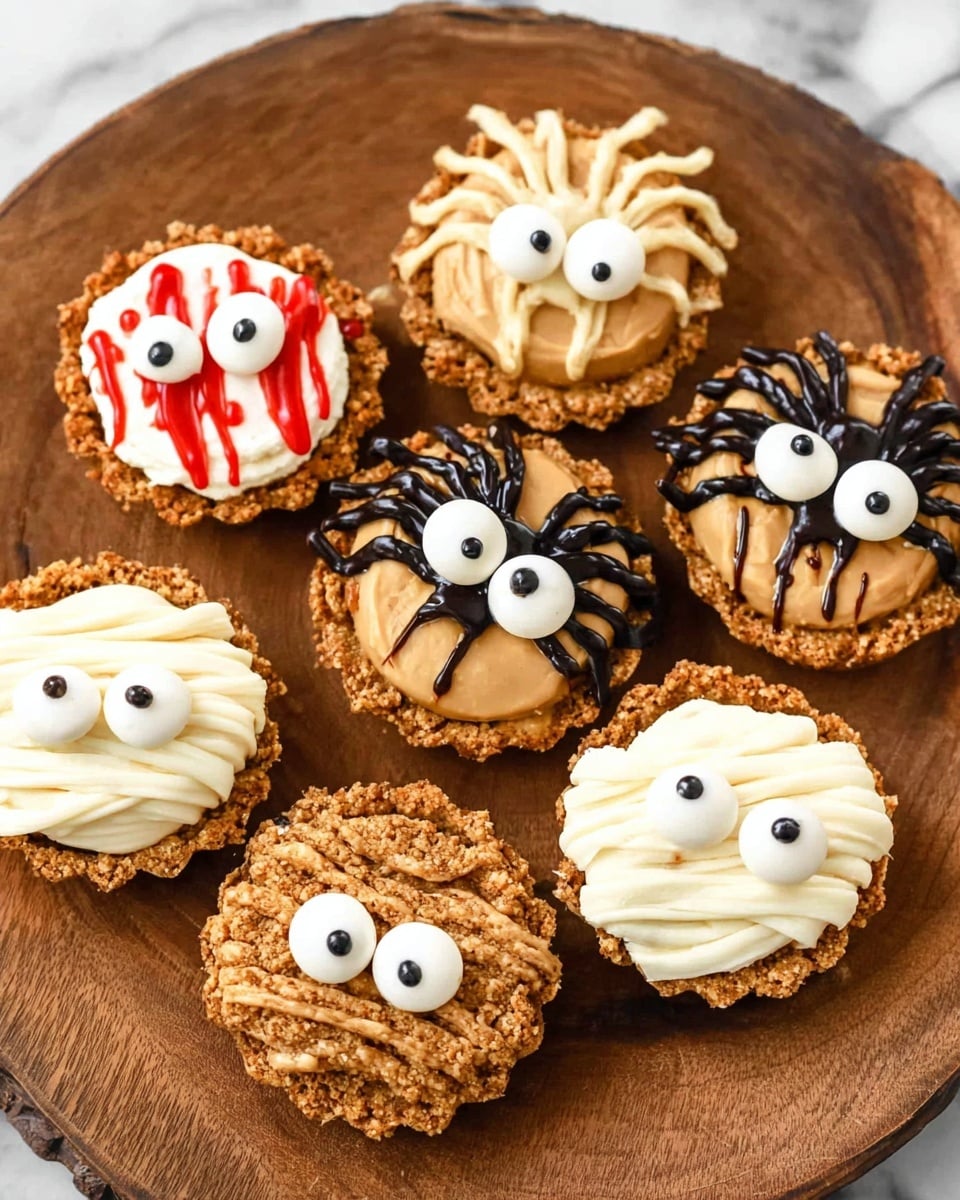
If you’re looking for a cookie recipe that’s as fun to make as it is to eat, then you’re in the right place. This Halloween Peanut Butter Cookie Cups Recipe is one of my all-time favorites to bake around spooky season. It’s a simple peanut butter cookie base transformed into adorable and slightly creepy little treats topped with candy eyes, chocolate drizzles, and marshmallow magic. Trust me, once you try these little cuties, you’ll want to keep making them year after year. Let me walk you through everything you need to know to nail this perfect Halloween dessert!
Why This Recipe Works
- Simplicity Meets Creativity: You start with just three pantry staples for the cookies, then let your imagination run wild with fun Halloween decorations.
- Perfect Texture: The peanut butter cookies come out soft and chewy with just a little crisp on the edges – the ideal base for candy toppings.
- Kid-Friendly & Festive: These cookie cups are a hit with kids and adults alike, and they’re a fantastic Halloween party treat or classroom snack.
- Customizable Designs: Mummies, spiders, or spooky eyeballs – you pick your favorite or make all three without extra fuss.

Ingredients & Why They Work
Every ingredient in this Halloween Peanut Butter Cookie Cups Recipe plays a role in building flavor and texture – plus, the candy toppings bring in that extra fun factor that turns ordinary cookies into festive treats. Here’s a quick rundown and some tips before you shop.
- Creamy Peanut Butter: Use a smooth, high-quality peanut butter for the best texture; natural varieties with no excess oil work great.
- Granulated Sugar: This adds sweetness and helps create that slight crispness on the cookie edges.
- Egg: Acts as a binder to hold everything together while keeping the cookies soft.
- White Chocolate Reese’s Cups: Perfect for mummy and eyeball designs – their creamy filling melts just right on warm cookies.
- Candy Eyes: These are essential for the spooky look and can be found in most baking aisles or online.
- Ghirardelli White & Dark Chocolate Melting Wafers: These melt smoothly for drizzling and decorating without seizing.
- Reese’s Peanut Butter Cup Miniatures: Great for spider cookies, their size fits beautifully on cookie cups.
- Marshmallows (optional): Can be used as an alternative for some designs and add a fluffy texture twist.
- Sparkly Red Gel: For that creepy bloody eyeball effect – makes your cookies stand out at any Halloween party.
Make It Your Way
One of the reasons I adore this Halloween Peanut Butter Cookie Cups Recipe is how flexible it is. I often tweak the toppings based on what I have on hand or the vibe of my Halloween party. You can totally make it your own and have fun experimenting.
- Variation: Last year, I swapped the candy eyes for mini chocolate chips and used pretzel sticks to create spider legs – it was a hit and gave a salty-sweet twist!
- Dietary swap: You can easily make this gluten-free by checking your peanut butter and candy ingredients, or try almond butter for a slightly different flavor.
- Seasonal twist: Add a sprinkle of pumpkin spice to the cookie dough for an autumnal flair that smells heavenly baking.
- Extra spooky: Use edible googly eyes or glow-in-the-dark sprinkles if you’re baking with kids who love everything animated.
Step-by-Step: How I Make Halloween Peanut Butter Cookie Cups Recipe
Step 1: Mixing Your Cookie Magic
Start by preheating your oven to 350°F and spraying your mini muffin tin with baking spray. In a medium bowl, mix creamy peanut butter, sugar, and a large egg until the texture is smooth and fully combined. This simple dough is your canvas, so no need for elaborate creaming or chilling – just stir it until it’s uniform.
Step 2: Scooping & Baking
Use a 1-tablespoon cookie scoop or spoon to drop dollops of cookie dough into the mini muffin pan, filling each cup. Pop the tray in the oven and bake for 12 to 14 minutes until cookies turn golden but still soft. This timing is key – too long, and they’ll dry out; too short, and they won’t hold their shape.
Step 3: Pressing & Decorating Immediately
This is where the Halloween magic really starts! Right when the cookies come out of the oven, gently press your chosen Reese’s cups or marshmallow halves into each cookie. Don’t wait—cookies need to be hot so that candy melts into them slightly, creating a snug fit. Then grab your melted chocolates, candy eyes, and gels to bring your mummies, spiders, and spooky eyeballs to life.
Tips from My Kitchen
- Prep Your Candy First: Unwrap and arrange your candy before you start baking to keep everything moving quickly when the cookies are hot.
- Let Cookies Cool a Bit: After decorating, let the cookie cups rest in the muffin tin for about 10 minutes before popping them out so they stay intact.
- Use a Butter Knife to Remove: Carefully run a butter knife around the edges to help loosen these delicate cups from the tin without breaking.
- Melting Chocolate Consistency: Melt your wafers slowly over low heat or in short bursts in the microwave for perfect drizzle consistency.
How to Serve Halloween Peanut Butter Cookie Cups Recipe
Garnishes
I love using extra candy eyes on top for maximum spooky appeal, plus a drizzle of white or dark chocolate as “mummy wraps” or “spider legs.” Occasionally, I add edible glitter or colored sugar sprinkles to bring a whimsical shine that kids adore. The red gel is my go-to for the bloody eyeballs – it looks dramatic and delicious!
Side Dishes
These cookie cups pair beautifully with a chilled glass of milk (classic, right?). For a party, I usually line them up with pumpkin-shaped sugar cookies or a festive fruit platter like black grapes and orange slices for a nice contrast. They also balance well with a warm cup of spiced apple cider or hot chocolate.
Creative Ways to Present
One year, I set these out inside a carved pumpkin “bowl” lined with parchment – total showstopper. Another fun trick is arranging your Halloween Peanut Butter Cookie Cups Recipe on a serving tray decorated with faux spider webs and plastic spiders, turning your dessert table into a spooky scene. Individually placing each cookie cup in mini cupcake liners also makes for an easy grab-and-go option at parties.
Make Ahead and Storage
Storing Leftovers
I like to store leftover cookie cups in an airtight container at room temperature. They keep well for up to 3 days, but honestly, I’ve rarely had them last that long! Just be gentle when stacking to avoid disturbing the delicate decorations.
Freezing
Freezing works too! I freeze these in a single layer on a baking sheet first, then transfer them to a freezer bag to protect the decorations. When I’m ready to enjoy, I let them thaw in the fridge overnight to prevent condensation from making the candy soggy.
Reheating
If you want a warm cookie cup, I reheat them gently in a low oven (about 275°F for 5-7 minutes), watching carefully so the chocolate doesn’t melt too much. Microwaving can make the peanut butter filling a bit oily, so oven reheating is my preferred method.
FAQs
-
Can I make the Halloween Peanut Butter Cookie Cups Recipe without peanut butter?
While peanut butter is key to the flavor and texture of these cookie cups, you can substitute it with almond or sunflower butter if needed. Keep in mind the taste and texture will shift slightly, so it’s best to choose a creamy, spreadable nut or seed butter for the best results.
-
How do I prevent the candy from sliding off the cookies?
Press the candy toppings into the cookies immediately after baking while the cookies are still warm. This slight melting helps the candy stick. Also, letting cookies cool completely in the pan sets everything nicely, preventing toppings from sliding off later.
-
Can I use regular chocolate chips instead of melting wafers for decoration?
Regular chocolate chips can sometimes seize when melted, making them harder to drizzle smoothly. Melting wafers are designed for decoration, melting evenly and retaining a silky texture, so they’re worth the investment to get those perfect drizzles and designs.
-
How long will these Halloween Peanut Butter Cookie Cups last?
Stored properly at room temperature in an airtight container, these cookies stay fresh for about 3 days. Beyond that, the decorations may start to soften or lose their shape, so enjoy them sooner rather than later!
Final Thoughts
Honestly, this Halloween Peanut Butter Cookie Cups Recipe is one I keep coming back to because it’s just so joyful to make and share. I love how it combines simplicity with that festive flair that gets everyone excited during the spooky season. You don’t have to be an expert baker to pull these off, and they bring such smiles to faces (those candy eyes work wonders!). So grab your mixing bowl, clear a little space in your kitchen, and dive into these delightful treats. You’ll be glad you did!
Print
Halloween Peanut Butter Cookie Cups Recipe
- Prep Time: 15 minutes
- Cook Time: 14 minutes
- Total Time: 49 minutes
- Yield: 24 cookie cups
- Category: Dessert
- Method: Baking
- Cuisine: American
- Diet: Vegetarian
Description
These Halloween Peanut Butter Cookie Cups are a festive and delicious treat perfect for spooky celebrations. Soft peanut butter cookies serve as the base for fun decorations like mummies, spiders, and bloody eyeballs made with various Reese’s cups, marshmallows, candy eyes, and melted chocolates. Easy to make and delightfully creepy, these cookie cups are great for parties and kids.
Ingredients
Cookie Base
- 1 cup creamy peanut butter
- 1 cup granulated sugar
- 1 large egg
Mummy Decoration
- 24 white chocolate Reese’s cups or 12 regular sized marshmallows, cut in half
- 48 candy eyes
- ½ cup Ghirardelli White Chocolate Melting Wafers, melted
Spider Decoration
- 24 Reese’s Peanut Butter Cup miniatures, unwrapped
- 48 candy eyes
- ½ cup Ghirardelli Dark Chocolate Melting Wafers, melted
Spooky Eyeballs Decoration
- 24 Reese’s White Chocolate Peanut Butter Cup miniatures, unwrapped (or 12 regular marshmallows, cut in half)
- Sparkly red gel (for bloodshot effect)
- 24 spooky candy eyeballs
Instructions
- Preheat oven: Preheat your oven to 350°F and spray a mini muffin tin with baking spray to prevent sticking.
- Make cookie dough: In a bowl, combine 1 cup creamy peanut butter, 1 cup granulated sugar, and 1 large egg. Mix until well blended and smooth.
- Form cookie cups: Using a 1 tablespoon cookie scoop, drop spoonfuls of dough into the prepared mini muffin tin, filling each cup evenly.
- Bake cookies: Bake the cookie cups for 14 minutes until set and edges are slightly golden.
- Add decorations: Remove the pan from the oven. Immediately press your choice of Reese’s cups or marshmallow halves into the hot cookie centers. Proceed to decorate according to your chosen design.
- Decorate Mummies: For mummy cookies, drizzle melted white chocolate over the cookie cups to mimic cloth strips and add candy eyes on top while the chocolate is still wet.
- Decorate Spiders: For spider cookies, press candy eyes onto the peanut butter cup miniatures and use melted dark chocolate to pipe legs onto the cookie cups.
- Decorate Spooky Eyeballs: Use white chocolate peanut butter cups or marshmallow halves, add a candy eyeball on top, and apply sparkly red gel to create a bloodshot effect.
- Cool and serve: Allow the cookie cups to cool in the pan for about 10 minutes, then carefully remove using a butter knife. Enjoy your spooky treats!
Notes
- Have all your candy decorations unwrapped and ready before baking so you can press them into the cookies immediately after removing from the oven.
- Allow the cookie cups to cool in the pan for about 10 minutes to firm up before removing to avoid breakage.
- For mummy cookies, marshmallows create a soft fluffy texture, while white chocolate peanut butter cups add a sweet richness.
- Spider legs can be piped with melted dark chocolate using a toothpick or small piping bag.
- The sparkly red gel adds a fun bloody effect to spooky eyeball cookies—use sparingly for best results.
Nutrition
- Serving Size: 1 cookie cup
- Calories: 140 kcal
- Sugar: 12 g
- Sodium: 90 mg
- Fat: 9 g
- Saturated Fat: 3.5 g
- Unsaturated Fat: 5 g
- Trans Fat: 0 g
- Carbohydrates: 12 g
- Fiber: 1 g
- Protein: 4 g
- Cholesterol: 20 mg


