Halloween Mummy Oreo Cookies Recipe
Looking for a quick and super adorable treat to wow your friends and family this spooky season? Trust me, this Halloween Mummy Oreo Cookies Recipe is pure magic on a plate. Not only are these little mummies ridiculously cute, but they’re also incredibly easy to make—even if you don’t consider yourself a baking whiz. Stick with me here, and I’ll show you how to create these hauntingly fun, sweet Halloween treats that everyone will be talking about.
Why This Recipe Works
- Simple Ingredients: Uses classic Oreo cookies and white chocolate, so you won’t need to hunt down anything fancy.
- Fun Decoration: The piped chocolate “bandages” and royal icing eyes bring these mummies to life in the cutest way.
- Quick to Make: About half an hour from start to finish, making it perfect for last-minute Halloween parties or classroom treats.
- Kid-Friendly: A no-bake dessert that’s fun (and safe!) for little helpers to join in on the decorating.

Ingredients & Why They Work
Each ingredient in the Halloween Mummy Oreo Cookies Recipe plays a part in making this project as charming and tasty as it looks. I love the classic Oreo cookie base—chocolatey and creamy, it’s perfect for this theme. The white chocolate melts smoothly for coating, and the royal icing eyes are the little spooky details that really sell the look.
- Oreo Sandwich Cookies: Any Oreo flavor works, but I usually go with the classic because the black cookie contrasts so well with the white chocolate “bandages.”
- White Chocolate Melting Wafers: These melt easily for dipping and decorating; I prefer melting wafers because they stay shiny and smooth.
- Paramount Crystals: Optional, but trust me, they keep your white chocolate glossy and help stop the dreaded white streaks or “bloom.”
- Royal Icing Eyes: These tiny eyes add personality to each mummy, making every cookie look unique and a tad spooky.
Make It Your Way
I like to think of this Halloween Mummy Oreo Cookies Recipe as a blank canvas. Sometimes I jazz them up with food coloring in the chocolate for a fun twist, or swap out Oreo flavors to surprise my guests. The best part? You can totally personalize these mummies to fit your Halloween vibe.
- Variation: One time, I added a little orange food coloring to the white chocolate to make “pumpkin mummies”—it was a big hit with the kids at our party.
- Dietary Modifications: For dairy-free, try vegan white chocolate wafers—it melts well and keeps the same smooth finish.
- Extra Detail: If you want an extra “creepy” look, pipe on tiny spider webs with dark chocolate icing instead of white.
Step-by-Step: How I Make Halloween Mummy Oreo Cookies Recipe
Step 1: Ready Your Workspace
First things first: line a baking sheet with parchment paper or a Silpat mat. This simple prep saves you from sticky messes later, and your mummies will set up on a clean surface. I typically work by the microwave for easy access to melting the chocolate, too.
Step 2: Melt the White Chocolate the Right Way
Pop your white chocolate melting wafers together with the paramount crystals (if you decide to use them) into a microwave-safe bowl. Heat on medium power for 30 seconds, then stir gently. Repeat 15-second bursts, stirring after each, until the chocolate is fully melted and luxuriously smooth. Patience here is key—overheating can make your chocolate seize, which you don’t want to deal with right before dipping cookies!
Step 3: Dip the Oreos & Add the Eyes
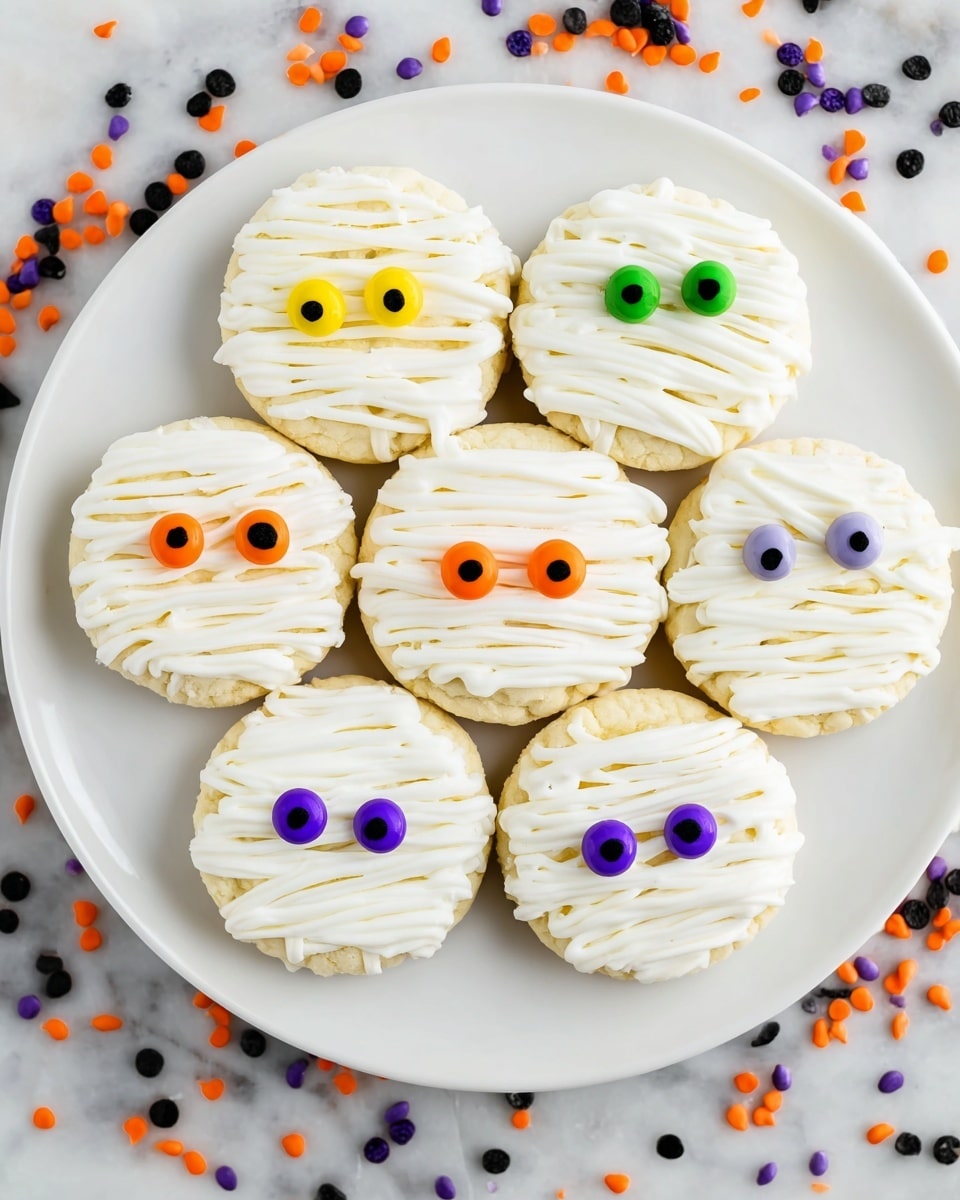
Now comes the fun part—dipping your Oreos! Using a fork or a dipping tool, dunk each cookie into the melted chocolate, then tap gently to let the excess drip off. Transfer to your lined sheet and quickly press two royal icing eyes onto each cookie before the chocolate hardens. Once I got the hang of the timing here, it felt like decorating mini edible Halloween masterpieces.
Step 4: Pipe on the Mummy Bandages
Pour your leftover melted chocolate into a small piping bag or a sandwich bag with a tiny corner cut off. Now, pipe thin, messy lines back and forth over each cookie—but be sure to leave those spooky eyes exposed! This step transforms simple dipped Oreos into cute little mummies with flowing “bandages.” Let the chocolate harden completely before touching them.
Tips from My Kitchen
- Melt Gently: Low and slow microwave bursts prevent burning your chocolate—always stop and stir between heats.
- Timing Is Everything: Place eyes on after dipping quickly before chocolate sets; if it hardens first, the eyes won’t stick well.
- Piping Practice: If piping feels intimidating, practice on parchment first to get cozy with your pressure and speed.
- Avoid Overheating: Chocolate that’s too hot can crack once cooled—let it cool slightly before dipping for the best finish.
How to Serve Halloween Mummy Oreo Cookies Recipe
Garnishes
I often add a sprinkle of edible glitter or some mini candy corn pieces around the cookies just for an extra festive flair on the serving platter. It’s a simple touch, but it adds to the Halloween party vibe and makes your presentation pop.
Side Dishes
These mummies pair beautifully with a cold glass of milk (always!) or a warm pumpkin spice latte if you want to get cozy. For party spreads, try serving alongside other Halloween finger foods like caramel apples or pumpkin-shaped cheese balls.
Creative Ways to Present
One of my favorite presentation tricks is arranging the cookies on a black platter with faux spider webs and small plastic spiders scattered around. I’ve also wrapped a few mummies individually in clear cellophane and tied them with orange ribbon for easy party favors. Kids go nuts for those!
Make Ahead and Storage
Storing Leftovers
If you have leftovers (good luck!), store your Halloween Mummy Oreo Cookies in an airtight container at room temperature. They keep their crisp texture and white chocolate coating nicely for up to a week—great news if you want to make them before the big day.
Freezing
I’ve frozen these cookies before by placing parchment between layers in a freezer-safe container. When thawed, the chocolate holds up well, and they taste just like freshly made. Just avoid thawing in a humid spot to keep those “bandages” looking sharp.
Reheating
Since these are no-bake, reheating isn’t necessary—but if the chocolate looks dull, a gentle 5-10 second zap in the microwave can bring back a little shine. Just be careful not to melt the “bandages” back off!
FAQs
-
Can I use other types of cookies besides Oreos for this Halloween Mummy Oreo Cookies Recipe?
Absolutely! While Oreos give that perfect contrast and classic flavor, any sandwich cookie with a cream filling will work. Just make sure they’re not too thick, or the dipping and decorating might get tricky.
-
What if I don’t have royal icing eyes? Can I use something else?
You can definitely substitute with mini chocolate chips, edible googly eyes, or even pipe dots of black icing for eyes. The key is a small detail that makes the mummy look lively.
-
Why do you recommend using paramount crystals in the white chocolate?
Paramount crystals help keep the melted white chocolate smooth and shiny, and prevent sugar or fat blooming on the surface. They also make the chocolate easier to work with when piping. But if you don’t have any, you can still make excellent mummies without them!
-
Can kids help make these cookies?
Definitely! Kids love dipping and decorating these cookies. Just supervise carefully around the hot melted chocolate. It’s a fun way to get everyone involved in Halloween prep.
Final Thoughts
This Halloween Mummy Oreo Cookies Recipe holds a special place in my heart because it’s one of those no-stress, high-reward treats that brings simple joy to any spooky party or cozy night in. Whether you’re making them with kids or just impressing your friends with your crafty baking skills, these mummies deliver the perfect mix of cute and delicious every time. Give them a try—you’ll be delighted at how easy and fun they are to create!
Print
Halloween Mummy Oreo Cookies Recipe
- Prep Time: 5 minutes
- Cook Time: 25 minutes
- Total Time: 30 minutes
- Yield: 25 cookies
- Category: Dessert
- Method: No-Cook
- Cuisine: American
Description
These Halloween Mummy Oreo Cookies are a fun and spooky treat perfect for Halloween celebrations. Oreo cookies are dipped in melted white chocolate, decorated with royal icing eyes, and drizzled with more white chocolate to create a mummy-like appearance. Easy to make and delightful to eat, these cookies are ideal for parties or festive snacks.
Ingredients
Cookies
- 25 Oreo Sandwich Cookies, your favorite flavor
Chocolate Coating
- 2 cups white chocolate melting wafers
- 2 tablespoons paramount crystals (optional)
Decorations
- Royal icing eyes
Instructions
- Prepare Baking Sheet: Line a baking sheet with parchment paper or a Silpat mat and set it aside for placing the dipped cookies.
- Melt Chocolate: In a microwave-safe bowl, combine white chocolate melting wafers and paramount crystals. Microwave on medium heat for 30 seconds, then stir gently. Continue microwaving in 15-second increments, stirring after each, until the chocolate is fully melted and smooth.
- Dip Cookies: Using a fork or dipping tool, dip each Oreo cookie into the melted white chocolate. Lightly tap the fork to remove excess chocolate and transfer the cookie onto the lined baking sheet. Immediately press royal icing eyes onto the cookies while the chocolate is still wet.
- Pipe Mummy Wraps: Pour some melted white chocolate into a decorating bag or a sandwich bag with a small corner snipped off. Pipe lines back and forth over the dipped cookies to resemble mummy wraps, taking care not to cover the eyes.
- Set the Cookies: Allow the chocolate on the cookies to harden completely at room temperature before serving. Enjoy your spooky Halloween treat!
Notes
- Store the Halloween Mummy Oreo Cookies in an airtight container to keep them fresh for 7 or more days.
- Paramount crystals are optional but recommended to keep the chocolate shiny and smooth, preventing sugar and fat bloom.
- If you don’t have paramount crystals, you can melt the white chocolate carefully and stir frequently to maintain texture.
- Use royal icing eyes or other small candy eyes compatible with dipping in chocolate for best results.
Nutrition
- Serving Size: 1 cookie
- Calories: 150 kcal
- Sugar: 20 g
- Sodium: 95 mg
- Fat: 7 g
- Saturated Fat: 4 g
- Unsaturated Fat: 2 g
- Trans Fat: 0 g
- Carbohydrates: 22 g
- Fiber: 1 g
- Protein: 1 g
- Cholesterol: 5 mg

