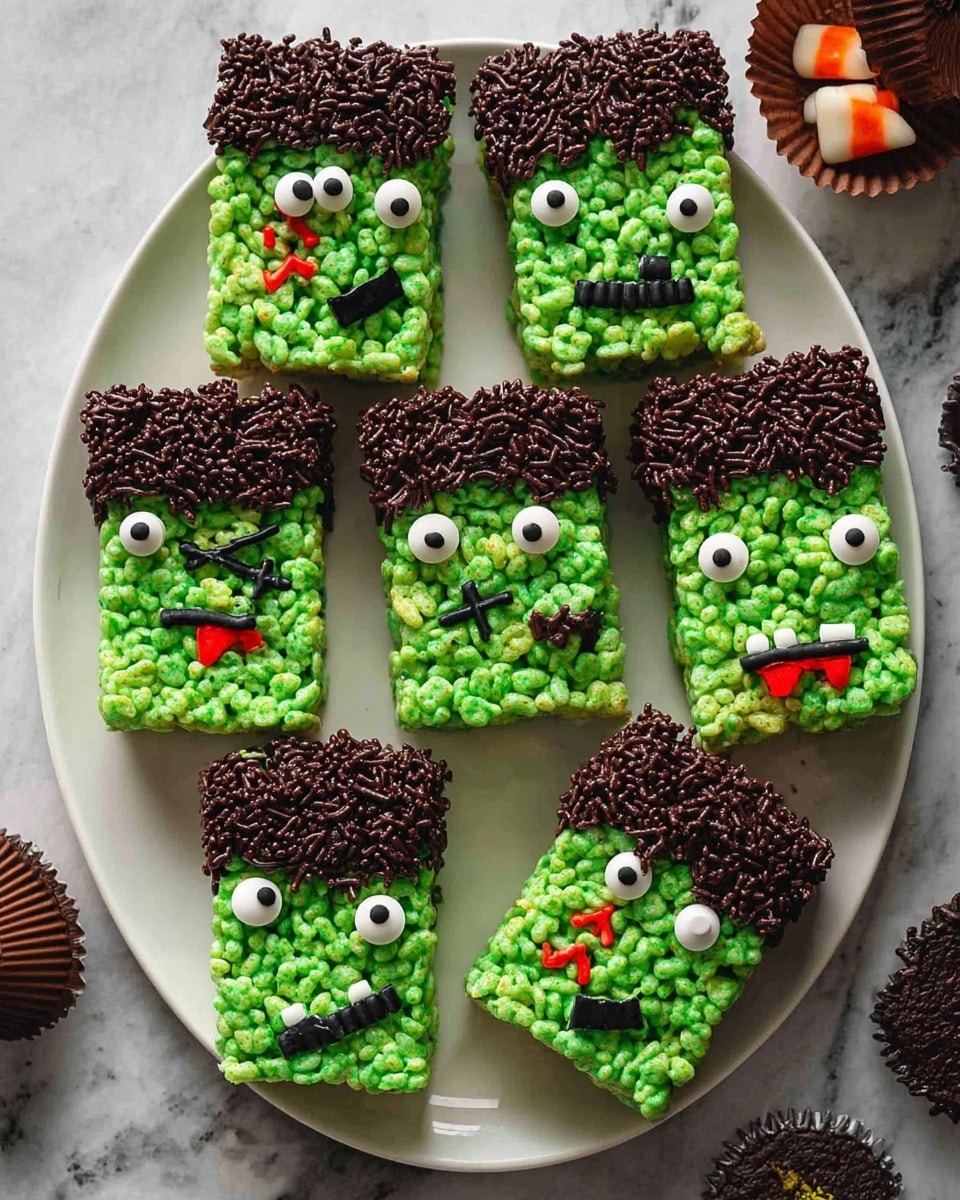
Halloween Green Frankenstein Rice Krispies Treats with Candy Eyeballs and Neck Bolts Recipe
If you’re looking for an easy, fun treat that’s going to wow your friends and family this season, you’ve got to try my Halloween Green Frankenstein Rice Krispies Treats with Candy Eyeballs and Neck Bolts Recipe. Seriously, these are the perfect mix of spooky and sweet — bright green, crispy, and decked out with all the little Frankenstein details that make them irresistibly cute. Plus, they’re quick to whip up, so you can get these monsters ready in no time! Stick with me, and I’ll walk you through every step to nail this festive favorite.
Why This Recipe Works
- Bright and Inviting Color: The green food coloring gives these treats that classic Frankenstein hue that’s eye-catching and perfect for Halloween.
- Crunchy, Chewy Texture: Using classic Rice Krispies cereal balances the softness of marshmallows with a satisfying crispiness.
- Easy Decorating: Candy eyeballs, chocolate dipped neck bolts, and writing gel make detailing fun and simple, no professional decorating skills needed.
- Kid-Friendly and Quick: It takes under an hour from start to finish, and kids love helping assemble these festive Frankenstein faces.

Ingredients & Why They Work
The magic behind these Halloween Green Frankenstein Rice Krispies Treats with Candy Eyeballs and Neck Bolts Recipe comes down to a handful of simple ingredients that play off one another perfectly. Each item is easy to find around Halloween, and together they transform a classic treat into this spooky mashup.
- Unsalted butter: Helps the marshmallows melt smoothly without adding any salty flavors that would interfere.
- Mini marshmallows: The gooey binder of the whole treat; I like minis since they melt more evenly and quickly.
- Green food coloring: The secret to that Frankenstein green — just add until you get a bright, fun shade.
- Rice Krispies cereal: Classic crispy rice cereal creates that perfect crunchy texture.
- Semisweet chocolate chips: Melted for dipping the neck bolts and “stitches” — adds rich flavor and visual contrast.
- Chocolate sprinkles: Adds texture and a little extra chocolate fun on the dipped ends.
- Candy eyeballs: No Frankenstein is complete without those googly eyes — they’re easy to find in the seasonal candy aisle.
- Reese’s Minis (unwrapped): These work perfectly as neck bolts — peanut butter cup goodness with the right shape.
- Black writing gel: For drawing spooky mouths and stitches with precision and ease.
- Red writing gel (optional): A fun way to add a little “bloody” effect if you want to up the creep factor.
Make It Your Way
I love that Halloween Green Frankenstein Rice Krispies Treats with Candy Eyeballs and Neck Bolts Recipe gives you room to get creative. Over the years, I’ve played around with different candy for the neck bolts or added colorful sprinkles to dial up the fun. You can totally make this your own!
- Variation: Sometimes I swap out Reese’s Minis for mini gummy worms to make a creepy-crawly version — kids went wild for it at my last Halloween party.
- Dietary tweaks: To make these gluten-free, just make sure you grab gluten-free crispy rice cereal, which is easier to find nowadays.
- Color customization: You can adjust the green intensity depending on your preference, or even mix in some edible glitter for a shiny monster effect!
Step-by-Step: How I Make Halloween Green Frankenstein Rice Krispies Treats with Candy Eyeballs and Neck Bolts Recipe
Step 1: Prep your pan and melt the butter
Start by spraying your 13×9-inch pan with nonstick baking spray. It’ll make removing the treats so much easier later on. Then, melt your butter over medium-low heat in a large pot. I usually give it a gentle stir to make sure it doesn’t brown or burn — you want it silky and smooth as the base for your marshmallow mixture.
Step 2: Melt marshmallows and add green food coloring
Once the butter is melted, toss in all the mini marshmallows along with a pinch of kosher salt to enhance the sweetness. Stir constantly until everything is melted together and smooth. Now comes the fun part: add enough green food coloring to make the mixture glow that vibrant Frankenstein green. Don’t rush here — I like to start with a few drops, stir, then add more until I get the perfect shade. It’s okay if it looks kinda neon — it’ll calm down once mixed with the cereal.
Step 3: Combine with Rice Krispies and press into the pan
Remove the pot from heat and quickly stir in the Rice Krispies cereal until every crispy bit is coated in that green marshmallow mix. Using a piece of parchment paper or lightly greased hands, press the mixture firmly into the bottom of the prepared pan. The greasing helps prevent sticking without messing up the color or texture. Let it rest at room temperature for about 15 minutes to set up — this waiting part is key so the treats don’t fall apart when you cut them later.
Step 4: Slice and melt chocolate for dipping
Turn the set treats out onto a cutting board. Cut the large rectangle lengthwise in half, then slice each half into 5 smaller rectangles. This yields about 10 Frankenstein treats total. About the chocolate: heat your chocolate chips in a microwave-safe glass measuring cup in 30-second intervals, stirring after each, until it’s completely melted and silky smooth. This is where patience pays off; overheating can cause the chocolate to seize, so take your time.
Step 5: Decorate with chocolate, candy eyeballs, and neck bolts
Dip one end of each treat into the melted chocolate, then immediately sprinkle with chocolate sprinkles before it hardens. Next, use the rest of the melted chocolate as glue to attach the candy eyeballs and Reese’s Minis as neck bolts. This step is where your Frankensteins really start to come to life! Finish by drawing mouths, stitches, and other scary details with black writing gel. If you want to get a little extra creepy, add some red gel for a “bleeding” effect. I always find this part the most fun, especially with the kids helping.
Tips from My Kitchen
- Get the Green Right: I learned that the key is to add the food coloring early and test the color before adding cereal — this way you don’t have to guess when it’s already mixed in.
- Use Parchment for Pressing: Pressing the mixture with parchment paper keeps your hands clean and prevents sticking—trust me, it saves a sticky mess!
- Microwave Chocolate Carefully: Heating chocolate in short bursts and stirring prevents burning, giving the chocolate a glossy finish that looks professional.
- Attach Decorations Quickly: Melted chocolate sets fast; work swiftly to place eyes and bolts before it hardens for a strong hold.
How to Serve Halloween Green Frankenstein Rice Krispies Treats with Candy Eyeballs and Neck Bolts Recipe
Garnishes
I like keeping garnishes simple so the Frankenstein faces stand out. Chocolate sprinkles on the dipped ends add fun texture and a little shine. If you want to get fancy, a light dusting of edible glitter makes them pop on a dessert table. Mini-pretzel sticks can also be used on the sides to mimic stitches or scars for extra flair.
Side Dishes
These treats are sweet and filling, so I usually pair them with light, kid-friendly drinks like apple cider or a cold glass of milk. For a Halloween party, I love adding some spooky fruit platters — think orange slices arranged like pumpkins and black grapes for a touch of natural color contrast.
Creative Ways to Present
Whenever I make these Halloween Green Frankenstein Rice Krispies Treats with Candy Eyeballs and Neck Bolts Recipe for parties, I set them upright in a shallow box lined with black tissue paper to make them look like Frankenstein monsters standing tall. Another time, I cut smaller squares and presented them on themed cupcake wrappers for easy grab-and-go treats at a school event — total crowd-pleasers!
Make Ahead and Storage
Storing Leftovers
I store leftover Frankenstein treats in an airtight container at room temperature, layered between sheets of parchment. They keep their freshness well for up to 3 days — perfect for those Halloween leftovers when you want a quick treat without baking again.
Freezing
If you want to make these ahead of the season, you can freeze the treats individually wrapped in plastic wrap and placed in a zip-top freezer bag. When I’ve done this, they stay delicious for up to 1 month. Just thaw at room temperature before serving so the chocolate decorations stay intact.
Reheating
There’s really no need to reheat these since they’re best enjoyed chewy and crisp. But if you like them a little softer, I pop them in the microwave for 5-7 seconds — careful not to melt the decorations! You’ll have warm, gooey treats without losing that iconic Frankenstein look.
FAQs
-
Can I use a different cereal instead of Rice Krispies?
You can! Puffed rice cereal is what gives these treats their classic texture, but you could try other crisp cereals like corn flakes or even gluten-free crispy rice as long as the texture suits your preference.
-
How long do these Halloween Green Frankenstein Rice Krispies Treats last?
Stored in an airtight container at room temperature, they stay fresh for about 3 days. Beyond that, they might start to get stale or too hard.
-
Can kids help make this Halloween Green Frankenstein Rice Krispies Treats with Candy Eyeballs and Neck Bolts Recipe?
Absolutely! This recipe is great for kids to help press the mixture into the pan and decorate. Just be sure to supervise during the melting and dipping steps for safety.
-
What’s the best way to melt chocolate for the decorations?
I prefer microwaving in short 30-second bursts and stirring in between to ensure smooth melting without burning — patience here really makes the difference.
-
Can I use different candies for the neck bolts?
Yes! Reese’s Minis are my go-to because of their shape and flavor, but you can swap in mini chocolate bars, gummy candies, or anything that fits the theme and your taste.
Final Thoughts
This Halloween Green Frankenstein Rice Krispies Treats with Candy Eyeballs and Neck Bolts Recipe is one of my absolute favorite seasonal treats because it’s quick, fun, and gets everyone—from toddlers to grown-ups—in the spirit of Halloween. The vibrant green color and quirky candy decorations bring smiles every time, making it a must-have at any spooky celebration. Trust me, once you make these, they’ll become a Halloween staple you’ll look forward to crafting every year.
Print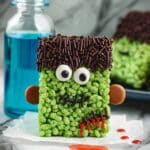
Halloween Green Frankenstein Rice Krispies Treats with Candy Eyeballs and Neck Bolts Recipe
- Prep Time: 30 minutes
- Cook Time: 5 minutes
- Total Time: 50 minutes
- Yield: 10 servings
- Category: Dessert
- Method: Stovetop
- Cuisine: American
- Diet: Vegetarian
Description
Create spooky Halloween Rice Krispies Treats inspired by Frankenstein’s Monster with green marshmallow coating, chocolate-dipped edges, candy eyeballs, and decorative writing gel for a fun, festive dessert.
Ingredients
Main Ingredients
- 4 tablespoons unsalted butter
- 10 ounces mini marshmallows (5-1/2 cups)
- Pinch kosher salt
- Green food coloring (enough to make mixture bright green)
- 5 cups Rice Krispies cereal
Decorations
- 8 ounces semisweet chocolate chips
- ¼ cup chocolate sprinkles
- 20 candy eyeballs
- 20 Reese’s Minis Unwrapped
- Black writing gel
- Red writing gel (optional)
- Nonstick baking spray
Other
Instructions
- Prepare the Pan: Spray the bottom and sides of a 13 x 9-inch pan with nonstick baking spray to prevent sticking.
- Melt Butter: In a large pot, melt the unsalted butter over medium-low heat until fully melted but not browned.
- Add Marshmallows and Color: Add mini marshmallows and a pinch of kosher salt to the melted butter, stirring constantly until the marshmallows are fully melted and the mixture is smooth. Stir in enough green food coloring to achieve a bright green color, adjusting as needed for intensity.
- Combine with Cereal: Remove the pot from heat and fold in the Rice Krispies cereal until all the cereal is completely coated with the green marshmallow mixture.
- Press into Pan: Transfer the mixture into the prepared pan. Using a piece of parchment paper or greased hands, press the mixture evenly against the bottom of the pan. Let it stand at room temperature for 15 minutes to set.
- Cut Treats: Turn the set mixture out onto a cutting board. Cut the large rectangle in half lengthwise, then cut each half crosswise into 5 pieces for a total of 10 treats.
- Melt Chocolate: Place the semisweet chocolate chips in a microwave-safe glass container and microwave in 30 second intervals, stirring between each, until the chocolate is smooth and fully melted.
- Dip Treats: Dip one end of each Rice Krispies treat into the melted chocolate, then place the dipped end on parchment paper. Immediately sprinkle the chocolate-dipped ends with chocolate sprinkles.
- Add Decorations: Use the remaining melted chocolate as glue to attach candy eyeballs and Reese’s Minis as neck bolts onto each treat.
- Draw Details: Use black writing gel to draw mouths and stitches on the treats. Optionally, use red writing gel to add a bit of “blood” for extra spooky detail.
Notes
- Use parchment paper or greased hands to prevent sticking when pressing the mixture into the pan.
- Adjust green food coloring gradually to achieve the desired bright green shade without overpowering the flavor.
- Microwaving chocolate in short intervals and stirring between prevents overheating and seizing.
- If Reese’s Minis are not available, substitute with mini peanut butter cups or similar small chocolates.
- Red writing gel is optional but adds a realistic ‘bloody’ effect for Halloween theme.
Nutrition
- Serving Size: 1 treat
- Calories: 250 kcal
- Sugar: 20 g
- Sodium: 90 mg
- Fat: 12 g
- Saturated Fat: 7 g
- Unsaturated Fat: 4 g
- Trans Fat: 0 g
- Carbohydrates: 33 g
- Fiber: 1 g
- Protein: 2 g
- Cholesterol: 20 mg


