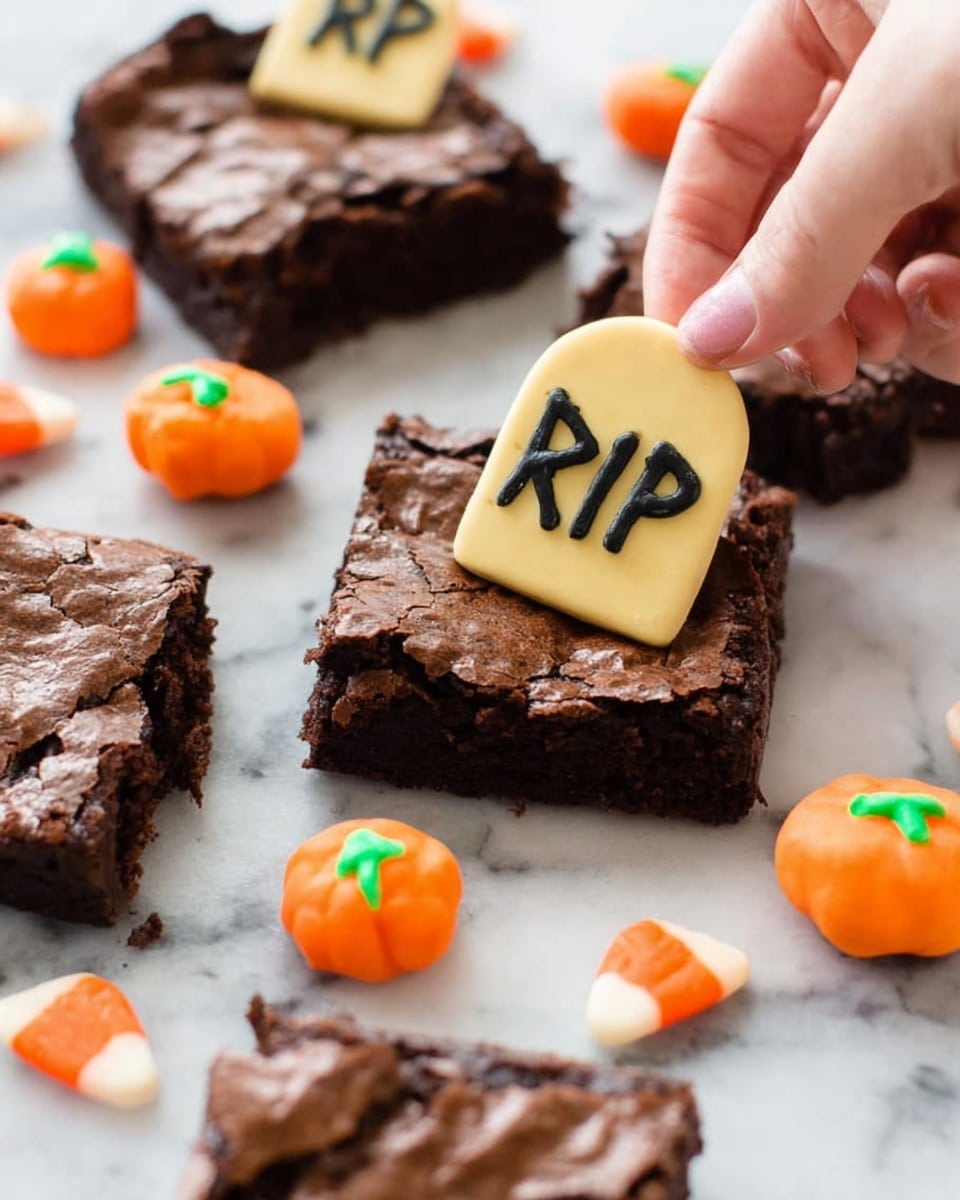
Halloween Brownies with Graveyard Cookies and Green Frosting Recipe
Oh, you’re going to love this one — I promise! If you’re looking to wow your friends and family this spooky season, this Halloween Brownies with Graveyard Cookies and Green Frosting Recipe is pure magic. It’s not just about the taste (though it’s deliciously fudgy), it’s the fun, festive vibe it brings to your baking table. Imagine rich brownies topped with little graveyard-themed cookies and a pop of vibrant green frosting — so cute and perfect for Halloween parties or cozy nights in. Stick with me, and I’ll walk you through every step to nail this recipe!
Why This Recipe Works
- Visual Appeal: The graveyard cookies and green frosting create an adorable spooky vibe that’s easy to pull off.
- Simple Ingredients: Uses straightforward basics plus a few festive touches, so you’re not hunting for specialty items.
- Flexible Prep: Whether you make brownie batter from scratch or use a box mix, it turns out fantastic.
- Kid-Friendly Fun: Decorating with candy pumpkins and writing “RIP” on cookies is always a hit with little ones and adults alike.

Ingredients & Why They Work
Each ingredient in this Halloween Brownies with Graveyard Cookies and Green Frosting Recipe plays a role — we start with rich brownies for that fudgy base, then spooky graveyard cookies and vibrant green frosting bring the fun. Here’s what you need and why I love each.
- Prepared Brownie Batter: Whether from scratch or box mix, this is the rich, chocolatey foundation — I like Ghirardelli for its deep flavor.
- Milano Cookies: These delicate cookies form the “headstones” — their size and shape are just perfect.
- Black Decorating Gel: Essential for writing “RIP” on the cookies; easy to find near the baking aisle and adds that spooky final touch.
- Candy Pumpkins: Tiny, colorful, and so festive — they turn the graveyard scene into something really charming.
- Powdered Sugar: The base for the frosting’s sweetness and smooth texture.
- Butter: Adds richness and creaminess to the frosting — softened for easy mixing.
- Milk: Helps get the buttercream to the right texture — just enough to make it silky.
- Green Food Coloring: This is the star color that brings your frosting to life with a spooky grassy effect.
Make It Your Way
This Halloween Brownies with Graveyard Cookies and Green Frosting Recipe is really fun to tweak! I personally love adding a sprinkle of crushed nuts for extra texture or using dairy-free butter for a vegan twist. You can make it as bright or as subtle as you want with the green frosting, too.
- Gluten-Free Option: I’ve tried using gluten-free brownie mix and gluten-free cookies here — works like a charm, and no one suspects anything!
- Extra Spooky Touch: Adding edible silver glitter to the frosting for a shimmer effect is something I recently tried and totally recommend for kids’ parties.
- Flavor Variations: Swapping candy pumpkins for gummy worms makes a hilarious, creepy graveyard and is always a hit.
Step-by-Step: How I Make Halloween Brownies with Graveyard Cookies and Green Frosting Recipe
Step 1: Prep Your Pan and Bake the Brownies
The first thing I do is line my 8-inch pan with parchment paper — leave about an inch overhang so it’s easy to lift those brownies out later. Pour your prepared brownie batter in and give it a smooth, even surface with a spatula. Bake according to your batter’s instructions (I usually do around 30 minutes for my size). Pro tip: check the brownies with a toothpick about 5 minutes before the baking time ends to avoid overbaking — fudgier is better here.
Step 2: Cool and Cut Into Graveyard-Sized Rectangles
Once out of the oven, let the brownies cool completely — this is the hard part because they smell amazing! Use the parchment overhang to lift them out gently onto a cutting board. I cut mine into 12 rectangles, about 4 x 3, which gives the perfect size to hold each cookie “headstone.” If your brownies are slightly warm, the cookies might slide, so patience pays off here.
Step 3: Whip Up the Bright Green Buttercream
Combine powdered sugar, softened butter, and milk in a bowl and beat for about 2 minutes until creamy and fluffy. If it’s too thick, add a splash more milk; if too thin, a little extra powdered sugar does the trick. Then add green food coloring — I start with a few drops and add more until I get that perfect spooky grass-green shade. Set aside and resist the urge to eat it straight away (though I’ve never managed that).
Step 4: Decorate Your Graveyard with Cookies and Candy Pumpkins
Grab your Milano cookies and gently slice off the bottom edge if you want shorter “headstones” — this is optional but I love the look. Use the black decorating gel to write “RIP” on the top of each cookie; it takes just a minute per cookie but really sells the theme. Next, press each cookie carefully into the top edge of each brownie rectangle. Then spoon a dollop of green frosting right near the cookie to look like moss or grass, and top with a candy pumpkin. It’s like building a tiny edible Halloween scene!
Tips from My Kitchen
- Parchment Paper Hack: Make sure the parchment overlaps enough on all sides to easily lift brownies without breaking.
- Decorating Gel Patience: Let the “RIP” writing set for a few minutes before placing cookies on frosting to avoid smudges.
- Frosting Consistency: If you plan to pipe frosting, make it a bit thicker by adding powder sugar slowly.
- Avoid Sliding Cookies: Press the cookies firmly but gently into the brownies to keep them stuck without breaking the cookies.
How to Serve Halloween Brownies with Graveyard Cookies and Green Frosting Recipe
Garnishes
For garnishes, I love adding extra mini candy pumpkins scattered around the serving tray, maybe some edible silver or black glitter on top of the green frosting for a magical shimmer. Fresh mint leaves can double as “grass” if you want a natural touch. It’s small details like these that turn a simple dessert into a full Halloween centerpiece.
Side Dishes
Pair these brownies with a simple cold glass of milk or a rich hot chocolate with a sprinkle of cinnamon — the classic combo can’t be beat. For parties, some crunchy pumpkin spice popcorn or candied nuts also compliment the sweet fudginess of these treats perfectly.
Creative Ways to Present
One Halloween, I arranged the brownies on a rustic wooden tray with fake spider webs and plastic spiders woven around — it was a showstopper! You can even add little tombstone signs with toothpicks or serve them on eerie black plates for maximum effect. Kids love helping place the “headstones” and candy pumpkins, turning the presentation into a fun group activity.
Make Ahead and Storage
Storing Leftovers
Once decorated, I keep these brownies in an airtight container at room temperature for up to 3 days. The cookies stay crisp and the frosting fresh — just take care not to stack them to avoid smudging the decorations.
Freezing
I’ve frozen undecorated brownies successfully — just cut them into squares and freeze flat in a single layer wrapped tightly in plastic wrap, then in a freezer bag. When you’re ready, let thaw completely before frosting and decorating. It’s a great way to prep ahead if you want to impress without the stress.
Reheating
Leftover brownies with frosting are best eaten cold or at room temp. If you want to warm one up, just microwave for 10 seconds — any longer, and you’ll melt your frosting. I learned that the hard way!
FAQs
-
Can I use box brownie mix for this Halloween Brownies with Graveyard Cookies and Green Frosting Recipe?
Absolutely! I often use Ghirardelli box brownie mix because it’s rich and fudgy, perfect for this recipe. Just prepare it as directed, bake in an 8-inch pan, and follow the decorating steps. It’s a great shortcut without sacrificing flavor.
-
How do I make sure the “RIP” writing on the cookies doesn’t smudge?
Good question! After writing with the black decorating gel, let it set for at least 10 minutes on a parchment or plate before placing the cookie on the frosting. This drying time helps prevent smudging when you press the cookie into the brownie.
-
Can I make the green frosting ahead of time?
You can! Store the frosting airtight in the fridge for up to 3 days. Bring it to room temperature and give it a quick whip before using to restore the fluffy texture.
-
What if I can’t find Milano cookies?
No worries — any oblong-shaped cookie like shortbread or butter cookies work great. Just pick ones that are firm and can stand upright, so they resemble little gravestones.
Final Thoughts
This Halloween Brownies with Graveyard Cookies and Green Frosting Recipe has become a cherished tradition in my kitchen. It’s the perfect blend of spooky and sweet, and the fun of decorating it really brings out the kid in all of us. Whether it’s for a Halloween party or just a seasonal treat, I know you’ll enjoy making (and eating!) these little edible graves as much as I do. So go ahead, give this recipe a try — it’s a guaranteed crowd-pleaser with minimal fuss and maximum delight.
Print
Halloween Brownies with Graveyard Cookies and Green Frosting Recipe
- Prep Time: 10 minutes
- Cook Time: 30 minutes
- Total Time: 40 minutes
- Yield: 12 servings
- Category: Dessert
- Method: Baking
- Cuisine: American
Description
These Halloween Brownies are spooky and fun treats perfect for a festive celebration. Featuring rich chocolate brownies topped with green buttercream frosting, Milano cookie headstones decorated with RIP in black gel, and candy pumpkins for a playful graveyard effect, this recipe is a delightful dessert to impress guests.
Ingredients
For the Brownies:
- Prepared brownie batter for an 8” pan
- 12 Milano cookies
- Black decorating gel
- 12 candy pumpkins
For the Green Buttercream Frosting:
- 1 cup powdered sugar
- 1/4 cup butter (salted or unsalted), softened
- 2 teaspoons milk
- A few drops green food coloring
Instructions
- Prepare the Pan: Line an 8” baking pan with parchment paper, leaving overhang on the sides to easily lift the brownies out later.
- Bake Brownies: Pour the brownie batter into the prepared pan and smooth into an even layer. Bake according to the original brownie recipe instructions, typically about 30 minutes.
- Cool and Cut Brownies: Allow brownies to cool completely. Use the parchment paper overhang to lift brownies from the pan and place on a flat surface. Cut into 12 rectangles, approximately 4 by 3 pieces.
- Make Frosting: In a bowl, mix powdered sugar, softened butter, milk, and green food coloring. Beat for 2 minutes until light and fluffy. Adjust thickness with more powdered sugar or milk as needed. Set aside.
- Decorate Cookies: Use black edible decorating gel to write “R-I-P” on each Milano cookie. Optionally, trim the bottom edge of cookies to shorten the “headstones.”
- Assemble Graves: Press each decorated cookie vertically into the tops of the brownies to resemble headstones.
- Add Frosting and Pumpkin: Spoon some green buttercream near each cookie and place a candy pumpkin on top of the frosting to complete the graveyard look.
Notes
- For brownies, use a favorite chocolate brownie recipe scaled for an 8×8” pan or a boxed mix such as Ghirardelli.
- If doubling the recipe for a 9×13” pan, double the number of cookies, candy pumpkins and frosting ingredients accordingly.
- Black decorating gel can be found in grocery baking aisles or Walmart near cake decorating supplies.
- Softened butter for frosting can be salted or unsalted based on preference.
- Adjust green food coloring intensity to achieve desired frosting color.
Nutrition
- Serving Size: 1 brownie
- Calories: 250 kcal
- Sugar: 20 g
- Sodium: 150 mg
- Fat: 12 g
- Saturated Fat: 7 g
- Unsaturated Fat: 4 g
- Trans Fat: 0 g
- Carbohydrates: 30 g
- Fiber: 2 g
- Protein: 3 g
- Cholesterol: 35 mg


