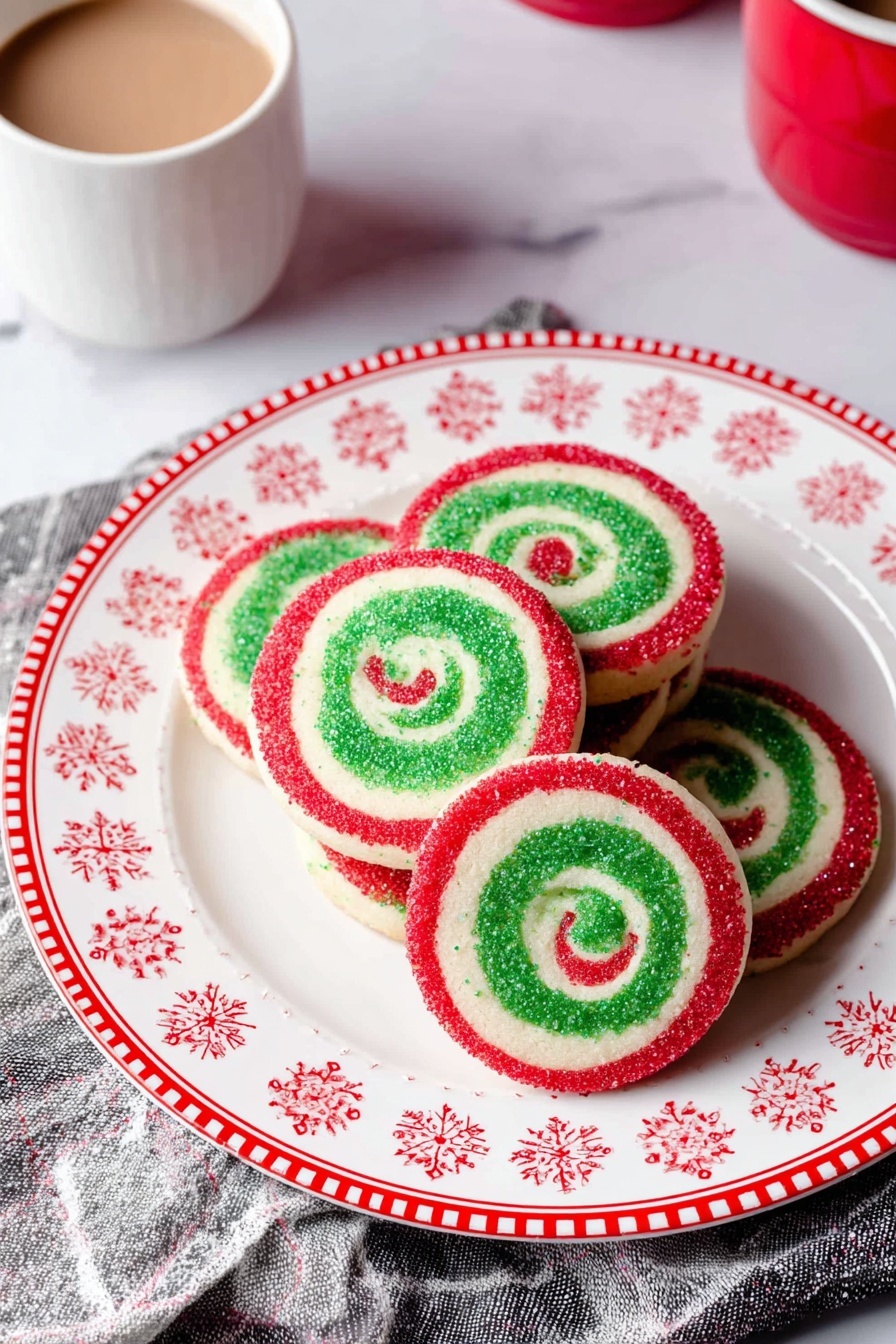
Festive Pinwheel Cookies Recipe
If you adore holiday baking as much as I do, you’re going to flip over this Festive Pinwheel Cookies Recipe. These charming swirled cookies bring together classic buttery dough with pops of red and green that just scream celebration. They’re perfect for sharing at a party, gifting to friends, or sneaking a few with your afternoon coffee. Stick around — I’ll guide you through every step so your pinwheels come out gorgeous and delicious every single time.
Why This Recipe Works
- Colorful Visual Appeal: The use of red and green gel food coloring creates those festive pinwheel swirls that look as good as they taste.
- Perfectly Balanced Sweetness: Combining granulated and powdered sugar gives the dough a tender crumb with just the right touch of sweetness.
- Easy Dough Handling: Chilling the dough in stages helps maintain crisp edges and prevents cracking while rolling.
- Fun Topping Texture: Rolling the dough in holiday colored nonpareils adds a delightful crunch and extra festive charm.

Ingredients & Why They Work
Each ingredient in this Festive Pinwheel Cookies Recipe plays a role to balance flavor and texture, while bringing out that nostalgic, holiday spirit. Here’s a friendly rundown of these ingredients and a little tip on each so you get the best results.
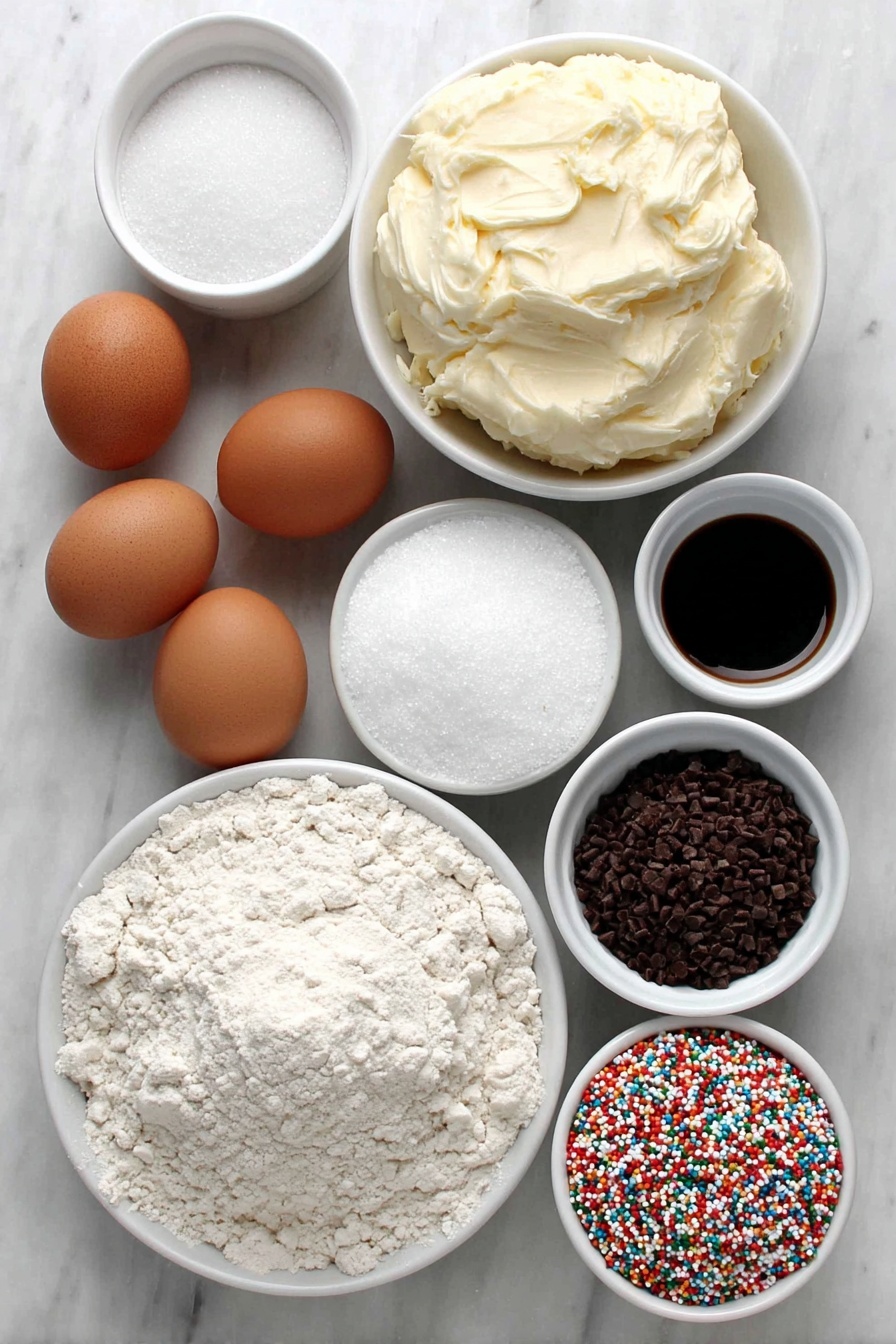
- Salted butter: Using salted butter adds just a bit of savory contrast, making the sweetness pop; make sure it’s softened but not melty for easy creaming.
- Granulated sugar: Adds a bit of structure and subtle crunch to the cookies’ texture.
- Powdered sugar: Keeps the dough tender and smooth, giving a melt-in-your-mouth feel.
- Eggs: Bind everything together and add richness—using large eggs is key for consistent dough texture.
- Vanilla extract: Brings warmth and depth to every bite; I’ve also added lemon zest sometimes to brighten things up.
- All-purpose flour: The backbone of our dough, balanced perfectly to provide the right chew and structure.
- Baking powder: Just enough to lighten the dough without making the cookies puffy.
- Salt: Enhances all the flavors and deepens the sweetness.
- Gel food coloring: Use gel rather than liquid for vivid swirls without altering dough consistency.
- Holiday colored nonpareils: Make these cookies festive and fun with an extra crunchy coating that sticks beautifully.
Make It Your Way
I love playing around with this Festive Pinwheel Cookies Recipe to make it my own year after year. Some days, I plan on keeping it classic—with red and green—while other times, I swap out the colors or add little twists to keep things interesting. You can absolutely do that too! Here are a few ideas to get your creative juices flowing.
- Variation: I once swapped the green for a deep blue to match a winter wonderland theme, and it was a hit—especially with the kids who loved the snowy vibe.
- Dietary tweaks: You can swap half the butter for coconut oil for a dairy-free version, but just be mindful of slightly different textures.
- Flavor boosts: Adding lemon or almond extract gives a lovely twist. I sometimes mix lemon zest right into the white dough layer to keep it bright and fresh.
- Festive add-ons: Rather than nonpareils, try rolling the log in crushed peppermint candies for a minty crunch.
Step-by-Step: How I Make Festive Pinwheel Cookies Recipe
Step 1: Cream Butter and Sugars Until Fluffy
Start by combining your softened salted butter with both granulated and powdered sugar in a stand mixer or with a hand mixer. Beat it on medium speed until the mixture turns pale, light, and fluffy—this usually takes about 3 to 5 minutes. This step is crucial because it traps air into the batter, giving your cookies that wonderful tender crumb. Don’t rush it! I always scrape down the bowl halfway through to make sure everything is mixed evenly.
Step 2: Add Eggs, Vanilla, and Optional Flavor
Next, add your eggs one at a time with the vanilla extract (and any other flavorings you want, like lemon zest or almond extract). Beat until fully incorporated. The dough will start to come together but might look a bit soft—that’s okay. Scrape the sides again; you want everything blended seamlessly before adding your dry ingredients.
Step 3: Mix in Dry Ingredients and Divide Dough
In a separate bowl, whisk together the flour, baking powder, and salt. Gradually add these dry ingredients to your wet mix, stirring until you no longer see piles of flour, but don’t overmix—just enough to combine. Once the dough feels firm but pliable, divide it evenly into three balls.
Step 4: Color and Chill the Dough
Place one ball back in the mixing bowl and stir in red gel food coloring until the color is solid and uniform—use about 5 to 10 drops. Do the same with another ball and green coloring. The last ball stays plain to give that classic white contrast in the pinwheel. Flatten each colored dough ball into discs, wrap in plastic, and pop them in the freezer for 20 minutes (or fridge for 1 hour if you prefer).
Step 5: Roll Out, Stack, and Trim
Once chilled, roll out each dough disc on parchment paper into rectangles of roughly equal size. Stack them carefully in this order: green on the bottom, white in the middle, and red on top. Trim the long sides with a sharp knife so all edges line up perfectly. Don’t trim the short ends yet — you’ll do that after rolling.
Step 6: Roll Into a Log and Chill Again
Using the bottom piece of parchment to help, gently and tightly roll the stacked dough into a log. This can take a few tries, so be patient and avoid cracking the dough edges. Wrap the log tightly in plastic wrap and chill in the refrigerator for at least 1 to 2 hours — this really helps the layers set and the dough to firm up, which is key for clean slices and beautiful pinwheels.
Step 7: Coat the Dough Log with Nonpareils
After chilling, unwrap the dough and roll it gently on a baking sheet full of holiday colored nonpareils. Press the log into the sprinkles firmly so they stick well for an even, festive coating. Yay for sparkle! You can slice and bake immediately or keep it refrigerated for up to one week to bake fresh batches anytime.
Step 8: Slice and Bake
Preheat your oven to 350°F (175°C) and line a baking sheet with parchment paper. Trim uneven ends from the log so you have a neat shape. Use a sharp knife to slice into ¼-inch thick rounds. Place them about 1 to 2 inches apart—you want room because they don’t spread much but still need some breathing room.
Bake for 10-12 minutes until they’re set but not browned—golden edges are lovely, but don’t let them turn dark. Then, cool completely on a wire rack before digging in. These cookies keep their shape and flavor perfectly after cooling.
Tips from My Kitchen
- Perfect Dough Temperature: Always chill your dough layers well—warm dough cracks and loses those pretty pinwheel layers.
- Sharp Knife Slicing: Use a very sharp knife and wipe it clean between cuts for smooth, even cookie rounds.
- Gel Food Coloring: I recommend gel coloring over liquid to avoid watering down the dough and dull swirls.
- Nonpareils Rolling: Don’t be shy about pressing the dough into the sprinkles – it’s the only way to get them to really stick and brighten your cookies.
How to Serve Festive Pinwheel Cookies Recipe
Garnishes
I usually keep it simple and let the colorful nonpareils shine, but a light dusting of powdered sugar adds a snowy, magical touch. Sometimes for extra flair, I’ll drizzle a little white chocolate over the cooled cookies—it’s easy and makes them feel even more festive.
Side Dishes
These pinwheel cookies pair beautifully with hot cocoa, spiced apple cider, or even a mellow cup of black tea. For parties, I like setting them out alongside peppermint bark and mini gingerbread cookies for a festive cookie platter everyone loves.
Creative Ways to Present
Try stacking the cookies in a clear jar tied with a festive ribbon for super cute edible gifts. Or arrange them in a circular pattern on a holiday platter to showcase the pinwheel shape front and center. I’ve also tucked mini cookie stacks into colorful tins, which guests always appreciate when they leave the party.
Make Ahead and Storage
Storing Leftovers
Once completely cooled, store your festive pinwheel cookies in an airtight container at room temperature. They stay delicious and crisp for up to one week. I usually add a slice of bread in the container to keep them from drying out, and it works like a charm!
Freezing
If you want to make batches ahead, slice the dough log into rounds, arrange them on a baking sheet, and freeze until solid before transferring to a freezer-safe bag. You can bake from frozen; just add a couple of extra minutes to baking time. This hack has saved my holidays more than once when unexpected guests showed up!
Reheating
To freshen up cookies after storing, pop them in a preheated 300°F oven for about 5 minutes to regain that just-baked crispness—just keep an eye to prevent over-browning. They come out warm and delightful, just like fresh from the oven.
FAQs
-
Can I make the Festive Pinwheel Cookies Recipe without food coloring?
Absolutely! While the classic look depends on those vibrant red and green swirls, you can leave the dough plain for a simple vanilla version or use natural colorings like beet juice powder or matcha if you’d prefer a natural tint.
-
What’s the best way to avoid cracks when rolling the dough?
Chilling the dough adequately before rolling is essential. Rolling the dough while it’s cold but pliable helps prevent cracking. Also, roll slowly and gently use the parchment paper to help lift and guide the dough as you roll.
-
Can I use different sprinkles instead of nonpareils?
You can! Just keep in mind that larger sprinkles may not stick as well. Finely crushed candies or sanding sugar also make great alternatives that add sparkle and crunch, but nonpareils provide the best consistent coating.
-
How long can I store the dough log before baking?
The dough log holds up beautifully in the refrigerator for about one week wrapped tightly. This lets you slice and bake fresh cookies whenever you need them through the holiday season.
-
Can these cookies be made gluten-free?
You can swap the all-purpose flour for a gluten-free blend designed for baking, but results may vary. I’d recommend testing a small batch first since gluten-free dough can behave differently in rolling and stacking.
Final Thoughts
This Festive Pinwheel Cookies Recipe always brings back fond memories of cozy kitchen afternoons filled with laughter, flour everywhere, and holiday tunes playing in the background. Making these cookies feels like a warm hug, and seeing those colorful spirals come to life simply never gets old. I hope you’ll bake a batch (or two!) and create your own sweet traditions with loved ones. Trust me — these pinwheels are as fun to make as they are to eat, and they’re sure to bring a little extra joy to your festive celebrations.
Print
Festive Pinwheel Cookies Recipe
- Prep Time: 15 minutes
- Cook Time: 12 minutes
- Total Time: 2 hours 27 minutes
- Yield: 24 cookies
- Category: Dessert
- Method: Baking
- Cuisine: American
Description
Festive and colorful Christmas Pinwheel Cookies featuring buttery dough in red, green, and white layers rolled into a swirl pattern, coated with holiday nonpareils for a delightful crunch and perfect seasonal treat.
Ingredients
Dough
- 3/4 cup salted butter softened to room temperature
- 3/4 cup (150g) granulated sugar
- 3/4 cup (150g) powdered sugar
- 2 large eggs
- 2 teaspoons vanilla extract
- 2 1/2 cups (353g) all-purpose flour
- 1/2 teaspoon baking powder
- 1/2 teaspoon salt
- Optional: 1/2-1 teaspoon of additional flavoring extracts or lemon zest
Coloring and Decoration
- Red gel food coloring (5-10 drops)
- Green gel food coloring (5-10 drops)
- Holiday colored nonpareils
Instructions
- Prepare the Dough Base: Combine 3/4 cup softened salted butter, 3/4 cup granulated sugar, and 3/4 cup powdered sugar in a mixer and beat well until the mixture is light and fluffy.
- Add Wet Ingredients: Add 2 large eggs, 2 teaspoons vanilla extract, and any optional flavoring such as additional extracts or lemon zest. Scrape the bottom and sides of the bowl and mix until fully combined.
- Incorporate Dry Ingredients: Mix in 2 1/2 cups all-purpose flour, 1/2 teaspoon baking powder, and 1/2 teaspoon salt until the dough comes together. Then divide the dough evenly into three balls.
- Color the Dough: Return one-third of the dough to the mixing bowl and add 5-10 drops of red gel food coloring. Mix well until evenly colored. Repeat with another third of the dough using green gel food coloring.
- Chill the Dough: Flatten each dough ball into a disc, wrap in plastic wrap, and chill in the freezer for 20 minutes or in the refrigerator for 1 hour.
- Roll Out and Assemble Layers: Roll out each disc on parchment paper into rectangles about the same size and shape. Stack the layers with red and green dough on top and bottom and white in the middle. Trim the long edges evenly; shorter ends will be trimmed later.
- Form the Log: Carefully roll the stacked dough into a tight log using the parchment paper to lift and roll, preventing cracks. Wrap the log in plastic wrap and chill in the refrigerator for at least 1 to 2 hours.
- Add Nonpareils: After chilling, roll the log in holiday colored nonpareils on a baking sheet, pressing firmly to adhere the sprinkles to the dough’s surface. The dough can be sliced and baked immediately or stored wrapped in the fridge for up to one week.
- Preheat Oven and Prepare Baking Sheet: When ready to bake, preheat the oven to 350°F and line a baking sheet with parchment paper.
- Slice and Bake Cookies: Unwrap the log, trim uneven ends, and slice into 1/4-inch thick cookies using a sharp knife. Place cookies 1 to 2 inches apart on the prepared baking sheet.
- Bake and Cool: Bake for 12 minutes until the cookies are set. Remove from oven and cool completely on a wire rack before serving.
Notes
- For best results, ensure butter is softened to room temperature for easier mixing.
- Chilling the dough thoroughly prevents spreading and helps maintain the pinwheel shape.
- If you prefer more vibrant colors, add additional drops of gel food coloring gradually.
- Use a sharp knife chilled in the freezer for cleaner cookie slices without cracking the dough.
- Cookies can be stored in an airtight container for up to one week or frozen after baking for longer storage.
Nutrition
- Serving Size: 1 cookie
- Calories: 130 kcal
- Sugar: 10 g
- Sodium: 90 mg
- Fat: 7 g
- Saturated Fat: 4 g
- Unsaturated Fat: 3 g
- Trans Fat: 0 g
- Carbohydrates: 15 g
- Fiber: 0.5 g
- Protein: 1.5 g
- Cholesterol: 30 mg

