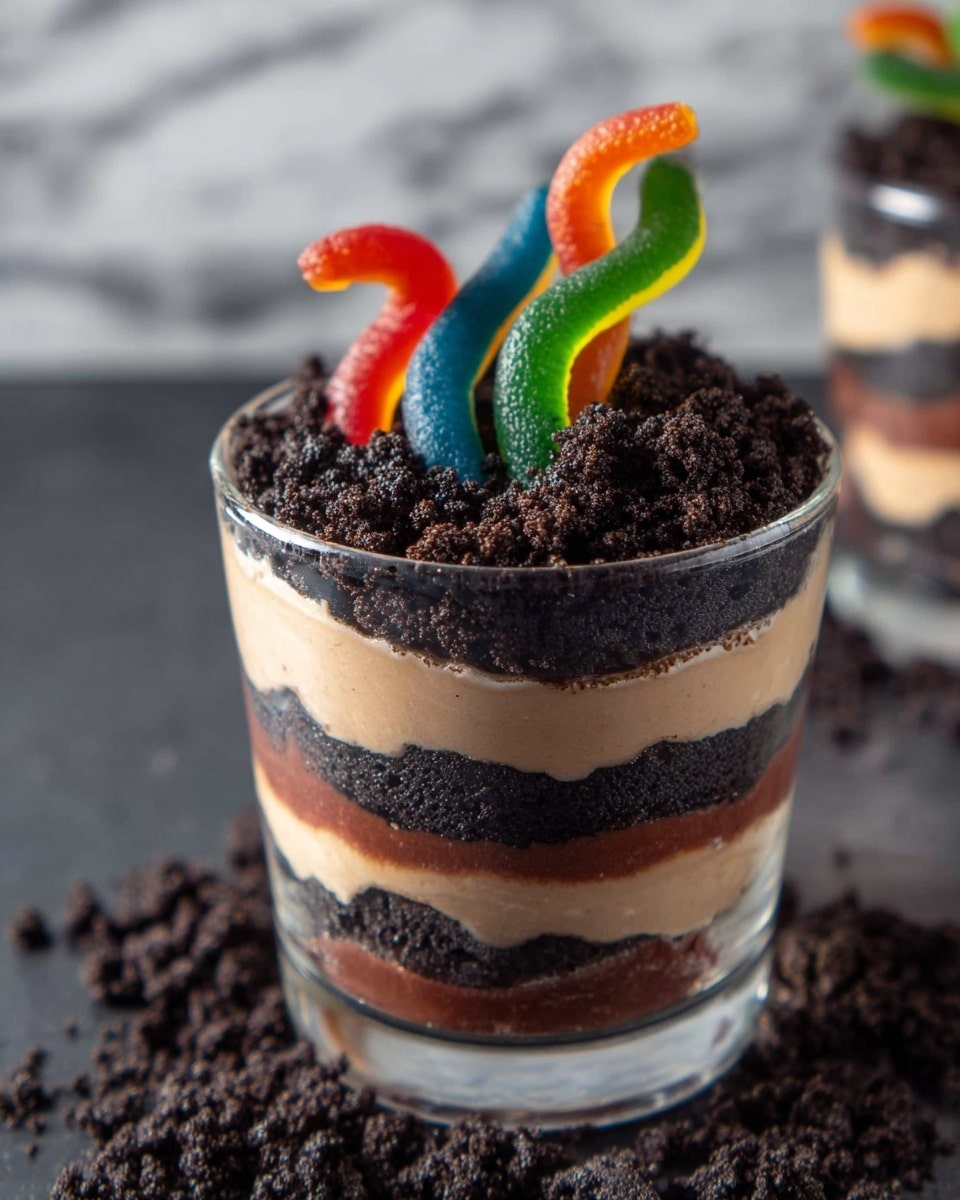
Dirt Pudding Cups Recipe
If you’re craving a dessert that’s as fun to eat as it is delicious, then you’re in for a treat with my Dirt Pudding Cups Recipe. It’s creamy, chocolatey, and has those playful gummy worms that bring back all the childhood memories. Whether you’re making this for a party, a weeknight snack, or just because you deserve it, this recipe is super simple and guaranteed to wow your taste buds—so stick around, because it’s a fan-freaking-tastic dessert you’ll want to make again and again.
Why This Recipe Works
- Simple Ingredients: Uses everyday pantry staples with a couple of easy additions for a crowd-pleaser.
- Creamy, Not Overly Sweet: Greek yogurt keeps it creamy and tangy, balancing the sweetness perfectly.
- Fun Presentation: Layers of crushed cookies and chocolate pudding create that classic “dirt cup” look kids and adults adore.
- Quick & No-Bake: Ready in just 15 minutes, with no oven required—ideal for warm days or last-minute desserts.

Ingredients & Why They Work
Each ingredient in this Dirt Pudding Cups Recipe was chosen to give you maximum flavor with effortless prep. The vanilla Greek yogurt adds creaminess with a subtle tang, which pairs wonderfully with the cocoa and peanut butter for richness. And those crushed chocolate sandwich cookies? They give you that dirt-like crunch we all love, while the gummy worms inject a playful texture and look.
- Vanilla Greek yogurt: Provides creamy texture and a hint of tanginess to balance out the sweetness.
- Heavy cream: Helps lighten the yogurt mixture for a fluffier pudding layer.
- Honey: Natural sweetness with a mild floral note that blends smoothly.
- Cocoa powder: Adds deep chocolate flavor without the extra fat or sugar.
- Creamy peanut butter (optional): Gives a subtle nutty richness that beautifully complements the chocolate.
- Vanilla extract: Enhances the overall sweetness and flavor complexity.
- Salt: Just a pinch to brighten and balance the flavors.
- Chocolate sandwich cookies: Crushed to mimic dirt while adding crunchy texture and chocolatey goodness.
- Gummy worms: Classic decorative element that makes the dessert playful and totally Instagram-worthy.
Make It Your Way
One thing I adore about this Dirt Pudding Cups Recipe is how easy it is to play around with it. You can swap out flavors, add your favorite nuts, or even skip the gummy worms if you aren’t feeling the nostalgia—but honestly, don’t skip the gummy worms! I’ve tried it with and without and trust me, they bring a fun surprise every time.
- Variation: I love adding a teaspoon of instant coffee granules to the cocoa mixture for a mocha twist—just a little, so it doesn’t overpower the chocolate.
- Dietary modification: To make it dairy-free, substitute coconut yogurt and a coconut-based whipping cream.
- Seasonal tweak: Swap gummy worms for seasonal candies or fruit slices, like strawberries or raspberries, for a fresher spin.
Step-by-Step: How I Make Dirt Pudding Cups Recipe
Step 1: Whip Up the Chocolate Pudding Mix
Start by adding the vanilla Greek yogurt, heavy cream, honey, cocoa powder, peanut butter (if using), vanilla extract, and salt into your stand mixer bowl. Turn it on medium speed and beat until everything’s fully combined, smooth, and fluffy—about 1 minute. Don’t forget to scrape down the sides with a spatula a couple of times during mixing so the ingredients blend evenly. This step is key to getting that creamy, pudding-like texture that holds up well when layered.
Step 2: Crush the Cookies
While the pudding mixture is coming together, crush your chocolate sandwich cookies. I like to pop them in a ziplock bag and give them a few good whacks with a rolling pin—leave a few bigger chunks for texture and crumble the rest finer. Using about 16 cookies gives you the perfect amount of “dirt” to layer without overwhelming the creaminess.
Step 3: Layer Your Cups
Grab six small cups or jars and start creating alternate layers. Begin with a spoonful of crushed cookie dirt on the bottom, then add a layer of your fluffy chocolate pudding mix. Repeat once more, so you have two cookie layers and two pudding layers in each cup. This alternating method not only looks great but also ensures every bite has that perfect balance of crunchy and creamy.
Step 4: Garnish and Serve
Pop a few gummy worms on top to give that classic dirt cup vibe—and voilà! Your Dirt Pudding Cups are ready to eat. They’re best enjoyed immediately when the cookies retain some crunch, but I’ll share storage tips below if you want to prep in advance.
Tips from My Kitchen
- Don’t Overmix: Beat the pudding mixture just until fluffy to prevent it from becoming runny.
- Cookie Crushing Technique: Leaving some cookie chunks adds texture, so avoid pulverizing them into dust.
- Serve Fast for Crunch: Assemble and enjoy immediately to keep the cookies crisp.
- Peanut Butter Balance: If you’re sensitive to peanut butter flavor, use just half the amount or skip—it blends nicely but can be strong.
How to Serve Dirt Pudding Cups Recipe
Garnishes
I’m all about keeping it classic by topping with gummy worms—they just make the dish playful and fun. But I’ve also sprinkled crushed nuts or mini chocolate chips on top for a little extra crunch sometimes. If you want to jazz it up even more, a dollop of whipped cream or a few fresh berries adds freshness and color contrast.
Side Dishes
This dessert is usually the star of the show, but I’ve paired it with simple vanilla or cinnamon ice cream to make it even more indulgent. For parties, it’s cute to serve alongside a fruit platter to offer something refreshing against the richness.
Creative Ways to Present
For special occasions, I like serving the dirt pudding cups in small mason jars or clear glass cups so the layers are visible. Sometimes, I stick a little flag or paper straw for a cute “garden” look. Kids love it when you add a few chocolate “rocks” made from chocolate-covered almonds or pecans tucked into the dirt.
Make Ahead and Storage
Storing Leftovers
I recommend storing any leftover Dirt Pudding Cups in the fridge covered tightly with plastic wrap or lids. The texture of the cookies will soften after a few hours, but the dessert is still absolutely delicious. Just know the “dirt” crunch won’t be quite the same.
Freezing
I haven’t tried freezing this particular pudding cup because the texture changes too much with the cookies and gummy worms. For best results, enjoy fresh or refrigerated rather than frozen.
Reheating
This dessert is best served cold, so reheating isn’t really recommended. If you prefer it less chilled, just let it sit at room temperature for 10-15 minutes before serving.
FAQs
-
Can I make Dirt Pudding Cups Recipe vegan?
Absolutely! Substitute the vanilla Greek yogurt with coconut or almond-based yogurt, swap the heavy cream for a dairy-free whipped topping, and ensure your chocolate cookies and gummy worms are vegan-friendly. This way, you’ll still get that creamy texture and layered fun without dairy.
-
How long can I keep Dirt Pudding Cups in the fridge?
It’s best to enjoy them within 2 days for optimal texture and flavor. After that, the cookies will soften significantly, and the gummy worms may get sticky, but it will still taste yummy if you don’t mind the change.
-
Can I use regular yogurt instead of Greek yogurt?
You can, but Greek yogurt is thicker and creamier, which makes the pudding hold up better. If using regular yogurt, opt for a full-fat version and consider straining it through cheesecloth beforehand to remove excess whey.
-
What if I don’t have a stand mixer?
No worries! You can mix everything with a hand mixer or even vigorously whisk by hand—just be sure to mix thoroughly for a smooth, fluffy texture and scrape the bowl as you go.
Final Thoughts
This Dirt Pudding Cups Recipe is one of those feel-good desserts that brings smiles every time. It’s simple, quick, and versatile, with just the right mix of creamy and crunchy textures that make it addictive. I love making it for casual gatherings or when I want to treat myself without fuss. You should definitely give it a try—you’ll be surprised how a few simple ingredients can transform into a dessert that’s both nostalgic and refreshingly new. Happy dipping into your dirt!
Print
Dirt Pudding Cups Recipe
- Prep Time: 15 minutes
- Cook Time: 0 minutes
- Total Time: 15 minutes
- Yield: 6 servings
- Category: Dessert
- Method: No-Cook
- Cuisine: American
- Diet: Vegetarian
Description
Dirt Pudding Cups are a fun and delicious dessert featuring layers of creamy chocolate pudding made from yogurt, cocoa, and peanut butter, combined with crushed chocolate sandwich cookies and topped with gummy worms for a playful twist. Perfect for parties or a sweet treat for kids and adults alike.
Ingredients
Pudding Mixture
- 1 ½ cups vanilla Greek yogurt
- ¼ cup heavy cream
- ¼ cup honey
- ¼ cup cocoa powder
- ¼ cup creamy peanut butter (optional)
- 1 teaspoon vanilla extract
- ½ teaspoon salt
Assembly
- 1 ½ cups crushed chocolate sandwich cookies (about 16 cookies)
- 15 gummy worms
Instructions
- Prepare the pudding mixture: Place the vanilla Greek yogurt, heavy cream, honey, cocoa powder, peanut butter, vanilla extract, and salt in the bowl of a stand mixer. Process until the mixture is smooth and fluffy, about 1 minute, scraping down the sides of the bowl as needed to ensure even mixing.
- Layer the cups: In six small cups or jars, create alternating layers starting with crushed chocolate sandwich cookies followed by a layer of the chocolate pudding mixture. Repeat this layering twice so each cup has two layers of cookies and two layers of pudding.
- Add the finishing touch: Top each cup with a few gummy worms to resemble dirt and worms, making the dessert visually fun and enticing.
- Serve immediately: Enjoy these Dirt Pudding Cups right away for the freshest texture and taste.
Notes
- If you prefer a thicker pudding, chill the mixture for 30 minutes before layering.
- The peanut butter is optional but adds a nice depth of flavor; you can omit it for a simpler chocolate pudding.
- For a gluten-free option, substitute the chocolate sandwich cookies with gluten-free chocolate cookies.
- Customize the gummy worm topping by adding other candy or crushed nuts if desired.
Nutrition
- Serving Size: 1 cup
- Calories: 250 kcal
- Sugar: 18 g
- Sodium: 150 mg
- Fat: 12 g
- Saturated Fat: 5 g
- Unsaturated Fat: 6 g
- Trans Fat: 0 g
- Carbohydrates: 28 g
- Fiber: 3 g
- Protein: 8 g
- Cholesterol: 30 mg


