Delicious Danish Butter Cookies Recipe
If you’re anything like me and adore that classic melt-in-your-mouth texture paired with buttery richness, then you’re going to absolutely love this Delicious Danish Butter Cookies Recipe. These cookies aren’t just your everyday treat — they’re the perfect harmony of crisp edges and tender centers, all wrapped up in buttery goodness. Stick around, because I’m sharing all the tips and secrets I’ve learned to make sure you nail these delightful cookies every single time.
Why This Recipe Works
- Perfect Butter Balance: Using European salted butter gives these cookies their rich, creamy flavor and the perfect tender crumb every time.
- Flour Combo for Texture: A mix of all-purpose and cake flour ensures crisp edges but a lovely melt-in-your-mouth center.
- Chilling Step: Chilling the shaped dough helps keep the cookies from spreading too much—a small step that delivers great results.
- Simple Yet Sophisticated: No complicated ingredients here, just classic flavors that sing.

Ingredients & Why They Work
Let’s break down the star players in this Delicious Danish Butter Cookies Recipe. Each ingredient is thoughtfully chosen to build that iconic buttery, tender texture — and I’ll share little tips on what to look for to make your cookies shine.
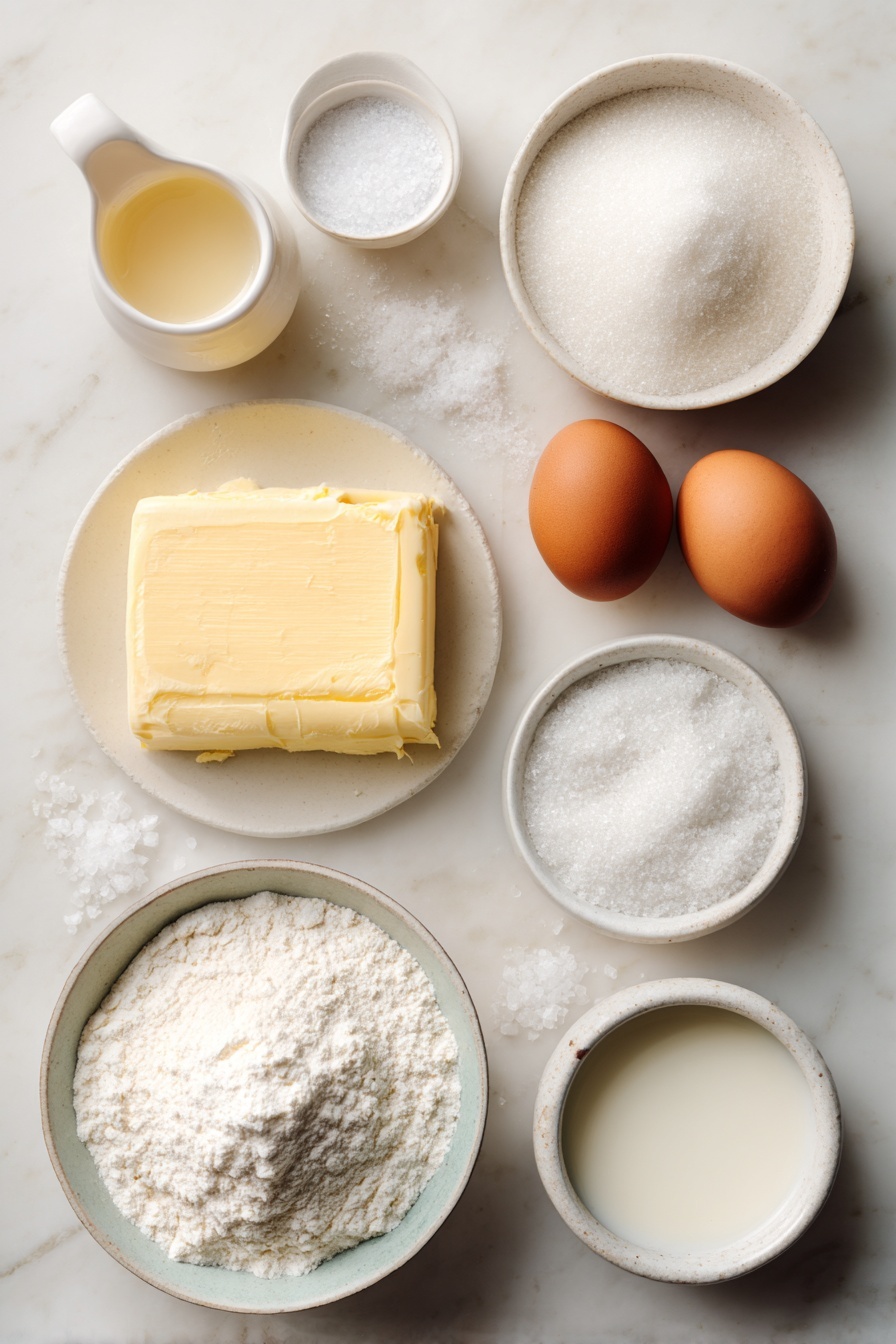
- European salted butter: This butter has a higher fat content and a hint of salt, giving your cookies that authentic Danish flavor and perfect richness.
- Granulated sugar: Adds sweetness and helps create the perfect crumb and slight crunch on top.
- Salt: Enhances all the flavors — if you use unsalted butter, increase this slightly.
- Egg yolks: Adds richness and helps tenderize the cookie dough.
- Vanilla extract: A classic flavor enhancer that warms up the whole cookie experience.
- Whole milk: Just a touch softens the dough so it’s easier to pipe and keeps the texture just right.
- All-purpose flour: The base of the cookie, providing structure.
- Cake flour: Lightens the dough so the cookie melts on your tongue instead of feeling dense.
- Coarse sugar (for decorating): Adds a pretty sparkle and subtle crunch — a simple touch that looks and tastes delightful.
Make It Your Way
I love how versatile the Delicious Danish Butter Cookies Recipe is! From festive sprinkles to simple elegant shapes, you can make these cookies uniquely yours—whether for everyday treats or special occasions.
- Variation: I sometimes switch out the vanilla for almond extract for a nutty twist that’s delightful at holiday time.
- Gluten-Free Version: I haven’t tried it myself yet, but substituting a blend of gluten-free flours with some xanthan gum could work well; just chill the dough a bit longer.
- Seasonal Touches: For Christmas, I sprinkle coarse sugar tinted with edible gold dust for that extra sparkle.
Step-by-Step: How I Make Delicious Danish Butter Cookies Recipe
Step 1: Prep Like a Pro
First things first — clear some space in your refrigerator. Chilling the shaped cookies is crucial to prevent them from spreading too thin while baking, so make sure you have at least one baking sheet ready to tuck in. Next, line two baking sheets with parchment paper or silicone mats; it really helps keep the cookies from sticking and ensures even baking.
Step 2: Cream the Butter and Sugar
Pop your room temperature European salted butter into the mixer with your sugar and salt. Beat it on medium speed until it’s smooth and creamy. Here’s my personal tip: don’t rush this step — the air you incorporate here helps give the cookies a light texture. Once it’s smooth, lower your speed and gradually add sugar and salt, then crank it back up until you get that fluffy, dreamy mix.
Step 3: Add Those Yolk-y Goodies
While your mixer is still running, add the egg yolks, vanilla extract, and that bit of whole milk. Keep mixing until everything combines perfectly. I always scrape down the bowl once here — trust me, it helps avoid any stray pockets of flour later and ensures your dough is uniformly wonderful.
Step 4: Flour Power
In a separate bowl, whisk together the all-purpose and cake flour. Gradually add this dry mix into your wet ingredients in two parts. Mixing on low speed, just until combined, is the trick here — overmixing can develop gluten and make your cookies tough, which we definitely don’t want! If your dough feels too stiff to pipe, don’t be shy about adding a tablespoon more milk to get that perfect consistency.
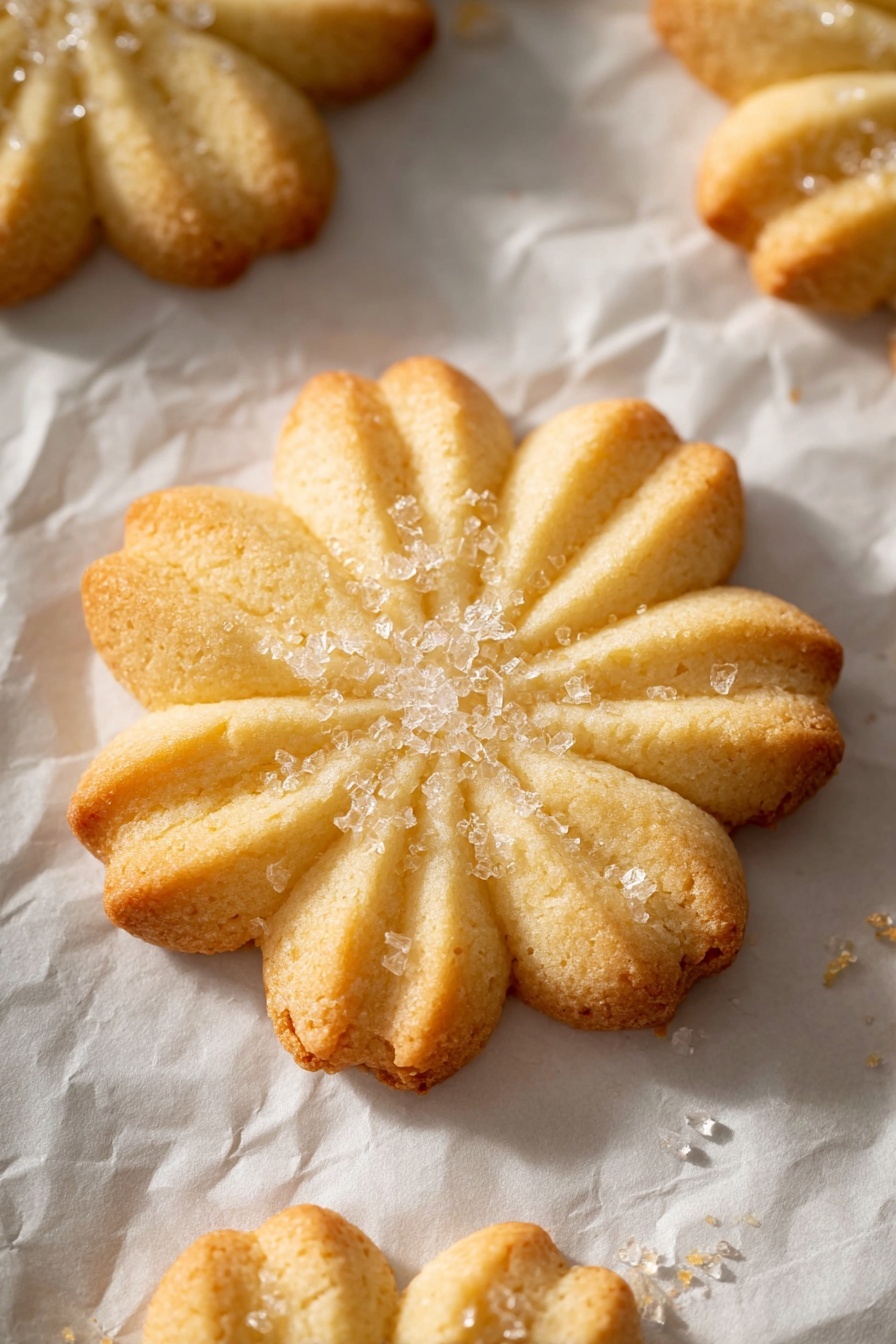
Step 5: Pipe and Chill
Transfer your cookie dough to a piping bag fitted with a ½-inch open star tip — this shape makes those beautiful classic butter cookie forms like rosettes and pretzels. Pipe the cookies about 2 inches apart on your lined baking sheets. If you’re feeling festive, sprinkle with coarse sugar or sprinkles right now. Now, the magic chill: pop them into the refrigerator for 20 to 30 minutes. This resting step is key to keeping their shape in the oven.
Step 6: Bake to Golden Perfection
Preheat your oven to 350°F (175°C) and place your rack in the center. Bake your cookies for 10-15 minutes, but here’s where you have to watch closely because size and shape affect timing. You’re looking for just a light golden edge — that subtle hint of color means they’re perfectly baked but still deliciously tender inside. Let them cool on the baking sheet for 5 minutes before moving them gently to a wire rack to cool completely.
Tips from My Kitchen
- Butter Temperature Matters: Leaving your butter out about 45 minutes so it’s soft—but not melty—makes creaming easier and dough smoother.
- Don’t Overmix the Dough: I’ve learned the hard way that overworking the dough makes your cookies tough; mix just until flour disappears.
- Use a Kitchen Scale: Measuring flour by weight ensures you don’t add too much, which can dry out your cookies.
- Keep an Eye in the Oven: Every oven is different, so start checking at 10 minutes to avoid overbaking.
How to Serve Delicious Danish Butter Cookies Recipe
Garnishes
I’m a sucker for a simple sprinkle of coarse sugar or pearl sugar on top before baking — it catches the light nicely and adds a subtle crunch that makes the cookie feel extra special. Around holidays, I like tossing on red and green sprinkles or a dusting of edible glitter for a festive vibe.
Side Dishes
These butter cookies pair wonderfully with a cup of strong coffee or a pot of hot tea — think Earl Grey or Darjeeling. For dessert spreads, I’ll often serve them alongside fresh berries and whipped cream or a simple bowl of fruit preserves.
Creative Ways to Present
If you want to impress your guests, try arranging the cookies on a tiered platter with little paper doilies underneath each layer. For birthdays or celebrations, I’ve piped them in mini wreath shapes and added a little red candied cherry “berry” on top — always a hit!
Make Ahead and Storage
Storing Leftovers
I store my Danish butter cookies in an airtight container at room temperature, and they stay fresh for about 4 to 5 days with no loss in flavor or texture. I usually separate layers with parchment paper to keep them from sticking together.
Freezing
One of my favorite kitchen life hacks — freeze the piped, unbaked dough on a tray, then transfer it to a freezer bag for up to 3 months. When you want cookies, just pop them straight on a baking sheet (no thawing needed!) and add a few minutes extra to the baking time. It’s fantastic for busy days or unexpected guests.
Reheating
If your cookies lose a bit of crispness after sitting out, I give them a quick 3-4 minute toast in a 300°F oven to bring back that fresh-baked texture. Just watch closely so they don’t brown too much.
FAQs
-
Can I use unsalted butter instead of salted butter in this recipe?
Yes, absolutely! If you’re using unsalted butter, just add about ¼ teaspoon of kosher salt to the dough to balance the sweetness and enhance the flavor. This gives you control over the salt level and keeps the cookies tasting just right.
-
Why do the cookies need to chill before baking?
Chilling the dough helps solidify the butter, which prevents the cookies from spreading too much during baking. This step ensures your cookies maintain those lovely shapes and a perfect texture. I never skip this part because it makes all the difference.
-
Can I pipe these cookies in different shapes?
Definitely! Using a star tip gives you the classic design, but feel free to get creative — rosettes, pretzels, circles, or even squares all work well. As long as the dough is soft enough to pipe and you space them about 2 inches apart, you’ll get beautiful results.
-
Why do you use both all-purpose and cake flour?
The combination gives you the perfect cookie texture: all-purpose flour provides structure, while cake flour reduces the protein content, making the cookies tender and melt-in-your-mouth. If you don’t have cake flour, you can use all-purpose flour alone, but expect a slightly different texture.
-
Can I make these cookies vegan or dairy-free?
While this recipe relies on butter and egg yolks for its signature richness, you might experiment with vegan butter and flax egg substitutes. However, results can vary, and the texture might differ from classic Danish butter cookies.
Final Thoughts
Honestly, this Delicious Danish Butter Cookies Recipe holds a special place in my kitchen. They’re the kind of treat that brings back cozy memories of family gatherings and simple joys. I’m confident you’ll find the process as rewarding as the result — buttery, tender, and elegantly simple cookies that make any day feel a little brighter. So grab your mixer, set aside some time, and indulge in baking these classic gems. You won’t regret it, and I think you might just end up sharing them with everyone you know!
Print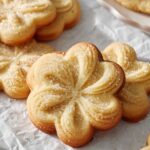
Delicious Danish Butter Cookies Recipe
- Prep Time: 15 minutes
- Cook Time: 15 minutes
- Total Time: 1 hour 30 minutes
- Yield: 24 cookies
- Category: Dessert
- Method: Baking
- Cuisine: Danish
Description
These Danish Butter Cookies are melt-in-your-mouth delights made with European salted butter and a blend of all-purpose and cake flours, offering a crisp yet tender texture. Perfectly piped and lightly golden baked, these festive cookies are easy to prepare and ideal for any occasion.
Ingredients
Butter Cookie Dough
- 1 cup (227 g) European salted butter room temperature
- ½ cup (100 g) granulated sugar
- ⅛ teaspoon salt
- 2 egg yolks
- 2 teaspoons (10 g) vanilla extract
- 1 tablespoon (15 g) whole milk or more to soften
- 2 cups (220 g) all-purpose flour
- ½ cup (50 g) cake flour
Decoration
- Coarse sugar for decorating
Instructions
- Prepare Refrigerator and Baking Sheets: Make space in your refrigerator for a baking sheet so the shaped cookies can chill for 20-30 minutes. Line two baking sheets with parchment paper or silicone baking mats and set aside.
- Cream Butter, Sugar, and Salt: In the bowl of a stand mixer fitted with a paddle attachment, cream the butter on medium speed until smooth. With the mixer running on low, slowly add sugar and salt. Mix on medium speed until the mixture is light and fluffy.
- Add Egg Yolks, Vanilla, and Milk: While mixing, add egg yolks, vanilla extract, and milk. Continue mixing on medium speed until well combined. Scrape down the sides of the bowl to ensure even mixing.
- Combine Dry Ingredients and Mix In: In a separate bowl, whisk together the all-purpose flour and cake flour. Add the flour mixture to the mixer in two additions, scraping down the bowl sides as needed. Mix on low speed until fully combined with no traces of flour. If the dough is too thick to pipe, add another tablespoon of milk to soften.
- Pipe the Cookies: Transfer the dough to a large piping bag fitted with a ½-inch open star tip. Pipe 2-inch cookies in desired shapes such as rosettes, pretzels, circles, or squares onto the prepared baking sheets. Space cookies at least 2 inches apart. Sprinkle with coarse sugar or festive sprinkles if desired. Chill in the refrigerator for 20-30 minutes.
- Preheat Oven: Preheat your oven to 350°F. Position the baking rack in the middle of the oven.
- Bake the Cookies: Bake the cookies for 15 minutes or until the edges are just lightly golden brown. Remove from the oven and let the cookies cool on the baking sheet for about 5 minutes before transferring them to a wire rack to cool completely to room temperature.
Notes
- Use room temperature butter: Leave butter out for about 45 minutes until slightly cool but soft enough to leave an indentation with your finger.
- Use room temperature eggs: Warm eggs quickly by placing in slightly warm water for 5 minutes to ensure even baking.
- Do not over mix: Over mixing develops gluten, toughening the dough.
- Watch baking time closely: Times vary depending on cookie size and shape.
- You can substitute all-purpose flour for the cake flour and use 260 grams of all-purpose flour instead.
- Measure flour accurately using a kitchen scale or properly fluff and level your measuring cup to avoid adding too much flour.
- If using unsalted butter, add ¼ teaspoon kosher salt to the dough.
- Storage: Store cookies in an airtight container at room temperature for up to 5 days or freeze for up to 3 months.
- Make-Ahead: Chill shaped cookies on the baking sheet in the refrigerator for up to 2 days, covering if over 30 minutes. Alternatively, freeze shaped dough for up to 2-3 months and bake without thawing, adding a couple of extra minutes to baking time.
Nutrition
- Serving Size: 1 cookie
- Calories: 90 kcal
- Sugar: 5 g
- Sodium: 50 mg
- Fat: 6 g
- Saturated Fat: 4 g
- Unsaturated Fat: 2 g
- Trans Fat: 0 g
- Carbohydrates: 8 g
- Fiber: 0.2 g
- Protein: 1 g
- Cholesterol: 20 mg


