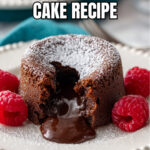
Decadent Chocolate Lava Cakes Recipe
If you’re on the hunt for an indulgent treat that melts in your mouth and has that irresistible molten center, you’re going to love this Decadent Chocolate Lava Cakes Recipe. Seriously, these little beauties have become my go-to when I want to impress guests or just treat myself after a long day. The combination of silky chocolate and warm, gooey lava is nothing short of magical — and I’m excited to share all my tips so that you can nail this recipe on your first try.
Why This Recipe Works
- Perfect Texture Balance: The batter bakes just long enough for firm edges while keeping that luscious molten center true to its name.
- Simple Ingredients, Big Flavor: Using a quality chocolate bar and a hint of coffee elevates the depth without complicating the process.
- Flexible Method: Whether you have ramekins or a jumbo muffin tin, this recipe adapts so no one misses out on a warm chocolate hug.
- Make-Ahead Friendly: You can prep the batter up to three days in advance without sacrificing that fresh-from-the-oven magic.

Ingredients & Why They Work
Every ingredient here plays a crucial role — from the butter helping create that rich mouthfeel to the eggs that give structure while keeping things tender. I like to use premium chocolate bars because they really make the lava center shine, but I’ll talk more about possible swaps below.
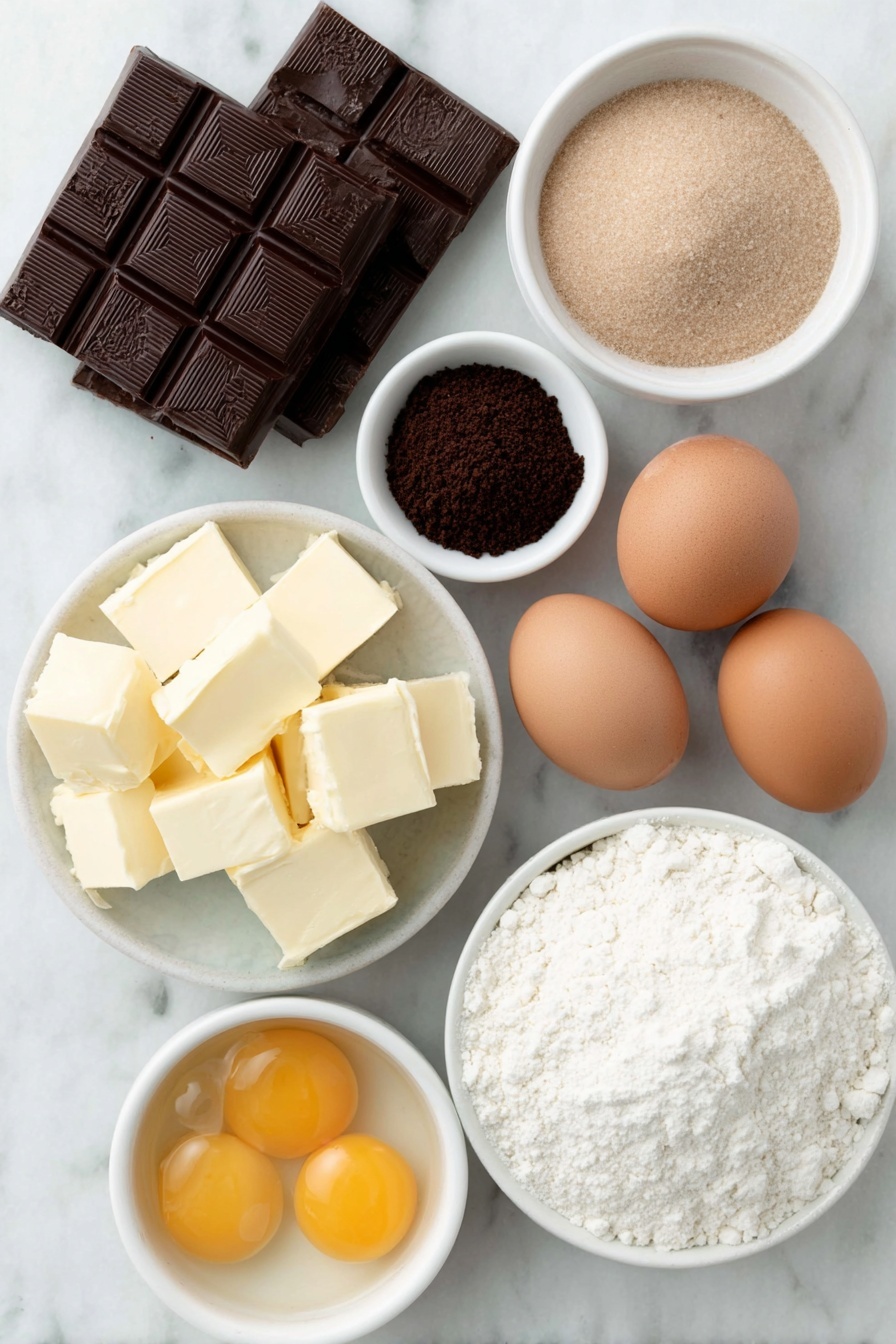
- Unsalted Butter: Adds richness and helps achieve the silky texture as it melts into the chocolate.
- Premium Semisweet or Dark Chocolate Bar: Gives that intense chocolate flavor; I prefer around 60% cocoa — Ghirardelli is my go-to brand.
- Instant Coffee (Optional): Just a touch helps deepen the chocolate taste, but it won’t make your cakes taste like coffee — promise!
- Vanilla Extract (Optional): Brightens the flavors subtly, rounding everything out.
- Salt: Enhances the chocolate’s sweetness and balances the richness perfectly.
- Eggs & Egg Yolks: Give the batter body and that little jiggle you want in the center without being raw.
- Light Brown Sugar: Adds moisture and a hint of caramel complexity that pairs beautifully with chocolate.
- All Purpose Flour: Just enough to give structure, making sure the cakes hold their shape but stay delicate.
Make It Your Way
I often experiment with little twists, depending on who I’m serving or what I have on hand. The beauty of this Decadent Chocolate Lava Cakes Recipe is how forgiving and versatile it is — just keep an eye on baking times.
- Variation: I once swapped in a raspberry coulis drizzle right after plating, which added a pleasant tart punch that balanced the sweet lava perfectly — a total crowd-pleaser!
- Dairy-Free Option: Try using coconut oil instead of butter and dark dairy-free chocolate; results will be rich and just as indulgent.
- Seasonal Twist: Adding a pinch of cinnamon or chili powder is fun for fall or winter; it adds warmth and a little surprise heat.
Step-by-Step: How I Make Decadent Chocolate Lava Cakes Recipe
Step 1: Prep Your Pans and Oven
First things first — preheat your oven to 450°F (235°C) and get your ramekins ready. I always grease and lightly flour mine or use baking spray. This step might seem minor, but trust me, it makes the difference between a smooth release and a tragic lava cake stuck forever to the dish. Arrange them on a baking sheet for easy handling.
Step 2: Melt the Chocolate and Butter
Combine your chopped chocolate and butter in a microwave-safe bowl. Microwave in 20-second bursts, stirring thoroughly each time. Patience here matters — the mixture should be smooth and velvety, free of lumps. If you rush this, you risk burning the chocolate and ruining the texture.
Step 3: Bring in the Flavor Boosters
Once your chocolate and butter are melted, stir in the instant coffee, vanilla extract, and salt. These small additions are game-changers — they enhance the chocolate’s natural richness in a way that feels gourmet but requires no extra effort.
Step 4: Whisk Eggs and Sugar
In a separate bowl, whisk together the eggs, egg yolks, and brown sugar vigorously for about 15 seconds until the mixture is slightly foamy on top. This light aeration helps give the lava cakes a tender crumb while maintaining that luscious gooey core.
Step 5: Combine Batter and Add Flour
Pour the egg mixture into the chocolate bowl and stir until everything’s smooth and combined. Then sift your flour over the batter and fold gently so you don’t overwork the mixture— you want fluffiness and density balanced perfectly.
Step 6: Bake to Molten Perfection
Divide your batter evenly among the ramekins — about four servings here. Pop them in your hot oven and bake for 9 to 11 minutes. The secret: watch for edges that look set and cakey, while the center stays just a bit jiggly. Resist the urge to bake longer or you’ll lose that signature molten core!
Step 7: Cool, Release, and Serve
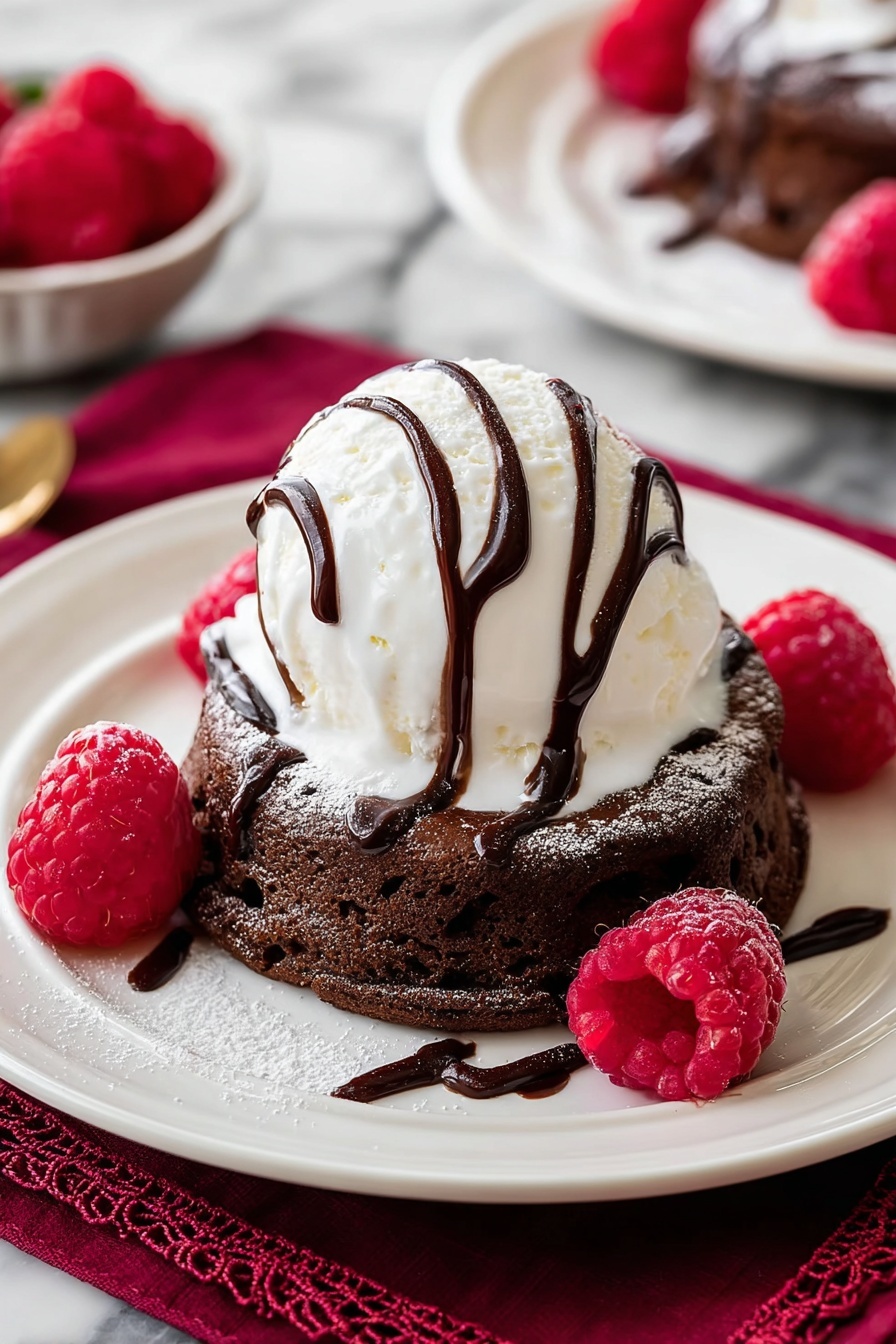
Let your lava cakes cool for 5 minutes before running a knife carefully around their edges. I always nudge them out onto a plate with an oven mitt on hand because those ramekins stay hot! Serve immediately. I love topping mine with powdered sugar or a scoop of vanilla ice cream because the contrast of warm and cold takes things to another level.
Tips from My Kitchen
- Room Temperature Eggs: I learned early that cold eggs make the batter lumpy—letting them sit for about 30 minutes before whisking really smooths things out.
- Watch Your Bake Time: Every oven’s different; check your cakes a minute or two early to avoid over-baking that precious molten center.
- Flavor Enhancer: Don’t skip the instant coffee — it seems optional but really makes the chocolate pop without adding any coffee taste.
- Loose Ramekin Trick: If your cakes stick, gently warming the ramekin sides with a warm damp cloth before inverting helps ease release.
How to Serve Decadent Chocolate Lava Cakes Recipe
Garnishes
My go-to garnish is a simple dusting of powdered sugar or, even better, a scoop of vanilla bean ice cream. The hot, molten cake with cool ice cream melting alongside? That combo never fails. Sometimes I add fresh berries or a sprig of mint for a pop of color and brightness.
Side Dishes
I like keeping it focused on the lava cakes themselves, but if I’m serving a larger dessert spread, light fruit salads or a citrus sorbet pair beautifully. Their freshness cuts through the richness and rounds out the experience.
Creative Ways to Present
For special occasions, I sometimes plate the lava cakes with chocolate drizzle patterns or serve them inside decorative bowls lined with edible gold leaf sheets for an extra wow factor. Tiny edible flowers can add a whimsical touch, perfect for Valentine’s Day or birthdays.
Make Ahead and Storage
Storing Leftovers
If you have any leftovers (they rarely last long at my house!), I store them covered in the refrigerator for up to two days. Just know the texture does change — the lava center firms up and it’s not quite as oozy.
Freezing
I’ve tried freezing the unbaked batter in the ramekins — tightly covered in plastic wrap — and thawing before baking. The key is to bring the batter fully to room temperature before popping it in the oven, or the baking time will be off. Baked lava cakes don’t freeze well because the texture becomes grainy once thawed.
Reheating
Leftover baked cakes can be reheated gently in the microwave for 20-30 seconds. However, be careful not to overheat or they’ll lose their molten quality and can get dry around the edges. I always prefer freshly baked when possible!
FAQs
-
Can I use chocolate chips instead of a chocolate bar?
You certainly can, but from my experience, using premium chocolate bars like Ghirardelli results in a richer, more molten center and a deeper chocolate flavor. Chocolate chips might produce a less gooey filling and a slightly different texture.
-
Why add instant coffee to the batter?
The instant coffee is optional but highly recommended because it enhances the chocolate flavor without imparting a coffee taste. It adds complexity, making the chocolate taste even more intense and indulgent.
-
What if I don’t have ramekins?
No worries! You can use a jumbo 6-count muffin tin instead. Just note that baking times will be shorter (about 6-7 minutes), and the recipe yields six cakes rather than four.
-
Can I prepare the batter ahead of time?
Absolutely. You can make the batter up to three days in advance, store it in an airtight container in the fridge, then bring it to room temperature before baking. This makes getting a fresh batch ready on a busy day so much easier!
-
How do I know when the lava cakes are done?
Look for edges that are set and cakey while the centers should still jiggle slightly when gently pressed. This is the sweet spot where you have a baked cake exterior with a molten chocolate center inside.
Final Thoughts
This Decadent Chocolate Lava Cakes Recipe has been such a rewarding journey for me — from nailing that perfect molten center to seeing faces light up after the first bite. It feels fancy but really comes together quicker than you’d expect, making it a total winner for special occasions or chocolate cravings in your everyday life. Trust me, once you try it, you’ll be reaching for this recipe again and again — it’s like a little hug from the inside out.
Print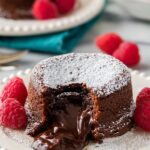
Decadent Chocolate Lava Cakes Recipe
- Prep Time: 20 minutes
- Cook Time: 11 minutes
- Total Time: 31 minutes
- Yield: 4 servings
- Category: Dessert
- Method: Baking
- Cuisine: American
- Diet: Vegetarian
Description
Indulge in these decadent Chocolate Lava Cakes, featuring a gooey, molten center surrounded by a rich, tender cake exterior. Perfectly balanced with premium semisweet chocolate and a hint of coffee to enhance the chocolate flavor, these individual cakes bake quickly and are ideal for a sophisticated dessert served warm with powdered sugar or vanilla ice cream.
Ingredients
Chocolate Mixture
- ½ cup (113 g) unsalted butter, cut into 8 pieces
- 6 oz (170 g) premium semisweet or dark chocolate bar, coarsely chopped
- ½ teaspoon instant coffee (optional)
- ½ teaspoon vanilla extract (optional)
- ¼ teaspoon salt
Egg Mixture
- 2 large eggs
- 2 large egg yolks, room temperature
- ⅓ cup (66 g) light brown sugar, firmly packed
Dry Ingredients
- ¼ cup (32 g) all purpose flour
Instructions
- Preheat and Prepare Ramekins. Preheat your oven to 450F (235C). Grease the bottom and sides of four 3 ½ inch diameter ramekins with baking spray or with butter and dust with flour. Place them on a baking sheet and set aside to prepare the batter.
- Melt Chocolate and Butter. Place the chopped chocolate and butter in a microwave-safe bowl. Heat in 20-second increments, stirring thoroughly each time, until the mixture is fully melted and smooth.
- Add Flavorings. Stir in the instant coffee, vanilla extract, and salt until fully combined. These enhance the depth of the chocolate flavor subtly.
- Whisk Eggs and Sugar. In a separate bowl, whisk together the whole eggs, egg yolks, and brown sugar vigorously for about 15 seconds until the mixture is foamy and combined well.
- Combine Egg Mixture with Chocolate. Pour the egg mixture into the chocolate mixture and stir until fully incorporated and smooth.
- Add Flour. Sift the all-purpose flour over the chocolate mixture and fold it in gently until combined without overmixing to keep the batter light.
- Divide Batter and Bake. Evenly distribute the batter into the prepared ramekins. Bake in the preheated oven at 450F (235C) for 11 minutes. The edges should be set and cakey, while the centers remain slightly jiggly and spring back to the touch.
- Cool and Unmold. Let the lava cakes cool for about 5 minutes. Run a knife around the edges carefully to loosen, then invert each ramekin onto a serving plate while wearing oven mitts because ramekins will be hot.
- Serve Warm. Serve immediately while warm for the best molten lava center experience. Top with a dusting of powdered sugar or a scoop of vanilla ice cream. Allow the lava to cool an additional 5 minutes if too hot to enjoy safely.
Notes
- Substituting chocolate chips: Using semisweet chocolate chips (1 cup) is possible but results in less molten centers and flavor compared to premium chocolate bars.
- Coffee addition: Instant coffee enhances the chocolate flavor without imparting a coffee taste. Highly recommended for depth.
- Without ramekins: A 6-count jumbo muffin tin can be used, increasing yield to 6 cakes but reducing bake time to 7 minutes.
- Make ahead: Batter can be refrigerated up to 3 days in an airtight container; bring to room temperature before baking.
- Storage: Baked lava cakes are best enjoyed fresh and warm; they can be stored up to two days or frozen, but texture and quality degrade.
Nutrition
- Serving Size: 1 cake (approx. 100 g)
- Calories: 370 kcal
- Sugar: 28 g
- Sodium: 150 mg
- Fat: 26 g
- Saturated Fat: 15 g
- Unsaturated Fat: 10 g
- Trans Fat: 0 g
- Carbohydrates: 31 g
- Fiber: 3 g
- Protein: 5 g
- Cholesterol: 165 mg

