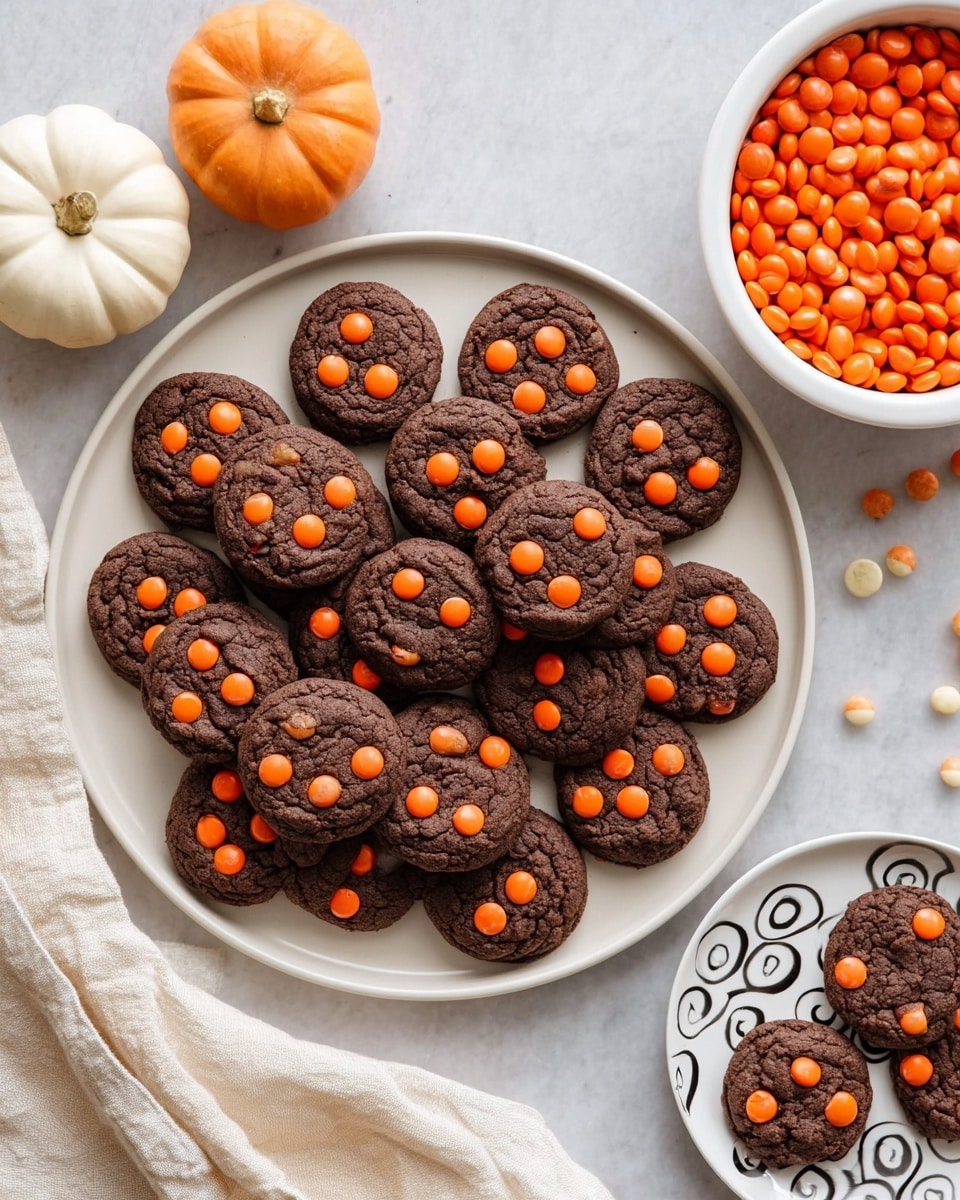
Dark Chocolate Halloween Cookies Recipe
Alright, friends, gather ’round because I’ve got a treat that’s perfect for your spooky season baking adventures. This Dark Chocolate Halloween Cookies Recipe has been my go-to for years when I want something rich, fudgy, and just a little bit festive. These cookies have that deep chocolate flavor with just the right hint of sweetness, plus the fun pop of orange candy on top that screams Halloween vibes. You’re going to love how easy it is to whip these up and impress your family or party guests!
Why This Recipe Works
- Perfectly Balanced Flavors: The mix of cocoa powder and chocolate chips delivers that rich dark chocolate punch without being overly bitter.
- Simple Ingredients: Easy pantry staples that come together quickly, so you can get baking without any extra trips to the store.
- Fun Halloween Twist: The orange candy topping turns these into festive treats that kids and adults both adore.
- Reliable Texture: Soft and chewy with lightly crisp edges—hard to mess up and totally comforting.

Ingredients & Why They Work
Choosing the right ingredients here really makes all the difference. I love starting with room temperature butter because it creams up nice and fluffy for that perfect cookie base. Plus, using both brown and granulated sugar helps keep the cookies chewy with a slight caramel undertone. The cocoa powder and chocolate chips double down on chocolate flavor, and don’t skip the orange candies — they add that iconic Halloween pop!
- Unsalted Butter: Room temp butter blends easily into a creamy base without adding extra salt; it lets you control the cookie’s savory balance.
- Light Brown Sugar: Adds moisture and caramel notes for chewy, tender cookies.
- Granulated Sugar: Gives a slight crunch and sweetness, balancing out the brown sugar’s moisture.
- Egg: Helps bind the dough while keeping the texture soft and rich.
- Vanilla Extract: Enhances all the chocolate flavors beautifully.
- All-Purpose Flour: Your cookie’s structure backbone—make sure to measure properly to avoid dry or cakey cookies.
- Cocoa Powder: Provides that deep, dark chocolate flavor and intense color.
- Baking Soda: Gives the cookies a slight lift and tender crumb.
- Salt: Small pinch to balance sweetness and bring out the cocoa.
- Chocolate Chips: Melty pockets of chocolate that make every bite extra special.
- Orange Colored Chocolate Candies: For fun, festive Halloween flair and a subtle crunch.
Make It Your Way
I always love finding ways to make recipes my own, and this Dark Chocolate Halloween Cookies Recipe is no exception. Once you nail the base, you can play around with mix-ins or toppings that suit your taste or occasion. Whether you want to make them gluten-free, add a spicy kick, or decorate them with your own Halloween designs, this recipe is a great canvas!
- Variation: I’ve tried swapping half of the chocolate chips for white chocolate chips to add a bit of contrast, and it’s such a fun twist that kids adored!
- Dietary Modification: Use almond flour and a flax egg to make a gluten-free, vegan version—just be mindful of baking times and texture changes.
- Seasonal Change: Instead of orange candies, sprinkle crushed peppermint candies during winter holidays for a festive flavor switch-up.
Step-by-Step: How I Make Dark Chocolate Halloween Cookies Recipe
Step 1: Creaming Butter and Sugars until Fluffy
This is where the magic begins. I use a stand mixer fitted with a paddle attachment, but a hand mixer works too. Beat the room temperature butter with both brown and granulated sugars on medium speed for about 4 minutes until you see it lighten in color and get that fluffy texture. Don’t rush this part—it really helps create the soft, tender structure that I adore in these cookies.
Step 2: Adding the Egg and Vanilla
Once you’ve got that fluffy base, scrape down the sides of the bowl to incorporate every bit of goodness. Add your egg and vanilla extract, mixing for just about 30 seconds. You want these ingredients fully incorporated without overmixing, which can lead to tougher cookies.
Step 3: Sifting and Combining Dry Ingredients
Sift together flour, cocoa powder, baking soda, and salt. Sifting helps avoid lumps and evenly distributes the leavening and salt. Add this to your wet mixture on low speed, mixing just until you no longer see streaks of flour. Overmixing here can make the cookies dense, so a gentle touch works best.
Step 4: Folding in Chocolate Chips
Remove the bowl from the mixer and fold in the chocolate chips using a rubber spatula. This prevents overworking the dough and keeps those chocolate chunks intact for sweet, melty pockets in every bite.
Step 5: Scooping and Baking Your Cookies
Using a spring-loaded cookie scoop (about 1.5 tablespoons), form dough balls and set them on parchment-lined baking sheets, spaced about 2 inches apart. Bake at 350˚F for 10-12 minutes—look for crinkly edges and a center that’s set but still soft. The smell at this point? Absolutely irresistible.
Step 6: Adding the Orange Candy Touch
Once out of the oven, let the cookies cool for about a minute on the pan. While they’re still warm (but not hot), gently press the orange chocolate candies into the tops. This step is key for that festive Halloween look without the candies melting into the cookie. Let the cookies rest for a few minutes before moving them to a wire rack to cool completely.
Tips from My Kitchen
- Don’t Skip Sifting: It really makes a difference in texture by removing lumps and evenly mixing cocoa and flour.
- Press Candies Quickly: The cookies cool fast, so press your orange candies in as soon as possible to help them stick!
- Use Parchment Paper: Prevents sticking and makes clean-up a breeze.
- Avoid Overbaking: The cookies will set as they cool, so it’s better to take them out just as edges are firm and centers are soft.
How to Serve Dark Chocolate Halloween Cookies Recipe
Garnishes
I keep it simple with this recipe because the orange candies add such a fun pop on their own. Sometimes I sprinkle a little flaky sea salt on top after baking, which might sound odd but trust me, it brings out the chocolate flavor even more. And, of course, you can always add extra mini chocolate chips or a drizzle of white chocolate for a fancier look.
Side Dishes
These cookies are the perfect sweet side to a cup of warming pumpkin spice latte or a cold glass of milk. I’ve also paired them with a scoop of vanilla ice cream for an evening treat that feels extra indulgent. For Halloween parties, I like serving them alongside other fall-themed snacks like candied nuts, caramel apples, or even a bowl of popcorn dusted with cinnamon.
Creative Ways to Present
I once arranged these Dark Chocolate Halloween Cookies on a platter with candy corn scattered around them for a still-life treat centerpiece that was fun and fuss-free. Another favorite was packaging a few cookies in cellophane bags tied with orange and black ribbons—perfect for party favors or little neighbor gifts. If you’re feeling crafty, pipe a little royal icing spider web design on top to up your spooky decor game!
Make Ahead and Storage
Storing Leftovers
I store extra cookies in an airtight container at room temperature, with wax paper between layers to keep them from sticking together. They stay soft and fudgy for up to 4 days, but I’ve noticed they taste best within the first 48 hours.
Freezing
These cookies freeze beautifully! I usually freeze the dough balls on a tray first, then transfer them to a zip-top freezer bag. When I want fresh cookies, I just bake them straight from the freezer, adding a couple extra minutes to the baking time. Leftover baked cookies freeze well too, wrapped tightly in plastic wrap and stored in a freezer bag.
Reheating
To reheat, I pop a cookie or two in the microwave for about 10-15 seconds to get that fresh-baked warmth and softness back. If you want a crispier edge, warming them briefly in a toaster oven works wonders, just keep an eye so they don’t dry out.
FAQs
-
Can I use regular chocolate instead of dark chocolate for this recipe?
Absolutely! You can swap in milk chocolate chips or even semi-sweet chocolate chips depending on your preference. Just keep in mind the flavor will be sweeter and less intense, so if you love a rich chocolate taste, you might want to stick with dark chocolate or use a blend.
-
My candies don’t stick well—any tips?
It happens! If your orange chocolate candies don’t stick nicely, try melting a bit of chocolate and adding a small dab on top of the cookies before pressing the candies in. Let them dry completely, and this little hack keeps your candy decoration intact.
-
Can I make the dough ahead of time?
Yes, the dough can chill in the fridge for up to 24 hours. In fact, chilling improves flavor and texture, making the cookies even more delicious. Just bring the dough back to room temperature for 10-15 minutes before scooping and baking.
-
How do I avoid flat cookies?
Make sure your butter is fully softened but not melted, measure your flour accurately (spoon it in and level it off), and don’t overmix the dough once you add flour. These steps help your cookies keep a nice shape and chewiness.
Final Thoughts
This Dark Chocolate Halloween Cookies Recipe has become a small tradition in my kitchen every October, and I can’t recommend it enough. It’s easy to make, fun to decorate, and always gets rave reviews for that perfect balance of festivity and seriously indulgent chocolate goodness. Next time you want to impress your spooky crew without spending all day in the kitchen, give these a try—you’ll be so glad you did!
Print
Dark Chocolate Halloween Cookies Recipe
- Prep Time: 15 minutes
- Cook Time: 12 minutes
- Total Time: 27 minutes
- Yield: 24 cookies
- Category: Dessert
- Method: Baking
- Cuisine: American
Description
Delicious dark chocolate Halloween cookies featuring rich cocoa, chocolate chips, and festive orange candy toppings. These cookies are soft with crinkly edges, perfect for a spooky celebration or a sweet treat any time of year.
Ingredients
Cookie Dough
- 1 stick unsalted butter at room temperature
- ½ cup packed light brown sugar
- ¼ cup granulated sugar
- 1 egg at room temperature
- ½ teaspoon vanilla extract
- 1 cup all-purpose flour
- 3 tablespoons cocoa powder
- ½ teaspoon baking soda
- pinch salt
- 1 cup chocolate chips
- ¼ cup orange colored chocolate coated candies
Instructions
- Preheat Oven: Preheat the oven to 350˚F and line two large baking sheets with parchment paper.
- Cream Butter and Sugars: In the bowl of a stand mixer fitted with the paddle attachment, add butter, brown sugar, and granulated sugar. Mix at medium speed for about 4 minutes until light and fluffy.
- Add Egg and Vanilla: Scrape down the sides of the bowl, then add the egg and vanilla extract. Mix for 30 seconds to combine.
- Combine Dry Ingredients: In a medium bowl, sift together flour, cocoa powder, baking soda, and salt.
- Mix Dry and Wet Ingredients: Add the dry ingredients to the butter mixture and mix at low speed just until no streaks of flour remain.
- Fold in Chocolate Chips: Remove the bowl from the mixer and fold the chocolate chips into the batter with a rubber spatula until evenly distributed.
- Scoop Dough: Using a 1.5 tablespoon-size spring-loaded cookie scoop, place 12 dough balls on each prepared baking sheet about 2 inches apart.
- Bake Cookies: Bake for 12 minutes until the cookies are crinkly on the edges and just set in the middle.
- Add Candies: Let cookies sit for about 1 minute. Quickly and carefully press the orange chocolate candies into the warm cookies.
- Cool Cookies: Let sit on the pan for 2-3 minutes, then transfer to a cooling rack until completely cool.
Notes
- If the orange candies don’t stick well, melt a little chocolate and add several drops on top of the cookie, then press candies into the melted chocolate and let dry.
- Ensure butter and egg are at room temperature to achieve the best texture.
- You can substitute orange candies with any other colored chocolate candies for different occasions.
Nutrition
- Serving Size: 1 cookie
- Calories: 160 kcal
- Sugar: 12 g
- Sodium: 90 mg
- Fat: 8 g
- Saturated Fat: 4 g
- Unsaturated Fat: 3 g
- Trans Fat: 0 g
- Carbohydrates: 21 g
- Fiber: 1.5 g
- Protein: 2 g
- Cholesterol: 25 mg


