Dark Chocolate Candy Cane Cookies Recipe
If you’re craving something festive, rich, and a little bit magical this season, then I have the perfect treat for you: my Dark Chocolate Candy Cane Cookies Recipe. This recipe combines the deep, intense flavor of dark cocoa with the refreshing crunch of crushed candy canes—it’s a true holiday showstopper that’s surprisingly easy to whip up. Trust me, once you bake these, they’ll be the cookie everyone comes back for seconds (or thirds!). Stick around and I’ll walk you through every detail so you can nail these in your own kitchen.
Why This Recipe Works
- Perfect Flavor Balance: The combination of Dutch-processed and black cocoa powders creates a rich, almost fudgy chocolate base that’s perfectly offset by the cooling peppermint notes.
- Textural Contrast: These cookies have just the right chewiness, but the crushed candy canes on top add a delightful crunch you’ll love.
- Easy yet Impressive: Despite their fancy look and festive feel, these cookies come together with simple pantry ingredients and straightforward steps.
- Customizable Finish: You can swap out the candy melts for white chocolate or drizzle them with extra dark chocolate, making them as versatile as you want.

Ingredients & Why They Work
This Dark Chocolate Candy Cane Cookies Recipe hinges on carefully chosen ingredients that bring out bold flavors and charming textures. From the dual cocoa powders to the peppermint extract and crushed candy canes, every component adds something special. Here’s why I love each ingredient and my shopping tips:
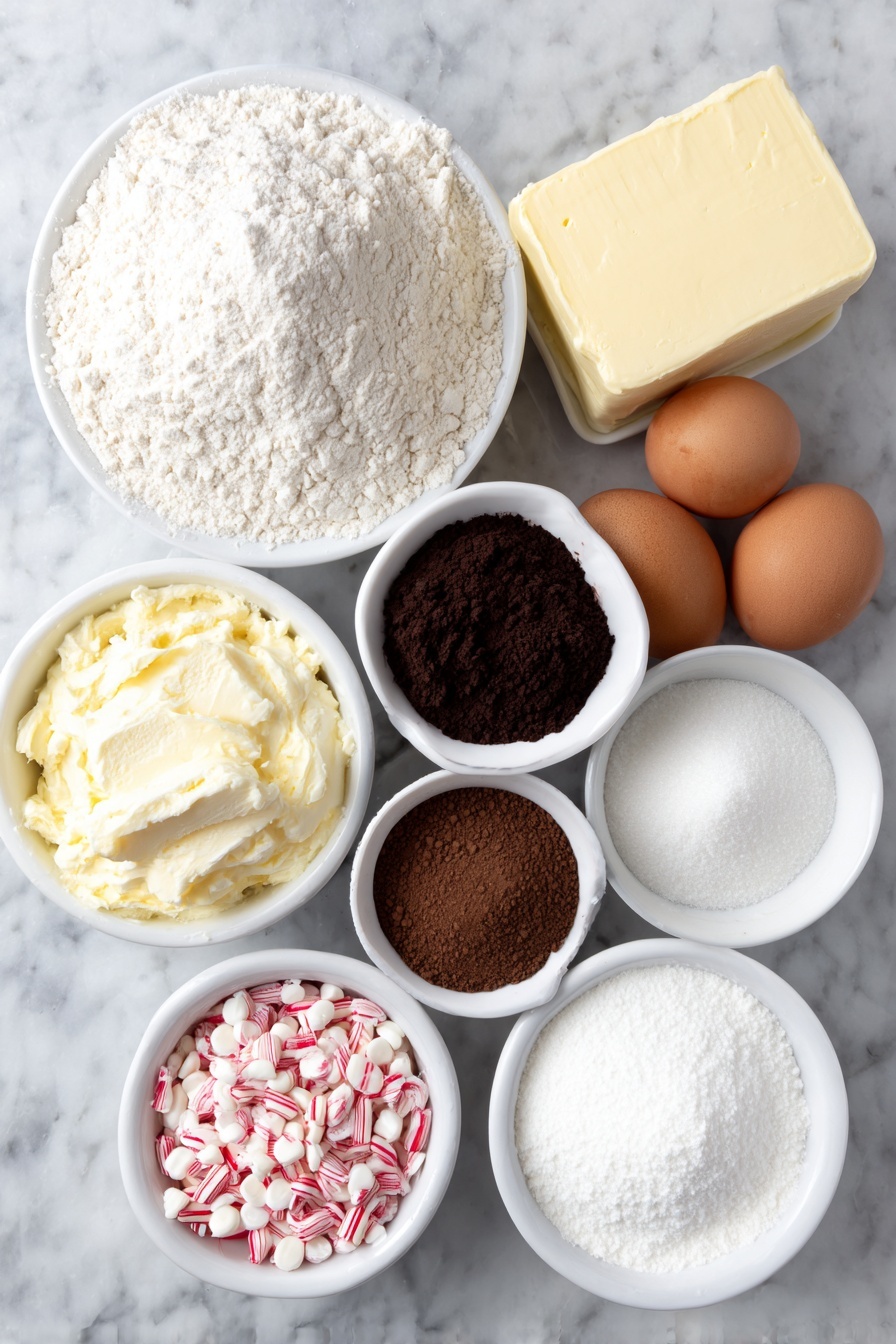
- All-purpose flour: The sturdy base for these cookies, giving them structure while letting the chocolate shine. I always sift it to avoid lumps.
- Dutch-processed cocoa powder: Adds depth with its smooth, mellow chocolate taste — perfect for a darker cookie without bitterness.
- Black cocoa powder: The secret weapon for an ultra-dark color and an intense chocolate punch that makes these cookies stand out.
- Baking soda: Helps with just enough lift and spread for a tender bite that’s not too cakey.
- Sea salt: Elevates the chocolate flavor and balances the sweetness, never skip it!
- Unsalted butter: For rich creaminess and to keep the dough tender; make sure it’s softened to room temp so it creams smoothly.
- Granulated sugar & light-brown sugar: The perfect combo — granulated gives crisp edges while brown sugar adds chewiness and a hint of caramel.
- Large eggs: Bind everything together and add moisture; I always use room temperature eggs for better mixing.
- Peppermint extract (optional): Adds that festive, refreshing hint — I never skip this for that classic candy cane vibe.
- Bright White Candy Melts or white chocolate: For that beautiful, creamy coating on top; melts smoothly and holds the crushed candy canes perfectly.
- Vegetable shortening: Helps thin out candy melts if they get too thick, making dipping a breeze.
- Crushed candy canes: The finishing touch for festive flair and sweet peppermint crunch that everyone raves about.
Make It Your Way
One of my favorite things about this Dark Chocolate Candy Cane Cookies Recipe is how you can easily tweak it to make it truly yours. Whether you love them with extra chocolate, want to skip peppermint, or tweak textures, it all works beautifully.
- Extra chocolate kick: I sometimes fold in mini dark chocolate chips for pockets of gooey goodness, and it seriously ups the indulgence factor.
- No peppermint? No problem! These cookies shine on their own with rich cocoa—just omit the extract and swap crushed candy canes for crushed nuts or colored sugar.
- Gluten-free twist: I’ve swapped the flour for a high-quality gluten-free blend with great results—just watch your bake time as it may vary slightly.
- Make it vegan: Replace butter with a plant-based alternative, and swap eggs for flax “eggs.” The texture will be a bit different but still delicious.
Step-by-Step: How I Make Dark Chocolate Candy Cane Cookies Recipe
Step 1: Whisk Dry Ingredients Together
Start by sifting both the Dutch-processed and black cocoa powders with the all-purpose flour, baking soda, and sea salt into a medium bowl. Mixing these evenly before combining with wet ingredients ensures every bite has intense chocolate flavor without any pockets of cocoa powder. This little step helps your cookies have consistent texture and color!
Step 2: Cream Butter and Sugars
In your stand mixer bowl (or with a hand mixer), beat the softened butter with both granulated and light brown sugar on medium-high speed. I usually go for 2 to 3 minutes until it looks light, fluffy, and pale—a sign that air has been incorporated for tender cookies. This step matters: don’t rush it, or your cookies may turn out dense.
Step 3: Add Eggs and Peppermint Extract
Reduce the mixer speed and add eggs one at a time, beating until blended before adding the next. Then, gently mix in the peppermint extract if you’re using it. This subtle step infuses your dough with that unmistakable candy cane spirit without overwhelming the chocolate.
Step 4: Fold in the Dry Ingredients
Slowly add your flour and cocoa mixture to the butter mixture. Use the mixer on low or switch to a spatula and fold gently just until combined. Don’t overmix here—overworking the dough can make the cookies tough. You want a smooth, slightly sticky dough that’s ready for chilling.
Step 5: Chill the Dough
This is a game changer. I always chill the dough for at least one hour, but overnight is even better. The chilling helps the flavors deepen, the dough stiffen for easier scooping, and prevents your cookies from spreading too much while baking. Wrap the dough in plastic wrap or cover the bowl tightly.
Step 6: Bake the Cookies
Preheat your oven to 350°F and line cookie sheets with parchment paper or silicone mats. Using a medium cookie scoop (about 1.5 tablespoons), portion out the dough evenly—9 cookies per sheet works perfectly. Bake for about 10 minutes until the centers are set but still soft. Your cookies will puff up, then deflate and develop those beautiful crinkles as they cool. Let them sit on the baking sheet for 5 minutes before transferring to a wire rack.
Step 7: Dip and Decorate
Melt your white candy melts or white chocolate carefully—adding a little vegetable shortening if needed to get that perfect dipping consistency. Dip the cooled cookies halfway or fully, then sprinkle generously with crushed candy canes while the coating is still warm. Lay them back on parchment-lined sheets and let the coating set completely. This is the part I always savor while waiting: the anticipation is real!
Tips from My Kitchen
- Chill That Dough: I can’t stress this enough — chilling makes scooping cleaner, baking neater, and flavor better.
- Don’t Skip Sifting: Makes your cocoa powders blend perfectly without clumps, giving a glossy cookie surface.
- Use Quality Peppermint Extract: A little goes a long way; I prefer pure peppermint extract over artificial to keep the flavor fresh.
- Handle Candy Melts Right: Overheating can ruin texture; melt gently in short intervals with stirring.
How to Serve Dark Chocolate Candy Cane Cookies Recipe

Garnishes
I love to keep it classic with crushed candy canes, but you can also sprinkle crushed peppermint bark, edible glitter, or even a light dusting of powdered sugar for a snowy effect. A little extra flick of melted chocolate drizzle adds a fancy touch if you’re feeling festive.
Side Dishes
These cookies pair wonderfully with a hot cup of peppermint mocha, rich eggnog, or even just a tall glass of cold milk. For holiday parties, I like serving them alongside spiced nuts and fresh cranberries for a pop of color and texture.
Creative Ways to Present
For gift-giving or parties, stack these cookies in pretty tins lined with parchment paper tied with red and white twine. You can also arrange them on a festive platter with mints and pine sprigs for a charming holiday centerpiece. I once wrapped individual cookies in cellophane bags with a small bow—perfect for office treats!
Make Ahead and Storage
Storing Leftovers
Once dipped and fully set, store your cookies in an airtight container layered with parchment paper to keep them from sticking. I keep them at room temperature in a cool spot, and honestly, they last about a week before they mysteriously disappear from my kitchen!
Freezing
If you want to make these cookies ahead for a party, freeze the baked and cooled cookies before dipping. Freeze on a baking sheet until solid, then transfer to a sealed freezer bag. When ready to serve, thaw and dip in candy melts fresh for that glossy finish.
Reheating
I usually don’t reheat these cookies because they’re best enjoyed with that fresh-crisp coating. But if you want to warm one up, a quick 10 second zap in the microwave softens the cookie without melting the candy coating too much—just watch closely!
FAQs
-
Can I make Dark Chocolate Candy Cane Cookies Recipe without peppermint extract?
Absolutely! The peppermint extract is optional. Your cookies will still be rich and chocolatey without it. You can swap the peppermint for a teaspoon of vanilla extract or simply omit it for a pure chocolate cookie.
-
What’s the best way to crush candy canes for topping?
I like placing candy canes in a zip-top bag and gently crushing them with a rolling pin or meat mallet. This method gives uneven sizes, which add a nice texture and visual appeal to the cookies.
- Why do the cookies deflate after baking?
These cookies puff up while baking due to the leavening, then gently deflate and crinkle as they cool—that’s exactly how they should look! It means the structure is tender but holds together nicely.
- Can I use regular cocoa powder instead of black cocoa?
You can, but the cookies won’t be as dark or intensely flavored. Black cocoa gives that signature midnight color and robust taste. If you don’t have it, try increasing the Dutch-processed cocoa by a tablespoon for better richness.
- How do I thin candy melts if they’re too thick for dipping?
Add a teaspoon of vegetable shortening at a time to the melted candy melts and stir until you reach a smooth, dip-friendly consistency. Be careful not to overheat the melts as they can seize.
Final Thoughts
This Dark Chocolate Candy Cane Cookies Recipe holds a special place in my heart—the way it blends nostalgia with grown-up chocolate decadence makes it my go-to holiday treat every year. I hope you find joy baking these as much as I do sharing them with friends and family. Go ahead, give the recipe a try—you’re going to love how effortlessly you can bring a little festive magic to your kitchen with these cookies!
Print
Dark Chocolate Candy Cane Cookies Recipe
- Prep Time: 1 hour 30 minutes
- Cook Time: 10 minutes
- Total Time: 1 hour 40 minutes
- Yield: 36 cookies
- Category: Dessert
- Method: Baking
- Cuisine: American
- Diet: Vegetarian
Description
These decadent Dark Chocolate Candy Cane Cookies combine rich cocoa flavors with a festive peppermint twist. Perfect for holiday celebrations, these cookies feature a tender chocolate base dipped in creamy white chocolate and sprinkled with crushed candy canes for a delightful crunch and minty finish.
Ingredients
Dry Ingredients
- 2 cups all-purpose flour
- 1/4 cup Dutch-processed cocoa powder, sifted
- 1/4 cup black cocoa powder, sifted
- 1 tsp baking soda
- 1/2 tsp sea salt
Wet Ingredients
- 1 cup unsalted butter, room temperature
- 1/2 cup granulated sugar
- 1 cup light-brown sugar, packed
- 2 large eggs, room temperature
- 1 tsp peppermint extract, optional
Toppings
- 1 bag Bright White Candy Melts or white chocolate, melted*
- Vegetable shortening, as needed to thin candy melts
- Crushed candy canes
Instructions
- Mix dry ingredients: In a medium bowl, whisk together the all-purpose flour, Dutch-processed cocoa powder, black cocoa powder, baking soda, and sea salt until well combined. Set aside.
- Cream butter and sugars: In the bowl of a stand mixer, beat the unsalted butter, granulated sugar, and light-brown sugar on medium-high speed for about 2-3 minutes until the mixture is light and fluffy.
- Add eggs and flavor: Reduce the mixer speed to medium and add the eggs one at a time, then add the peppermint extract if using. Beat until the mixture is well combined.
- Combine wet and dry: Gradually add the dry flour mixture to the wet ingredients and mix just until combined, being careful not to overmix the dough.
- Chill dough: Cover the dough and chill it in the refrigerator for at least 1 hour, or preferably overnight, to firm up and develop flavors.
- Preheat oven and prepare trays: Preheat the oven to 350°F and line baking sheets with parchment paper or silicone baking mats for easy cleanup.
- Shape and bake cookies: Using a medium cookie scoop, portion the dough onto the prepared baking sheets, fitting about 9 cookies per sheet. Bake for approximately 10 minutes or until the centers are set. Expect the cookies to deflate and crackle as they cool.
- Cool cookies: Allow the cookies to cool on the baking sheets for 5 minutes to firm up, then transfer them to a wire rack to cool completely.
- Dip and decorate: Dip the cooled cookies into the melted candy melts or white chocolate, using vegetable shortening as needed to thin the melts for a smooth coating. Place dipped cookies on parchment-lined baking sheets and immediately sprinkle with crushed candy canes.
- Set topping: Let the dipped cookies set at room temperature until the white chocolate or candy melts harden before serving or storing.
Notes
- To melt candy melts smoothly, gently heat with small amounts of vegetable shortening to prevent thickening and ensure easy dipping.
- Chilling the dough overnight enhances flavor and helps cookies maintain their shape during baking.
- For a stronger peppermint flavor, increase peppermint extract to 1 1/2 teaspoons if desired.
- Store cookies in an airtight container at room temperature for up to 5 days, or freeze for longer storage.
Nutrition
- Serving Size: 1 cookie
- Calories: 180 kcal
- Sugar: 14 g
- Sodium: 90 mg
- Fat: 10 g
- Saturated Fat: 6 g
- Unsaturated Fat: 3 g
- Trans Fat: 0 g
- Carbohydrates: 22 g
- Fiber: 2 g
- Protein: 2 g
- Cholesterol: 35 mg


