Christmas Tree Sheet Cake with White Chocolate Buttercream Recipe
If you’re on the hunt for a show-stopping holiday dessert, you’ve got to try this Christmas Tree Sheet Cake with White Chocolate Buttercream Recipe. It’s one of those recipes that always gets compliments – moist yellow cake layers sandwiched with fluffy whipped cream filling, then generously coated in a luscious white chocolate buttercream that’s as festive as it is delicious. Plus, decorating it with green sanding sugar and holiday sprinkles turns this simple sheet cake into a stunning Christmas tree centerpiece you’ll be proud to serve.
Why This Recipe Works
- Perfect Texture: Combining yellow cake mix with buttermilk and sour cream gives you a moist, tender crumb every time.
- Light & Creamy Filling: The whipped cream filling adds a fluffy layer without weighing down the cake or making it too sweet.
- Decadent White Chocolate Buttercream: The smooth, rich frosting complements the cake beautifully and lends an elegant holiday vibe.
- Festive Finish: Bright red piped borders and green sanding sugar sprinkle the perfect festive touch that’s easy to personalize.

Ingredients & Why They Work
The ingredients in this Christmas Tree Sheet Cake with White Chocolate Buttercream Recipe strike an amazing balance between convenience and indulgence. I love using a boxed yellow cake mix boosted with real buttermilk and sour cream because it makes the cake super moist yet fluffy, while the whipped cream filling lends a light contrast to the rich buttercream.
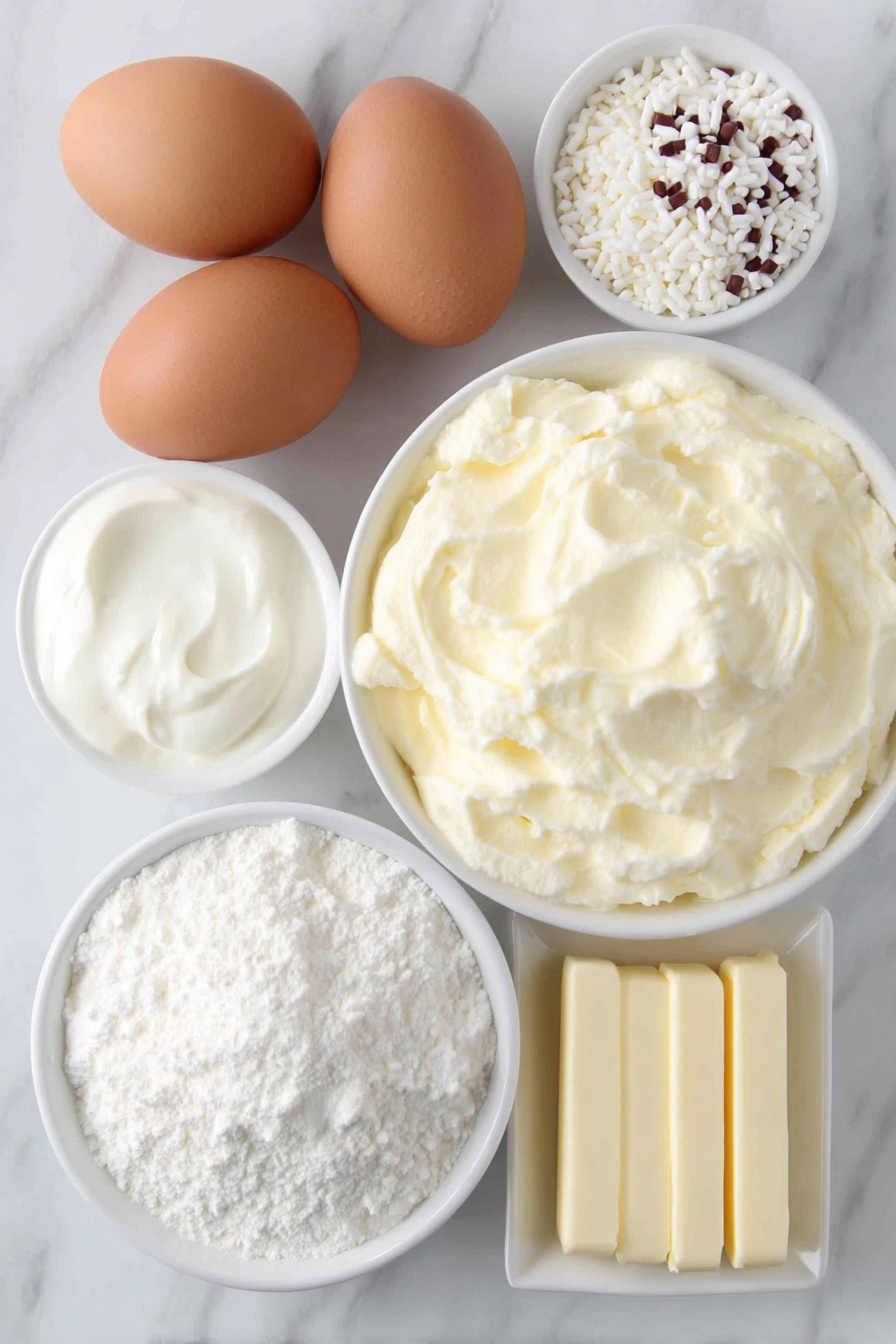
- Buttermilk: Adds tang and tenderness, making the cake milder and moist.
- Sour Cream: Works with buttermilk to provide extra moisture and a creamy crumb.
- Vanilla: A staple that rounds out all the flavors beautifully without overpowering.
- Yellow Cake Mix: A convenient base that bakes up flawlessly and consistently.
- Heavy Whipping Cream: For the fluffy whipped cream filling and the rich ganache base of the buttercream.
- White Chocolate Chips: Melt smoothly into the buttercream, giving that luscious flavor and texture.
- Unsalted Butter: Make sure it’s softened to room temperature for creamy frosting without lumps.
- Powdered Sugar: Gives your frosting that sweet, silky finish and structure.
- Green Sanding Sugar & Holiday Sprinkles: Simple yet effective decorating touches to create the Christmas tree look.
Make It Your Way
I like to keep things pretty traditional with this Christmas Tree Sheet Cake with White Chocolate Buttercream Recipe, but don’t let that stop you from making it your own! Whether you want to switch up the filling, change the color accents, or even make it dairy-free, there’s room for creativity here.
- Variation: Once, I swapped out the whipped cream filling for a mascarpone-based cream cheese filling. It added a bit more tang and richness that my family adored.
- Dietary Modifications: You can use dairy-free butter and coconut cream to adapt the buttercream for lactose intolerance – just make sure to chill your coconut cream well for a fluffy texture.
- Seasonal Changes: I’ve decorated this cake with pastel sprinkles for Easter and it worked just as well—versatile enough for other holidays too.
Step-by-Step: How I Make Christmas Tree Sheet Cake with White Chocolate Buttercream Recipe
Step 1: Mix and Bake the Perfect Yellow Cake
Start by preheating your oven to 325°F and prepping a 9×13 pan generously with baking spray or grease and flour. In a large bowl, whisk together buttermilk, sour cream, eggs, oil, and vanilla until smooth. Then sift in the yellow cake mix and gently stir until combined—don’t overmix or you’ll lose that tender crumb. Pour it into your pan and bake for 22-25 minutes. When it’s done, you’ll want the cake to feel springy to the touch and a toothpick should come out clean. Let it cool completely before moving on.
Step 2: Whip Up Your Light and Fluffy Filling
While the cake cools, you can prepare your whipped cream filling. For best results, chill a metal bowl and your whisk attachments in the freezer for a few minutes—it helps the cream whip faster. Beat the heavy cream starting on low, gradually increasing speed over 2-3 minutes until you reach stiff peaks. Fold in vanilla, almond extract (if using), and powdered sugar for flavour and stability. This filling is wonderfully airy and perfectly balances the sweet richness of the buttercream.
Step 3: Slice and Layer Like a Pro
This part gets a little technical but is so worth the effort. Flip the cake out onto parchment paper and carefully slice it horizontally with a cake leveler to create two even layers. Slide a flat cutting board or piece of cardboard beneath the top layer and lift it gently away. Return the bottom layer to the pan, spread your whipped cream filling evenly, then slide the top layer right back on. It’s easier than it sounds, just take your time so your layers stay perfect.
Step 4: Make That Showstopping White Chocolate Buttercream
Heat the heavy cream and white chocolate chips in short bursts in the microwave, stirring until smooth and glossy—that’s your ganache base. Meanwhile, whip softened butter until fluffy, then mix in salt, vanilla, and the ganache. Start adding powdered sugar bit by bit, mixing well, and add more cream if the frosting feels too thick. Finally, whip on high until it’s a light pastel ivory and creamy. Don’t rush this step – the texture makes all the difference.
Step 5: Frost, Decorate, and Celebrate!
Use a flat cake scraper to frost the whole cake with most of your buttercream, reserving about 2 ½ to 3 cups. Color the reserved portion red with gel food coloring and pipe wavy lines and a shell border using your piping tips. Finish off with a generous sprinkle of green sanding sugar in the center, surrounded by festive holiday sprinkles to mimic a glittering tree. Seeing your cake come alive like this is seriously the best holiday feeling.
Tips from My Kitchen
- Room Temperature Ingredients: Using eggs, sour cream, and buttermilk at room temp really helps your batter mix evenly and bake smoothly.
- Whipping Cream to Stiff Peaks: Watch it closely; overwhipping can ruin the texture, so stop as soon as peaks stand stiff.
- Slicing the Cake: A serrated cake leveler or knife is key here—cut slowly to avoid crumbling.
- Avoid Air Bubbles in Buttercream: After whipping, gently press the frosting with a spoon to pop large air bubbles before frosting your cake.
How to Serve Christmas Tree Sheet Cake with White Chocolate Buttercream Recipe

Garnishes
I personally love the combination of green sanding sugar and holiday-themed sprinkles to evoke that fresh pine tree look. The red piped buttercream adds a festive pop and looks so charming. But you can also sprinkle crushed peppermint candy for a minty crunch or edible gold dust for a touch of sparkle — whatever feels like holiday magic to you.
Side Dishes
This cake pairs wonderfully with a simple cup of spiced hot cocoa or a warm chai latte — the perfect combo for cold winter evenings. If it’s a holiday brunch, I sometimes serve it alongside fresh fruit salad and eggnog pour-overs for a festive spread everyone enjoys.
Creative Ways to Present
For special occasions, I’ve shaped this sheet cake into mini Christmas tree slices by cutting triangles after frosting, then stacked them tiered on a platter with twinkle lights around. Another fun idea is to add tiny edible gold stars or candy canes as ornaments on the piped buttercream borders for extra holiday cheer.
Make Ahead and Storage
Storing Leftovers
Store any leftover cake covered tightly with plastic wrap or in an airtight container in the refrigerator for up to 4 days. Because of the whipped cream filling and buttercream, keeping it cold helps maintain freshness and texture. I like to slice it before storing, so you can grab a piece without doing a full cake round.
Freezing
I’ve frozen this cake successfully by wrapping slices individually in plastic wrap and then tin foil, freezing for up to 2 months. When ready to enjoy, thaw overnight in the fridge. The texture holds up superbly, and the buttercream stays creamy without breaking down.
Reheating
This cake is best served chilled or at room temperature, so I recommend simply removing slices from the fridge 30 minutes before serving. If your kitchen is really cold and you want to soften the buttercream a little, leave it out longer, but avoid microwaving or warming the cake directly as it can melt the frosting and change the texture.
FAQs
-
Can I make this cake from scratch instead of a cake mix?
Absolutely! You can replace the yellow cake mix with your favorite homemade yellow cake recipe. Just be sure your batter has similar moisture levels with buttermilk and sour cream to keep the cake tender and moist like in this recipe.
-
What’s the best way to slice the cake in half evenly?
Using a cake leveler or a long serrated knife polished with a little wax paper helps make a clean, straight cut without crumbling. It’s easier on a flat surface with parchment beneath to catch crumbs. Take your time and slice slowly for best results.
-
Can I prepare this cake a day ahead?
Yes! This cake actually tastes better after a few hours or overnight in the fridge as the flavors meld and the moisture settles. Just make sure to cover it tightly to prevent the frosting from drying out.
-
How do I prevent my buttercream from being too sweet?
Using white chocolate ganache in the buttercream adds a rich flavor that balances sweetness nicely. Also, be careful not to overdo the powdered sugar; add it gradually and taste as you go for your preferred sweetness level.
Final Thoughts
This Christmas Tree Sheet Cake with White Chocolate Buttercream Recipe has honestly become one of my go-to holiday treats because it’s as joyful to make as it is to eat. There’s something magical about the fluffy layers and that creamy frosting all decorated like a sparkly Christmas tree—it never fails to bring smiles. I hope you enjoy making and sharing this cake as much as I do. Trust me, once you’ve tried it, it’ll be your festive favorite too!
Print
Christmas Tree Sheet Cake with White Chocolate Buttercream Recipe
- Prep Time: 30 minutes
- Cook Time: 25 minutes
- Total Time: 1 hour 15 minutes
- Yield: 12 servings
- Category: Dessert
- Method: Baking
- Cuisine: American
Description
This Little Debbie Christmas Tree Sheet Cake is a festive and delicious dessert featuring a classic yellow cake layered with a whipped cream filling and topped with rich white chocolate buttercream. Decorated with red buttercream accents, green sanding sugar, and holiday sprinkles, this cake is perfect for holiday gatherings and celebrations.
Ingredients
Classic Yellow Cake
- 3/4 cup buttermilk, room temperature
- 2/3 cup sour cream, room temperature
- 3 whole eggs, room temperature
- 1/3 cup vegetable oil
- 1 tablespoon vanilla
- 1 15.25 oz box yellow Duncan Hines cake mix
Whipped Cream Filling
- 4 cups heavy whipping cream
- 1 teaspoon vanilla
- 1/2 teaspoon almond extract (optional)
- 2 cups powdered sugar
White Chocolate Buttercream
- 1/2 cup white chocolate chips
- 1/2 cup heavy cream
- 3 sticks (1 1/2 cups) unsalted butter, room temperature
- pinch of salt
- 1 tablespoon vanilla
- 8-9 cups powdered sugar
- 1/4 cup heavy cream (if needed to thin)
Red Buttercream Border & Decorating Elements
- 1/2 cup green sanding sugar
- 1 cup Wilton Christmas Tree sprinkles or any holiday sprinkles
- 2-3 drops red gel coloring
Instructions
- Prepare the Yellow Cake: Preheat the oven to 325 degrees Fahrenheit. Grease a 9×13-inch cake pan with baking spray, cake goop, or shortening and flour. In a large bowl, whisk together buttermilk, sour cream, eggs, vegetable oil, and vanilla. Sift the yellow cake mix into the bowl and gently stir until combined. Pour the batter into the prepared pan and bake for 25 minutes until a toothpick inserted in the center comes out clean. Let the cake cool completely.
- Slice the Cake: Once cooled, flip the cake onto a sheet of parchment paper on your counter. Using a cake leveler or serrated knife, carefully slice the cake horizontally in half. Place a thin cutting board or flat piece of cardboard under the top layer and lift it off. Return the bottom cake layer to the 9×13 pan.
- Make the Whipped Cream Filling: Chill a metal mixing bowl and whisk attachment in the freezer for 5 minutes. Pour 4 cups heavy whipping cream into the cold bowl and whip on low speed for 1 minute, then medium for 1 minute, increasing to high for 1 minute until stiff peaks form. Add vanilla, almond extract (if using), and powdered sugar. Whip again to combine. Spread this whipped cream mixture evenly over the bottom cake layer in the pan. Carefully place the top cake layer on top of the whipped cream filling layer.
- Prepare the White Chocolate Buttercream: Heat 1/2 cup heavy cream and white chocolate chips together in the microwave for 30 seconds, stirring until smooth. Repeat heating for 10 seconds if necessary until fully melted and smooth. In a stand mixer fitted with a paddle attachment, beat the room-temperature butter until light and fluffy. Add a pinch of salt and vanilla, then beat in the white chocolate mixture. Gradually add 8-9 cups powdered sugar, beating well after each addition. Add up to 1/4 cup heavy cream if the buttercream is too thick. Beat on high speed for about 2 minutes until the buttercream is lighter in color and fluffy. Use a wooden spoon to gently press out some air bubbles.
- Frost the Cake: Using a flat cake scraper, frost the entire cake with the white chocolate buttercream, reserving about 2 1/2 to 3 cups for the decorative borders and details.
- Create Red Buttercream Decorations: Add 2-3 drops of red gel coloring to the reserved buttercream and mix until color is evenly distributed. Using a small round piping tip, pipe a red wavy pattern over the cake and on the Christmas tree shapes as desired. Then, fill a piping bag fitted with a large star tip with the remaining red buttercream and pipe a shell border around the edges of the cake.
- Add Final Decorations: Sprinkle the green sanding sugar generously in the middle of the cake to mimic pine needles. Decorate the outer edges with Wilton Christmas tree sprinkles or other festive holiday sprinkles. The cake is now ready to serve and enjoy!
Notes
- Ensure your eggs, buttermilk, and sour cream are at room temperature to create a smooth batter and even texture.
- Carefully slice the cake with a serrated knife or cake leveler to avoid breaking the layers.
- Chilling the metal bowl and whisk before whipping the cream helps achieve better volume and stiffness.
- If you do not have almond extract, you can omit it without affecting the overall flavor significantly.
- Adjust the thickness of the buttercream with additional heavy cream as needed to get a spreadable but stable consistency.
- Reserve some buttercream before coloring it red to keep the frosting colors vibrant and clean.
- This cake is best served the same day or within 1-2 days stored in the refrigerator to maintain freshness.
Nutrition
- Serving Size: 1 slice (1/12 of cake)
- Calories: 450 kcal
- Sugar: 40 g
- Sodium: 200 mg
- Fat: 30 g
- Saturated Fat: 18 g
- Unsaturated Fat: 10 g
- Trans Fat: 0 g
- Carbohydrates: 45 g
- Fiber: 1 g
- Protein: 4 g
- Cholesterol: 110 mg

