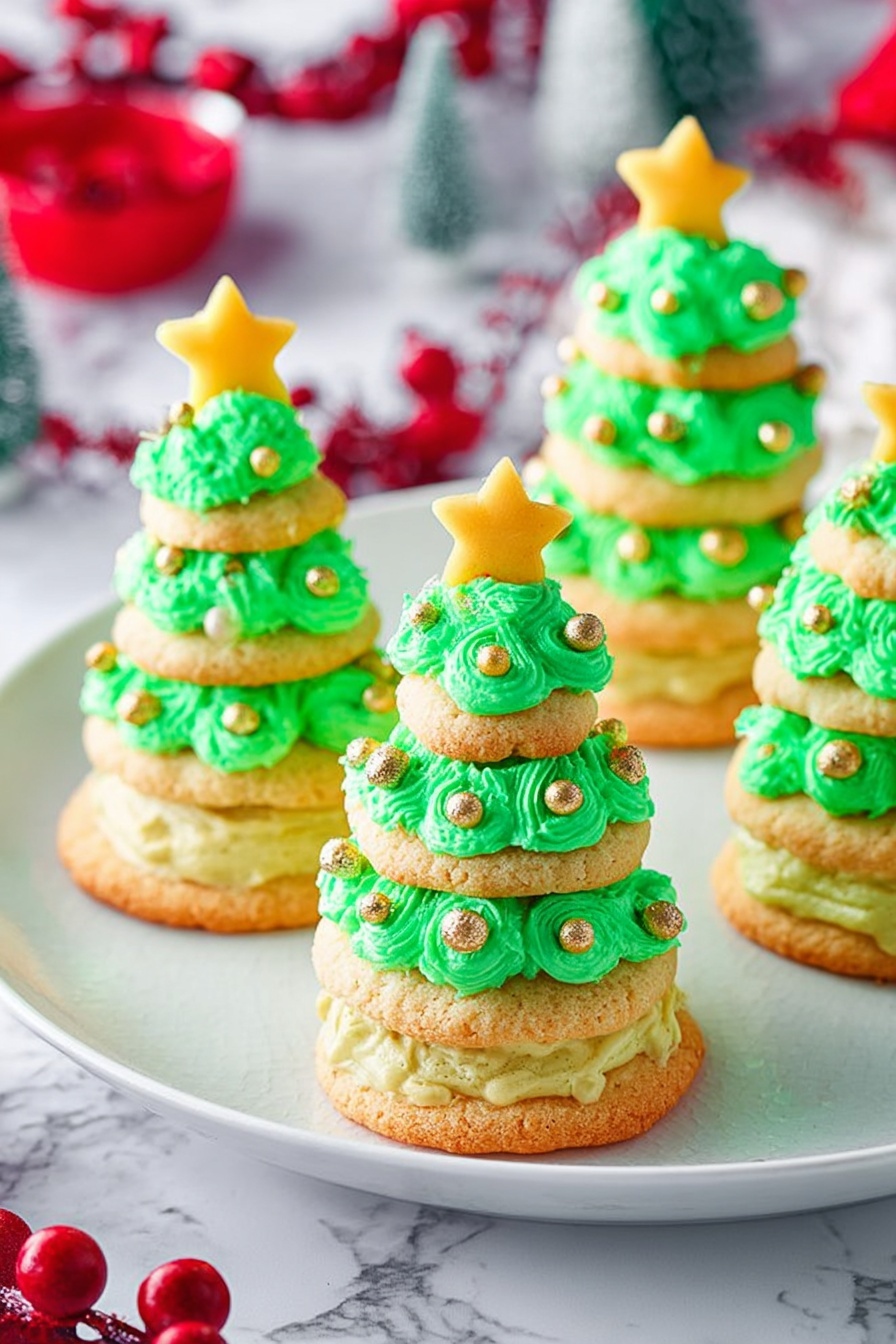
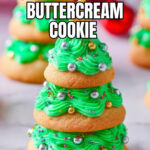
Christmas Tree Cookies with Buttercream Frosting Recipe
Hey friend! If you’re looking to add a little extra festive magic to your holiday baking, you’ve got to try this Christmas Tree Cookies with Buttercream Frosting Recipe. They’re not just cute—they’re downright delicious, with soft, buttery cookies stacked high and topped with the creamiest, dreamiest green buttercream. Plus, they make such a fun activity if you want to get into the holiday spirit and decorate together. Stick around because I’m sharing all my best tips to help you nail these festive treats every time!
Why This Recipe Works
- Multi-sized Cookies: Using three sizes lets you stack each “tree” perfectly, giving that charming layered look without fuss.
- Rich Buttercream: The buttercream frosting balances sweetness and butter flavor with just the right green tint for that Christmas vibe.
- Simple Ingredients: No fancy or hard-to-find stuff – just classic staples that come together beautifully.
- Flexible Baking: Baking times vary for sizes, making it easy to get tender, perfectly baked cookies every time.

Ingredients & Why They Work
Choosing the right ingredients here makes all the difference, especially because the cookies need to hold their shape when stacked but still remain soft and tasty. Plus, the buttercream frosting is easy to tweak to your color and sweetness preference.
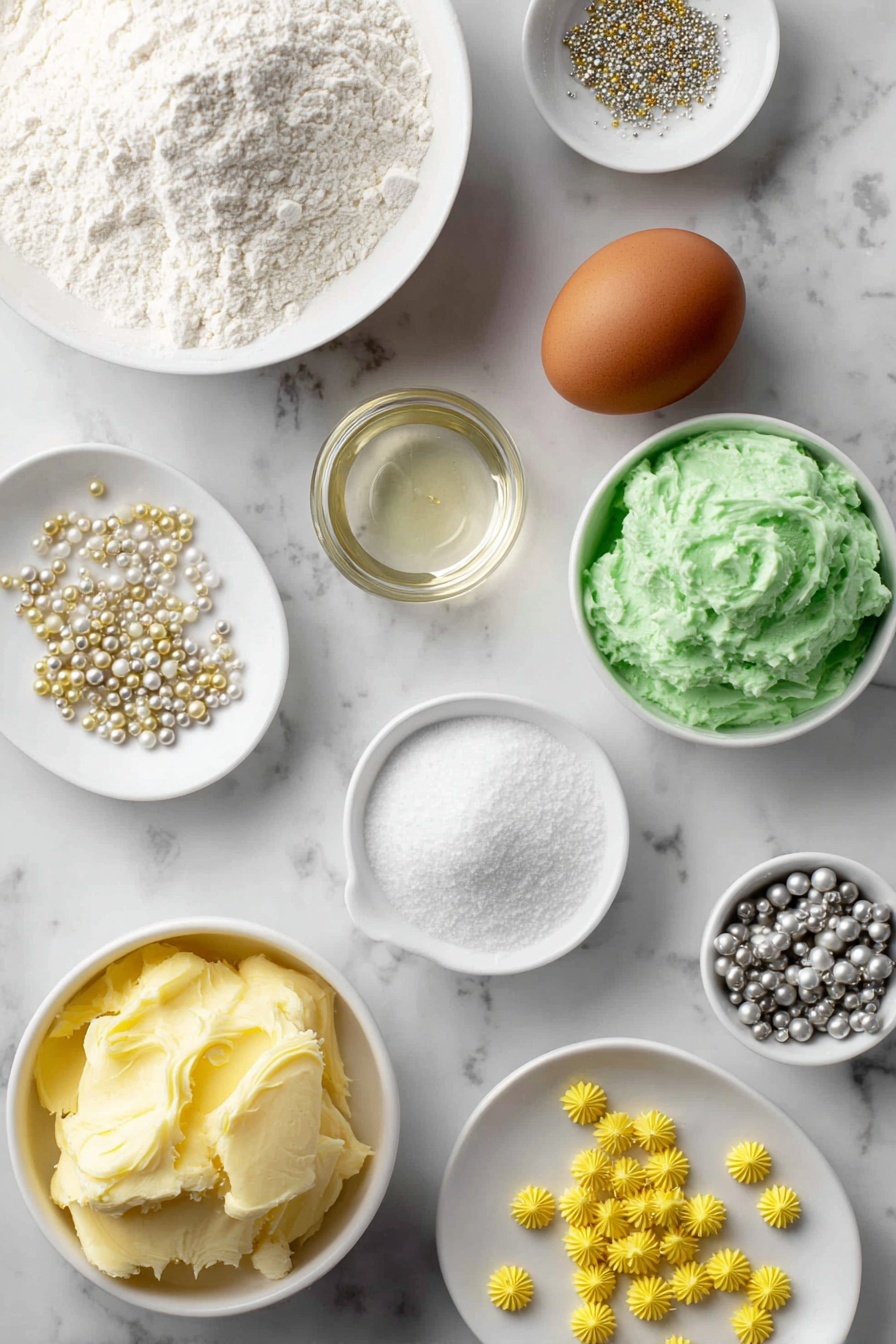
- Unsalted Butter: Using unsalted butter lets you control the saltiness and get that rich, creamy texture in both the cookie dough and frosting.
- Confectioners’ Sugar: Perfect for smooth sweetness and silky frosting without any graininess.
- Egg: Adds moisture and helps bind the dough for those soft cookies.
- Vanilla Extract: A must-have for depth in both cookies and frosting—it gives a warm, inviting flavor.
- All-Purpose Flour: The backbone of the cookies, providing structure without toughness.
- Baking Soda: Just enough leavening to give a slight lift without spreading too thin.
- Salt: Balances sweetness and brightens the flavors.
- Green Food Coloring: Adds that classic Christmas “tree” color—go slow, a little goes a long way!
- Yellow Star Sprinkles & Pearl Sprinkles: For decorating your cookie trees with extra sparkle and charm.
Make It Your Way
I love tweaking these Christmas Tree Cookies with Buttercream Frosting Recipe depending on the occasion or who I’m baking for. Sometimes I swap out the green food coloring for fun pastel shades or add a hint of peppermint extract to the frosting for an extra wintery kick. You should totally make these your own too!
- Variation: I once added finely chopped toasted pecans between layers for a delightful crunch—amazing combo with the soft cookies and creamy frosting.
- Dietary Modification: For a gluten-free twist, you can try swapping all-purpose flour with a gluten-free blend, but be sure to test your baking times since they might differ.
- Seasonal Changes: Beyond Christmas, playing with colors lets you use this recipe year-round—think pink and white frosting for Valentine’s Day cookie trees.
Step-by-Step: How I Make Christmas Tree Cookies with Buttercream Frosting Recipe
Step 1: Creaming the Butter & Sugar
Start by beating the softened butter in your mixer until it’s velvety smooth—this usually takes 2 to 3 minutes. I like to stop once or twice to scrape down the bowl to catch everything. Then add confectioners’ sugar and keep beating until it’s light and creamy—this is the secret to soft, tender cookies! A good tip is to have the butter at room temp but not melting—it creams up better that way!
Step 2: Adding the Egg and Vanilla
Pop in the egg and vanilla extract, and beat again until everything’s perfectly blended. Scrape down the bowl so you don’t miss any dough stuck on the sides—this helps with even mixing and texture.
Step 3: Mixing the Dry Ingredients
In goes the flour, baking soda, and salt—beat on low speed just until everything’s combined. Overmixing will make the cookies tough, and we want those soft yet sturdy little trees!
Step 4: Forming & Baking the Cookies
Here’s where the magic happens. You’ll make cookie dough balls in three sizes—1, 2, and 3 teaspoons each—to stack later. I usually use a measuring spoon for consistency. Bake the large ones for about 10 minutes, medium for 7-8, and small for 5-6 minutes, but keep an eye on them because oven temps vary. They’re done when edges look set even if centers aren’t fully firm—they continue to cook off the hot sheet.
Step 5: Whipping Up the Buttercream Frosting
Using the same mixer bowl (quick and easy cleanup!), beat the softened butter until creamy, then add confectioners’ sugar in two parts, beating well after each addition. Mix in vanilla and a pinch of salt to keep it bright. Add green food coloring slowly until you get that perfect shade—remember, you can always add more but can’t take it out!
Step 6: Decorating & Stacking Your Cookie Trees
Load up a piping bag fitted with a star tip (I swear by the 1M tip—it makes frosting swirl perfectly!). Pipe frosting on the large and medium cookies then add a little swirl on the small cookies to mimic the tree tip. Don’t forget your yellow star sprinkles on top to make them shine like real Christmas trees! Stack starting with a large cookie as the base, then medium, then small, layering until you’ve used all your cookies. Finish with your favorite sprinkles for sparkle.
Tips from My Kitchen
- Room Temperature Dates: Make sure your butter and egg are room temp; cold ingredients slow down mixing and affect cookie texture.
- Watch Baking Times Closely: Since your cookie balls differ in size, baking times vary; checking periodically ensures none burn or underbake.
- Stack While Frosting Is Soft: Pipe and stack cookies while frosting is soft and fresh so they hold well together.
- Cool Cookies Completely: To avoid frosting melt or cookies sliding, make sure they are room temp and cool before decorating.
How to Serve Christmas Tree Cookies with Buttercream Frosting Recipe
Garnishes
I’m a sucker for the classic festive feel, so I always finish off my cookie trees with tiny yellow star sprinkles on top to mimic a shining star, plus gold and silver pearl sprinkles for that frosty sparkle. You could easily mix in red and green jimmies or edible glitter for extra flair—all those little details make the cookies feel extra special.
Side Dishes
These cookies pair wonderfully with a warm cup of cocoa or mulled cider. If you’re hosting a party, I like to serve them alongside a simple cheese board or some spiced nuts to balance out the sweetness. They also make a festive treat perfect to leave out on the table for Santa!
Creative Ways to Present
For parties, I love displaying the stacked Christmas Tree Cookies on a tiered cake stand with fresh pine branches and mini ornaments around. Wrapping a set of them up in cellophane with a red ribbon makes for an adorable homemade gift. You can even arrange them on holiday platters shaped like wreaths or stars to amp up the festive vibe.
Make Ahead and Storage
Storing Leftovers
I usually store these Christmas Tree Cookies with Buttercream Frosting Recipe in an airtight container at room temperature for up to 4 days. I find that the butter and sugar in both the cookies and frosting keep them fresh longer than you’d expect. If you prefer chilled, they’ll also last well in the fridge for 1 to 2 weeks, but just know the frosting may firm up a bit.
Freezing
From what I’ve learned, freezing works best if you freeze the baked, undecorated cookies first. Bag them airtight or store in a container, then thaw completely before frosting and stacking. Freezing decorated cookies usually results in frosting damage, so I recommend frosting fresh when you’re ready to serve.
Reheating
If you want that fresh-baked warmth, pop the cookies into a low-temperature oven (around 300°F) for just 3-5 minutes, but only if they’re plain or unfrosted. Buttercream doesn’t do well with heat, so I skip reheating once decorated. Letting them come to room temp naturally brings out the best flavors.
FAQs
-
Can I use a different shape cookie cutter instead of making cookie dough balls?
Absolutely! Though I prefer dough balls for that stacked tree effect, you can roll out the dough and use tree-shaped cutters. Keep in mind, stacking might be trickier and frosting may need more precise piping for decorating.
-
How do I prevent the cookies from spreading too much in the oven?
Make sure your dough is chilled briefly before baking, and avoid over-soft butter or overmixing the dough. Also, accurately measuring flour helps keep the dough firm enough to hold shape.
-
What’s the best way to pipe the frosting for a beautiful tree effect?
I recommend using a star tip, like the 1M, and piping in a circular, swirling motion to mimic pine branches. Keep the pressure steady for even frosting layers and have fun with star sprinkles for the topper.
-
Can I make the cookies vegan or dairy-free?
Yes! Swap butter for plant-based alternatives and use egg replacers. For frosting, dairy-free butter substitutes work well, but it might take a couple of tries to perfect the texture.
-
How far in advance can I make these cookies?
You can bake the cookies up to a week ahead and keep them airtight at room temperature. Frost and decorate them the day you plan to serve to keep them fresh and vibrant.
Final Thoughts
This Christmas Tree Cookies with Buttercream Frosting Recipe has quickly become my go-to for holiday baking because it’s festive, fun, and actually pretty easy—no intimidating techniques here! The way the soft cookies and luscious frosting come together just puts me in the holiday mood every time. I hope you have as much fun making and eating these as I do. Trust me, your friends and family will be asking for these year after year—so get ready to bake, stack, and spread some holiday joy!
Print
Christmas Tree Cookies with Buttercream Frosting Recipe
- Prep Time: 30 minutes
- Cook Time: 10 minutes
- Total Time: 1 hour 10 minutes
- Yield: 20 servings
- Category: Dessert
- Method: Baking
- Cuisine: American
- Diet: Vegetarian
Description
Create festive Stacked Christmas Tree Cookies featuring buttery sugar cookies layered with creamy green buttercream frosting and decorated with star sprinkles and pearl-shaped sprinkles. Perfect for holiday celebrations and gifting.
Ingredients
Cookies
- ¾ cup unsalted butter, softened
- ¾ cup confectioners’ sugar
- 1 large egg
- 1 teaspoon vanilla extract
- 2 ¼ cups all-purpose flour
- 1 teaspoon baking soda
- ½ teaspoon salt
Buttercream Frosting
- 1 cup unsalted butter, softened
- 4 cups confectioners’ sugar
- 1 teaspoon pure vanilla extract
- ¼ teaspoon salt
- Drops green food coloring, as desired
Garnishing
- Yellow star sprinkles
- Silver and gold pearl-shaped sprinkles
Instructions
- Preheat and Prepare Baking Sheets: Preheat your oven to 350°F and line at least two baking sheets with Silpat liners or parchment paper, then set aside.
- Cream Butter: Using a stand mixer fitted with a paddle attachment or a handheld electric mixer, beat ¾ cup unsalted butter on high speed until creamy, about 2 to 3 minutes, scraping down the bowl sides as needed.
- Add Sugar: Add ¾ cup confectioners’ sugar and continue to beat until the mixture is creamy and well incorporated, about 3 minutes.
- Add Egg and Vanilla: Beat in 1 large egg and 1 teaspoon vanilla extract until fully combined, scraping the sides of the bowl.
- Incorporate Dry Ingredients: Add 2 ¼ cups all-purpose flour, 1 teaspoon baking soda, and ½ teaspoon salt. Beat on low speed until just combined, being careful not to overmix.
- Form Cookie Dough Balls: Shape the dough into balls of three sizes: 1 teaspoon, 2 teaspoons, and 3 teaspoons each. Aim to make approximately 20 balls of each size, totaling around 60 balls.
- Bake Cookies: Bake the large 3-teaspoon balls for about 10 minutes, medium 2-teaspoon balls for 8 minutes, and small 1-teaspoon balls for 6 minutes or until set around the edges. Allow cookies to cool on the baking sheets for 10 minutes before transferring to wire racks to cool completely.
- Prepare Buttercream Frosting: In a large mixing bowl, beat 1 cup unsalted butter on high speed until smooth and creamy, about 3 to 4 minutes.
- Add Sugar to Frosting: Gradually add 4 cups confectioners’ sugar in two parts, beating on medium speed and scraping down the bowl after each addition until thoroughly incorporated.
- Flavor and Color Frosting: Mix in 1 teaspoon vanilla extract and ¼ teaspoon salt, then add green food coloring drops until your desired intensity of green is achieved, mixing each time.
- Pipe Frosting on Cookies: Fit a piping bag with a star tip (such as 1M), fill it with frosting, and pipe layers of frosting on large cookies followed by medium cookies. Pipe a swirl on the smallest cookies to resemble tree tops and add a yellow star sprinkle on top.
- Assemble Cookie Trees: Stack the cookies in order—large base, medium center, and small top—building festive cookie Christmas trees.
- Decorate Trees: Garnish your cookie trees with silver and gold pearl-shaped sprinkles or any preferred holiday sprinkles like red and green jimmies for a colorful finish.
Notes
- Baking times vary based on the exact dough ball size, oven calibration, and environmental factors—watch cookies carefully to avoid overbaking.
- Store decorated cookies airtight in the refrigerator for up to 1 to 2 weeks or at room temperature for up to 4 days for best taste and texture.
- For freezing, freeze baked but undecorated cookies in airtight containers or zip-top bags. Frost after thawing to preserve frosting texture.
- Rotating your baking sheets midway through baking can help with even cooking and browning.
Nutrition
- Serving Size: 1 cookie tree
- Calories: 220 kcal
- Sugar: 20 g
- Sodium: 140 mg
- Fat: 12 g
- Saturated Fat: 7 g
- Unsaturated Fat: 4 g
- Trans Fat: 0 g
- Carbohydrates: 25 g
- Fiber: 0.5 g
- Protein: 2 g
- Cholesterol: 30 mg
