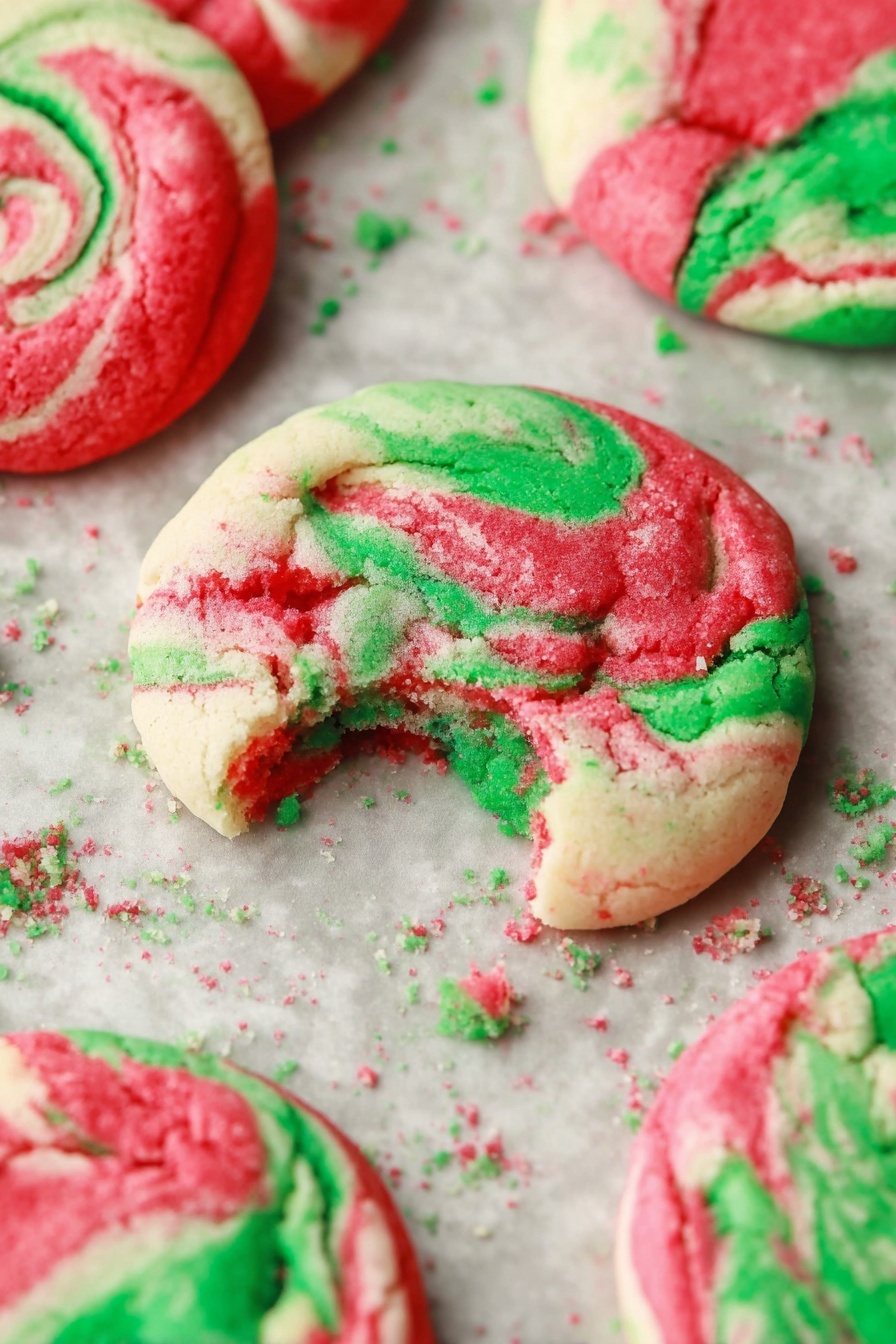
Christmas Peppermint Cheesecake Cookies Recipe
If you’re looking to add a festive twist to your holiday baking, these cookies are an absolute must-try. The Christmas Peppermint Cheesecake Cookies Recipe is everything you want in a Christmas treat—soft, buttery, with that subtle tang of cream cheese, and a delightful peppermint kick that makes your kitchen smell like holiday magic. I promise, once you make these, they’ll quickly become your go-to cookie for the season.
Why This Recipe Works
- Cream Cheese for Moisture: The cream cheese makes these cookies incredibly moist and tender, a fun twist on traditional holiday cookies.
- Peppermint Flavor Balance: Adding peppermint extract only to the green dough gives an inviting, festive pop that isn’t overpowering.
- Marbled Color Fun: The red and green doughs swirl together for a gorgeous, homemade look that screams Christmas.
- Simple Technique with Big Impact: Rolling half-tablespoons of dough together lets you create beautiful, unique cookies without any fancy tools.

Ingredients & Why They Work
The magic behind this Christmas Peppermint Cheesecake Cookies Recipe lies in the ingredients working harmoniously to create that soft, rich texture with a festive twist. Plus, I’ve got some handy tips to make sure you grab the best ingredients to nail this recipe on your first try.
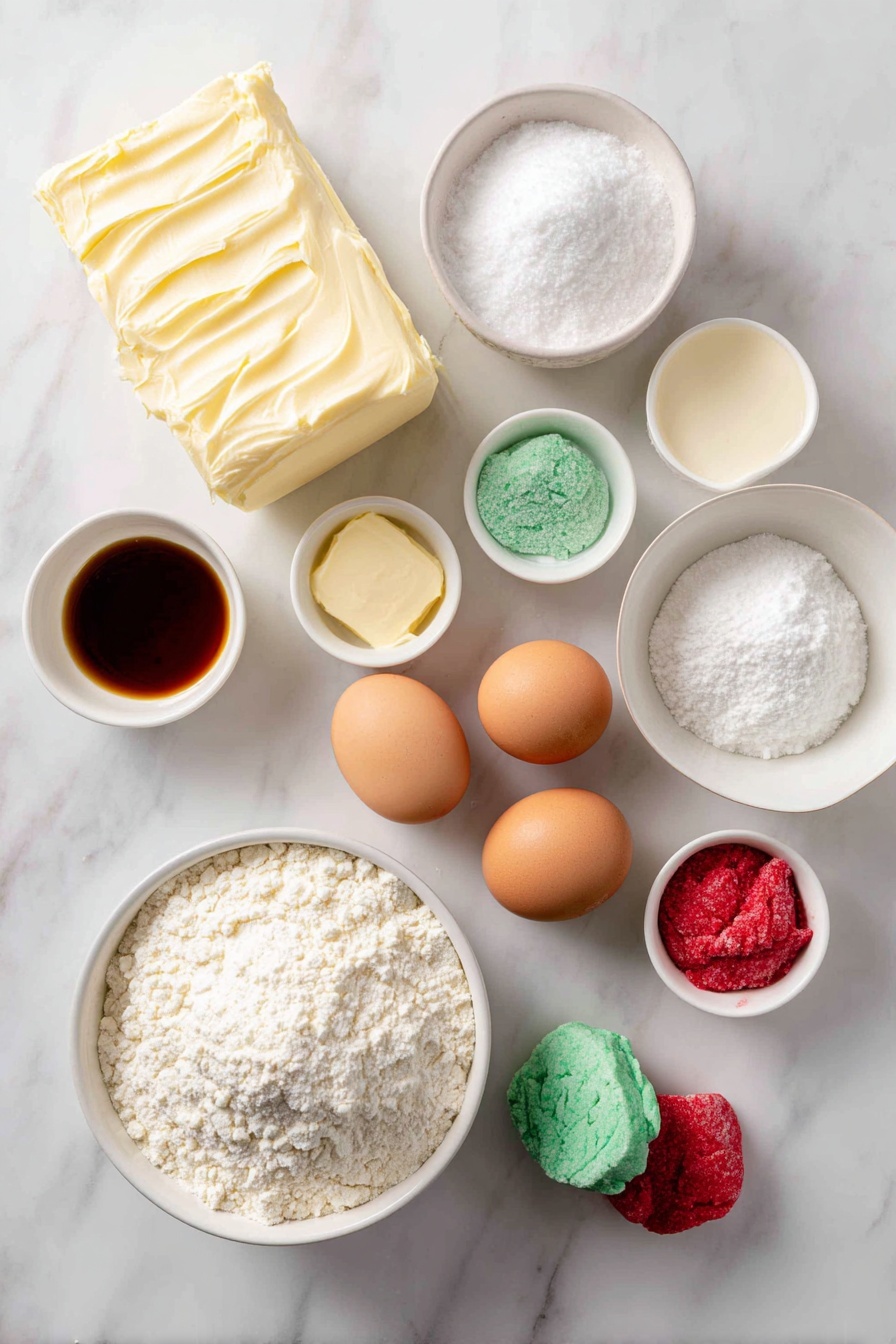
- Cream Cheese: Using full-fat cream cheese at room temperature ensures a smooth, creamy base that keeps the cookies tender.
- Butter: Room temperature butter creams well with the sugar, helping with a light texture.
- Granulated Sugar: Provides that classic sweetness and helps with the cookie’s structure.
- Eggs: They bind everything together and add moisture.
- Vanilla Extract: Adds warmth and smoothness to balance the tang of cream cheese.
- Flour: All-purpose flour works perfectly here to give the right cookie density.
- Baking Powder: Gives the cookies a gentle lift without making them cakey.
- Salt: Enhances all those flavors and balances the sweetness.
- Food Coloring (Red & Green): Causes the fun Christmas marbled effect—feel free to use gel coloring for more vibrant hues.
- Peppermint Extract: Only in the green dough to give a subtle but unmistakably festive flavor punch.
- Optional: Powdered Sugar: For dusting if you want an extra holiday touch and a little sweetness on top.
Make It Your Way
I’ve found that this Christmas Peppermint Cheesecake Cookies Recipe is super adaptable, so don’t hesitate to play with it a bit! Whether you want to skip the peppermint for a more classic vibe or add a lemony zing by swapping vanilla for lemon zest, make it your own to suit your tastes or your guests’ preferences.
- Variation: Sometimes I add a teaspoon of lemon juice instead of vanilla to really play up the cheesecake tang, which my family loves.
- Dietary Swap: If you prefer, use dairy-free cream cheese and butter substitutes—just keep them at room temp for best mixing.
- Color Fun: Try different holiday colors if red and green aren’t your style. I’ve also done blue and silver for a winter wonderland theme.
- Texture Twist: Sprinkle crushed candy canes on top just before baking for an extra peppermint crunch.
Step-by-Step: How I Make Christmas Peppermint Cheesecake Cookies Recipe
Step 1: Cream Together the Base
Start by beating the cream cheese and butter together until they become fluffy and smooth—this usually takes me 1 to 2 minutes on high speed. It’s key that both are at room temperature to avoid lumps. Then, add the granulated sugar and whip it until everything is light and fluffy, about another couple of minutes. This step gives your cookies their signature soft texture that’s both rich and airy.
Step 2: Mix in the Eggs and Vanilla
Next, beat in the eggs one at a time and then the vanilla extract, about a minute in total. The eggs add structure and a little extra moisture, so don’t skip this part. I like to scrape the sides of my bowl once here to make sure everything’s well combined.
Step 3: Combine Dry Ingredients & Bring It All Together
In a separate bowl, whisk your flour, baking powder, and salt together to evenly distribute the leavening agent and salt. Gradually add this dry mix to your wet ingredients, stirring just until everything’s incorporated. Don’t overmix here—overworked dough makes cookies tough, and you want these soft and tender.
Step 4: Separate, Chill, and Color Your Dough
I divide the dough into three bowls at this point, then pop them in the refrigerator for about 15 minutes. That chill time firms the dough up a bit, making it easier to work with. When ready, add your red and green food coloring (I leave one bowl plain for contrast). Add the peppermint extract only to the green dough—that’s where all the minty magic comes from. If the dough feels sticky, a few extra minutes in the fridge will help with handling.
Step 5: Roll and Marble Your Cookies
Here’s the fun and creative part! Take about ½ tablespoon from two different colors of dough and gently roll them together between your palms to create marbled swirls. Be careful not to mix too much—you want distinct colors that swirl like holiday candy cane stripes. Place them on baking sheets lined with parchment or silicone mats, giving each cookie enough space to spread a little.
Step 6: Bake to Perfection
Bake at 350°F for 10 to 11 minutes—watch closely! You want the cookies to be light in color, just starting to show golden edges on the bottom but not browned on top. This careful timing keeps them tender and soft, not dry or crispy.
Step 7: Cool and Optional Finish
Let the cookies cool on the baking sheet for a few minutes to firm up, then transfer them to a wire rack to cool completely. If you want, dust them lightly with powdered sugar. It adds a snow-dusted look and a little extra sweetness—perfect for popping in festive cookie tins!
Tips from My Kitchen
- Room Temperature is Key: Make sure your cream cheese and butter are truly softened for that perfect creamy mix.
- Don’t Overmix the Dough: It’s tempting to keep stirring, but stopping as soon as flour is combined keeps cookies soft.
- Chill Twice if Needed: If dough feels too sticky when marbling, another quick chill makes shaping much easier.
- Watch Your Bake Time: The moment before they brown on top is your sweet spot for that tender cheesecake texture.
How to Serve Christmas Peppermint Cheesecake Cookies Recipe
Garnishes
I like to keep it simple with a light dusting of powdered sugar, which gives the cookies a snowy, festive look that’s so charming to serve at holiday parties. Sometimes I also sprinkle crushed peppermint candies on top right after baking for a little crunch and extra peppermint flavor.
Side Dishes
Pairing these cookies with a warm cup of hot cocoa or peppermint-spiked coffee makes for a cozy holiday treat. If you’re setting up a dessert spread, I love placing them next to gingerbread or sugar cookies for a colorful, flavor-packed selection.
Creative Ways to Present
For gifting, I arrange these Christmas Peppermint Cheesecake Cookies Recipe on a festive platter lined with parchment paper, topped with sprigs of fresh rosemary or holly. Wrapping them in cellophane bags tied with red and green ribbons also makes for a lovely holiday gift that friends rave about every year.
Make Ahead and Storage
Storing Leftovers
I store these cookies in an airtight container at room temperature, layered between parchment paper to keep them from sticking together. They stay soft and delicious for up to a week, which is great because they tend to disappear fast in my house!
Freezing
Freezing these cookies works wonderfully. I place them in a single layer on a baking sheet until firm, then transfer them to a freezer-safe bag or container. When sealed well, they keep for about three months without losing their chewy texture.
Reheating
To revive frozen cookies, let them thaw at room temperature for about 30 minutes, then warm briefly in a preheated 300°F oven for 3-4 minutes. This restores that fresh-baked softness and the peppermint aroma that hooks everyone.
FAQs
-
Can I substitute peppermint extract with something else?
Absolutely! If peppermint isn’t your thing, you can skip it or replace it with vanilla or almond extract. For a citrusy twist, a little lemon or orange zest works beautifully, especially if you swap out the vanilla in the base dough.
-
Why are my Christmas Peppermint Cheesecake Cookies cakey or dry?
If your cookies are turning out cakey or dry, it’s usually due to overbaking or overmixing the dough. Stop mixing as soon as the flour is just incorporated, and take the cookies out when they’re still very lightly golden at the edges but not browned on top.
-
Can I make these cookies ahead of time for a party?
Yes! You can prepare and shape the dough ahead, refrigerate it for up to 24 hours, then bake fresh on party day. Baked cookies store well up to a week in an airtight container, making them perfect for holiday prep.
-
What if I don’t have cream cheese, can I still make these?
Cream cheese is key for that signature tang and softness in this recipe, so while you could try substituting with mascarpone or ricotta, it will affect texture and flavor. If you don’t have cream cheese, I’d suggest trying another holiday cookie recipe instead.
-
How do I get the best marble effect with the dough?
Mix just enough to swirl the colors together without fully blending them. Use small amounts of dough, about half a tablespoon from each color, and gently roll. If the dough is too sticky, chill it for a few minutes before shaping.
Final Thoughts
Honestly, this Christmas Peppermint Cheesecake Cookies Recipe is one of my all-time favorite holiday treats because it combines festive fun with rich, creamy flavor. It’s such a joy to bake and even more fun to share—everyone comments on their unique marbled look and that perfect peppermint hint. I can’t wait for you to make these, try your own spins, and fill your home with that warm, happy holiday smell. Give them a go—you’re going to love how easy and rewarding they are!
Print
Christmas Peppermint Cheesecake Cookies Recipe
- Prep Time: 15 minutes
- Cook Time: 11 minutes
- Total Time: 26 minutes
- Yield: 44 cookies
- Category: Dessert
- Method: Baking
- Cuisine: American
- Diet: Vegetarian
Description
Celebrate the holidays with these festive Christmas Cheesecake Cookies featuring a soft, creamy texture from cream cheese, a delightful marbled effect in red and green, and a hint of peppermint flavor perfect for the season.
Ingredients
Base Ingredients
- 8 oz cream cheese room temperature
- 1/2 cup butter room temperature
- 1 1/4 cup granulated sugar
- 2 eggs
- 1 teaspoon vanilla extract
Dry Ingredients
- 2 1/2 cups flour
- 2 teaspoons baking powder
- 1/2 teaspoon salt
Flavoring and Coloring
- Red and green food coloring (as needed)
- 1/2 teaspoon peppermint extract
Optional
- Powdered sugar for dusting
Instructions
- Preheat Oven: Preheat your oven to 350 degrees F. Prepare two baking sheets by lining them with parchment paper or silicone baking mats to prevent sticking.
- Cream Butter and Cheese: In a large bowl, beat the cream cheese and butter together on high speed until the mixture is fluffy and smooth, about 1 to 2 minutes.
- Add Sugar and Eggs: Gradually add the granulated sugar to the butter-cream cheese mixture and beat until fully incorporated and fluffy, an additional 1 to 2 minutes. Then beat in the eggs and vanilla extract for about 1 minute.
- Mix Dry Ingredients: In a separate medium bowl, whisk together the flour, baking powder, and salt to evenly distribute the leavening agents and salt.
- Combine Mixtures: Gradually add the dry ingredients to the wet mixture, stirring gently just until combined. Avoid over-mixing to ensure tender cookies.
- Divide and Chill Dough: Separate the dough evenly into three small bowls. Refrigerate the dough for 15 minutes to firm up for easier handling.
- Color and Flavor Dough: Once chilled, add red food coloring to one bowl, green food coloring and peppermint extract to another, and leave the third bowl plain. Mix each until the desired color and flavor are achieved. If dough is too sticky to handle, chill briefly again.
- Form Cookies: Take ½ tablespoon of each colored dough, gently roll them together between your palms to create a marbled effect without overmixing, then place formed dough balls on the prepared baking sheets, spaced to allow spreading.
- Bake: Bake the cookies in the preheated oven for 11 minutes. Cookies should be light in color with just a slight browning on the bottom but not browned on top.
- Cool: Allow cookies to cool on the baking sheets for a few minutes before transferring to a wire rack to cool completely.
- Optional Dusting: Once cooled, dust the cookies lightly with powdered sugar for a festive finishing touch.
Notes
- Store cookies in a tightly sealed container at room temperature for up to one week or freeze for up to three months.
- For a more tart and cheesy flavor profile, add a teaspoon of lemon juice instead of vanilla extract, or omit extracts entirely.
- The peppermint extract can be omitted or substituted with other flavorings like almond or orange extract depending on preference.
- Avoid overbaking to prevent dry, biscuit-like texture; cookies should remain soft.
Nutrition
- Serving Size: 1 cookie
- Calories: 150 kcal
- Sugar: 12 g
- Sodium: 90 mg
- Fat: 8 g
- Saturated Fat: 4 g
- Unsaturated Fat: 3 g
- Trans Fat: 0 g
- Carbohydrates: 18 g
- Fiber: 0.5 g
- Protein: 2 g
- Cholesterol: 30 mg

