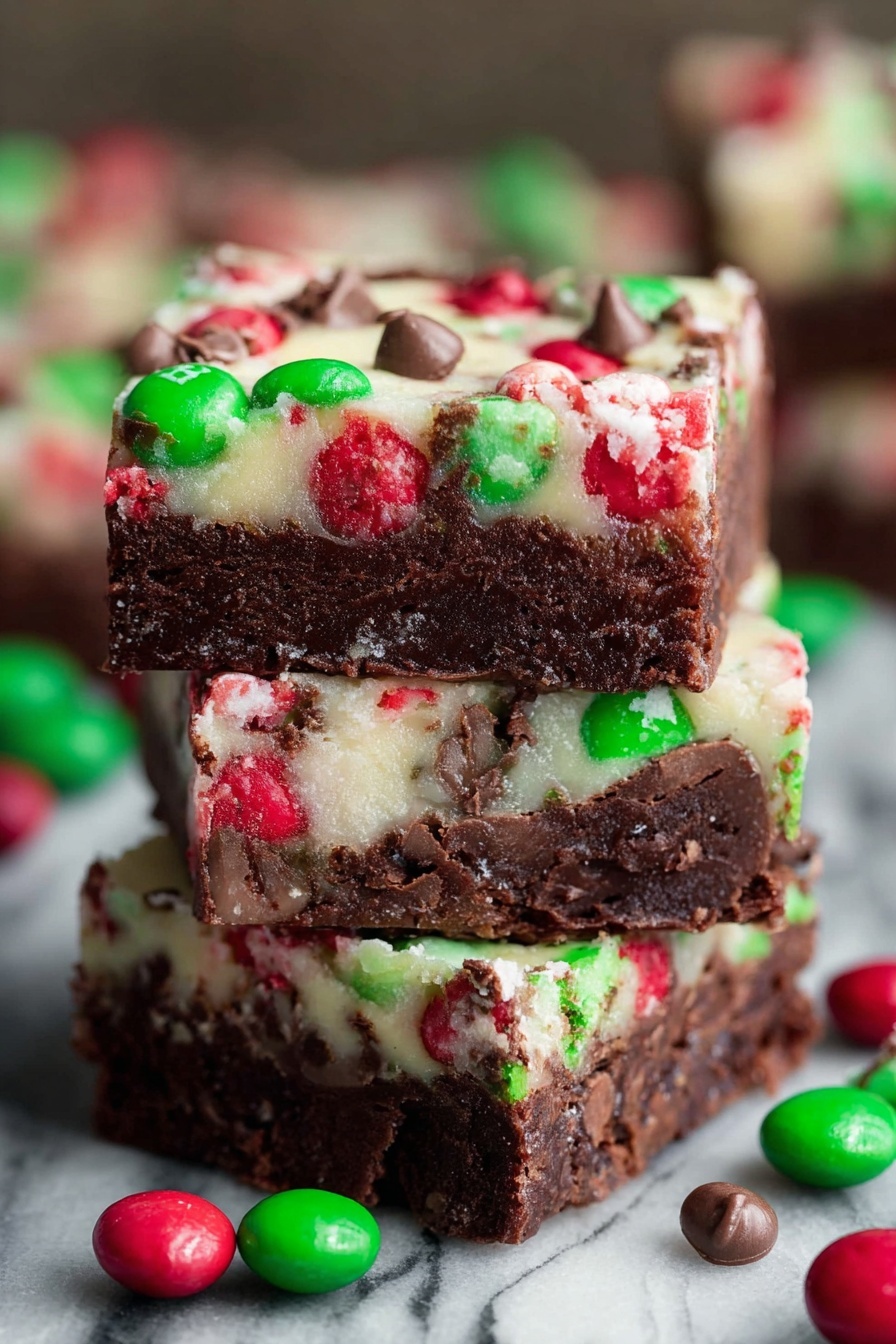
Christmas Layer Brownie Bars Recipe
If you’re looking for the ultimate festive treat that’ll wow your friends and family, look no further. This Christmas Layer Brownie Bars Recipe is packed with rich chocolate, a surprise layer of gooey sweetness, and festive colors that just scream holiday cheer. Trust me, once you try these bars, you’ll want to make them part of your every Christmas tradition. They’re not just any brownies—they’re a showstopper layered with crunchy nuts, melty chocolate chips, coconut, and colorful holiday M&Ms and sprinkles. You’re going to love making (and eating) this recipe as much as I do!
Why This Recipe Works
- Layered Texture: The combination of fudgy brownie base with crunchy nuts and chewy coconut makes every bite interesting and delicious.
- Festive Appeal: Bright M&Ms and sprinkles not only add color but also a fun holiday vibe that’s perfect for parties.
- Sweetened Condensed Milk Magic: This ingredient lends a luscious, gooey layer that balances the chocolate and nuts perfectly.
- Make-Ahead Friendly: These bars store beautifully, making your holiday prep less stressful and more joyful.

Ingredients & Why They Work
This Christmas Layer Brownie Bars Recipe brings together ingredients that each play a special role in delivering that perfect festive flavor and texture. From chocolate chips to coconut to the secret weapon of sweetened condensed milk, let’s talk about why these work so well together—and some tips on picking quality ingredients.
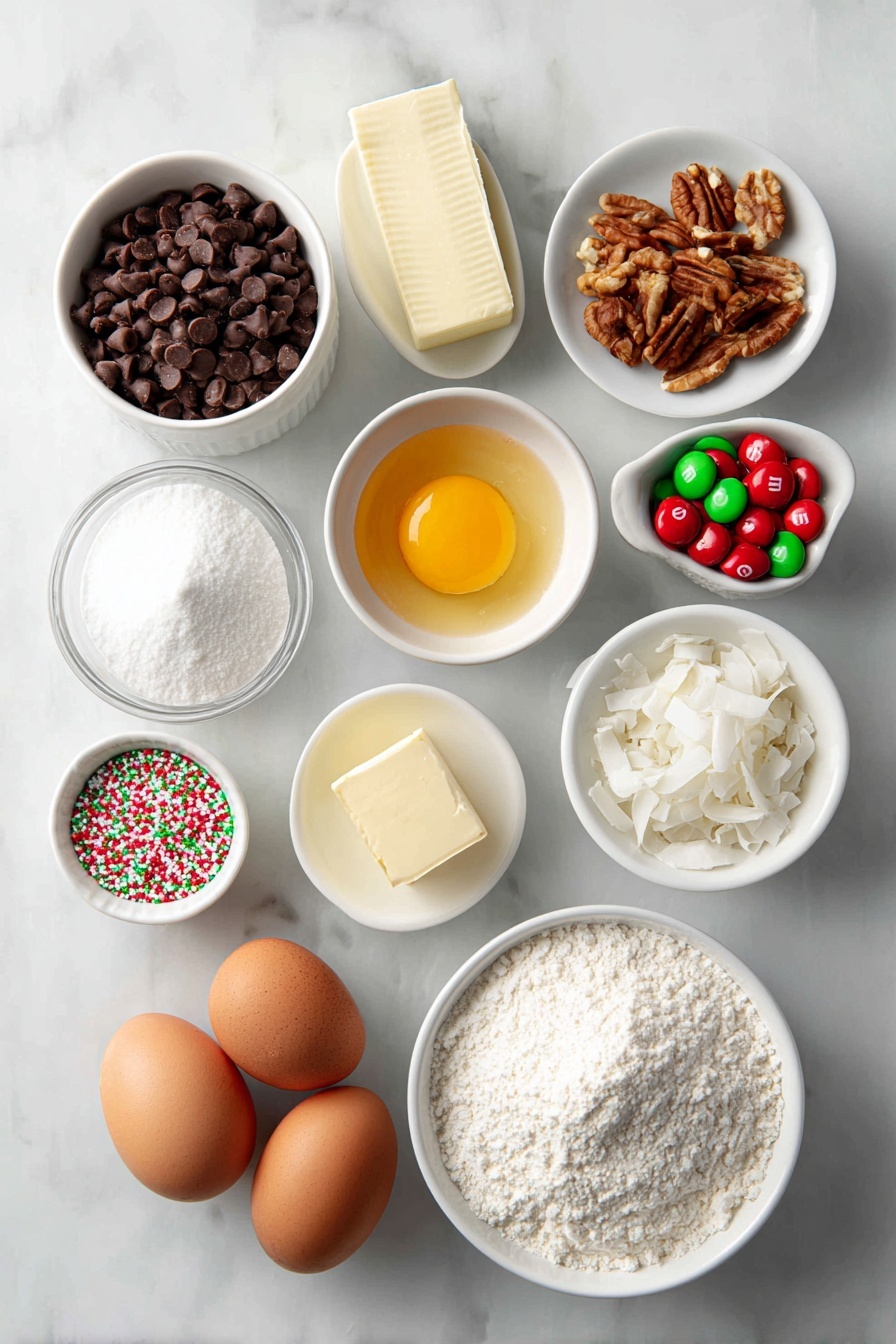
- Semi-sweet Chocolate Chips: Choose good-quality chips that melt smoothly to create that rich, fudgy brownie base and delicious pockets in the topping layer.
- Salted Butter: Adds richness and helps intensify the chocolate flavor, balancing sweetness and enhancing texture.
- Granulated Sugar: Sweetens, of course, but also contributes to the fudgy texture of the brownie layer.
- Eggs & Egg Yolk: These provide structure but keep the base tender and moist—don’t skip the yolk for extra richness!
- All-Purpose Flour: Provides just enough structure so your brownies hold together without getting cakey.
- Vanilla Extract: Brings out all the chocolate notes and deepens flavor complexity.
- Nuts (Optional): I love pecans or walnuts for a toasty crunch that contrasts the gooey layers perfectly.
- Mini & Regular Holiday M&Ms: Choose these festive candies with bright colors to keep your dessert cheerful and fun—plus the chocolate pockets add extra melty bites.
- Sweetened Flaked Coconut: Adds chewy, sweet texture and works beautifully with nuts and chocolate.
- Sweetened Condensed Milk: The secret sauce that creates a sticky, luscious middle layer—make sure to use quality condensed milk for best results.
- Holiday Sprinkles: For that final festive touch, sprinkle them on to brighten up your bars and make them party-ready.
Make It Your Way
One of the things I love most about this Christmas Layer Brownie Bars Recipe is how easy it is to customize. Feel free to swap nuts for dried fruit, use white chocolate chips if you prefer, or make it nut-free altogether. Your kitchen, your rules—this recipe is super forgiving and still delicious when you get creative.
- Nut-Free Variation: I’ve made this with just coconut and M&Ms for a nut-free crowd, and it was a huge hit – no one even missed the nuts!
- Chocolate Swap: Once I tried using white chocolate chips instead of semi-sweet for a sweeter, creamier flavor that balanced nicely with the coconut.
- Seasonal Twist: Adding crushed peppermint candies on top made my last batch extra festive and gave an unexpected holiday mint kick.
Step-by-Step: How I Make Christmas Layer Brownie Bars Recipe
Step 1: Getting the Brownie Base Just Right
Preheat your oven to 350°F and line a 9-inch baking pan with foil or parchment paper—spray it lightly with nonstick cooking spray so your brownies come out clean and easy. Melt the butter and semi-sweet chocolate chips together in the microwave, stirring every 30 seconds until smooth. This step is key because if your chocolate isn’t fully melted and silky, your brownie texture will suffer!
Step 2: Mixing the Batter
Beat the sugar into your chocolate-butter mixture until combined, then add vanilla, eggs, and the extra egg yolk. Stir in the flour—just until it disappears—because overmixing will make the brownies tough. Pour this beautifully fudgy batter into your pan and bake for 20 minutes. The brownies will jiggle a little in the center—that’s perfect, you don’t want them too done yet!
Step 3: Layering the Festive Toppings
Immediately after the first bake, layer your toppings directly on the warm brownie base. Start with your nuts (if using), then sprinkle half the chocolate chips and M&Ms evenly. Spread the coconut on top, then pour the sweetened condensed milk evenly over everything—this gives that luscious gooey layer we all love. Finish by scattering the remaining chocolate chips, M&Ms, and your sprinkles for a colorful, festive look.
Step 4: Final Bake & Cooling
Bake your masterpiece for another 25 minutes or until the edges turn golden and the center just starts to set and brown. If the top starts browning too fast, loosely tent it with foil to avoid burning. Once out of the oven, cool completely in the pan before slicing into squares with a sharp knife. Patience here really pays off—cutting too soon makes a mess!
Tips from My Kitchen
- Melting Chocolate Smoothly: Microwaving in short bursts and stirring prevents scorching and keeps the chocolate shiny and smooth.
- Don’t Overmix Flour: Mixing just until flour disappears keeps brownies fudgy instead of cakey every time.
- Even Layering: Spread your toppings evenly for balanced flavor and festive color in every bite.
- Using a Sharp Knife: Cutting with a sharp, warmed knife smooths slices and keeps the layers intact—no crumbly mess.
How to Serve Christmas Layer Brownie Bars Recipe
Garnishes
I like to give these bars an extra festive touch by dusting powdered sugar lightly over the top just before serving—it looks like a fresh dusting of snow and adds a hint of sweetness without overpowering the other flavors. Sometimes I toss on a few whole nuts or sprinkles right before serving for some added glamour and texture contrast.
Side Dishes
These bars are rich and perfect on their own, but I love pairing them with a scoop of vanilla ice cream or a dollop of whipped cream to balance out the sweetness. For drinks, a cup of hot cocoa or spiced mulled wine complements all those layers wonderfully, making it a perfect cozy holiday dessert.
Creative Ways to Present
At last year’s holiday party, I served these bars stacked on a pretty platter with fresh evergreen sprigs and cinnamon sticks around them for a festive touch. I also love cutting them into mini squares and placing each one in a decorative mini cupcake liner—that way, they’re easy to grab and share. Whatever you choose, dressing them up a bit will really make your effort shine!
Make Ahead and Storage
Storing Leftovers
I usually store leftover Christmas Layer Brownie Bars Recipe in an airtight container at room temperature for up to a week. To keep the bars from sticking together, I place parchment paper between the layers. If the kitchen gets warm, I pop the container in the fridge, and they keep for up to two weeks that way—still tasting just as good!
Freezing
Freezing is a great option! I remove the bars from the pan, wrap them tightly in plastic wrap and then foil for the best protection. After that, they last in the freezer for up to three months. When I want a sweet pick-me-up, I thaw individual squares on the counter for about an hour—it’s like fresh-baked magic, anytime you want it.
Reheating
If you want warm brownies, I recommend reheating a single square in the microwave for 15-20 seconds—it softens the chocolate and condensed milk layer perfectly without drying it out. Avoid reheating the whole batch to keep that chewy fudgy texture intact.
FAQs
-
Can I make the Christmas Layer Brownie Bars Recipe nut-free?
Absolutely! Simply omit the nuts or replace them with extra coconut flakes or dried fruit to keep things festive and delicious without the nuts.
-
What’s the best way to prevent the brownie from being dry?
Don’t overbake the initial brownie layer and be sure to mix the flour just until combined—overmixing develops gluten, making it cakey and dry. Also, the sweetened condensed milk layer adds wonderful moisture.
-
Can I use a different type of chocolate chip?
Yes, you can swap with white chocolate, milk chocolate, or even peanut butter chips if you want a twist—just keep the quantity the same.
-
How long do these bars stay fresh?
At room temperature in an airtight container, they last about a week, and refrigerated they can keep up to two weeks without losing flavor or texture.
Final Thoughts
This Christmas Layer Brownie Bars Recipe is one of those special desserts that brings my whole family together every holiday season. I love how it combines so many holiday flavors and textures in one delicious bar, and it’s always met with oohs and aahs when I bring it to celebrations. If you want an easy-to-make treat that’s both festive and indulgent, try this recipe—you’ll feel like a holiday baking superstar, and I promise it’ll become a beloved tradition in your kitchen, too!
Print
Christmas Layer Brownie Bars Recipe
- Prep Time: 15 minutes
- Cook Time: 45 minutes
- Total Time: 1 hour
- Yield: 9 bars
- Category: Dessert
- Method: Baking
- Cuisine: American
Description
These Christmas Magic Layer Brownie Bars combine rich chocolate brownies with festive toppings including nuts, M&Ms, shredded coconut, and sweetened condensed milk for a decadent holiday treat. Perfect for sharing, these bars offer a fun and flavorful twist on traditional brownies with layers of texture and colors that bring Christmas magic to your dessert table.
Ingredients
Brownie Layer:
- 1½ cups semi-sweet chocolate chips
- ½ cup salted butter (1 stick)
- 1 cup granulated sugar
- 2 large eggs
- 1 large egg yolk
- 1 cup all-purpose flour
- ½ teaspoon vanilla extract
Toppings Layer:
- ¾ cup nuts (optional, divided)
- ¼ cup mini holiday M&Ms (divided)
- ¾ cup regular holiday M&Ms (divided)
- ½ cup semi-sweet chocolate chips (divided)
- 1 cup sweetened flaked coconut
- ¾ cup sweetened condensed milk (from a 14 ounce can)
- ¼ cup holiday sprinkles
Instructions
- Prepare the pan: Preheat oven to 350 degrees F. Line a 9-inch baking pan with foil or parchment paper and spray with nonstick cooking spray to prevent sticking.
- Melt chocolate and butter: Place the butter and 1½ cups semi-sweet chocolate chips in a large microwave-safe bowl. Microwave on high for 30 seconds, stir, then continue heating and stirring in 30-second intervals until the mixture is smooth and melted.
- Mix wet ingredients: Beat in 1 cup granulated sugar, ½ teaspoon vanilla extract, 2 large eggs, and 1 large egg yolk until well combined.
- Add flour: Stir in 1 cup all-purpose flour until just combined to form the brownie batter. Avoid overmixing.
- Bake brownie base: Pour the batter into the prepared pan and bake for 20 minutes. The brownies will still jiggle slightly but will be set on top.
- Add toppings: Remove the pan from the oven. Layer ¾ cup nuts (optional), half of the ½ cup semi-sweet chocolate chips, half of the ¼ cup mini holiday M&Ms, half of the ¾ cup regular holiday M&Ms, and all of the 1 cup sweetened flaked coconut evenly over the brownie layer.
- Pour condensed milk: Evenly pour ¾ cup sweetened condensed milk over the layered toppings. Spread gently to distribute evenly.
- Finish topping: Sprinkle remaining ¼ cup holiday sprinkles, the remainder of chocolate chips, and remaining M&Ms on top of the condensed milk layer.
- Bake again: Return the pan to the oven and bake for an additional 25 minutes or until the edges are golden and the center is set and just starting to brown. If the top browns too fast, tent loosely with foil.
- Cool and serve: Let the brownies cool completely in the pan before cutting into 9 squares with a sharp knife. Store in a sealed container for up to one week.
Notes
- Store brownies in an airtight container at room temperature for up to 1 week, or refrigerate for up to 2 weeks; place parchment paper between layers to prevent sticking.
- To freeze, remove brownies from the pan, wrap tightly with plastic wrap then aluminum foil; freeze for up to 3 months. Alternatively, freeze individual squares wrapped similarly.
- Thaw frozen brownies on the counter for about 1 hour before serving for best texture.
- Use salted butter as specified for balanced flavor or unsalted butter with a pinch of salt if preferred.
- Optional nuts can be omitted or substituted with other nuts like pecans or almonds according to preference.
Nutrition
- Serving Size: 1 bar
- Calories: 380 kcal
- Sugar: 35 g
- Sodium: 170 mg
- Fat: 22 g
- Saturated Fat: 13 g
- Unsaturated Fat: 7 g
- Trans Fat: 0 g
- Carbohydrates: 45 g
- Fiber: 2 g
- Protein: 4 g
- Cholesterol: 70 mg

