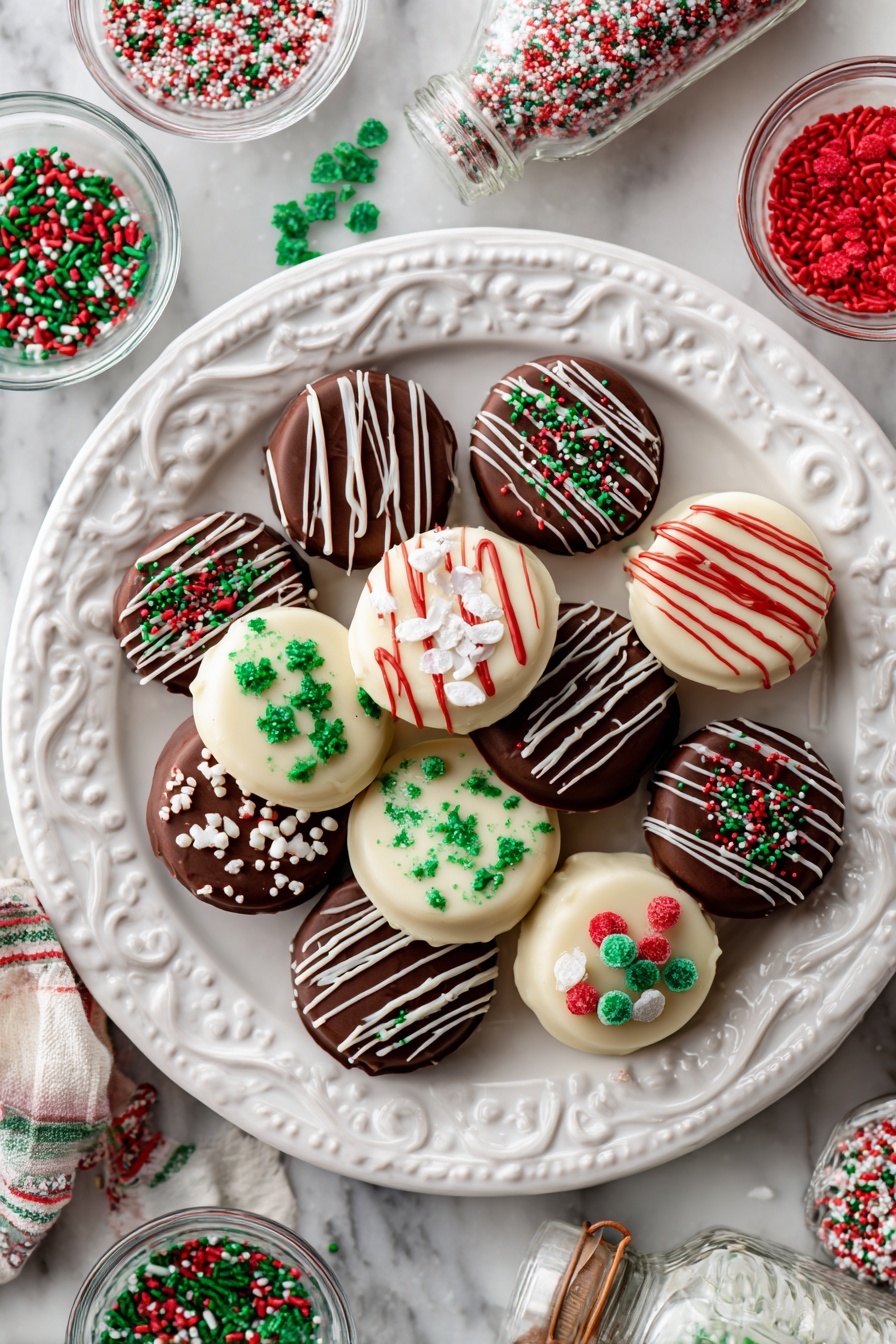
Christmas Chocolate Covered Oreos Recipe
If you’re on the hunt for a festive treat that’s as delightful to eat as it is to give, you’ve just hit the jackpot with this Christmas Chocolate Covered Oreos Recipe. Imagine classic Oreos cloaked in silky smooth milk chocolate, with the option to add a festive twist of white chocolate and colorful sprinkles that scream holiday cheer. Trust me, once you try this, your holiday cookie game will never be the same—and you’ll want to make them for every party and cozy night in!
Why This Recipe Works
- Simplicity Meets Elegance: Few ingredients create a stunning, festive look without complicated baking.
- Versatility: You can easily customize with different Oreos, chocolates, and sprinkles for your perfect holiday vibe.
- Reliable Chocolate Melts: Using Ghirardelli melting wafers guarantees smooth coatings that set beautifully and taste delicious.
- Make-Ahead Friendly: These cookies hold well in the fridge or freezer, making them ideal for holiday gifting or parties.

Ingredients & Why They Work
The magic of this Christmas Chocolate Covered Oreos Recipe comes down to pairing a beloved classic cookie with high-quality melting chocolates that set just right. Each ingredient plays its part to create a festive finish that’s both eye-catching and utterly delicious. Let me break down the essentials, plus some shopping tips I’ve learned along the way.
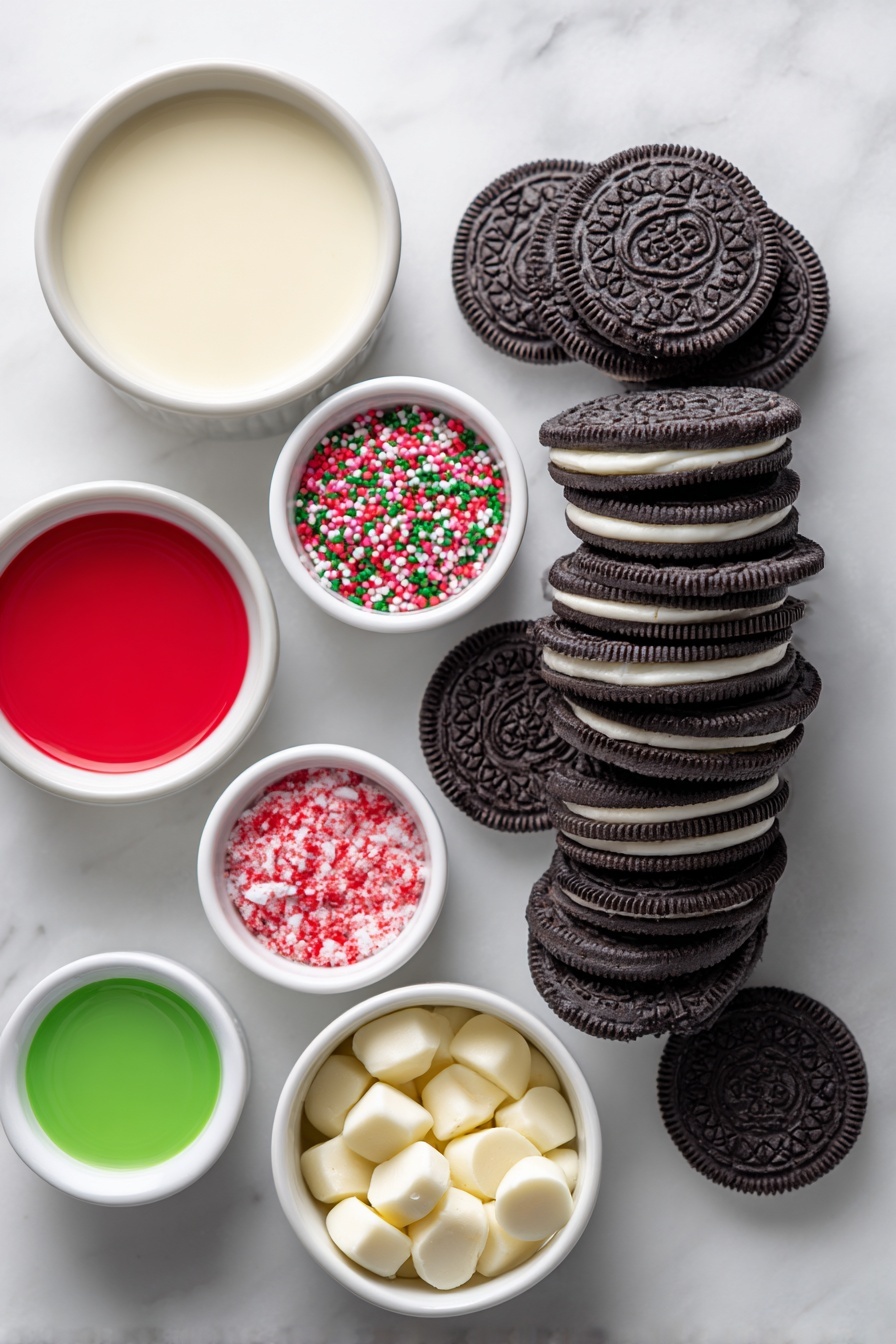
- Oreos: I love starting with mint Oreos for that added pop of holiday flavor, but regular or Double Stuf are fantastic too—choose your favorite!
- Milk Chocolate Melting Wafers: Using Ghirardelli wafers ensures smooth melting and glossy coats; trust me, the difference is night and day from regular chips.
- White Chocolate Melting Wafers: Optional for the fun double-dipped look; adding color with food coloring makes the cookies feel extra festive.
- Christmas Sprinkles: This is where you bring your personality – go bold with reds, greens, or metallics for maximum holiday cheer.
- Food Coloring: Red and green are my go-to for piping on details and adding that Christmas magic to the white chocolate.
Make It Your Way
While I adore the classic milk chocolate coating, I like to mix things up by double-dipping some Oreos in white chocolate and adding colorful drizzles and sprinkles. You can totally personalize the Christmas Chocolate Covered Oreos Recipe to suit your festive style or dietary preferences—don’t hesitate to make it your own!
- Variation: Once, I swapped out the milk chocolate for dark chocolate to give a richer flavor contrast, and it was a big hit at our holiday gathering.
- Allergy-Friendly: If you’re serving friends with sensitivities, you could try dairy-free chocolate melts—I haven’t tried it myself yet, but many readers have had success!
- Color Themes: Beyond red and green, I’ve decorated with gold and silver sprinkles for a classy New Year’s twist.
Step-by-Step: How I Make Christmas Chocolate Covered Oreos Recipe
Step 1: Prep Your Workspace and Melt Chocolate
Start by lining a wire rack with wax paper underneath to catch drips—this keeps cleanup a breeze. Melt your Ghirardelli milk chocolate wafers in a microwave-safe bowl, heating in 30-second intervals and stirring gently to avoid overheating. If you’re planning on double-dipping with white chocolate, melt that separately in another bowl using the same careful method. I find patience here pays off for smooth coatings without seizing.
Step 2: Dip and Decorate Your Oreos
Grab an Oreo and dip it fully into the melted milk chocolate using a fork; let the excess drip back into the bowl. Place the cookie gently on the wire rack. If you want to double-dip, wait for the milk chocolate to fully set—this usually takes about an hour at room temperature. Then, carefully dip half the cookie in white chocolate for that elegant two-tone look. While the chocolate is still wet, sprinkle on your chosen Christmas sprinkles to make each cookie absolutely festive.
Step 3: Add Colorful Drizzles (Optional)
For an extra special touch, add red or green food coloring to your melted white chocolate, then transfer it to small plastic bags and snip the tips. Use these like piping bags to drizzle playful lines or designs over your dipped Oreos. This not only adds flair but makes the cookies uniquely yours.
Step 4: Set and Store Your Cookies
Let the chocolate set at room temperature for about one hour. I usually avoid popping them in the fridge to dry because the chocolate can lose that beautiful shine, and the cookies don’t look quite as glossy. But if you’re in a hurry, chilling works fine—you’ll just sacrifice some of that gorgeous finish. Store your cookies airtight at room temp for up to two weeks, in the fridge for a month, or freeze for up to six months.
Tips from My Kitchen
- Use High-Quality Melting Wafers: I swear by Ghirardelli wafers; they melt silky smooth and hold their shine—dip your Oreos with confidence.
- Patience is Key: Let the milk chocolate set completely before double-dipping, or the layers might run together and get messy.
- Control Your Drips: Using a fork to dip the Oreos helps shake off excess chocolate and keeps your cookies neat and less messy to handle.
- Skip Refrigeration for Shine: I used to rush chilling, but the chocolate dulls in the fridge; room temp setting keeps cookies glossy and festive.
How to Serve Christmas Chocolate Covered Oreos Recipe
Garnishes
I’m a fan of classic red and green sprinkles, mixed with a few gold stars for a little glam. Sometimes I add crushed candy canes for a peppermint crunch that elevates the mint Oreos wonderfully. These garnishes don’t just add color—they add texture and festive vibes that your guests will love.
Side Dishes
These chocolate-covered Oreos pair beautifully with hot cocoa or a rich peppermint mocha to boost the cozy holiday spirit. If you’re hosting, I like to serve them alongside other holiday treats like gingerbread men or spiced nuts for a balanced cookie platter.
Creative Ways to Present
For a festive party, you could arrange these Oreos on a tiered dessert stand or place them in holiday-themed gift boxes tied with ribbons, perfect for giving. I once created a “cookie tree” by stacking Oreos on a foam cone and drizzling extra chocolate over it—it was such a showstopper!
Make Ahead and Storage
Storing Leftovers
Store your Christmas Chocolate Covered Oreos in an airtight container at room temperature if you’re planning to eat them quickly—this keeps the chocolate shiny and the cookies crisp. For longer storage, I keep mine in the fridge, especially in warmer climates, but keep in mind the chocolate finish won’t look quite as glossy.
Freezing
I often freeze leftover Oreos for up to six months wrapped in parchment and then sealed in a freezer bag. When it’s time to enjoy, I let them thaw at room temp, and while the finish dulls a bit, they still taste just as delicious. Some family members even swear by eating them frozen for a nice crunch!
Reheating
Since these are no-bake dipped cookies, reheating isn’t necessary or recommended. Just bring frozen ones to room temp gradually, and they’ll be ready to enjoy without losing their texture or flavor.
FAQs
-
Can I use regular chocolate chips instead of melting wafers for this Christmas Chocolate Covered Oreos Recipe?
While you technically can melt regular chocolate chips, they aren’t ideal for dipping because they can seize or burn easily and don’t stay melted as smoothly or as long as melting wafers. For the best smooth, glossy coating, I strongly recommend using high-quality melting wafers like Ghirardelli’s which melt consistently and hold their texture during dipping.
-
How do I prevent the chocolate from cracking once it’s set on the Oreos?
Allowing the chocolate to set slowly at room temperature rather than chilling it quickly helps prevent cracking. Quick temperature changes can cause the chocolate to contract too fast, leading to cracks. Also, avoid stacking stored cookies directly on top of each other to keep them intact.
-
Can I double dip with white chocolate on the other side of the Oreos?
Absolutely! This recipe encourages creativity. You can fully coat in milk chocolate and then dip half in white chocolate, or vice versa. Any combo works wonderfully. Just make sure to let each chocolate layer set before adding another to avoid smudging.
-
How long do Christmas Chocolate Covered Oreos stay fresh?
Stored in an airtight container at room temperature, these cookies stay fresh for about two weeks. In the fridge, they last up to a month, and frozen, they keep well for about six months without sacrificing taste.
-
Can I add other toppings besides sprinkles?
Definitely! Try crushed candy canes, chopped nuts, mini candy pieces, or edible glitter to make your Christmas Chocolate Covered Oreos even more festive and personalized.
Final Thoughts
Making this Christmas Chocolate Covered Oreos Recipe has become one of my favorite holiday rituals—it’s simple, fun, and gives me an excuse to get creative with chocolate and sprinkles. Whether you’re gifting these beauties or sneaking one (or five!) by the fireplace, they never disappoint. Seriously, if you want a showstopper cookie that’s easy to pull off and guaranteed to delight, give this recipe a try—you’ll be so glad you did!
Print
Christmas Chocolate Covered Oreos Recipe
- Prep Time: 15 minutes
- Cook Time: 1 hour
- Total Time: 1 hour 15 minutes
- Yield: 36 servings
- Category: Dessert
- Method: No-Cook
- Cuisine: American
Description
Delight in festive Christmas Chocolate Covered Oreos dipped in smooth milk and optional white chocolate, decorated with vibrant holiday sprinkles and colorful drizzles for a stunning holiday treat.
Ingredients
Cookies
- 1 (15-ounce) package Oreos (mint, regular, or Double Stuf)
Chocolate Coating
- 1 (10-ounce) package Ghirardelli milk chocolate melts
- 1 (10-ounce) package Ghirardelli white chocolate melts (optional for double-dipping)
Decorations
- Assorted Christmas sprinkles, as desired
- Red food coloring, optional
- Green food coloring, optional
Instructions
- Melt Milk Chocolate: In a medium microwave-safe bowl, melt the Ghirardelli Milk Chocolate Melting Wafers according to package directions until smooth.
- Optional White Chocolate Melt: If double-dipping, melt the Ghirardelli White Chocolate Melting Wafers in a separate medium microwave-safe bowl following package instructions.
- Dip Oreos in Milk Chocolate: Place a piece of wax paper under a wire rack. Using a fork, dip each Oreo into the melted milk chocolate, allowing excess chocolate to drip off between the fork tines, then gently place on the wire rack to set.
- Double Dip in White Chocolate: Once milk chocolate has fully set, optionally pick up the cookie and dip half into the melted white chocolate for a two-toned effect.
- Add Sprinkles: Before the chocolate sets, sprinkle the cookies with assorted Christmas sprinkles for a festive look.
- Color and Drizzle White Chocolate: Add red and/or green food coloring to the melted white chocolate until desired color is achieved. Transfer to small plastic baggies, snip the corners, and carefully pipe or drizzle colored chocolate over the cookies for decorative accents.
- Set the Chocolate: Allow the cookies to set at room temperature for about 1 hour until the chocolate is firm and glossy. Optionally, refrigeration can speed setting but may dull the finish.
- Store Properly: Keep cookies in an airtight container at room temperature for up to 2 weeks, refrigerate for up to 1 month, or freeze for up to 6 months. Note that chilling may dull chocolate glossiness but will not affect taste.
Notes
- Use milk chocolate melting wafers for smooth, even melting and easy dipping, such as Ghirardelli Milk Chocolate Melting Wafers.
- White chocolate melting wafers are recommended over white chocolate chips as chips can seize and become difficult to melt properly.
- Feel free to customize by dipping cookies fully or partially in either milk or white chocolate in any combination.
- Melting chocolate chips is possible but requires careful technique; melting wafers provide better consistency for dipping.
- Chilling or freezing dipped Oreos can dull the chocolate’s shine but does not affect flavor; some prefer eating them frozen.
Nutrition
- Serving Size: 1 cookie
- Calories: 150 kcal
- Sugar: 15 g
- Sodium: 90 mg
- Fat: 9 g
- Saturated Fat: 5 g
- Unsaturated Fat: 3 g
- Trans Fat: 0 g
- Carbohydrates: 18 g
- Fiber: 1 g
- Protein: 1 g
- Cholesterol: 10 mg


