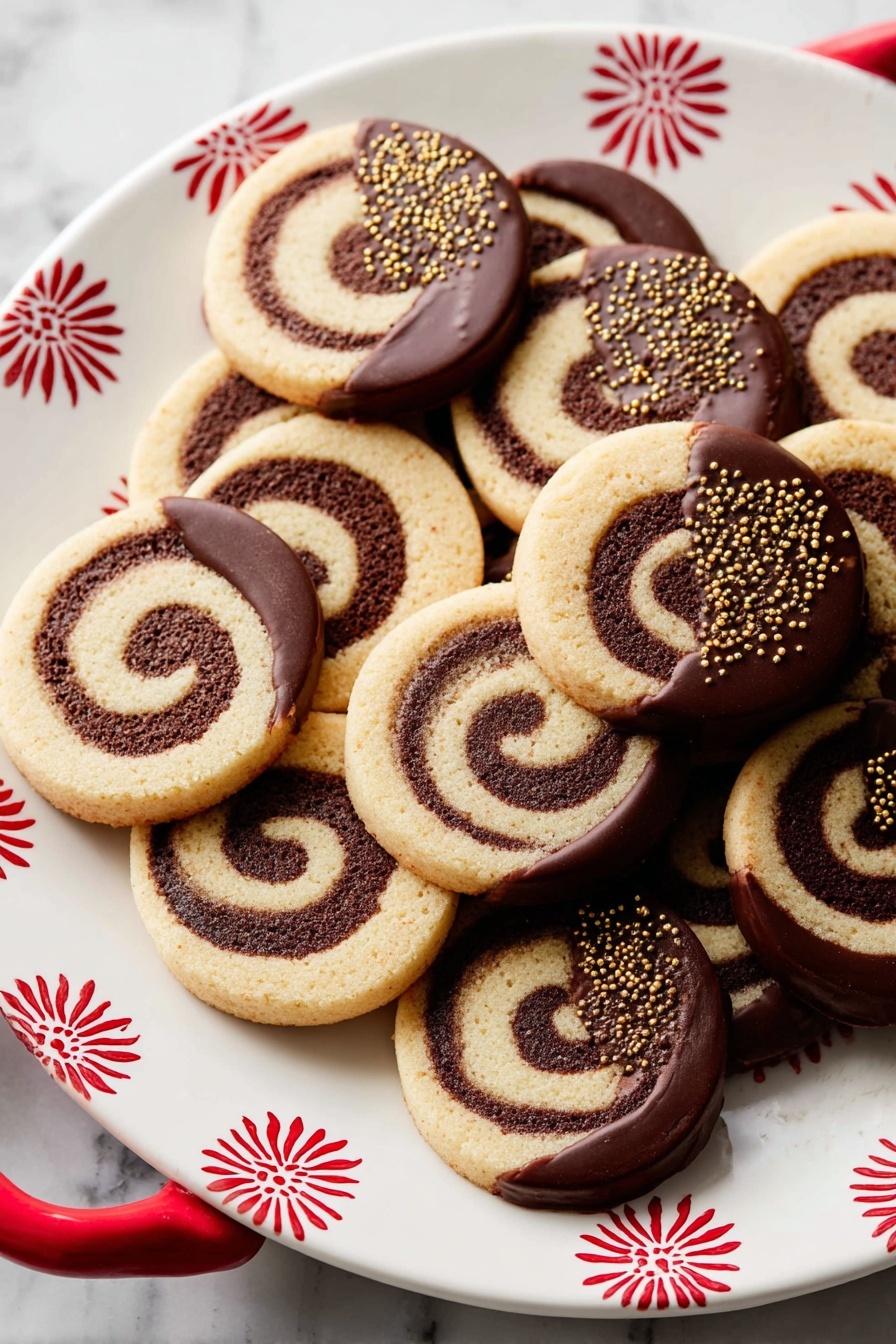
Chocolate Pinwheel Cookies Recipe
If you’re looking for a cookie recipe that’s both eye-catching and downright delicious, you can’t go wrong with this Chocolate Pinwheel Cookies Recipe. These cookies have this mesmerizing swirl pattern that’s almost too pretty to eat—but trust me, once you taste them, you won’t want to share! I’ve made these a bunch of times for friends and family, and they always get rave reviews. Stick with me, and I’ll walk you through every step so your cookies turn out perfectly every time.
Why This Recipe Works
- Classic Flavor Combination: The balance of vanilla and rich chocolate dough makes these pinwheel cookies irresistible.
- Easy Dough Handling: Chilling the dough at key steps prevents stickiness, so you’ll find rolling and slicing super manageable.
- Versatile Design: The dough can be tinted or flavored to match any season or celebration, making this a go-to for holidays.
- Reliable Texture: Slightly crisp on the edges with tender centers that keep these cookies perfectly chewy.

Ingredients & Why They Work
The magic starts with a simple base dough that’s split to create contrasting vanilla and chocolate layers. Each ingredient is essential in building that perfect buttery texture and distinctive swirl that defines this Chocolate Pinwheel Cookies Recipe.
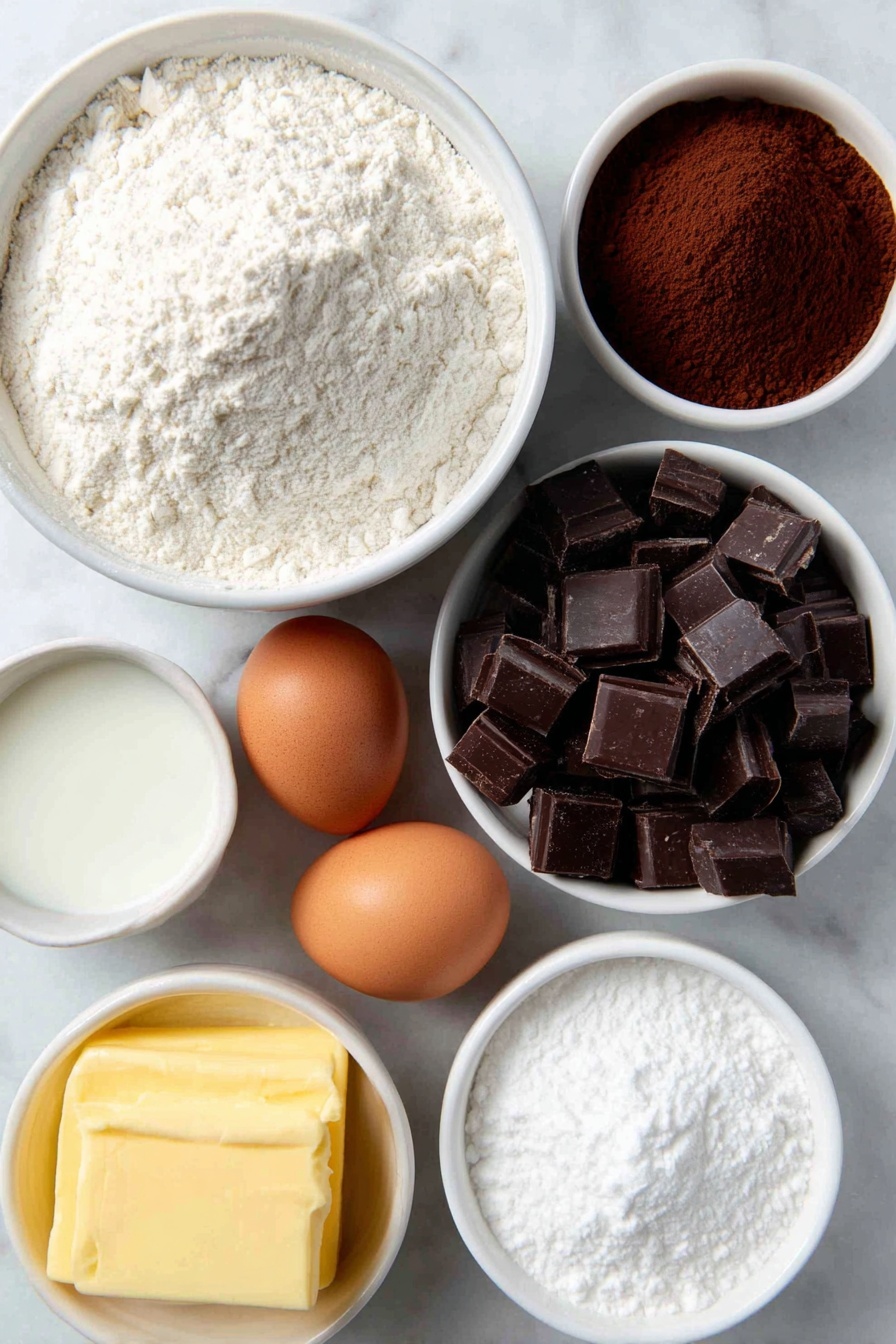
- All-purpose flour: Provides the ideal structure and bite without making the cookies dense or cakey.
- Baking powder: Gives a gentle lift, helping keep the cookies light and tender.
- Salt: Enhances the flavors and balances the sweetness perfectly.
- Unsalted butter: The backbone of rich flavor and tender crumb — always use softened, not melted.
- Granulated sugar: Sweetens while keeping the dough firm for rolling and shaping.
- Egg & egg yolk: Adds moisture and richness; the extra yolk helps keep the cookie soft.
- Vanilla extract: Elevates the vanilla dough and balances the chocolate layer.
- Cocoa powder: Choose natural or dutch-process for deep chocolate flavor without adding liquid.
- Milk: Just a splash to help incorporate the cocoa powder smoothly.
- Espresso powder (optional): Intensifies the chocolate notes without making the cookies taste like coffee.
- Chocolate for dipping (optional): Adds a luscious finishing touch if you want to get fancy and impress guests.
Make It Your Way
The best part about this Chocolate Pinwheel Cookies Recipe? It’s flexible! I love swapping out a little vanilla for almond or peppermint extract around the holidays. Feel free to personalize the look by adding gel food colors to the vanilla dough, making these cookies your own work of edible art.
- Flavor twists: I’ve added peppermint extract once and tinted the vanilla dough red for holiday cheer—it was a massive hit around the office!
- Dietary adjustments: For a dairy-free option, I’ve used coconut oil instead of butter, which gave a slight tropical hint but still delicious results.
- Sprinkle it up: Rolling the dough logs in coarse sugar or sprinkles before slicing adds a fun crunch and flash of color.
- Chocolate-dipped: If you want to make these extra special, dipping in white or dark chocolate is always a winner in my book and for guests.
Step-by-Step: How I Make Chocolate Pinwheel Cookies Recipe
Step 1: Cream the Butter and Sugar Until Fluffy
Start by beating your softened butter with granulated sugar on medium-high with a hand or stand mixer. This step is key because it traps air, giving your cookies that delightful lightness. Don’t rush—about 3 minutes until fluffy is perfect. If you’re unsure how to cream properly, I’ve found watching a quick tutorial really helped me get it right the first time.
Step 2: Mix in Eggs and Vanilla
Add your large egg plus yolk and vanilla extract, then beat on high until fully blended. Scrape down the sides once or twice to avoid any unincorporated bits—this ensures even flavor and texture throughout your dough.
Step 3: Combine Dry Ingredients and Divide Dough
Whisk together flour, baking powder, and salt separately, then add to your wet mix on low speed until everything comes together into a thick, sticky dough. At this point, divide the dough roughly in half—don’t stress about being exact. The slightly smaller half becomes your chocolate dough where you’ll fold in cocoa, milk, and espresso powder if using.
Step 4: Chill, Roll, and Layer the Dough
This part requires a little patience. Shape each dough half into similar-sized rectangles about an inch thick and refrigerate for at least an hour—this makes rolling much easier. Roll the vanilla dough out first on a floured parchment paper to about 8×14 inches, then do the same with the chocolate dough. Carefully layer the chocolate dough onto the vanilla dough, smoothing out any air pockets or tears gently with your hands.
Step 5: Roll into a Tight Log and Chill Again
Starting with a long side, roll the dough into a tight cylinder, using the parchment as a guide. Don’t worry if the edges aren’t perfect; you can patch small cracks with your fingers. Slice the log in half—this doubles your batch—and wrap the logs tightly to chill for at least 2 hours. This helps the cookies keep their shape when baked.
Step 6: Slice and Bake
Preheat your oven to 350°F (177°C). Slice each log into about 1/2-inch-thick rounds, spacing them comfortably on lined baking sheets since they spread a bit while baking. If the dough feels soft while slicing, pop the trays in the fridge for 10 minutes before baking. Bake for 14–15 minutes until just golden at the edges. That slight browning signals perfection!
Tips from My Kitchen
- Use Cocoa Powder for Dusting: I like to dust the chocolate dough with cocoa powder instead of flour to keep the color as rich as possible.
- Keep the Dough Pliable: Avoid over-chilling the dough to keep it flexible—too cold, and it cracks when rolling.
- Rotate While Rolling: I flip the dough a few times while rolling to prevent sticking and maintain an even thickness.
- Patch Imperfections: Don’t stress about tears—patch them up with a little extra dough and your fingers before rolling.
How to Serve Chocolate Pinwheel Cookies Recipe
Garnishes
I always like to fancy these up with a chocolate dip—melt some good-quality dark or white chocolate and dip half the cookie, then top with festive sprinkles if it’s a special occasion. It adds a lovely contrast in texture and a polished look that’s great for gifting.
Side Dishes
Pair these pinwheels with a warm cup of coffee, chai latte, or a classic cold glass of milk. They also make an excellent accompaniment to holiday dessert platters or afternoon tea spreads.
Creative Ways to Present
For holiday parties, I like arranging these cookies in a spiral on a large platter, mimicking the pinwheel shape on the plate. Wrapping a few individually in cellophane with a tied ribbon makes adorable party favors or thank-you gifts.
Make Ahead and Storage
Storing Leftovers
Store your baked cookies in an airtight container at room temperature, and they’ll stay fresh for up to a week. I always recommend a layer of parchment paper between layers of cookies to prevent sticking and breakage.
Freezing
I often prepare the dough ahead, rolling it into logs and freezing them tightly wrapped for up to 3 months. When I’m ready, I thaw the logs in the fridge overnight, slice, and bake fresh—this way, I get fresh-baked cookies anytime with minimal effort.
Reheating
Leftover cookies can be warmed for a few seconds in the microwave or popped in a warm oven (around 300°F) for 3-5 minutes to revive that just-baked softness. Just keep an eye on them so they don’t dry out!
FAQs
-
Can I use a different type of flour for this Chocolate Pinwheel Cookies Recipe?
All-purpose flour works best here because it provides just the right structure. Using whole wheat or gluten-free flour will change the texture and may require recipe adjustments. If you want to try alternatives, consider a 1-to-1 gluten-free blend, but expect slight differences in chewiness and spread.
-
How do I prevent the dough from cracking while rolling the log?
Chilling the dough until it’s firm but still pliable is key—you don’t want it rock hard. If cracks appear, gently press and patch with your fingers. You can also let the dough sit at room temperature for a few minutes if it’s too cold before rolling.
-
Is it necessary to chill the dough multiple times?
Yes, chilling helps the dough firm up, making rolling and slicing much easier and ensuring your cookies keep their pinwheel shape while baking. Skipping or shortening chill time can lead to spreading or misshapen cookies.
-
Can I omit the espresso powder in the chocolate dough?
Absolutely! The espresso powder is optional and only enhances the chocolate’s depth without imparting a coffee flavor. Leaving it out won’t negatively impact the recipe.
-
How do I store cookies dipped in chocolate?
Cookies dipped in chocolate should be refrigerated once the chocolate coating is set to avoid melting. Store them in an airtight container lined with parchment paper, and let them come to room temperature before serving for the best texture and flavor.
Final Thoughts
This Chocolate Pinwheel Cookies Recipe holds a special place in my kitchen because it’s as fun to make as it is to eat. The mesmerizing swirl never fails to get the “wow” reaction, and the balance of buttery vanilla with a cocoa kick is always a crowd-pleaser. I hope you’ll give these a try and maybe even customize your own pinwheel colors and flavors—it’s such a rewarding baking project that’s perfect for sharing memories, gifts, or just treating yourself to something sweet and unique.
Print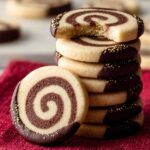
Chocolate Pinwheel Cookies Recipe
- Prep Time: 4 hours 15 minutes
- Cook Time: 15 minutes
- Total Time: 4 hours 30 minutes
- Yield: 28 cookies
- Category: Dessert
- Method: Baking
- Cuisine: American
- Diet: Vegetarian
Description
Learn how to make classic Pinwheel Cookies with a buttery vanilla dough and a rich chocolate dough rolled together to create a delightful spiraled treat. These cookies are perfect for any occasion and can be dipped in chocolate for an extra special touch.
Ingredients
Base Cookie Dough
- 2 and 2/3 cups (333g) all-purpose flour (spooned & leveled)
- 3/4 teaspoon baking powder
- 1/2 teaspoon salt
- 1 cup (16 Tbsp; 226g) unsalted butter, softened to room temperature
- 1 cup (200g) granulated sugar
- 1 large egg + 1 egg yolk, at room temperature
- 1 and 1/2 teaspoons pure vanilla extract
Chocolate Dough
- 2 Tablespoons (10g) unsweetened natural or dutch-process cocoa powder
- 1 Tablespoon (15ml) milk
- Optional: 1/2 teaspoon espresso powder
Optional for Dipping
- 6 ounces (170g) white, semi-sweet, or dark chocolate, finely chopped
- Optional: sprinkles
Instructions
- Make the dry mix: Whisk the flour, baking powder, and salt together in a medium bowl and set aside.
- Cream butter and sugar: In a large bowl, beat softened butter and granulated sugar on medium-high speed until light and fluffy, about 3 minutes, scraping down the bowl as needed.
- Add eggs and vanilla: Add the egg, egg yolk, and vanilla extract and beat on high speed until combined, about 1 minute. Scrape the bowl as needed to ensure even mixing.
- Combine wet and dry ingredients: Add the flour mixture to the wet ingredients and mix on low speed until just combined; dough will be thick and sticky.
- Divide dough: Separate dough into two halves, roughly 800–900g total; use the smaller half for chocolate dough if uneven.
- Make chocolate dough: To one half, add cocoa powder, milk, and espresso powder if using, and beat on low speed until well incorporated.
- Shape and chill dough: Shape each dough half into 1-inch-thick rectangles about 4×5 inches on a lightly floured surface. Wrap in plastic wrap and refrigerate for 60 to 90 minutes until less sticky but still pliable.
- Roll out vanilla dough: On a floured parchment paper, roll out vanilla dough to an 8×14-inch rectangle between 1/8 and 1/4 inch thickness. Refrigerate wrapped in parchment to keep firm.
- Roll out chocolate dough: Roll chocolate dough on a separate floured (or cocoa-dusted) parchment to a slightly smaller 8×14-inch rectangle. Peel carefully and place on top of the vanilla dough, aligning edges and smoothing out air bubbles. Patch any tears.
- Roll into a log: Starting from a long side, tightly roll the two dough layers together using the parchment paper to help, patch any cracks. Cut the log in half to make two 7-inch logs.
- Chill dough logs: Wrap each log tightly and refrigerate for 2 hours up to 4 days until firm.
- Preheat oven: Set oven to 350°F (177°C) and prepare baking sheets with parchment paper or silicone mats.
- Slice and bake: Cut each log into 14 slices about 1/2-inch thick. Place cookies 2 inches apart on baking sheets. Chill on baking sheets for 10 minutes if dough softens. Bake for 15 minutes or until lightly browned at edges.
- Cool cookies: Let cookies cool on baking sheets for 5 minutes, then transfer to cooling racks to cool completely.
- Optional chocolate dip: Melt chopped chocolate in a double boiler or microwave, stirring every 20 seconds until smooth. Dip half of each cooled cookie in chocolate, add sprinkles if desired, and allow chocolate to set at room temperature or in refrigerator.
Notes
- Baked cookies freeze well up to 3 months; thaw in refrigerator overnight before serving.
- You can shape the dough logs and refrigerate up to 4 days or freeze up to 3 months before slicing and baking.
- Gel food coloring can be added to vanilla dough after dividing for tinted pinwheels. Add extracts like peppermint or coconut for flavored variations.
- Roll dough logs in sprinkles or coarse sugar after chilling for extra texture and decoration; use a light water brush to help sprinkles adhere if needed.
- Use baking chocolate bars for melting and dipping, not chocolate chips that have stabilizers.
- If dough becomes too firm, let sit at room temperature 15–30 minutes before rolling.
- Use cocoa powder to dust while handling chocolate dough to reduce sticking.
Nutrition
- Serving Size: 1 cookie
- Calories: 150 kcal
- Sugar: 12 g
- Sodium: 80 mg
- Fat: 8 g
- Saturated Fat: 5 g
- Unsaturated Fat: 2 g
- Trans Fat: 0 g
- Carbohydrates: 18 g
- Fiber: 1 g
- Protein: 2 g
- Cholesterol: 30 mg


