Chocolate Peanut Butter Rice Krispy Cups Recipe
If you’re a fan of nostalgic treats with a grown-up twist, you’re going to adore this Chocolate Peanut Butter Rice Krispy Cups Recipe. It’s super easy to make, irresistibly delicious, and perfect whether you want to whip up a quick snack or impress a crowd. Honestly, every time I make this, I get asked for seconds—and that’s saying something since these cups disappear fast!
Why This Recipe Works
- Simple Ingredients: Uses pantry staples that come together quickly without any fuss.
- Perfect Balance: The combo of creamy peanut butter, sweet honey, and crunchy cereal hits all the right notes.
- No Baking Required: Just melt, mix, and chill—saving you from heating up the kitchen.
- Kid (and Adult) Approved: It’s a fun, hands-on treat that everyone loves.

Ingredients & Why They Work
The magic of this Chocolate Peanut Butter Rice Krispy Cups Recipe lies in the harmony of its ingredients. Each one plays a crucial role in creating that gooey, crunchy, and chocolaty bite you’ll crave again and again. Here’s why I chose these and how you can pick the best versions for your batch.

- Peanut Butter: Creamy peanut butter blends smoothly; if you like texture, chunky peanut butter adds a fun crunch.
- Honey: Adds natural sweetness and helps bind everything together without overpowering the peanut flavor.
- Salt: Just a pinch enhances all the flavors and balances the sweetness perfectly.
- Rice Krispies Cereal: Gives that iconic crispy crunch; make sure it’s fresh for the best texture.
- Chocolate Chips: I use semi-sweet for a balanced chocolate flavor, but feel free to go dark or milk chocolate depending on your preference.
Make It Your Way
One of the reasons I love the Chocolate Peanut Butter Rice Krispy Cups Recipe is how easy it is to customize. Feel free to switch up ingredients or tweak textures to match your cravings or dietary needs—let these cups be your canvas!
- Add-ins: Sometimes I toss in mini marshmallows or chopped nuts for extra chew and crunch—both are real crowd pleasers.
- Nut-Free Version: Swap peanut butter for sunflower seed butter if allergies are a concern; it still tastes amazing!
- Chocolate Variations: Use white chocolate chips or drizzle with caramel for a sweeter twist.
- Vegan Adjustment: Replace honey with maple syrup or agave to keep it plant-based.
Step-by-Step: How I Make Chocolate Peanut Butter Rice Krispy Cups Recipe
Step 1: Prep Your Muffin Tin
Start by lining your muffin pan with cupcake liners or giving it a good spray with cooking spray. This little step makes removing your peanut butter cups much easier and helps keep their shape nice and neat. I like using colorful liners—it makes presentation so cute!
Step 2: Melt the Peanut Butter Mix
In a small saucepan over medium heat, melt together the peanut butter, honey, and a pinch of salt. Stir frequently so the mixture is smooth and well combined. You’ll know it’s ready when it’s glossy and easily pourable but not too hot—it should be warm enough to coat the cereal evenly without cooking it.
Step 3: Combine with Rice Krispies
Pour the peanut butter mixture over the Rice Krispies in a medium bowl. Stir gently yet thoroughly, making sure every flake is coated. This step is key because it’s what binds the cups together so they don’t fall apart once chilled.
Step 4: Fill and Pack the Cups
Fill each lined muffin cup about two-thirds full with the coated cereal mix. Use the back of a spoon or your fingers to press the mixture down firmly and evenly—this helps the cups hold their shape and creates a satisfying crunch in every bite.
Step 5: Melt the Chocolate and Top
Melt your chocolate chips in a microwave-safe bowl in short bursts, stirring often, until silky smooth. Spoon the melted chocolate over each cup, spreading it gently to cover the top completely. This chocolaty layer is what turns simple peanut butter cups into a decadent treat.
Step 6: Chill and Enjoy
Pop the muffin tray into the refrigerator for at least 30 minutes to let the chocolate set. Once firm, you can peel back the liners and enjoy! They’re perfect chilled but taste amazing at room temperature too.
Tips from My Kitchen
- Even Coating: Don’t rush mixing peanut butter with cereal—every flake needs to be coated, or cups will crumble.
- Firm Pressing: Pack the mixture firmly into the cups to help them hold once chilled.
- Chocolate Smoothness: Stir chocolate often during melting to avoid burning and achieve a shiny finish.
- Chill Time: Don’t skip refrigeration—it’s the secret to Chocolate Peanut Butter Rice Krispy Cups Recipe’s perfect texture.
How to Serve Chocolate Peanut Butter Rice Krispy Cups Recipe

Garnishes
I love topping these rice krispy cups with a sprinkle of sea salt or a few chopped peanuts for extra texture and a salty-sweet contrast. Sometimes I drizzle a little extra melted peanut butter or chocolate over the top for a pretty finish when serving guests.
Side Dishes
These cups stand beautifully on their own, but if you’re serving a dessert platter, pair them with fresh berries or a scoop of vanilla ice cream for a delightful combination. A simple cup of coffee or cold milk is also perfect alongside.
Creative Ways to Present
For celebrations, arrange the Chocolate Peanut Butter Rice Krispy Cups Recipe on a tiered dessert stand. You could also wrap each cup in clear cellophane tied with ribbon to make cute party favors or gifts. I once added edible gold dust to the chocolate tops for a glam touch at a party—total showstopper!
Make Ahead and Storage
Storing Leftovers
I keep leftover cups in an airtight container in the refrigerator. They stay fresh and crunchy for up to a week, which means you can enjoy your treat a little at a time without worrying about sogginess.
Freezing
Frozen for longer storage? Absolutely! Wrap individual cups in plastic wrap, then place them in a freezer-safe container. They freeze beautifully for up to 2 months. Just thaw in the fridge before serving.
Reheating
Since these are best enjoyed cold or at room temp, I recommend letting any chilled cups sit out for 10-15 minutes before eating rather than reheating. If you want to slightly soften the chocolate layer, a quick 5-second zap in the microwave works wonders—just don’t melt it too much!
FAQs
-
Can I make this Chocolate Peanut Butter Rice Krispy Cups Recipe nut-free?
Yes! Simply swap out the peanut butter for a seed butter like sunflower seed butter or soy nut butter. These alternatives replicate the creamy texture and nutty flavor without actual nuts, making the treat safe for those with allergies.
-
How do I prevent the chocolate from cracking after setting?
Avoid rapid temperature changes—cool the chocolate in the fridge, but don’t freeze the cups. Also, adding a little coconut oil to the melting chocolate can help keep the surface glossy and less prone to cracking.
-
Can I use other cereals instead of Rice Krispies?
You sure can! Puffed wheat or cornflakes could work, though the texture and taste will vary. Just aim for a delicate, crispy cereal that won’t get soggy easily.
-
Do I have to refrigerate the cups?
While it’s not absolutely required, refrigerating helps the chocolate set nicely and gives the cups structure. If you serve them at room temperature, they might be a bit softer but still delicious.
Final Thoughts
Chocolate Peanut Butter Rice Krispy Cups aren’t just a snack—they’re a little dose of comfort and joy wrapped in one delicious bite. I love how quickly these come together and how they never fail to bring smiles around my kitchen table. If you’re looking for a no-fuss, crowd-pleasing treat that nails that sweet-and-salty combo, this recipe is your new go-to. Trust me, once you try them, you’ll be making them again and again—enjoy!
Print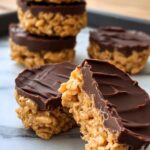
Chocolate Peanut Butter Rice Krispy Cups Recipe
- Prep Time: 10 minutes
- Cook Time: 5 minutes
- Total Time: 15 minutes
- Yield: 16 cups
- Category: Snack
- Method: Stovetop
- Cuisine: American
- Diet: Vegetarian
Description
Delicious and easy-to-make Chocolate Peanut Butter Rice Krispy Cups featuring creamy peanut butter, crunchy Rice Krispies cereal, and a smooth chocolate topping. Perfect as a sweet snack or dessert that sets quickly in the refrigerator.
Ingredients
Peanut Butter Mixture
- 1 cup creamy peanut butter
- 6 tablespoons honey
- 1 pinch salt
Cereal
- 3 cups Rice Krispies cereal
Chocolate Topping
- 2 cups semi-sweet chocolate chips
Instructions
- Prepare muffin pan: Line a muffin pan with muffin liners or spray it lightly with cooking spray to prevent sticking.
- Melt peanut butter mixture: In a small saucepan over medium heat, melt together peanut butter, honey, and salt until smooth and well combined.
- Mix cereal: In a medium bowl, add the Rice Krispies cereal and pour the melted peanut butter mixture over it. Stir thoroughly to coat all cereal pieces evenly.
- Fill muffin cups: Spoon the coated cereal mixture into each muffin cup, filling about two-thirds full. Press firmly to pack the mixture down tightly.
- Melt chocolate: In a microwave-safe bowl, melt the chocolate chips by heating in short intervals, stirring until smooth and fully melted.
- Add chocolate topping: Spoon the melted chocolate over the packed cereal mixture in each muffin cup, covering the tops evenly.
- Chill and set: Place the muffin tray in the refrigerator and chill until the chocolate topping is firm and the cups are set, about 30 minutes.
- Serve: Once firm, remove the peanut butter cups from the liners and serve immediately or store in an airtight container.
Notes
- Use creamy or chunky peanut butter based on your texture preference.
- For easy removal, ensure the muffin liners are properly placed or lightly grease the muffin pan.
- If you prefer sweeter chocolate topping, use milk chocolate chips instead of semi-sweet.
- The recipe sets quickly in the refrigerator, but chilling for at least 30 minutes ensures chocolate is fully firm.
- Store leftovers in the refrigerator to keep cups firm and fresh.
Nutrition
- Serving Size: 1 cup
- Calories: 180 kcal
- Sugar: 12 g
- Sodium: 95 mg
- Fat: 10 g
- Saturated Fat: 3 g
- Unsaturated Fat: 6 g
- Trans Fat: 0 g
- Carbohydrates: 18 g
- Fiber: 1 g
- Protein: 4 g
- Cholesterol: 0 mg


