Chocolate Cherry Black Forest Pie Recipe
If you’re looking to wow your friends or family with a show-stopping dessert, I have just the thing for you — my Chocolate Cherry Black Forest Pie Recipe. This pie combines a rich chocolate sour cream crust with a luscious tart cherry filling, all topped off with a heavenly vanilla mascarpone whipped cream. Trust me, it’s the kind of dessert that turns any ordinary day into a celebration. Stick with me, and I’ll walk you through every step so you can absolutely nail this pie in your own kitchen.
Why This Recipe Works
- Perfect Flavor Balance: The tartness of cherries brightens the deep cocoa notes in the crust for a harmonious taste.
- Fantastic Texture Contrast: Crisp chocolate crust and juicy cherry filling get complemented by fluffy mascarpone cream.
- Made-from-Scratch Goodness: From scratch crust and filling ensure fresh, rich, and satisfying results every time.
- Customizable and Fun: You can easily personalize it with your favorite liqueurs or spices to make it truly yours.

Ingredients & Why They Work
Each ingredient in this Chocolate Cherry Black Forest Pie Recipe has a purpose — from the cocoa-rich pie crust that adds depth, to the tart cherries that bring a bright burst, right through to the creamy mascarpone whipped topping that mellows everything out. Shopping smart can make a huge difference, like choosing frozen tart cherries instead of fresh—they hold up better and are packed with flavor.
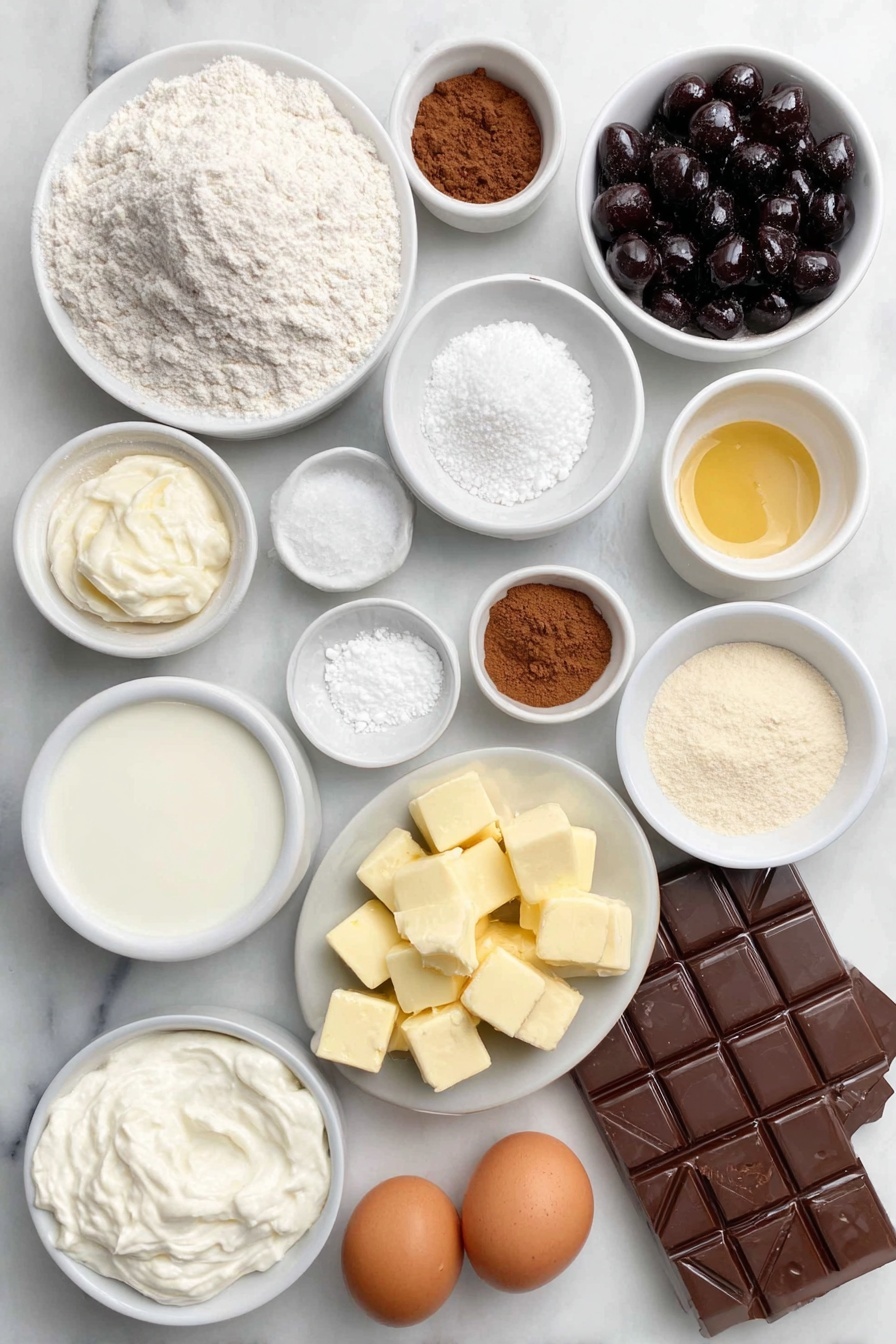
- All purpose flour: Forms the sturdy base of the crust; I always sift it to avoid lumps.
- Cocoa powder: Using unsweetened cocoa provides that rich chocolate flavor without extra sugar.
- Sea salt: Enhances all the flavors and balances the sweetness perfectly.
- Granulated sugar: Sweetens the crust and filling just right without overpowering the cherries.
- Unsalted butter: I love freezing it beforehand—this keeps the crust flaky and tender.
- Sour cream: Adds tang and moisture, contributing to that tender, crumbly pie crust texture.
- Vanilla extract: Brings warmth and depth to both crust and whipped cream.
- Cold water: Helps bind the dough just right without making it tough.
- Frozen tart cherries: I always keep a bag in my freezer; it works better than fresh for this filling.
- Cornstarch: Thickens the cherry filling to the perfect consistency without being gummy.
- Ground cinnamon: Adds a subtle spicy note that lifts the flavor profile wonderfully.
- Cherry liquor (optional): Boosts the cherry flavor with a boozy kick, but the pie is still fantastic without it.
- Almond extract: Just a hint lends that classic Black Forest cake vibe you’ll adore.
- Heavy whipping cream: Used both for brushing the crust and making the whipped topping—so important to keep it cold!
- Coarse demerara sugar: For a delightful crunchy finish on top of the pie.
- Mascarpone cheese: Gives the whipped cream a luscious richness and silky texture.
- Dark chocolate bar: For shaving on top — the finishing touch that makes it look gourmet.
Make It Your Way
I love how versatile this Chocolate Cherry Black Forest Pie Recipe is. I often tweak the filling depending on what I have, and encouraging you to play around makes each pie truly your own. Adding a splash of your favorite liquor or swapping spices is so simple but elevates the whole experience.
- Variation: Sometimes I swap almond for a drop of orange extract to bring out the chocolate-cherry combo in a new way — it’s surprisingly delicious!
- Dietary Swaps: If you want to make this gluten-free, I’ve had success using a gluten-free flour blend for the crust with excellent results.
- Seasonal Touch: Using fresh cherries in summer is great, but frozen cherries provide consistent flavor anytime.
- Easier Version: For a quicker take, use a pre-made chocolate crust and focus on mastering the filling and creamy topping.
Step-by-Step: How I Make Chocolate Cherry Black Forest Pie Recipe
Step 1: Crafting the Perfect Chocolate Sour Cream Pie Crust
First things first: mixing your dry ingredients — flour, cocoa, sugar, and salt. I like to whisk them together in a large bowl so everything’s evenly combined. Then, grab your cold, cubed butter straight from the freezer and cut it into the dry mix using your fingertips or a pastry cutter. You want pea-sized chunks, not a homogeneous dough. This is key to a flaky crust! Next, stir in sour cream and vanilla, then add cold water one tablespoon at a time, mixing with your hands until the dough just comes together. Don’t overmix — the dough should hold together but still feel a bit lumpy. Fold the dough three times right in the bowl for a tender texture. Split into two disks, wrap in plastic, and chill for at least an hour or overnight if you plan ahead. This rest time is a game-changer for flavor and structure.
Step 2: Making the Tart Cherry Pie Filling
While the dough chills, get your filling ready. Combine the frozen cherries (don’t defrost!) with sugar, cornstarch, salt, cinnamon, cherry liquor, and almond extract in a bowl. Mixing the frozen cherries directly means you’ll retain more juice in the filling, giving that luscious, thick texture we all love. Pop the mixture in the fridge while you roll out your crust. This step also helps the flavors meld beautifully.
Step 3: Rolling Out and Assembling the Pie
Lightly flour your surface and roll out one disk of dough to about ¼ inch thick. Carefully transfer it to your pie plate, letting it settle naturally without stretching the dough—that prevents a tough crust. Then spoon the cherry filling into the crust, making sure to gather all the sugary cornstarch bits that settled in the bowl; they’re full of flavor and help thicken the filling nicely. Roll out the second dough disk and cut it into strips about 1.5 inches wide. Weave these strips into a lattice on top, overlapping neatly. Trim any excess, leaving an inch for the edges, then tuck and crimp the border to seal. Brush the top lattice with cream and sprinkle generously with coarse demerara sugar for that pretty sparkle and crunch when baked.
Step 4: Baking to Perfection
Place your filled pie on a baking sheet (this catches any drips) and bake at 355°F (180°C) for 60 to 75 minutes. You’re aiming for bubbling filling and a crisp, nicely browned crust. Ovens vary, so keep an eye on the lattice edges—if they brown too fast, lightly cover with foil to protect them. When done, it’s best to let the pie cool down to warm or room temperature before slicing, so the filling sets but is still tender. That makes for clean slices and no messy spills.
Step 5: Whipping Up the Vanilla Mascarpone Topping
While your pie cools, whip your cream, sugar, vanilla, and a pinch of salt until you see medium-stiff peaks. Then, add mascarpone cheese and whip a bit more until stiff peaks form. This mix is luxuriously creamy and adds a cool contrast to the warm pie. Spoon a generous dollop over each slice just before serving. For the final flourish? Use a vegetable peeler to shave some dark chocolate right on top — it’s such a classy touch that feels like a gift every time.
Tips from My Kitchen
- Keep Butter Cold: Frozen butter helps create a flakier crust—don’t skip this or your texture will suffer.
- Use Frozen Cherries: I learned the hard way that thawed cherries can make the filling too watery; frozen cherries keep a perfect structure.
- Patch with Foil: If your lattice browns early, tent it loosely with foil—it’ll bake perfectly without burning.
- Serve Warm: This pie is best served when slightly warm to enjoy that tender crust and gooey filling harmony.
How to Serve Chocolate Cherry Black Forest Pie Recipe
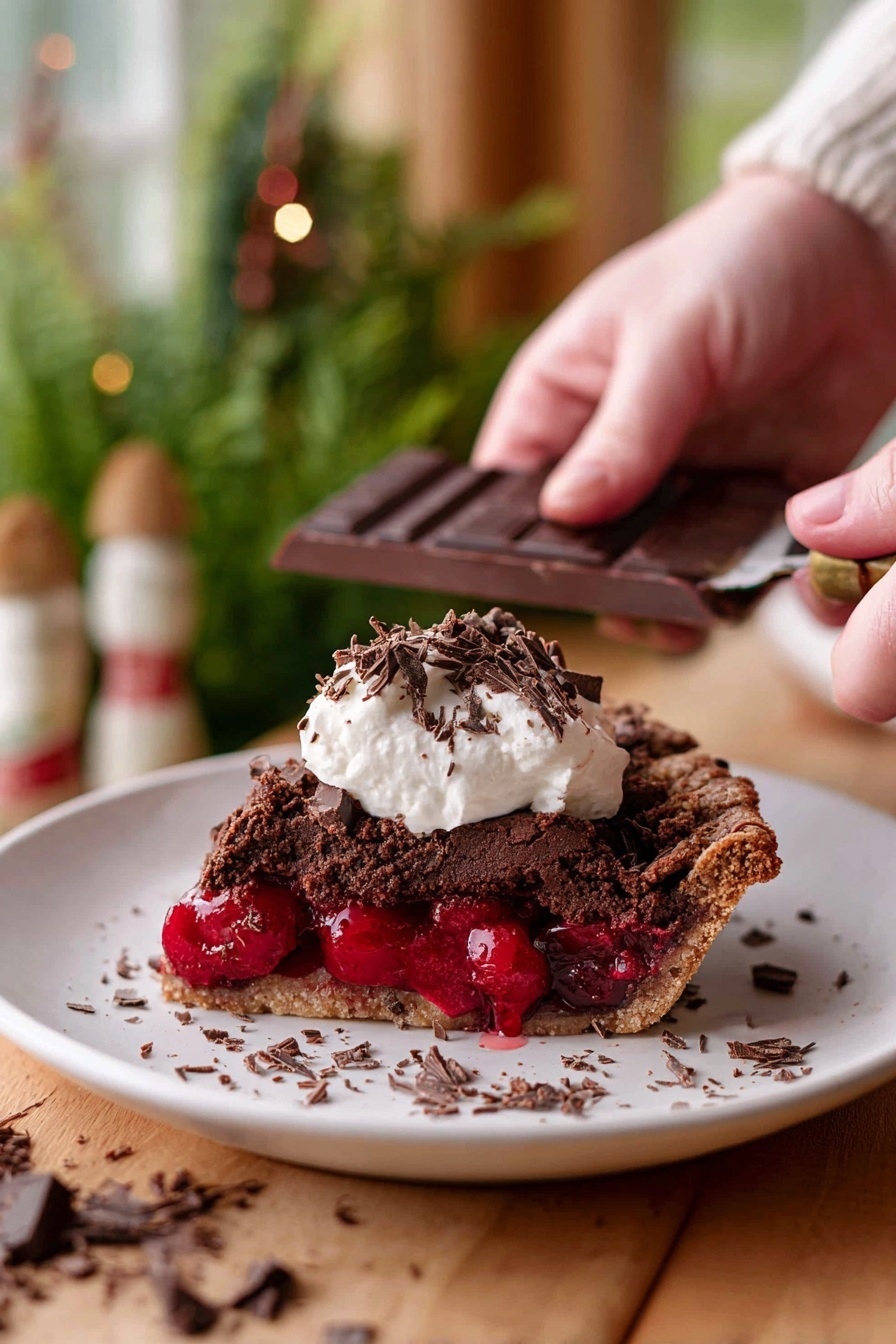
Garnishes
On my table, a generous dollop of vanilla mascarpone whipped cream is non-negotiable for serving this pie. The whipped cream mellows the tartness and adds creamy richness. Shaved dark chocolate on top not only looks elegant but adds subtle bittersweet fun with every bite. If I’m feeling fancy, I’ll toss on a few fresh cherries or a sprig of mint for a pop of color.
Side Dishes
This pie shines as a star dessert, so I usually keep sides light and simple — think freshly brewed coffee or a glass of ruby port wine. If it’s a party, a scoop of vanilla bean ice cream pairs beautifully with warm slices, making for an irresistible combo.
Creative Ways to Present
For special occasions, I’ve tried assembling this pie in mini tart pans to create individual servings, which is always a hit. I also sometimes use a decorative pie crust cutter for the lattice strips or sprinkle edible gold dust on the whipped cream for a festive touch.
Make Ahead and Storage
Storing Leftovers
Once your pie is fully cooled, cover it loosely with plastic wrap and refrigerate. I’ve had leftovers stay fresh and tasty for up to 5 days this way. Just keep the whipped cream separate if you haven’t yet topped it, and add fresh dollops when serving.
Freezing
Freezing this pie is a bit tricky because the cornstarch in the filling can become watery after thawing. If you want to freeze it, try substituting arrowroot starch for cornstarch—it holds up better. When freezing, wrap tightly in plastic and foil, and thaw slowly overnight in the fridge. I’ve done this a couple times with decent results, but freshly baked is definitely better.
Reheating
To reheat slices, I pop them in a 325°F oven for about 10-15 minutes until just warm. This revives the crust’s crispness without drying out the filling. You can add fresh whipped cream after warming for that perfect, freshly served feel.
FAQs
-
Can I use fresh cherries instead of frozen for the Chocolate Cherry Black Forest Pie Recipe?
Absolutely! Fresh cherries can work well if they’re in season, but keep in mind they tend to release more juice and might make the filling a bit more watery. You might want to drain some juice or add a bit more cornstarch to compensate. Frozen cherries are great because they hold their shape and texture nicely during baking.
-
Do I have to use sour cream in the crust for the Chocolate Cherry Black Forest Pie Recipe?
Sour cream is key to this crust’s tender, flaky texture and a subtle tang that balances the chocolate. If you need a substitute, Greek yogurt can work in a pinch, but the texture might be slightly different. I recommend sticking to sour cream if possible.
-
Can I make the vanilla mascarpone whipped cream ahead of time?
Yes! You can whip the mascarpone cream a day ahead and keep it covered in the fridge. Just give it a quick whisk before serving to bring back its fluffy texture if it settles a bit.
-
How do I prevent the pie crust edges from burning?
Great question! When you see the edges browning too fast during baking, cover them loosely with strips of aluminum foil or use a pie crust shield. This protects the edges while the rest of the pie continues to bake to perfection.
-
Is there a way to make this pie gluten-free?
Definitely! You can swap the all-purpose flour in the crust for a 1:1 gluten-free baking blend. Just make sure your cocoa powder and other ingredients are gluten-free certified. The texture might be a little different but still delicious.
Final Thoughts
This Chocolate Cherry Black Forest Pie Recipe quickly became one of my favorite desserts to make for friends and family because it balances intense chocolate flavor with bright cherries and dreamy cream. There’s something so satisfying about pulling a pie like this from your oven — it feels like a hug on a plate. Honestly, once you try it, you’ll want it in your rotation for birthdays, holidays, or “just because.” I can’t wait for you to give it a go, and I promise, the compliments will come rolling in!
Print
Chocolate Cherry Black Forest Pie Recipe
- Prep Time: 30 minutes
- Cook Time: 1 hour 15 minutes
- Total Time: 1 hour 45 minutes
- Yield: 12 slices
- Category: Dessert
- Method: Baking
- Cuisine: American
- Diet: Vegetarian
Description
This Chocolate Cherry Black Forest Pie combines a rich chocolate sour cream crust with a tart cherry filling and a luscious vanilla mascarpone whipped cream topping. The lattice crust bakes to a crisp finish, complementing the bubbling cherry filling with notes of cinnamon and almond extract. Perfect for dessert lovers craving a fruity yet decadent pie.
Ingredients
Chocolate Sour Cream Pie Crust
- 2 ¼ cup all purpose flour
- ⅓ cup cocoa powder
- ½ teaspoon sea salt
- ¼ cup granulated sugar
- 1 cup unsalted butter cut into 1 cm cubes and frozen
- ⅓ cup sour cream cold
- 1 tablespoon pure vanilla extract
- ¼ cup cold water
Tart Cherry Pie Filling
- 1 ½ lbs tart cherries frozen, don’t defrost, about 6 cups
- ¾ cup granulated sugar
- 4 tablespoons cornstarch
- ¼ teaspoon sea salt
- ½ teaspoon ground cinnamon
- 2 tablespoons cherry liquor optional
- ½ teaspoon almond extract
Topping and Finishing
- 2 tablespoons heavy whipping cream (for brushing crust)
- 2 tablespoons coarse demerara sugar
Vanilla Mascarpone Whipped Cream
- ¾ cup heavy whipping cream cold
- 2 tablespoons granulated sugar
- ½ teaspoon vanilla extract
- ⅛ teaspoon sea salt
- ½ cup mascarpone cheese cold
- ¼ bar dark chocolate for shaving on top
Instructions
- Prepare the Chocolate Sour Cream Pie Crust: In a large bowl, combine flour, cocoa powder, sea salt, and sugar. Mix until well combined. Add cold, cubed unsalted butter and work it into the flour mixture until the texture resembles coarse peas. Stir in sour cream and vanilla extract thoroughly. Add cold water one tablespoon at a time, mixing with your hands, until the dough comes together (about two tablespoons). Flatten the dough and fold it three times in the bowl. Divide the dough into two disks, wrap them individually, and refrigerate for at least one hour or overnight.
- Make the Tart Cherry Pie Filling: Preheat your oven to 355°F (180°C). In a large bowl, combine frozen tart cherries, granulated sugar, cornstarch, sea salt, ground cinnamon, cherry liquor (if using), and almond extract. Toss everything well to coat the cherries evenly. Place the bowl in the refrigerator to keep the filling cold.
- Roll and Assemble the Pie: On a floured surface, roll out one disk of pie crust to ¼ inch thickness. Carefully transfer it into a pie plate allowing it to settle naturally without stretching. Pour the cherry filling into the crust, ensuring all the thickened juices and dry bits are included. Roll out the second crust disk to the same thickness and cut into 1.5 inch wide strips. Arrange these strips in a lattice pattern over the filling. Trim the edges leaving about 1 inch and crimp the edges by folding inward and pressing with fingers or a fork.
- Prepare for Baking: Brush the lattice crust with 2 tablespoons of heavy whipping cream and sprinkle generously with coarse demerara sugar. Place the pie on a larger baking sheet to catch any drips. Bake in the lower part of the oven for 70 minutes until the filling is bubbling and the crust is crisp and browned. If edges or top crust brown too quickly, shield it with foil.
- Cool the Pie: Remove the pie from the oven and let it cool to warm temperature or room temperature before slicing to set the filling properly.
- Make Vanilla Mascarpone Whipped Cream: In a cold bowl, combine heavy whipping cream, granulated sugar, vanilla extract, and sea salt. Whisk by hand or with an electric mixer until medium-stiff peaks form. Add the cold mascarpone cheese and continue to whip until stiff peaks form. Use immediately or refrigerate up to three days.
- Serve: Spoon a generous dollop of the vanilla mascarpone whipped cream over each slice of pie. Use a vegetable peeler to shave dark chocolate over the whipped cream as garnish.
Notes
- Make ahead: Prepare the pie and whipped cream a day in advance; store separately in the refrigerator.
- Storage: Keep pie covered in the refrigerator for up to 5 days. Avoid freezing due to cornstarch thickening, which doesn’t freeze well. Substitute arrowroot starch if freezing is desired.
- Tips: Do not overwork the butter in the crust—keep it in chunky pieces for flaky texture.
- Keep cherries frozen to ease filling assembly and texture.
- Bake until the filling bubbles; tent the pie with foil if the crust browns too quickly.
- Serve the pie warm to enjoy a tender yet crisp crust and delicious filling.
Nutrition
- Serving Size: 1 slice
- Calories: 380 kcal
- Sugar: 26 g
- Sodium: 180 mg
- Fat: 22 g
- Saturated Fat: 12 g
- Unsaturated Fat: 9 g
- Trans Fat: 0 g
- Carbohydrates: 38 g
- Fiber: 3 g
- Protein: 4 g
- Cholesterol: 70 mg
