Chewy S’more Bars with Chocolate and Marshmallows Recipe
If you’re craving that nostalgic, campfire classic but want something you can make anytime in your kitchen, you’re going to love this Chewy S’more Bars with Chocolate and Marshmallows Recipe. Trust me, it hits that perfect balance of crispy graham cracker crust, melty chocolate, and gooey marshmallow topping that’s just downright irresistible. Once you try these bars, you’ll see why I keep making them for last-minute guests and cozy nights in. Let’s dive in so you can whip up this fan-freaking-tastic treat yourself!
Why This Recipe Works
- Simple Ingredients: Uses pantry staples you probably already have, making it easy to throw together anytime.
- Perfect Texture: The graham cracker crust bakes up crispy while the marshmallows get delightfully chewy and golden brown.
- All-in-One Dessert: Combines the flavors of classic s’mores into a neat bar, so no campfire needed.
- Kid-Friendly and Crowd-Pleasing: Everyone from kids to adults gets excited for these gooey bars.

Ingredients & Why They Work
Each component in this Chewy S’more Bars with Chocolate and Marshmallows Recipe plays a role in creating that nostalgic flavor and texture, so I never skip or substitute unless absolutely necessary. Plus, I’ll share a few tips on what to look for when buying these ingredients.
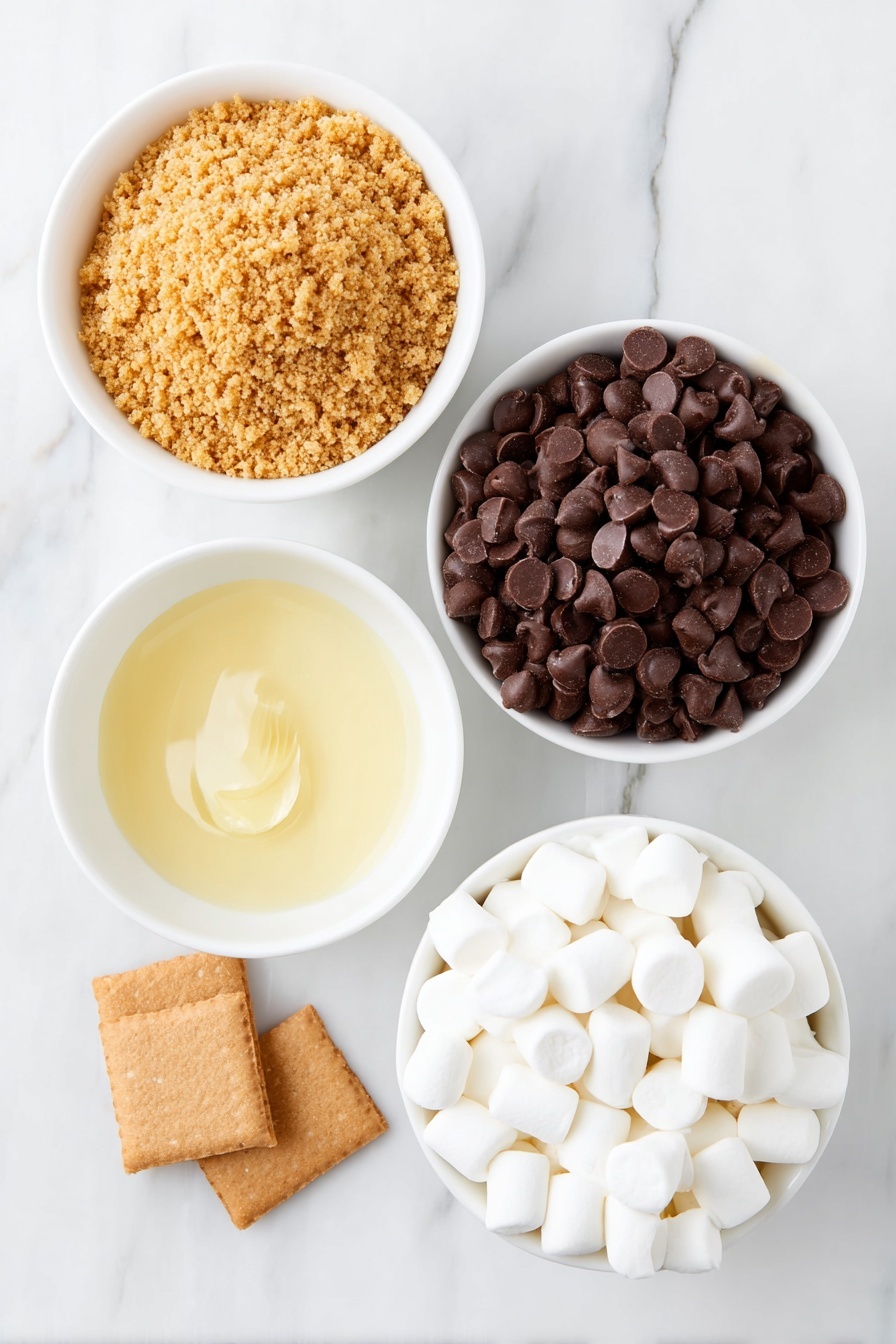
- Graham cracker crumbs: The base that brings that unmistakable classic s’mores crunch; using pre-crumbed or crushing your own works fine.
- Melted butter: This binds the graham crumbs and helps them crisp up during baking into a sturdy crust.
- Chocolate chips: I prefer semi-sweet for balance, but feel free to go milk or dark depending on your sweet tooth!
- Mini marshmallows: Size matters here—the minis melt evenly and toast beautifully without overpowering the bars.
Make It Your Way
One of my favorite things about this Chewy S’more Bars with Chocolate and Marshmallows Recipe is how easy it is to tweak based on what’s in your pantry or your personal taste. I often swap in different chocolates or add a sprinkle of nuts for crunch – it’s all about making it your own cozy treat.
- Variation: Sometimes, I add chopped peanuts or walnuts right before adding the marshmallows for an extra texture contrast that my family loves.
- Dietary modifications: For a gluten-free twist, use gluten-free graham crackers; for dairy-free, try coconut oil instead of butter and dairy-free chocolate.
- Seasonal changes: Around the holidays, I like swapping out the chocolate chips for peppermint or butterscotch chips to match the festive vibe.
Step-by-Step: How I Make Chewy S’more Bars with Chocolate and Marshmallows Recipe
Step 1: Get Your Oven and Pan Ready
First things first, preheat your oven to 350°F (175°C). While it warms up, grease your 9×13-inch baking pan with cooking spray—this makes removing the bars a breeze once baked. I’ve learned that using a light coat rather than a heavy one helps prevent sticking without altering the texture.
Step 2: Mix and Press the Graham Cracker Crust
Combine the 2 cups of graham cracker crumbs with the ½ cup melted butter until everything is evenly moistened. This mixture will act as your crust. Press it firmly not only on the bottom but up around the edges of your pan to form a sturdy, slightly raised base. Don’t rush this part—the firmer you pack it, the better it holds together when cut.
Step 3: Bake the Crust for a Golden Start
Bake the crust for about 8 minutes. This initial baking step gives the graham cracker base that satisfyingly crispy edge. Keep an eye on it; you want it lightly golden but not burnt. This really creates a nice contrast to the gooey marshmallows later.
Step 4: Layer on the Chocolate and Marshmallows
After removing the pan from the oven, immediately sprinkle the 4 cups of chocolate chips evenly over the hot crust. Then, spread the mini marshmallows on top of the chocolate layer. The warmth of the crust starts melting the chocolate slightly, so make sure to work fairly quickly.
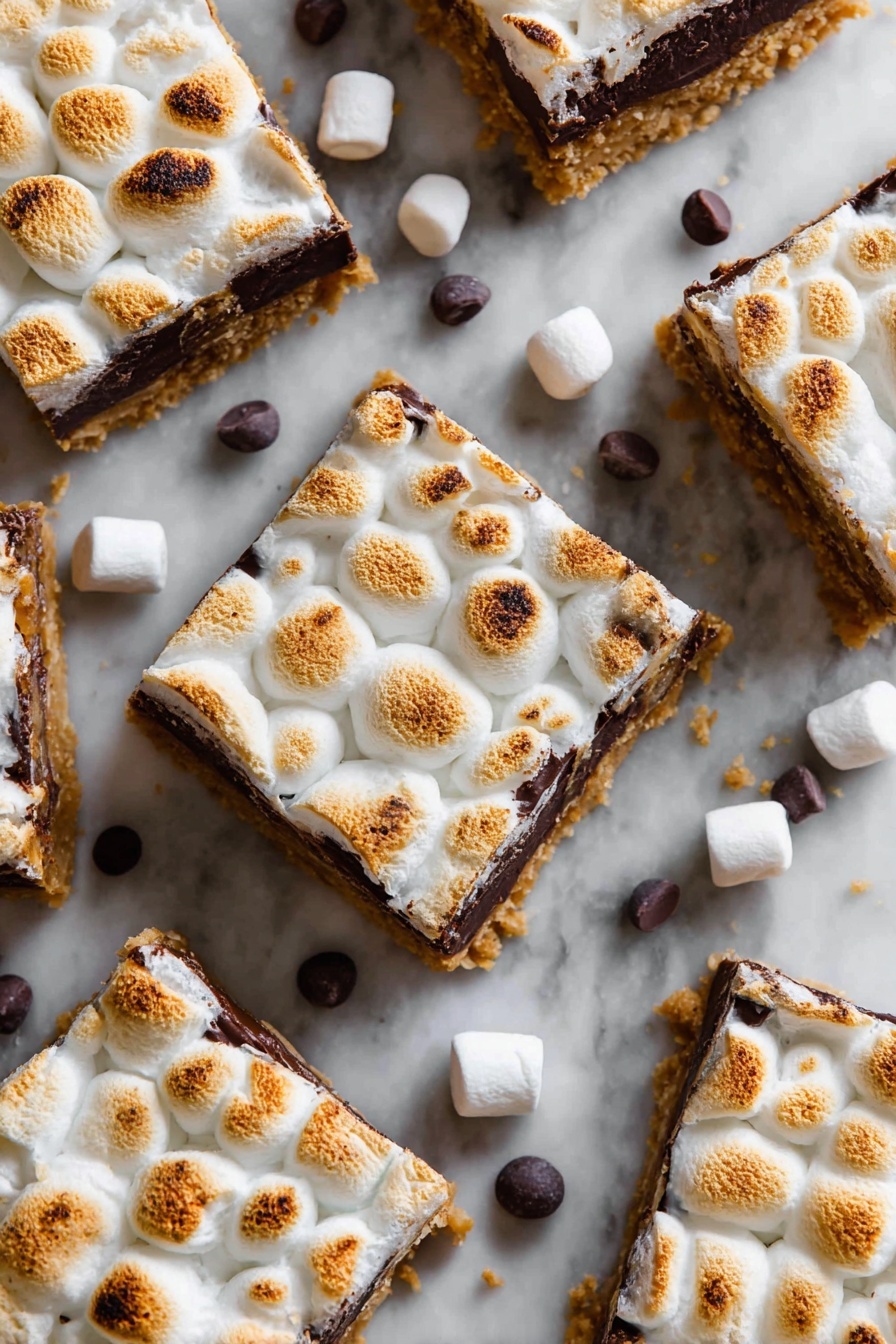
Step 5: Final Bake for Melty, Golden-Top Perfection
Return the pan to the oven and bake for another 20 minutes. You’re looking for the marshmallows to puff up and turn a lovely golden brown on their tops. This is where the magic happens—gooey, toasted marshmallows that are soft and chewy, not burnt.
Step 6: Cool and Chill Before Serving
Once out of the oven, let your s’more bars cool slightly at room temperature. Then pop them into the fridge for at least an hour to set up firmly—this step makes cutting cleaner and keeps everything intact when you serve. I often prepare these a day ahead for potlucks because they actually taste even better once chilled!
Tips from My Kitchen
- Firm Pressing: I press the graham cracker crust firmly with the back of a measuring cup; it creates an even, sturdy base that cuts well.
- Even Toasting: Place the bars on the middle rack to ensure the marshmallows toast evenly without burning.
- Chill Time is Key: Don’t skip refrigeration—it helps the chocolate and crust firm up for clean slices.
- Watch the Marshmallows: If they start browning too fast, lower the oven temperature slightly or tent with foil to avoid burning.
How to Serve Chewy S’more Bars with Chocolate and Marshmallows Recipe
Garnishes
I like to sprinkle a tiny pinch of flaky sea salt on top just after baking—it brings out the chocolate’s richness and enhances the sweet marshmallow flavor. Sometimes, I add a drizzle of caramel or a dusting of cinnamon for an extra special touch when serving to guests.
Side Dishes
These bars are sweet enough to shine solo, but they pair beautifully with a scoop of vanilla ice cream or a dollop of whipped cream for a luxurious dessert. For a casual snack, a hot cup of coffee or chocolate milk complements them perfectly.
Creative Ways to Present
For birthday parties or summer get-togethers, I sometimes serve these bars in mini mason jars layered with whipped cream and fresh berries for a fun s’mores parfait. Another crowd-pleaser is cutting them into bite-sized squares and arranging on a rustic wooden board alongside graham crackers and extra mini marshmallows for a DIY s’mores bar station.
Make Ahead and Storage
Storing Leftovers
Once completely cooled and chilled, I store leftover bars in an airtight container in the fridge. They keep well for up to 5 days, making them a perfect grab-and-go snack throughout the week.
Freezing
I’ve frozen these bars wrapped tightly in plastic wrap and then placed in a freezer bag. They freeze well for up to 2 months. To enjoy, just thaw them in the fridge overnight. They won’t be quite as crispy but still delightfully chewy and chocolatey.
Reheating
Reheating is easy: pop a bar in the microwave for about 10-15 seconds to get that melty marshmallow texture back. Alternatively, 5 minutes in a 325°F oven does the trick if you want to revive some crispness to the crust without burning the topping.
FAQs
-
Can I use regular marshmallows instead of mini marshmallows?
Yes, but keep in mind that regular-sized marshmallows will take longer to toast and melt, which could affect baking time and final texture. I recommend cutting them into smaller pieces or monitoring carefully to avoid burning.
-
What type of chocolate works best in this Chewy S’more Bars with Chocolate and Marshmallows Recipe?
Semi-sweet chocolate chips are my go-to because they balance the sweetness of marshmallows well. However, feel free to experiment with milk, dark, or even flavored chips like caramel or peanut butter to suit your taste.
-
Can I make these bars gluten-free?
Absolutely! Just swap out regular graham cracker crumbs for a gluten-free alternative. Just make sure the crumbs don’t have any added gluten ingredients, and you’re good to go.
-
Why do I need to refrigerate the bars before cutting?
Chilling helps the chocolate and crust firm up, making the bars much easier to cut into neat squares without the layers sliding apart. It also enhances the texture, allowing the bars to set properly.
-
Can I make these bars ahead of time for a party?
Yes! These bars actually taste better after sitting in the fridge for a few hours or overnight. They’re fantastic for potlucks or gatherings where you want a no-fuss make-ahead dessert.
Final Thoughts
Honestly, this Chewy S’more Bars with Chocolate and Marshmallows Recipe is one of those gems I keep returning to, especially when I want a quick dessert that feels special and homemade. The way the marshmallows toast perfectly over a crunchy crust with melty chocolate—it just hits every comfort-food note. If you love classic s’mores like I do but don’t always have a fire pit handy, these bars should be your new go-to. Give them a try soon; I can’t wait to hear how much you and your friends enjoy them!
Print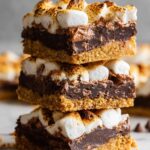
Chewy S’more Bars with Chocolate and Marshmallows Recipe
- Prep Time: 30 minutes
- Cook Time: 28 minutes
- Total Time: 58 minutes
- Yield: 6 servings
- Category: Dessert
- Method: Baking
- Cuisine: American
Description
Delicious and easy-to-make S’more Bars featuring a buttery graham cracker crust topped with melted chocolate chips and toasted mini marshmallows, perfect for a nostalgic dessert treat.
Ingredients
Crust
- 2 cups Graham cracker crumbs
- ½ cup Melted butter
Topping
- 4 cups Chocolate chips
- 1 package Mini marshmallows
Instructions
- Preheat oven, set your oven to 350 degrees Fahrenheit to prepare for baking.
- Prepare baking pan, grease a 9×13 inch pan thoroughly with cooking spray to prevent sticking.
- Mix crust ingredients, combine graham cracker crumbs and melted butter in a bowl until evenly mixed.
- Form crust, sprinkle the mixture into the baking pan and press firmly to cover the bottom and sides evenly.
- Bake crust, place the pan in the oven and bake for 8 minutes to set the crust.
- Add toppings, remove the pan from the oven and evenly sprinkle chocolate chips over the crust, followed by mini marshmallows on top.
- Bake final, return the pan to the oven and bake for 20 minutes until the marshmallows turn golden brown and melty.
- Cool and chill, remove from oven and let cool at room temperature, then place in the refrigerator to firm up.
- Serve, cut into bars and serve chilled for a perfect treat.
Notes
- Press the graham cracker crust evenly to ensure a firm base for easy cutting.
- Use full-fat butter for best flavor and crust texture.
- Feel free to use milk or dark chocolate chips depending on preference.
- For extra gooey bars, add an additional layer of chocolate chips before topping with marshmallows.
- Store leftover bars in the refrigerator to maintain freshness and texture.
Nutrition
- Serving Size: 1 bar
- Calories: 350 kcal
- Sugar: 25 g
- Sodium: 150 mg
- Fat: 20 g
- Saturated Fat: 12 g
- Unsaturated Fat: 7 g
- Trans Fat: 0 g
- Carbohydrates: 40 g
- Fiber: 2 g
- Protein: 4 g
- Cholesterol: 30 mg
