Cheesy Bean and Rice Burritos Recipe
If you’ve been craving a comforting, cheesy, and satisfying meal that comes together quickly and hits all the right notes, you’re in for a treat with my Cheesy Bean and Rice Burritos Recipe. It’s one of those dishes I keep coming back to because it’s so versatile, delicious, and perfect for feeding a crowd or meal prepping for the week. Trust me, once you try this, cheesy, golden-crisp burritos loaded with savory beans and fluffy rice will become a staple in your kitchen, just like they have in mine.
Why This Recipe Works
- Perfect Balance of Flavors: The refried beans, combined with taco seasoning and salsa, create a rich, flavorful base that’s complemented by the zesty rice and melty cheeses.
- Simple & Quick Prep: You only need a handful of pantry staples and about 30 minutes, making it ideal for weeknights or last-minute meals.
- Versatile & Crowd-Pleasing: Whether you’re serving a family, meal prepping, or hosting friends, these burritos satisfy almost everyone’s tastes with their cheesy, comforting goodness.
- Golden Crisp Finish: Baking the burritos until both sides get a golden crust adds an addictive crunch that really elevates this simple meal.

Ingredients & Why They Work
The beauty of this Cheesy Bean and Rice Burritos Recipe is in the combo of creamy beans, savory rice, and cheeses that melt perfectly. Each ingredient plays its part to make these burritos flavorful but approachable—plus, you probably already have them in your pantry or fridge.
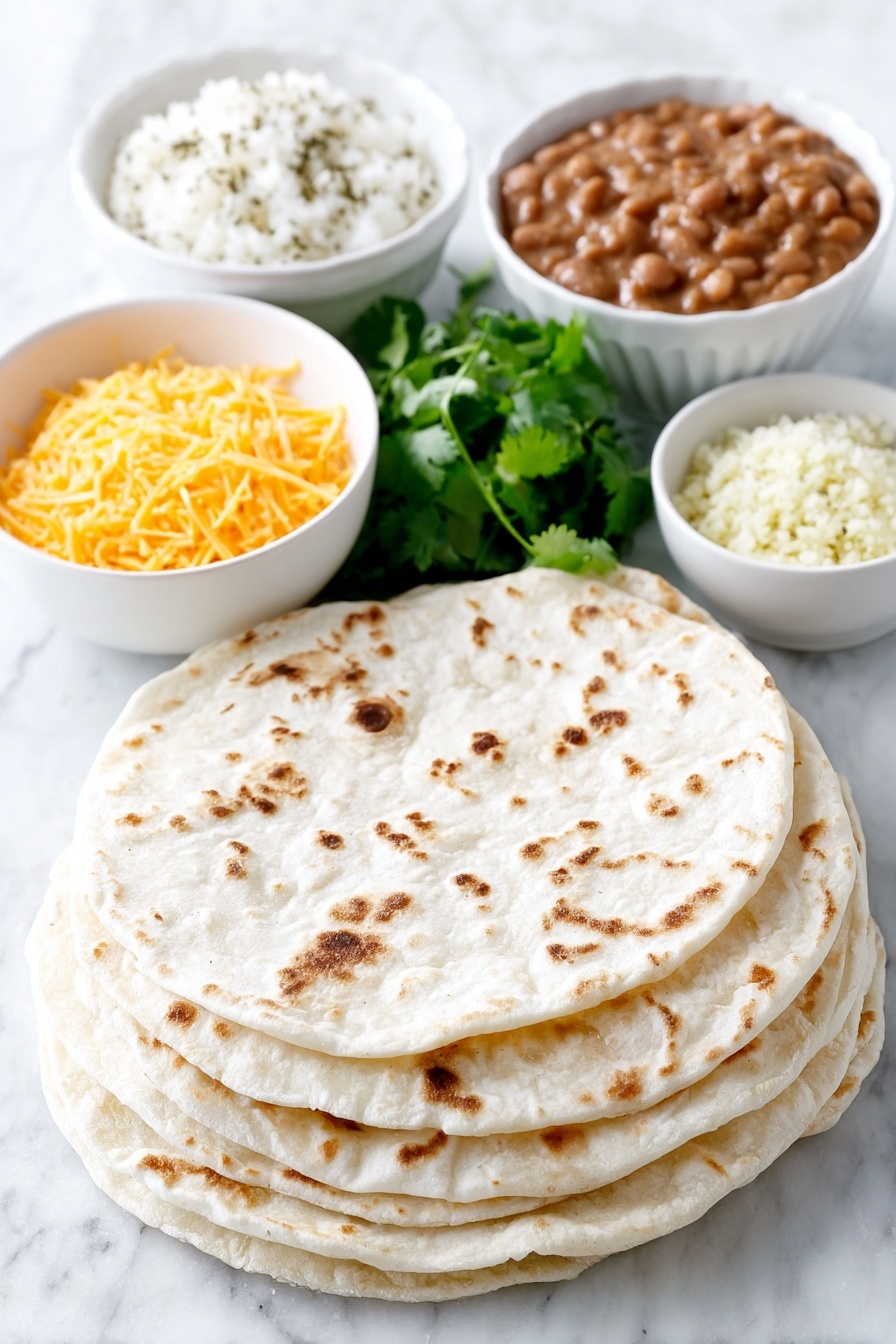
- Refried beans: Creamy and filling, refried beans provide a smooth texture and rich flavor that blends beautifully with spices.
- Jarred salsa: Adds a fresh zing and moisture to the beans without extra chopping or prep.
- Homemade taco seasoning mix: Tailor this blend to your taste, or easily swap in your favorite store-bought version to bring authentic Mexican flavor.
- Flour tortillas (8-inch): These are the perfect size to roll up just enough filling for a satisfying bite without being overwhelming.
- Restaurant-style Mexican rice: This classic side is subtly seasoned and adds a fluffy texture that contrasts beautifully with the beans.
- Shredded sharp cheddar cheese: Provides a tangy bite and great melty texture.
- Shredded Monterey Jack cheese: Melts smoothly and balances the sharpness of the cheddar with a creamy touch.
Make It Your Way
One of the best things about this Cheesy Bean and Rice Burritos Recipe is how easy it is to customize based on what you love or what you have on hand. I’ve made these with mild salsa when I had company over with kids, and also kicked up the heat with extra chili powder for my spice-loving friends.
- Variation: Adding sautéed veggies like bell peppers and onions adds an extra layer of flavor and crunch—I highly recommend trying this for a veggie boost.
- Dietary modifications: You can switch out the flour tortillas for gluten-free or whole wheat versions, and use vegan cheese and bean alternatives to keep it plant-based.
- Seasonal changes: In the summer, I sometimes mix in roasted corn or fresh pico de gallo for a bright fresh burst inside the burritos.
Step-by-Step: How I Make Cheesy Bean and Rice Burritos Recipe
Step 1: Prep Your Filling
In a small bowl, mix together the refried beans, taco seasoning, and your salsa. This blends everything nicely and brings zest and creaminess to the filling. I like to taste for seasoning here and add a pinch more taco seasoning if needed. This mix really carries the flavor in every bite.
Step 2: Warm the Tortillas
Stack your tortillas and pop them in the microwave for about 20 seconds. Warming makes them more pliable and much easier to roll tightly without breaking. Nothing worse than a cracked tortilla when you’re ready to enjoy your burritos!
Step 3: Assemble Your Burritos
Lay one tortilla flat, spread a couple tablespoons of your bean mixture down the center, add an equal amount of rice on top, and finish with a generous sprinkle of cheddar and Monterey Jack cheeses. Fold in both sides and roll it up firmly so it seals well. Place seam side down on a foil-lined baking sheet sprayed with nonstick spray—that way, your burrito stays wrapped tight while baking and won’t stick.
Step 4: Bake to Perfect Crispness
Bake the burritos at 400°F for 10 minutes. Then, use tongs to flip them over to brown the other side evenly. Bake for another 5 to 10 minutes until both sides are golden and crispy. I love this step because it creates texture contrast—melty on the inside and slightly crunchy outside. Watch carefully during baking to avoid burning.
Step 5: Serve and Enjoy!
Serve your burritos fresh out of the oven with extra salsa and sour cream on the side. I like to garnish with fresh cilantro too—adds a lovely freshness. These are also fantastic paired with guacamole or a squeeze of lime.
Tips from My Kitchen
- Softening Tortillas: Always warm your tortillas before rolling—it prevents cracking and makes folding so much easier.
- Even Filling Distribution: Don’t overload the burritos; too much filling can make them unmanageably messy.
- Flip with Care: Use tongs to gently flip the burritos halfway through baking to get that perfect crisp on both sides.
- Avoid Soggy Burritos: The cooking spray on the foil keeps the tortillas from sticking and helps them crisp up rather than steam.
How to Serve Cheesy Bean and Rice Burritos Recipe

Garnishes
I almost always top these burritos with fresh chopped cilantro and a dollop of sour cream or Greek yogurt. Salsa verde or a squeeze of fresh lime juice adds a tasty, tangy brightness that really makes each bite shine. Sometimes, a handful of sliced jalapeños or diced avocado takes things up a notch too.
Side Dishes
I love serving these burritos with a simple green salad, Mexican street corn, or some roasted veggies. For a quick and easy option, tortilla chips and guacamole are always winners. It’s my go-to for casual dinners or entertaining because everyone loves to build their plate.
Creative Ways to Present
For special occasions, try turning these into a burrito bake by layering sliced burritos in a casserole dish, sprinkling extra cheese on top, and baking until bubbly. I’ve also wrapped individual burritos in foil and served them as grab-and-go picnic lunches that were a hit outdoors. Rolling with flavored tortillas or adding colorful toppings makes presentation pop at parties too.
Make Ahead and Storage
Storing Leftovers
When I have leftover burritos, I let them cool completely, then store them in a zippered plastic bag in the fridge. This keeps them fresh for up to 3-4 days. I usually find that wrapping them individually prevents them from sticking together and messiness during storage.
Freezing
Freezing is a lifesaver for busy weeks! I assemble the burritos but freeze them before baking. I wrap each burrito tightly in wax paper and then foil, which really helps prevent freezer burn and keeps them tasting fresh months later. When I want to eat one, I bake it straight from frozen and add a few extra minutes to the cook time—super convenient.
Reheating
To reheat, I microwave the refrigerated burritos briefly until warmed through for convenience. But if you want to revive that crispy outside, I always pop them into a hot oven on a foil-lined pan for 5–6 minutes. This brings back that golden crunch I love without drying them out.
FAQs
-
Can I use canned black beans instead of refried beans for this recipe?
You can definitely use canned black beans, but I recommend mashing them up first and possibly adding a little oil or water for creaminess so the texture mimics refried beans. Otherwise, the burritos might be less cohesive and a bit drier inside.
-
Is it possible to make this recipe vegan?
Absolutely! Swap out the shredded cheeses for your favorite vegan cheese alternatives, and double-check your taco seasoning and salsa ingredients to ensure they’re vegan-friendly. The beans and rice are naturally vegan, so the rest is easy to adjust.
-
How do I prevent my burritos from getting soggy?
Warming the tortillas before assembly, using a nonstick spray on the baking sheet, and baking until golden and crispy all around help prevent sogginess. Also, avoid overstuffing the burritos, which can trap moisture.
-
Can I make these burritos ahead of time and freeze them?
Yes, these are excellent for freezing! Assemble the burritos and wrap them tightly before baking, then freeze for up to 3 months. When you’re ready, bake them directly from frozen, adding a few extra minutes to the cook time.
-
What kind of rice should I use?
Restaurant-style Mexican rice works beautifully because it’s seasoned and fluffy, but you can use any cooked rice you like. If you want to make your own, cooking rice with tomato sauce, garlic, and a bit of cumin gives you that perfect flavor to pair with the beans.
Final Thoughts
I can’t stress enough how much I adore this Cheesy Bean and Rice Burritos Recipe for its simplicity, flexibility, and utterly delicious results. It’s one of my all-time go-tos when I want something hearty, budget-friendly, and crowd-pleasing without spending hours in the kitchen. Whether you’re feeding your family or prepping for the week ahead, I truly think these burritos will make your life easier and tastier. So grab those ingredients, roll up your sleeves, and get ready for a cheesy, bean-and-rice-packed hug in a tortilla. You’re going to love it!
Print
Cheesy Bean and Rice Burritos Recipe
- Prep Time: 10 minutes
- Cook Time: 20 minutes
- Total Time: 30 minutes
- Yield: 10 small burritos
- Category: Main Course
- Method: Baking
- Cuisine: Mexican
- Diet: Vegetarian
Description
These Cheesy Baked Bean and Rice Burritos are a delicious and easy-to-make meal perfect for a quick lunch or dinner. Featuring refried beans seasoned with homemade taco mix and salsa, layered with Mexican rice and a blend of sharp cheddar and Monterey Jack cheeses, these burritos are baked until crispy and golden. Serve them with salsa and sour cream for a comforting and satisfying meal.
Ingredients
Filling
- 16 ounces refried beans
- 2 tablespoons jarred salsa
- 1 teaspoon homemade taco seasoning mix (or store-bought)
- 1 cup restaurant style Mexican rice
- 1 cup shredded sharp cheddar cheese
- 1 cup shredded Monterey Jack cheese
Burritos
- 10 8-inch flour tortillas (soft taco sized)
- Nonstick cooking spray, as needed for baking sheet and tops of burritos
Instructions
- Preheat Oven: Preheat your oven to 400 degrees Fahrenheit. Line a large rimmed baking sheet with foil and spray the foil generously with nonstick cooking spray to prevent sticking.
- Prepare Bean Mixture: In a small mixing bowl, combine the refried beans, taco seasoning, and salsa. Stir well and set aside to let the flavors meld.
- Warm Tortillas: Stack the 10 tortillas and warm them in the microwave for about 20 seconds to soften, making them easier to roll without cracking.
- Assemble Burritos: Lay each tortilla flat on a clean surface. Place a couple tablespoons of the refried bean mixture down the center, followed by a couple tablespoons of Mexican rice, then sprinkle some of both shredded cheddar and Monterey Jack cheeses on top. Fold in both sides of the tortilla and then roll it up tightly. Place each burrito seam side down on the prepared baking sheet. Repeat with remaining tortillas.
- Prepare for Baking: Lightly coat the tops of the assembled burritos with nonstick cooking spray to help achieve a crisp, golden finish during baking.
- Bake Burritos: Place the baking sheet in the preheated oven and bake for about 10 minutes. Remove from the oven and carefully flip each burrito using tongs to brown the other side.
- Finish Baking: Return the baking sheet to the oven and bake an additional 10 minutes or until the burritos are nicely browned and crisp on both sides.
- Serve: Serve the baked burritos warm with additional salsa and sour cream on the side for dipping or topping as desired.
Notes
- This recipe yields 10 small burritos using 8-inch tortillas. For larger, more filling burritos, use fewer tortillas and increase fillings; expect 6 to 8 bigger burritos.
- To store leftovers, refrigerate burritos in a zippered plastic bag and reheat quickly in the microwave, or bake at 400 degrees Fahrenheit for 5 to 6 minutes to restore crispiness.
- For freezing, assemble burritos and wrap each tightly in wax paper or freezer-safe plastic wrap, then foil to prevent freezer burn. Freeze up to 3 months.
- Bake frozen burritos from frozen by adding a few extra minutes to the baking time to ensure they are heated through and crisp.
- Nonstick cooking spray can be substituted with a light brushing of oil if preferred for browning.
Nutrition
- Serving Size: 1 burrito
- Calories: 350 kcal
- Sugar: 3 g
- Sodium: 700 mg
- Fat: 12 g
- Saturated Fat: 6 g
- Unsaturated Fat: 5 g
- Trans Fat: 0 g
- Carbohydrates: 45 g
- Fiber: 7 g
- Protein: 15 g
- Cholesterol: 30 mg


