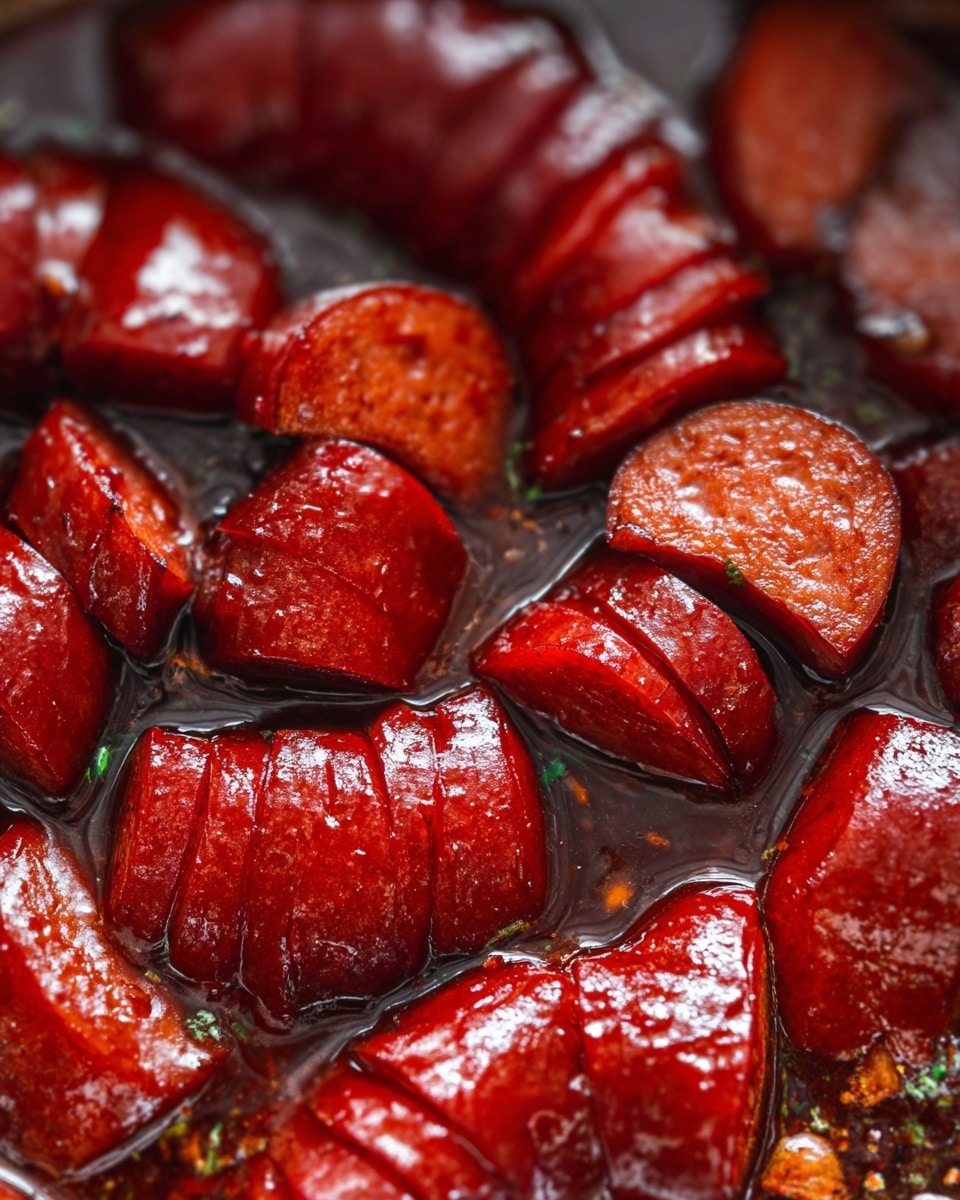
Candied Kielbasa Bites Recipe
Let me tell you, this Candied Kielbasa Bites Recipe is an absolute game-changer when you want to impress friends at your next get-together without sweating in the kitchen for hours. The sweet and tangy glaze perfectly caramelizes over smoky, juicy kielbasa slices, creating bursts of flavor that are totally addictive. Whenever I bring these bites to a party, they disappear faster than you can say “more, please!”
What makes this recipe so worth trying is how simple it is yet how gourmet it tastes. You don’t need fancy ingredients—just a few pantry staples to create these elegant little morsels. Plus, it’s great for casual nights too. I often whip these up for quick weeknight snacks or during football games, and it always feels like a treat.
Why This Recipe Works
- Perfect Balance of Flavors: The sweet brown sugar and tangy ketchup combine with horseradish for a zingy glaze that complements the smoky kielbasa beautifully.
- Easy Hasselback Technique: Using chopsticks to slice just partway through the sausage creates those signature “bites” that soak up the candied sauce gorgeously.
- Hands-Off Oven Cooking: Once it’s in the oven, just a few stirs every 20 minutes let the flavors build without constant attention.
- Versatile Snack or Appetizer: Works perfectly for parties, game days, or even an easy weeknight treat.

Ingredients & Why They Work
The ingredients in this Candied Kielbasa Bites Recipe are simple but thoughtfully chosen to create that deep caramelized glow and flavor. Each item plays a role, whether it’s the savory depth of the kielbasa or the sweet-tart kick from the sauce.
- Kielbasa Sausage: Go for a high-quality kielbasa with good smoky flavor—it forms the hearty base that’s packed with savory goodness.
- Brown Sugar: This is your caramelizing agent, giving the glaze that irresistible sweet crunch.
- Ketchup: Adds a tangy acidity and a bit of moisture, balancing the sweetness nicely.
- Prepared Horseradish: Don’t skip this—it brings a sharp, peppery zing that cuts through the richness, making the bites more dynamic.
Make It Your Way
I love mixing things up with this Candied Kielbasa Bites Recipe depending on the occasion, and you definitely should too! Whether you want to dial up the heat, swap ingredients for dietary needs, or add fresh herbs, this recipe is a terrific foundation for creativity.
- Spicy Variation: I sometimes add a dash of cayenne or a swirl of hot sauce to the glaze. It gives a lovely kick without overpowering the sweetness.
- Gluten-Free Version: Make sure your ketchup and horseradish are certified gluten-free to keep it safe and delicious.
- Herbal Boost: Toss in some chopped fresh parsley or chives after baking for a pop of color and freshness.
- Smoked Paprika Twist: A sprinkle of smoked paprika before baking adds extra depth—my guests always ask what that secret flavor is!
Step-by-Step: How I Make Candied Kielbasa Bites Recipe
Step 1: Prep and Hasselback the Kielbasa
First, preheat your oven to 375°F to get it ready for baking. Next, slice the kielbasa into 1-inch thick pieces. Here’s a neat trick I’ve picked up: place each kielbasa piece between two chopsticks or wooden skewers before slicing it into 1/4-inch slits. This hack prevents you from cutting all the way through, so you end up with perfect hasselback bites that fan out and soak up the candied glaze like little flavor sponges.
Step 2: Mix and Coat with the Candied Glaze
Pop the hasselback kielbasa pieces into a baking dish, then add the brown sugar, ketchup, and prepared horseradish right on top. Stir everything gently to make sure each piece is evenly coated with the mixture. This step guarantees every bite will have that luscious, sticky coating that makes the dish so addicting.
Step 3: Bake and Caramelize to Perfection
Place the dish in the oven and bake. Here’s the key: stir the kielbasa every 20 minutes to make sure the sauce caramelizes evenly and none of those edges burn. Depending on your oven and how crispy you want your bites, baking can take anywhere from 60 to 90 minutes. I usually check at the hour mark — when the edges look golden-brown and the sauce is nicely thickened, you’re good to go!
Tips from My Kitchen
- Chopstick Trick: That simple hack of using chopsticks to slice prevents your sausage from falling apart and maximizes surface area for caramelization.
- Don’t Rush the Bake: Slow caramelization makes all the difference, so be patient—check but don’t poke or stir too aggressively.
- Use a Glass or Ceramic Dish: It heats evenly without burning the sugars, unlike metal pans that sometimes get too hot on the edges.
- Watch for Burnt Sugar: Stir gently and don’t let the sugar crisp get black—that bitterness ruins the sweet-savory balance you’re aiming for.
How to Serve Candied Kielbasa Bites Recipe
Garnishes
Whenever I serve these candied kielbasa bites, I sprinkle them with chopped fresh parsley or green onions for a hit of color and freshness. A few red pepper flakes add a nice touch if you like a little heat. Some people love a dreamy dollop of sour cream on the side to cool down the sweetness, and honestly, I’m right there with them!
Side Dishes
They pair perfectly with crispy potato wedges, creamy coleslaw, or even a simple cucumber salad to balance their richness. I’ve also enjoyed these alongside a cold beer and some crusty bread to soak up any extra sauce—and who doesn’t love a bonus bite of sugary kielbasa glaze?
Creative Ways to Present
For parties, I like to skewer a few candied kielbasa bites on cocktail sticks and arrange them on a festive platter with small bowls of mustard or a spicy dip. Another fun idea is serving them over creamy polenta rounds as an upscale appetizer—this always wows guests and is surprisingly easy to put together.
Make Ahead and Storage
Storing Leftovers
I usually transfer leftover Candied Kielbasa Bites to an airtight container and store them in the fridge for up to 3 days. The flavors actually deepen overnight, so if you have leftovers (which isn’t common!), they taste even better the next day.
Freezing
Freezing works great with this recipe. Just cool the bites completely, then pack them into a freezer-safe container or bag. They keep well for up to 2 months. Thaw overnight in the fridge before reheating for best results.
Reheating
I reheat leftovers by warming them gently in a skillet over medium-low heat or in the oven at 350°F on a baking sheet until heated through. This helps maintain the caramelized glaze without getting soggy or burnt. Microwaving works in a pinch, but watch out for rubbery sausage texture if overdone.
FAQs
-
Can I use other types of sausage for the Candied Kielbasa Bites Recipe?
Absolutely! While kielbasa is traditional and offers a smoky flavor, you can experiment with other smoked sausages or even bratwurst. Just make sure they are firm enough to hold the hasselback cuts and can caramelize nicely without falling apart.
-
What’s the purpose of using chopsticks when slicing the kielbasa?
Using chopsticks or wooden skewers prevents your knife from slicing all the way through the sausage, creating hasselback-style slices. This technique helps the sausage hold together while allowing the sauce to penetrate deep into the cuts for maximum flavor.
-
Can I prepare Candied Kielbasa Bites Recipe ahead of time?
You can prep the kielbasa and sauce in advance and assemble them in the baking dish, then cover and refrigerate for up to 24 hours before baking. This makes it easy to get a head start for parties or gatherings.
-
How do I know when the candy coating is done?
Look for a thickened, sticky sauce that has caramelized to a deep amber color and edges of the kielbasa that are nicely browned. The aroma will be sweet and slightly smoky, and it should have a glossy finish.
-
Is this recipe spicy?
The basic Candied Kielbasa Bites Recipe isn’t spicy, but the horseradish adds a mild, sharp zing. You can easily customize the heat level by adding cayenne or hot sauce if you prefer something spicier.
Final Thoughts
Honestly, this Candied Kielbasa Bites Recipe holds a special place in my heart because it’s so simple yet packed with bold flavors that everyone loves. It’s become my go-to for quick appetizers that feel fancy but don’t stress me out in the kitchen. I hope you give it a try—it’s one of those recipes that once you nail it, you’ll want to bring it to every party. Trust me, your guests will thank you.
Print
Candied Kielbasa Bites Recipe
- Prep Time: 10 minutes
- Cook Time: 1 hour
- Total Time: 1 hour 10 minutes
- Yield: 8 servings
- Category: Appetizer
- Method: Baking
- Cuisine: American
Description
Delicious candied kielbasa bites featuring a sweet and tangy glaze made from brown sugar, ketchup, and horseradish, baked to caramelized perfection and perfect for serving as an appetizer or party snack.
Ingredients
Kielbasa
- 2 lbs kielbasa sausage
Glaze
- 1 cup brown sugar
- 1/2 cup ketchup
- 1/4 cup prepared horseradish
Instructions
- Preheat Oven. Preheat your oven to 375°F to ensure it is ready for baking the kielbasa bites.
- Slice Kielbasa. Cut the kielbasa into 1-inch pieces to create manageable bites for serving.
- Create Hasselback Cuts. Place each kielbasa piece between two chopsticks or skewers and slice into 1/4-inch slices without cutting all the way through, creating three hasselback sections per piece.
- Combine Ingredients. Place the sliced kielbasa in a baking dish and add the brown sugar, ketchup, and prepared horseradish. Stir gently to evenly coat the sausage pieces with the glaze.
- Bake and Caramelize. Bake in the preheated oven, stirring every 20 minutes to ensure even cooking and caramelization. Continue baking for 60 minutes until the sauce is caramelized and the edges of the kielbasa are browned and crispy as desired.
- Serve and Enjoy. Remove from the oven and serve the candied kielbasa bites warm as a tasty appetizer or snack.
Notes
- Using chopsticks while slicing prevents cutting all the way through the kielbasa, creating perfect hasselback slices.
- Stirring every 20 minutes helps the glaze caramelize evenly and prevents burning.
- The total baking time can be adjusted depending on how crispy you prefer the kielbasa bites.
- For extra flavor, you can add a dash of smoked paprika or cayenne pepper to the glaze mixture.
- Serve with toothpicks for easy handling at parties.
Nutrition
- Serving Size: 1/8 recipe
- Calories: 250 kcal
- Sugar: 12 g
- Sodium: 800 mg
- Fat: 18 g
- Saturated Fat: 6 g
- Unsaturated Fat: 10 g
- Trans Fat: 0 g
- Carbohydrates: 15 g
- Fiber: 1 g
- Protein: 10 g
- Cholesterol: 40 mg

