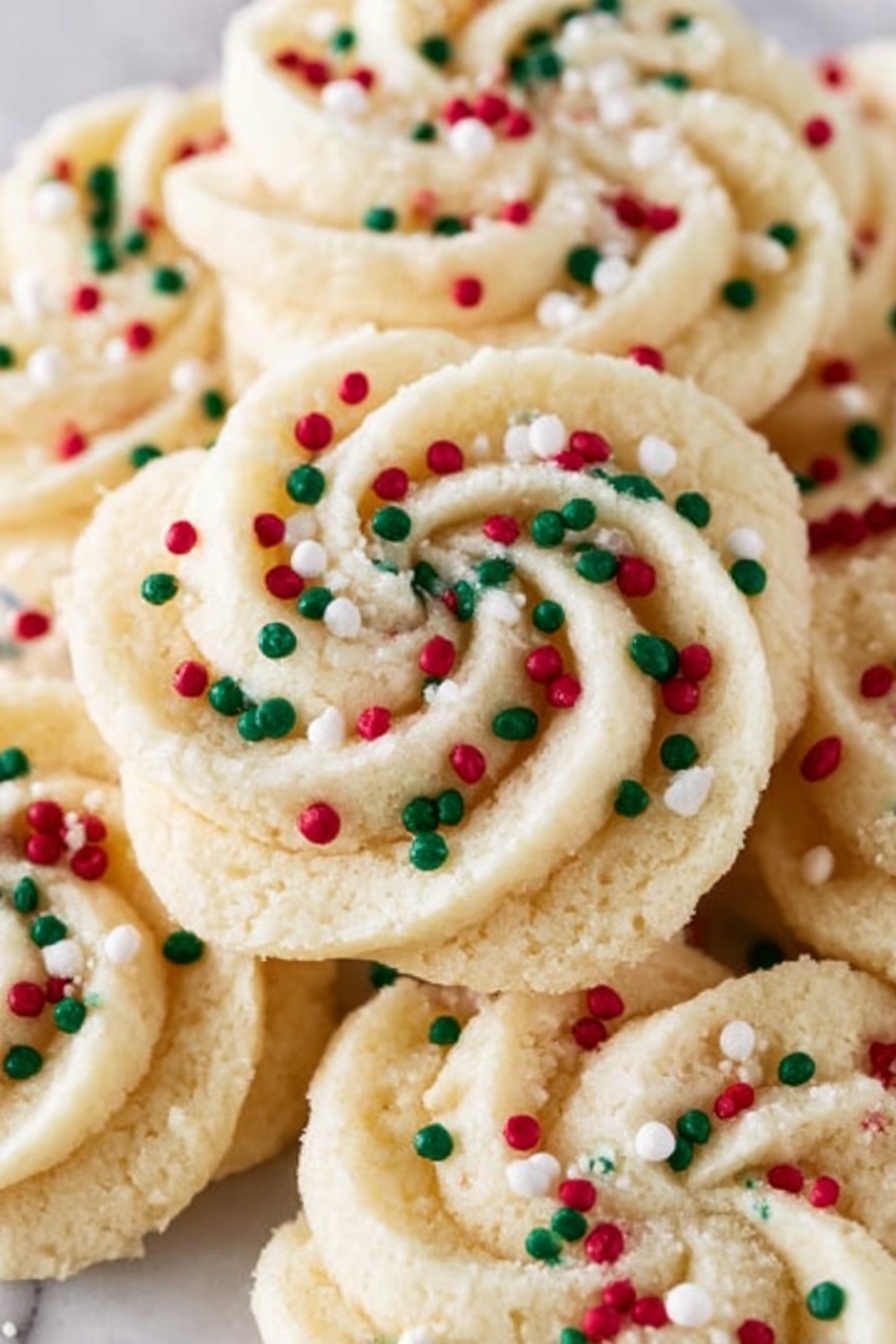
Butter Cookies Recipe
If you’re on the hunt for the ultimate buttery, melt-in-your-mouth treat, let me introduce you to my all-time favorite Butter Cookies Recipe. These cookies have been a constant in my kitchen for years—whether it’s a cozy afternoon with tea or a festive gathering, they never disappoint. Seriously, once you try this recipe, you’ll understand why it’s become a staple that everyone keeps coming back for.
Why This Recipe Works
- Simple Ingredients: Uses everyday pantry staples but results in bakery-quality cookies.
- Perfect Texture: Balances rich butter with just enough flour and milk for light, tender cookies.
- Chill Step Included: Essential chilling step prevents spreading, keeping those crisp edges intact.
- Adaptable & Friendly: Easy to tweak for flavoring, shape, or dietary needs without losing the buttery magic.

Ingredients & Why They Work
Every ingredient in this butter cookies recipe plays a special role to create that classic buttery snap with just a hint of chew. I always recommend using quality butter because, honestly, it makes all the difference in flavor and texture. Let’s break down why each item makes this recipe so great.

- Unsalted butter: Using softened, high-quality unsalted butter ensures creamy richness and control over salt levels—you’ll taste the difference.
- Granulated sugar: Adds just the right amount of sweetness and helps create that delicate crisp edge.
- Large egg: Binds everything together, adding moisture and a bit of structure to the cookies.
- Vanilla extract: Boosts flavor depth with a warm, inviting note that’s essential in any cookie.
- All-purpose flour: Provides the cookie’s body; just enough keeps them tender but not crumbly.
- Salt: Enhances all the flavors, balancing the sweetness and buttery notes perfectly.
- Milk: Added just enough to give the dough a smooth consistency for piping—don’t skip or overdo it!
Make It Your Way
I love sharing this butter cookies recipe because it’s so versatile. Over time, I’ve tried a few tweaks and loved the results—so don’t be shy! Feel free to personalize it with your favorite extracts or toppings to truly make it your own.
- Adding Citrus Zest: I sometimes fold in a teaspoon of lemon or orange zest right when adding vanilla—it brings a refreshing twist without overpowering the butter flavor.
- Sprinkles or Nuts: Piping cookies with colorful sprinkles on top makes them festive and fun for parties; you can also sprinkle chopped nuts for a little crunch.
- Gluten-Free Option: Swap the all-purpose flour for a 1:1 gluten-free flour blend—I’ve had good results, just keep the chilling step to avoid spreading.
- Salted Butter Swap: If you only have salted butter on hand, reduce added salt to keep balance.
Step-by-Step: How I Make Butter Cookies Recipe
Step 1: Cream the Butter and Sugar Until Fluffy
Start by softening your butter—it should be room temperature but not melted. Using a stand mixer or hand mixer, beat the butter and sugar at medium-low speed for about 3-4 minutes. You’ll notice the mixture lighten in color and become fluffy, which is key to that tender texture. Don’t rush this step; it’s worth the extra minutes!
Step 2: Incorporate Egg and Vanilla
Once your butter and sugar are perfectly creamed, crack in the egg and add vanilla extract. Continue mixing on medium-low until everything is smooth and well combined. This helps build a shiny dough that’s ideal for piping.
Step 3: Gently Fold in Flour and Salt
Add your all-purpose flour and salt gradually, mixing just until incorporated. The trick here is to avoid overmixing—it’ll make the cookies tough instead of tender. If you see any leftover flour patches, just fold them in gently with a spatula after the mixer’s done.
Step 4: Adjust with Milk for Piping Consistency
Here’s where a little patience pays off. Add milk one tablespoon at a time and mix. You want the dough just soft enough to pipe through your bag but not so wet it loses shape. Usually, 1 to 2 tablespoons do the trick, but keep an eye on your dough’s feel—it’s all about that perfect balance.
Step 5: Pipe and Chill Before Baking
Transfer your dough to a piping bag fitted with a round tip (or just snip the end). Pipe small circles onto your parchment-lined baking sheet—spacing them about 1 inch apart. This is a great step for involving kids or guests! For best results, pop the trays into the fridge for 20-30 minutes to chill. This little rest helps prevent the cookies from spreading too much when they bake.
Step 6: Bake to Golden Perfection
Slide your baking sheet into a preheated 350°F oven and bake for about 10 minutes, or until the edges start to turn a delicate golden brown. Keep an eye on them—oven temperatures vary, and you want that perfect snap without overbaking. Once done, remove them and let cool completely on the baking sheet before moving to a wire rack.
Tips from My Kitchen
- Choose Butter Wisely: I’ve learned that quality butter like Kerrygold or Tillamook helps avoid excess moisture that can make cookies spread too much.
- Don’t Skip Chilling: Piping then chilling the dough saved me from runny cookie disasters time and again.
- Test Your Oven: If you find cookies browning too fast, try lowering the temperature slightly and bake longer for even golden edges.
- Add More Flour If Needed: When my dough felt too sticky or my cookies spread, I added a tablespoon or two more flour—trust your dough’s feel over exact measurements.
How to Serve Butter Cookies Recipe
Garnishes
I love keeping these butter cookies simple but festive. Adding sprinkles before baking makes them perfect for celebrations, while a light dusting of powdered sugar after baking adds a delicate touch. Sometimes I press a small piece of chocolate or an almond in the center right before chilling—super simple and tasty.
Side Dishes
Butter cookies pair beautifully with a warm cup of tea or coffee—the classic combo, right? They also make a lovely after-dinner treat alongside fresh berries or a scoop of vanilla ice cream to keep that buttery flavor shining.
Creative Ways to Present
For special occasions, I like to arrange butter cookies in pretty gift boxes lined with parchment paper or stack them on a tiered tray with ribbons wrapped around. Another favorite is dipping half the cookie in dark chocolate—instantly festive and irresistible!
Make Ahead and Storage
Storing Leftovers
Once cooled, I store leftover butter cookies in an airtight container at room temperature, layering parchment paper between to keep them from sticking. They stay fresh and crisp for about 5-7 days, perfect for enjoying throughout the week.
Freezing
I often freeze these cookies because life gets busy, and it’s nice having them on hand. After baking and cooling, wrap them tightly in plastic wrap and place them in a freezer-safe container or bag. They’ll last 6-8 months without losing that delicious buttery texture.
Reheating
To reheat frozen or stored cookies, I pop them in a 300°F oven for about 5 minutes to refresh that crispness—just watch them so they don’t brown too much. A quick microwave zap works too, but I prefer the oven method for texture.
FAQs
-
Why are my butter cookies spreading too much?
This can happen if your butter is too warm or if the dough is too soft. Make sure to use quality, properly softened—not melted—butter, chill the dough after piping, and consider adding an extra tablespoon or two of flour if your cookies keep spreading. Also, check your oven temperature as a low temperature can cause spreading.
-
Can I make this butter cookies recipe without a piping bag?
Absolutely! While piping creates a lovely uniform shape, you can scoop spoonfuls of dough onto the sheet and gently flatten them with a fork or the bottom of a glass. The texture will be just as delicious.
-
How long does it take to make this butter cookies recipe from start to finish?
The active prep time is about 10 minutes, plus 20-30 minutes chilling, and 10 minutes baking—so plan around 45-50 minutes total.
-
Can I add other flavors to the butter cookies?
Yes! Vanilla is classic, but you can try almond extract, citrus zest, or even a little cinnamon for a cozy twist. Just add these when mixing in the egg and vanilla.
Final Thoughts
This butter cookies recipe feels like a warm hug from the kitchen—simple, dependable, and endlessly delicious. I’ve loved making these for friends, family, and myself on quiet afternoons and special celebrations alike, and I truly think you’ll enjoy these as much as I do. So grab that butter, heat up your oven, and get ready for some biscuit bliss—you might just find your new favorite cookie recipe right here.
Print
Butter Cookies Recipe
- Prep Time: 5 minutes
- Cook Time: 12 minutes
- Total Time: 47 minutes
- Yield: 24 cookies
- Category: Dessert
- Method: Baking
- Cuisine: American
Description
Classic buttery cookies with a delicate texture and a crisp edge, perfect for any occasion. Made with high-quality butter and simple ingredients, these butter cookies are easy to prepare, piped onto baking sheets, chilled, and baked to golden perfection.
Ingredients
Main Ingredients
- 1 cup Unsalted butter softened
- 1 cup Granulated sugar
- 1 Large egg
- 2 teaspoons Vanilla extract
- 2 cups All purpose flour
- ½ teaspoon Salt
- 1-2 tablespoons Milk
Instructions
- Preheat Oven: Preheat the oven to 350 degrees Fahrenheit and line a baking sheet with parchment paper. Set it aside for later use.
- Cream Butter and Sugar: In a large bowl or stand mixer, beat the softened butter and granulated sugar on medium-low speed until the mixture is light and fluffy, about 2-3 minutes.
- Add Egg and Vanilla: Add the egg and vanilla extract to the bowl and continue beating on medium-low speed until smooth and fully incorporated.
- Incorporate Dry Ingredients: Slowly add the all-purpose flour and salt to the wet mixture, mixing just until fully combined. Avoid overmixing to maintain a tender texture.
- Add Milk: Add milk one tablespoon at a time, mixing gently to reach a piping consistency that holds shape but is soft enough to pipe. Use the minimum milk needed, typically 1-2 tablespoons.
- Pipe the Dough: Transfer the batter to a piping bag and pipe small circles evenly spaced onto the prepared baking sheet. Optionally, decorate with sprinkles.
- Chill: Chill the baking sheets with the piped dough in the refrigerator for 20-30 minutes to firm up before baking. This step helps prevent spreading.
- Bake Cookies: Bake the cookies in the preheated oven for 10 minutes or until the edges start to turn golden brown.
- Cool and Serve: Remove the cookies from the oven and allow them to cool completely on the baking sheet before serving or storing.
Notes
- Store baked cookies at room temperature for 5-7 days or freeze them for up to 6-8 months in an airtight container.
- Chilling the dough after piping and before baking is crucial to prevent excessive spreading.
- Weather conditions and altitude can affect baking results; if cookies spread too much, add a few tablespoons more flour to the dough.
- Due to recent changes in butter moisture content by some brands, using high-quality, brand-name butter like Challenge, Kerrygold, or Tillamook is highly recommended to ensure cookie texture.
- If spreading continues, compensate by adding more flour gradually to achieve a firmer dough.
Nutrition
- Serving Size: 1 cookie
- Calories: 100 kcal
- Sugar: 7 g
- Sodium: 50 mg
- Fat: 6 g
- Saturated Fat: 3.5 g
- Unsaturated Fat: 2 g
- Trans Fat: 0 g
- Carbohydrates: 11 g
- Fiber: 0.2 g
- Protein: 1 g
- Cholesterol: 20 mg


