Brown Sugar Pop Tart Cookies Recipe
If you’re looking for a fun, nostalgic twist on a classic favorite, you’re going to love this Brown Sugar Pop Tart Cookies Recipe. These cookies capture all the buttery flakiness and sweet filling of your childhood pop tarts, but with a homemade cookie vibe that’s simply irresistible. I’ve made these a bunch of times, and trust me, once you try them, you’ll want to bake them again and again—whether for an afternoon treat or a special brunch! Let me walk you through everything you need to know to make these cookies turn out just right.
Why This Recipe Works
- Perfect Texture: The blend of brown sugar and butter creates a soft, tender cookie dough that crisps just right around the edges.
- Rich Filling: The cinnamon-brown sugar filling is gooey and flavorful, giving that classic pop tart feel without the fuss of pastry dough.
- Customization Friendly: From sprinkles to icing variations, you can make these look exactly how you want for any occasion.
- Easy to Make: No special equipment needed and straightforward steps let even baking beginners come out with amazing results.

Ingredients & Why They Work
The magic of this Brown Sugar Pop Tart Cookies Recipe lies in balancing classic baking ingredients with a little twist in the filling. Each one plays an important role to create the perfect cookie and filling that melts in your mouth. When shopping, I always recommend using good quality butter and fresh spices to really bring out the flavors.

- All-purpose flour: The base of the dough, providing just enough structure without making it tough.
- Baking powder & baking soda: These help the cookies rise slightly and stay light.
- Salt: Balances the sweetness and enhances the overall flavor.
- Unsalted butter: Softened to room temperature for easy creaming; adds richness and tenderness.
- Brown sugar: Its molasses content boosts moisture and adds that caramel-y depth especially important in the filling.
- Granulated sugar: Works with brown sugar to keep the cookie balanced, not overly sticky.
- Eggs: Bind everything together and add moisture.
- Vanilla extract: Elevates the flavor for a warm, sweet aroma.
- Cornstarch: Keeps the filling thick and prevents it from oozing out too much.
- Cinnamon: Brings a warm spice that complements the brown sugar beautifully.
- Milk: Used both for brushing before baking to brown the tops and in the icing to adjust consistency.
- Powdered sugar: For the sweet glaze that adds that quintessential pop tart look.
- Sprinkles (optional): Adds a fun and festive finishing touch.
Make It Your Way
One of the things I love most about this Brown Sugar Pop Tart Cookies Recipe is how easy it is to make your own. Whether you like a little extra cinnamon or want to punch up the filling with some mix-ins, it’s a really versatile dessert. Don’t be shy about putting your personal spin on it—you can even swap out sprinkles or leave the icing off to keep it simpler.
- Variation: I’ve tried adding mini chocolate chips to the brown sugar filling for a little chocolate surprise, and wow—it’s a game changer!
- Dairy-Free Option: Use vegan butter and a flax egg to keep these pop tart cookies allergy-friendly without losing texture.
- Spice it Up: Adding a pinch of nutmeg or ginger to the filling gives it a cozy holiday vibe.
Step-by-Step: How I Make Brown Sugar Pop Tart Cookies Recipe
Step 1: Mix the Dry Ingredients
Start by whisking together the flour, baking powder, baking soda, and salt in a medium bowl. This simple step ensures your leaveners are evenly distributed so the cookies bake uniformly. Pro tip: sift the flour and baking powder for an even lighter dough.
Step 2: Cream Butter and Sugars
In a larger bowl, beat softened butter with the brown and granulated sugars on medium speed until the mixture turns light and fluffy—about 2 to 3 minutes. This aeration is key for a tender cookie. I like using a hand mixer here to really get that creamy texture.
Step 3: Add Eggs and Vanilla
Beat in the eggs one at a time, making sure each is fully incorporated before adding the next. Stir in the vanilla extract last. This step adds moisture and a rich aroma that makes the flavor pop.
Step 4: Combine Wet and Dry Mixtures
Gradually add your dry mixture to the wet ingredients on low speed, mixing just until you see the dough come together. Avoid overmixing here to prevent toughness. The dough will be slightly soft but firm enough to handle after chilling.
Step 5: Chill the Dough
Split the dough into two disks, wrap tightly with plastic wrap, and refrigerate for at least one hour. Trust me on this: chilling makes rolling and cutting so much easier and helps cookies maintain their shape.
Step 6: Prepare the Brown Sugar Filling
While the dough chills, mix together brown sugar, cornstarch, and cinnamon in a small bowl until combined. This filling is your sweet and gooey surprise—make sure it’s smooth so it spreads evenly inside the cookies.
Step 7: Roll and Cut the Dough
Preheat your oven to 350°F (175°C) and line baking sheets with parchment. Roll out one dough disk on a lightly floured surface to about ¼ inch thick, then cut into 3×4 inch rectangles using a pizza cutter or sharp knife. I usually get around 12 rectangles per disk, which makes about 24 cookies total.
Step 8: Assemble the Cookies
Place a tablespoon of filling in the center of each rectangle, then top with a second rectangle. Press the edges together firmly, and crimp with a fork to seal and add a cute design. These little details make it feel just like a real pop tart!
Step 9: Bake and Cool
Brush the tops of cookies with a little milk, then bake for 12-15 minutes until edges turn golden and tops are set. Let them rest on the pan for 5 minutes before transferring to a wire rack to cool completely—this helps the filling set nicely without oozing out.
Step 10: Icing and Decoration
Whisk powdered sugar with milk to make a smooth glaze and drizzle it over the cooled cookies. Add sprinkles if you want that extra fun pop tart festivity. The icing hardens just enough to add a sweet finish without overpowering the filling.
Tips from My Kitchen
- Chill Twice: Chill the dough before rolling, and keep the cut dough in the fridge while assembling to prevent spreading.
- Don’t Overfill: Too much filling makes sealing tricky and can cause the filling to leak while baking.
- Use Parchment Paper: Makes cleanup easier and prevents sticking without flattening your cookies.
- Brush Lightly With Milk: Just a thin layer helps achieve that shiny golden finish without sogginess.
How to Serve Brown Sugar Pop Tart Cookies Recipe

Garnishes
I like to keep it simple—just a light drizzle of icing and some colorful sprinkles add enough pizzazz without overwhelming the flavors. Sometimes, a tiny pinch of flaky sea salt over the icing adds a sophisticated sweet-salty kick that really wakes up the palate.
Side Dishes
These cookies go beautifully with a cup of chai tea or a frothy cappuccino for breakfast or afternoon snack. If you want to serve them at brunch, pairing them with fresh fruit or a simple yogurt parfait balances their sweetness perfectly.
Creative Ways to Present
For parties, I’ve arranged these on a tiered dessert stand with fresh berries and mint leaves for a charming display. Wrapping them individually in clear cellophane tied with a ribbon makes great homemade gifts, too. Kids especially love decorating their own with colored icing and sprinkles before baking!
Make Ahead and Storage
Storing Leftovers
I usually keep leftover Brown Sugar Pop Tart Cookies in an airtight container at room temperature. They stay fresh and chewy for up to a week, though honestly, they rarely last that long in my house!
Freezing
If I want to freeze some, I assemble the cookies but don’t bake them. I place them in a single layer on a baking sheet and freeze until solid, then transfer them to a freezer-safe bag. When ready, just pop them in the oven, add the icing after baking, and you’re good to go.
Reheating
To warm up day-old cookies, I pop them in a 300°F oven for 5-7 minutes. This refreshes the texture and brings back some of that gooey filling warmth, making them taste freshly baked again.
FAQs
-
Can I use store-bought pie crust instead of making dough from scratch?
Using store-bought pie crust can save time, but it won’t give you quite the same flavor and texture as this cookie dough. If you try it, watch your baking time carefully since pie crust bakes faster and is more delicate. I prefer the homemade dough for that classic buttery chewiness.
-
Can I make these cookies gluten-free?
Yes! Swap the all-purpose flour for a gluten-free baking blend that measures 1:1. Make sure your baking powder is gluten-free as well. Keep in mind that gluten-free dough can be more delicate, so handle gently and chill well before cutting.
-
How do I prevent the filling from leaking while baking?
Make sure not to overfill each cookie—about 1 tablespoon is enough. Seal the edges tightly, and crimp them with a fork to reinforce the seal. Chilling the dough before baking helps the cookies keep their shape, too.
-
Can I skip the icing on top?
Definitely! The cookies are delicious on their own thanks to the flavorful brown sugar filling, but the icing adds a nice sweet finish and classic pop tart appearance. Sprinkles on top are totally optional.
Final Thoughts
Honestly, this Brown Sugar Pop Tart Cookies Recipe holds a special place in my baking heart. It’s such a clever way to enjoy all the comfort and fun of pop tarts, but in cookie form that you control from start to finish. I hope you’ll try baking them with me—you might just find a new favorite to share with your family and friends. Nothing beats that warm cookie scent filling your kitchen and that first bite of sweet, gooey nostalgia. Happy baking!
Print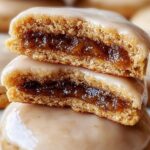
Brown Sugar Pop Tart Cookies Recipe
- Prep Time: 20 minutes
- Cook Time: 15 minutes
- Total Time: 1 hour 35 minutes
- Yield: 24 cookies
- Category: Dessert
- Method: Baking
- Cuisine: American
Description
Brown Sugar Pop Tart Cookies combine the nostalgic flavors of classic pop tarts with the delightful texture of cookies. These treats feature a soft and tender cookie dough filled with a cinnamon-spiced brown sugar filling, finished with a sweet glaze and optional sprinkles. Perfect for dessert or a special snack.
Ingredients
Dry Ingredients
- 2 ½ cups all-purpose flour
- 1 teaspoon baking powder
- ½ teaspoon baking soda
- ½ teaspoon salt
Wet Ingredients
- 1 cup unsalted butter, softened
- 1 cup brown sugar, packed
- ½ cup granulated sugar
- 2 large eggs
- 1 teaspoon vanilla extract
Filling
- 1 cup brown sugar
- 1 tablespoon cornstarch
- 1 teaspoon cinnamon
Finishing
- 1 tablespoon milk (for brushing)
- 1 cup powdered sugar (for icing)
- 2 tablespoons milk (for icing)
- Sprinkles (optional, for decoration)
Instructions
- Mix dry ingredients: In a medium bowl, whisk together the all-purpose flour, baking powder, baking soda, and salt to create the dry mix.
- Cream butter and sugars: In a large bowl, use an electric mixer on medium speed to beat the softened butter, brown sugar, and granulated sugar until the mixture is light and fluffy, about 2 to 3 minutes.
- Add eggs and vanilla: Beat in the eggs one at a time, ensuring each is fully incorporated before adding the next. Stir in the vanilla extract until combined.
- Combine wet and dry: Gradually add the dry mixture to the wet ingredients, mixing on low speed until just combined to avoid overworking the dough and ensure tenderness.
- Chill the dough: Divide the dough into two equal portions. Shape each into a disk, wrap with plastic wrap, and refrigerate for at least 1 hour to firm up.
- Prepare filling: In a small bowl, mix together the brown sugar, cornstarch, and cinnamon thoroughly. Set aside.
- Preheat oven: Heat the oven to 350°F (175°C) and line two baking sheets with parchment paper.
- Roll and cut dough: On a lightly floured surface, roll out one dough disk to about ¼ inch thickness. Cut into 3×4 inch rectangles, approximately 12 from each disk.
- Assemble cookies: Place 1 tablespoon of the prepared filling onto the center of half the rectangles. Top each with a second rectangle and press edges together, crimping with a fork for a decorative seal.
- Brush and bake: Arrange the filled cookies on prepared baking sheets, brush the tops with 1 tablespoon milk, then bake for 15 minutes until edges are lightly golden and tops are set.
- Cool: Let the cookies cool on the baking sheets for 5 minutes before transferring to a wire rack to cool completely.
- Prepare icing and decorate: Whisk powdered sugar with 2 tablespoons of milk until smooth. Drizzle over cooled cookies and add sprinkles if desired.
Notes
- Ensure the butter is at room temperature and softened for easy creaming and a smoother dough.
- Customize the filling by adding chopped nuts or chocolate chips for extra texture and flavor.
- Store cookies in an airtight container at room temperature for up to one week to maintain freshness.
- Use parchment paper on baking sheets to prevent sticking and for easier cleanup.
- If icing is too thick, add milk gradually to reach your desired consistency.
Nutrition
- Serving Size: 1 cookie
- Calories: 180 kcal
- Sugar: 15 g
- Sodium: 100 mg
- Fat: 8 g
- Saturated Fat: 5 g
- Unsaturated Fat: 3 g
- Trans Fat: 0 g
- Carbohydrates: 25 g
- Fiber: 1 g
- Protein: 2 g
- Cholesterol: 40 mg

