Halloween Jack Skellington Ricotta Olive Tarts Recipe
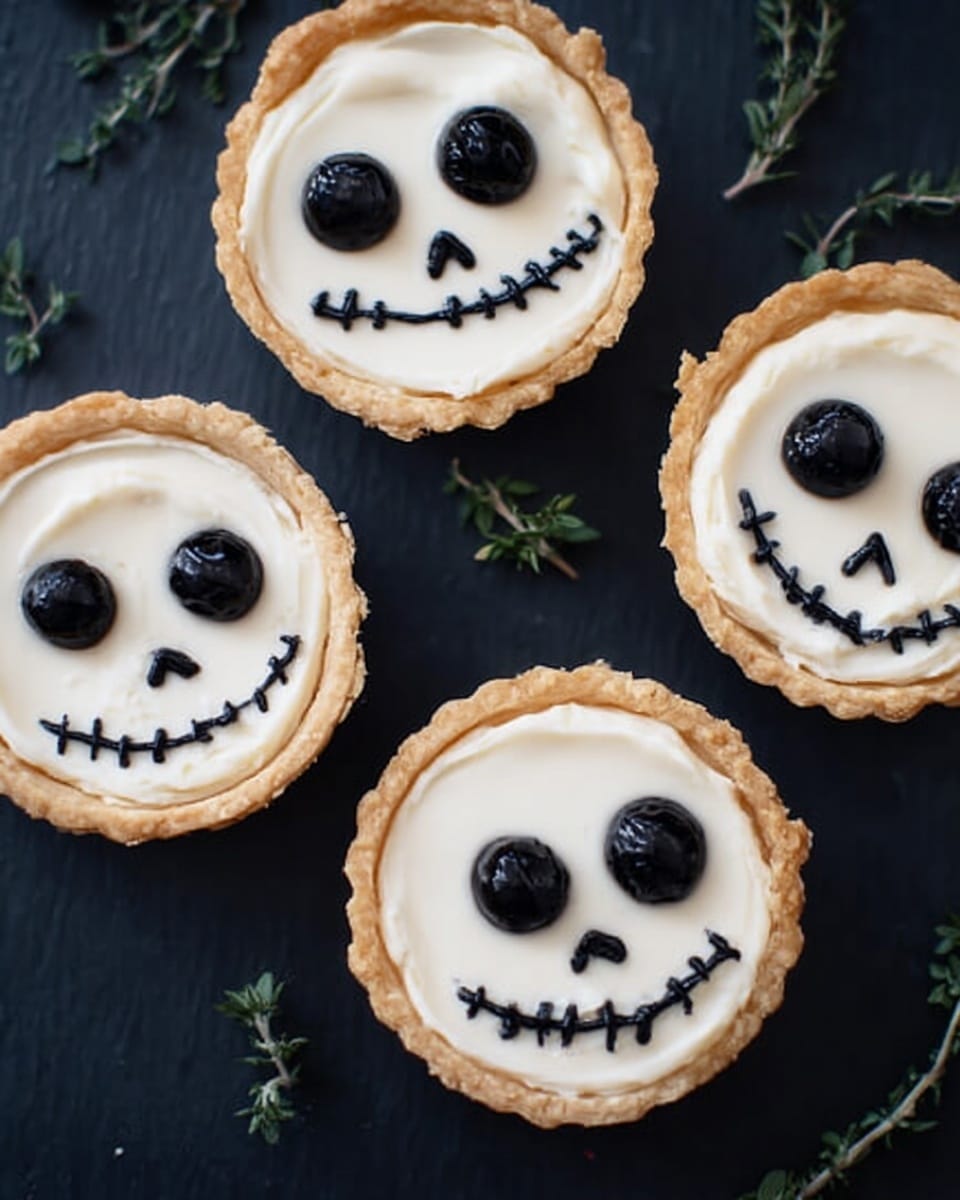
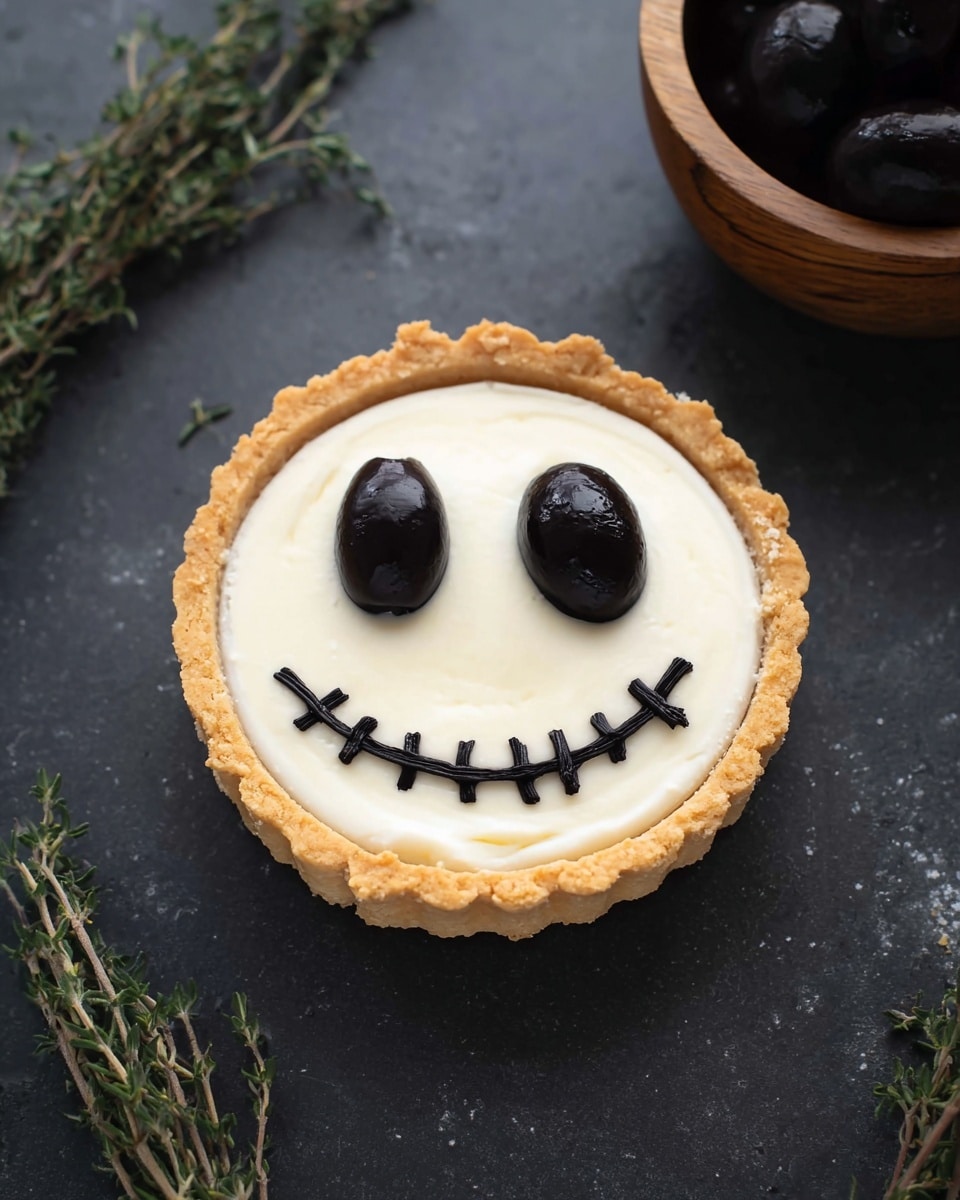
If you’re looking for a Halloween treat that’s both spooky and delicious, you’re going to love this Halloween Jack Skellington Ricotta Olive Tarts Recipe. Trust me, these tarts are fan-freaking-tastic — perfectly flaky gluten-free crust with a creamy, savory ricotta filling, all dressed up to look like Jack Skellington’s iconic face. I promise, whether it’s for a party, family dinner, or just because you want to impress your friends, this recipe will have everyone talking.
Why This Recipe Works
- Unique Halloween Flair: The Jack Skellington design is delightfully spooky and surprisingly easy to create, making these tarts a festive crowd-pleaser.
- Gluten-Free Crust: The blend of sweet rice, millet, and oat flours creates a tender yet sturdy base that supports the creamy filling without cracking or sogging.
- Ricotta and Olive Filling: The ricotta and greek yogurt mix offers a smooth, tangy, and light texture balanced perfectly by salty olives and sun-dried tomatoes.
- Perfect Portion Control: Making individual mini tarts is impressive and keeps things neat for serving during Halloween gatherings.
Ingredients & Why They Work
This Halloween Jack Skellington Ricotta Olive Tarts Recipe calls for a well-thought combination of ingredients that come together for both flavor and texture. The gluten-free flours make the crust friendly for anyone avoiding gluten, while the filling’s fresh herbs and cheeses balance savory with a hint of sweetness. Here’s a quick overview of some key players in this recipe.
- Sweet Rice Flour: Adds tenderness without graininess to the crust and helps with a delicate crumb.
- Millet Flour: Provides a subtle nutty flavor and a bit of structure for the crust.
- Oat Flour: Lightens the texture; I love grinding my own for freshness.
- Tapioca Flour: Works as a binder and gives a slight chew for elasticity in the crust.
- Unsalted Butter: The cold butter creates flaky layers once baked—don’t skip chilling!
- Black Olives: The star of the face design and add a briny, umami punch inside the tart.
- Sun-Dried Tomatoes: Bring a touch of sweetness and vibrant color that contrasts beautifully.
- Fresh Thyme: Adds herbal brightness that lifts the flavors without overpowering.
- Parmesan Cheese: Gives a savory depth and slight nuttiness.
- Ricotta Cheese: The creamy base that keeps the filling light yet rich.
- Greek Yogurt: Adds tang and creamy moisture with fewer calories than cream.
- Egg Whites: Set the filling with a delicate, custardy texture.
- Garlic: A subtle fragrant boost that ties everything together.
- Kosher Salt: Enhances all the flavors — don’t underestimate how important this is.
Make It Your Way
The beauty of this Halloween Jack Skellington Ricotta Olive Tarts Recipe is how easy it is to tweak. I often switch up the herbs or olives depending on what I have on hand, and I encourage you to do the same. After all, the goal is to create a Halloween snack that feels fun and suits your taste perfectly.
- Variation: Sometimes I swap fresh thyme for rosemary or oregano to give the tarts a different herbal note — both work wonderfully.
- Dietary tweak: For a dairy-free version, try swapping ricotta and yogurt with cashew cream, though the texture will be a bit different but still delicious.
- Extra spice: For a bit of heat, sprinkle a pinch of smoked paprika or red pepper flakes into the filling — it’s an unexpected twist that I love.
- Size swap: If you don’t have mini tart pans, this dough and filling also work great in a standard 9-inch tart pan for a family-style dish.
Step-by-Step: How I Make Halloween Jack Skellington Ricotta Olive Tarts Recipe
Step 1: Whisk and Cut the Gluten-Free Dough
I start by whisking together all the dry gluten-free flours and salt in a large mixing bowl. Then I add the cold, cubed butter and get my hands in there—mixing until the biggest bits of butter are pea-sized. I love the tactile feel of this step; it helps me connect with the dough. Adding the ice water bit by bit is key here—too much and the dough gets sticky, too little, and it won’t hold together. My trick is to add water one tablespoon at a time and test by pinching the dough. Once it holds, I’ll stop.
Step 2: Chill and Roll the Dough
After dividing the dough into several pieces, I roll each into a disc, cover them in plastic, and pop them in the fridge for at least 30 minutes. Chilling helps relax the flours and firm up the butter. When ready, I roll each piece out between two parchment sheets sprinkled lightly with millet flour—this keeps things smooth and prevents sticking. I like to roll circles about an inch larger than the tart pan rim so there’s enough dough to press into the edges nicely.
Step 3: Prep the Filling and Shape Jack Skellington’s Face
While the crusts bake briefly to set, I get to work on the filling. I slice black olives thinly for Jack’s signature mouth and carve small oval shapes for the nose, setting them aside carefully. I chop some olives for mixing into the tart filling and layer julienned sun-dried tomatoes and fresh thyme on top. Parmesan adds that sharp, nutty note I can’t get enough of here.
Step 4: Bake and Fill
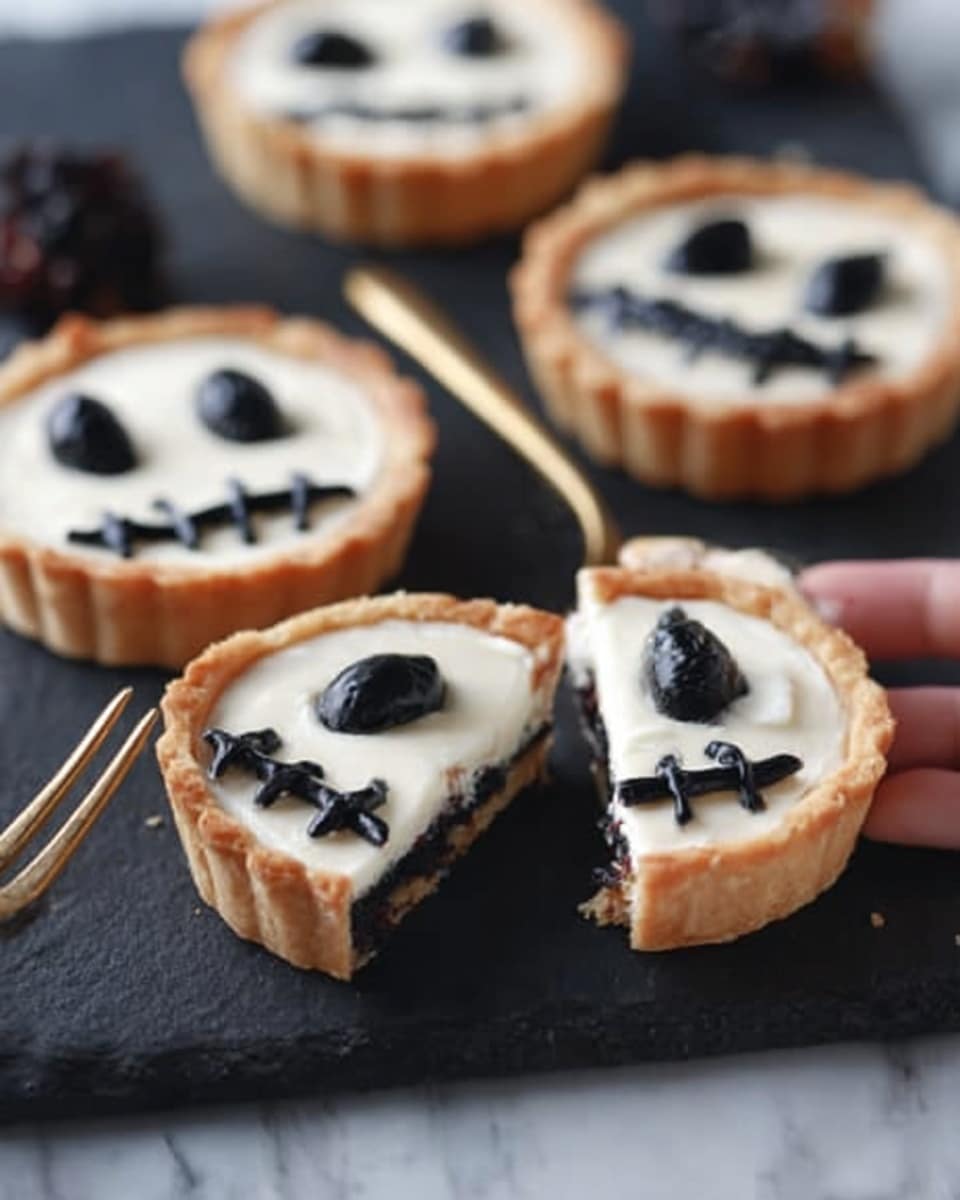
After the initial 12 minutes baking of the crusts, I whisk together ricotta, Greek yogurt, egg whites, garlic, and salt until just combined. This filling is luscious but light, and the egg whites help it set without turning rubbery. Then I scoop the filling evenly into each tart shell, topping with the olive “eyes,” nose pieces, and the carefully arranged olive strips that become Jack’s mouth. I use chopsticks to gently place those delicate slices—it’s easier than you think!
Step 5: Final Bake and Serve Warm
Into the oven for 20-25 minutes they go, or until the filling is just set—watching carefully starting at 15 minutes if your tart pans are smaller. When I take them out, they’re golden around the edges and ready to dazzle your guests. Serve them warm right out of the oven for the best texture and flavor.
Tips from My Kitchen
- Cold Butter is a Must: I learned this the hard way—warm butter makes the crust greasy and dense, so keep it chilled until the last minute.
- Chop Olives Carefully: Thin, even slices for the mouth really bring the Jack Skellington effect to life, so take your time here.
- Don’t Overfill: Filling to the top looks great but avoid overfilling to prevent spillage during baking.
- Watch Baking Times: Since pan sizes vary, check for filling set starting 5 minutes before the recipe’s minimum to avoid overcooking.
How to Serve Halloween Jack Skellington Ricotta Olive Tarts Recipe
Garnishes
I love finishing these tarts with a few fresh thyme leaves for that herbaceous pop and a light drizzle of good-quality olive oil to deepen the richness. If I’m feeling festive, a sprinkle of finely grated black pepper adds a touch of spice and contrasts the creamy filling beautifully.
Side Dishes
These tarts pair wonderfully with a crisp green salad tossed in a tangy vinaigrette or a bowl of roasted butternut squash soup to keep with the autumnal theme. For parties, I like serving them alongside a cheese platter with crackers, nuts, and fresh fruit for a well-rounded spread.
Creative Ways to Present
One year, I arranged the tarts on a black slate platter with little pumpkin candles and faux spider webs to amplify the Halloween vibe. I also tried placing them on orange and black napkins to bring out the holiday colors. If you’re serving kids, you can add a small Jack Skellington figurine as a fun centerpiece right on the serving board.
Make Ahead and Storage
Storing Leftovers
I usually store leftover tarts in an airtight container in the refrigerator, where they keep well for up to 3 days. I find it’s best to wait until they’re completely cooled before storing to prevent sogginess. When you’re ready, don’t forget that crisp crust is part of the charm, so proper reheating is key.
Freezing
If I want to prep ahead, I freeze the unbaked tart shells separately, wrapped tightly, for up to a month. I freeze the assembled tarts with filling only if they’re well chilled, but fresh-baking gives the best results. When ready to bake, I thaw overnight in the fridge then bake as directed.
Reheating
To reheat, I pop the tarts into a preheated 400°F oven for about 7 minutes. This warms the filling and revives the crust’s crispiness beautifully—way better than the microwave, which tends to make gluten-free crusts soggy.
FAQs
-
Can I make the crust ahead of time for the Halloween Jack Skellington Ricotta Olive Tarts Recipe?
Absolutely! The gluten-free tart crust can be made a day ahead and stored wrapped tightly in the fridge. Chilling the dough helps it firm up and makes rolling easier. Just remember to bring it to room temperature for a few minutes before rolling out if it’s too cold.
-
What can I substitute if I don’t have millet or sweet rice flour?
If you don’t have millet or sweet rice flour, you can try using more oat flour or a gluten-free all-purpose flour blend. Just be mindful the texture might vary slightly—sweet rice flour contributes to tenderness, so try to keep that softness in mind when substituting.
-
Can I prepare this recipe without gluten-free flours?
Yes! This recipe works well with regular all-purpose flour if gluten isn’t an issue. The crust will be a bit more traditional in texture but delicious nonetheless. Just swap in the same quantity of AP flour and proceed as usual.
-
How do I get the Jack Skellington face to look neat and professional?
Patience is key! Using a paring knife and chopsticks to slice and place the olives helps greatly. Thin, even slices for the mouth and small ovals for the nose are essential. I find working on a clean, flat surface and keeping the olives chilled makes them easier to handle.
-
Can I make these tarts vegan?
To make a vegan version, you’ll need to substitute ricotta with a plant-based cheese or cashew cream, and replace egg whites with a binder like aquafaba or flaxseed mix. The crust might also need a vegan butter substitute. The flavor will differ but can still be tasty with some experimentation.
Final Thoughts
I have to say, this Halloween Jack Skellington Ricotta Olive Tarts Recipe is one of my favorite ways to bring both festivity and flavor to the table. It feels special but is surprisingly straightforward once you get the hang of rolling and assembling. Plus, seeing that Jack face come to life never fails to bring a smile. If you want to wow your guests or treat yourself to a deliciously spooky snack, you really can’t go wrong with these tarts. Give them a try — I think you’ll have as much fun making and eating them as I do!
Print
Halloween Jack Skellington Ricotta Olive Tarts Recipe
- Prep Time: 45 minutes
- Cook Time: 37 minutes
- Total Time: 1 hour 22 minutes
- Yield: 8 tarts
- Category: Appetizer
- Method: Baking
- Cuisine: American
- Diet: Gluten Free
Description
This Halloween Jack Skellington Ricotta Olive Tart recipe features a gluten-free tart crust filled with a creamy ricotta and Greek yogurt mixture, topped with black olives and sun-dried tomatoes arranged to create a spooky Jack Skellington face. Perfect as a festive appetizer or snack for Halloween gatherings, these mini tarts combine savory flavors with a creative, seasonal presentation.
Ingredients
Gluten-Free Tart Crust
- ½ cup sweet rice flour
- ¼ cup millet flour
- ⅓ cup gluten-free oat flour
- 3 tablespoons tapioca flour or corn starch
- ¼ teaspoon kosher salt
- 8 tablespoons cold unsalted butter, cut into tablespoon-sized pieces
- 7 tablespoons ice water
Filling
- 1 can black olives
- 4 tablespoons julienned sun-dried tomatoes, from a jar packed in oil
- 3 teaspoons fresh thyme leaves
- 3 tablespoons freshly grated parmesan cheese
- 1½ cups ricotta cheese
- ¼ cup + 2 tablespoons Greek yogurt
- 3 egg whites
- 3 cloves garlic, minced
- ½ teaspoon kosher salt
Instructions
- Prepare the crust: Whisk together the sweet rice flour, millet flour, oat flour, tapioca flour, and kosher salt in a large bowl. Add the cold butter pieces and mix with your hands until the largest pieces are about the size of a pea.
- Add ice water: Gradually drizzle in the ice water one tablespoon at a time, mixing after each addition until the dough holds together when pinched. You may need up to 7 tablespoons.
- Divide and chill dough: Divide the dough into 6 to 8 pieces depending on tart size, roll each into a ball, flatten into a disc, wrap in plastic, and refrigerate for 30 minutes.
- Preheat oven: Set your oven to 400ºF (200ºC).
- Roll out dough: Roll each chilled dough disc between two pieces of parchment or wax paper lightly dusted with millet flour into circles about 1 inch larger than your tart pans.
- Place dough in tart pans: Remove one piece of parchment, flip the dough into the pan with parchment side up, then peel off the second sheet and press the dough gently into the tart pan. Repeat for all tart pans.
- Prepare topping slices: Thinly slice 6 black olives lengthwise into paper-thin strips for the mouths and cut 12 to 14 small ovals for the noses. Set aside.
- Assemble base filling: Chop 3 to 4 tablespoons of black olives roughly and distribute evenly among the tart shells. Add 3 to 5 strips of sun-dried tomatoes on top of each tart, sprinkle about ¼ teaspoon fresh thyme leaves, and evenly divide the parmesan cheese over all tarts.
- Pre-bake tart shells: Bake the tarts for 12 minutes until the crust is lightly cooked.
- Mix ricotta filling: While tarts bake, whisk together ricotta, Greek yogurt, egg whites, minced garlic, and kosher salt until smooth.
- Fill tarts with ricotta: Remove pre-baked tart shells from the oven and divide the ricotta mixture among them, filling each to the top.
- Decorate faces: Place two whole black olives for the eyes and two small olive ovals for the nose on each tart. Using the thin olive strips, carefully create a criss-cross mouth pattern. Use chopsticks for precision if needed.
- Bake final tarts: Bake the filled and decorated tarts for 25 minutes or until the ricotta filling is set. Begin checking for doneness around 15 minutes for smaller tart pans.
- Serve and reheat: Serve warm. To reheat leftovers, bake at 400ºF for 7 minutes.
Notes
- Make sure the butter is well chilled for flakier crusts.
- Use gluten-free oat flour made by grinding whole oats for best texture.
- The ricotta filling can be adjusted for creaminess with more or less Greek yogurt.
- Using chopsticks or tweezers helps with delicate olive decorations.
- Check tart baking time early if your tart pans are smaller than 3-4 inches to prevent overbaking.
- The crust dough can be made ahead and frozen before baking.
Nutrition
- Serving Size: 1 tart
- Calories: 210 kcal
- Sugar: 2 g
- Sodium: 350 mg
- Fat: 14 g
- Saturated Fat: 7 g
- Unsaturated Fat: 6 g
- Trans Fat: 0 g
- Carbohydrates: 15 g
- Fiber: 2 g
- Protein: 7 g
- Cholesterol: 40 mg

