Halloween Witch Apples Recipe
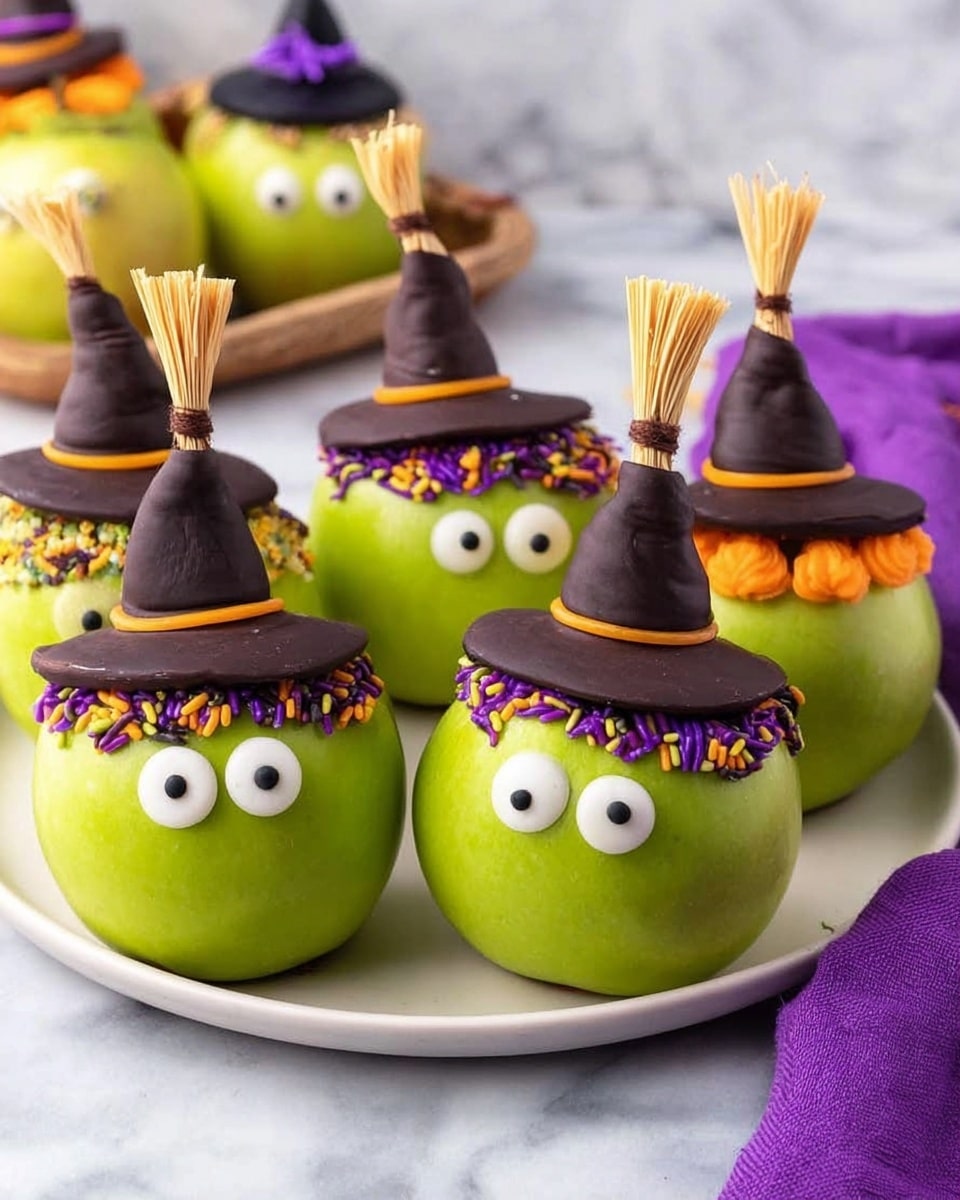
Alright friend, if you’re looking to wow your Halloween guests with a fun, festive, and downright adorable treat, you absolutely MUST try this Halloween Witch Apples Recipe. It’s playful, easy-to-make, and comes with that perfect combo of fruity, chocolatey, and colorful goodness. I remember the first time I whipped these up with my kids – their eyes lit up brighter than jack-o’-lanterns! So stick around, because this recipe is fan-freaking-tastic and I promise you’ll enjoy every step of it.
Why This Recipe Works
- Kid-friendly fun: This recipe turns simple ingredients into magical little witch apples your kids will adore helping with and eating.
- Simple assembly: No fancy tools or skills needed—just a few easy steps that anyone can follow.
- Customizable colors and decorations: You can switch up icings and sprinkles to match your Halloween vibe perfectly.
- Balanced flavors: Tangy apples plus sweet strawberries and chocolate hats make each bite delightfully balanced.
Ingredients & Why They Work
Each ingredient plays a part in creating this whimsical Halloween treat – from the crisp apples that provide freshness to the chocolate-coated strawberry hats that add a bit of decadence and visual charm. Plus, the candy eyes and colorful icings bring everything to life.
- Strawberries: They’re the perfect shape for witch hats, and the natural sweetness pairs beautifully with chocolate.
- Sugar cookies: Crisp and sturdy enough to support the hats without getting soggy.
- Dark melting chocolate: Creates a smooth coating that hardens nicely to make the hats glossy and stable.
- Large candy eyes: These give personality and make the “witch apples” really pop.
- Green apples: Crisp and tart to balance all the sweetness, plus their color fits the witch theme.
- Mini yellow M&Ms: Great for little hat details—they’re bright and add a fun pop of color.
- Halloween colored sprinkles: These tie everything into the spooky season visually and add a touch of crunch.
- String cheese: Perfect for making broomsticks – peelable texture means easy to fluff.
- Chocolate Twizzlers: Makes the broom handle knot strings, adding a delicious chewy element.
- Chocolate Pocky sticks: Serve as broom heads—crispy and chocolate-dipped, they’re a nice crunch contrast.
- Colored icings (white, orange, purple, green): These hold everything together and decorate perfectly, plus you can tweak colors to your liking.
Make It Your Way
The lovely thing about this Halloween Witch Apples Recipe is that it’s a blank canvas for your creativity. Whether you want to mix up icing colors, swap candies, or even try different apple varieties, go ahead! I often customize mine based on what I have on hand or the tastes of my family.
- Variation: I once used red apples for a “fiery witch” theme with red and black icing—it was a hit during a Halloween party and added a bold twist.
- Dietary swaps: If you’re avoiding dairy, go for vegan chocolate and dairy-free string cheese alternatives, and these still work wonderfully.
- Difficulty adjustment: If you don’t want to bother with melted chocolate hats, try simply pressing the strawberries and cookie hats with colored icing—still adorable!
Step-by-Step: How I Make Halloween Witch Apples Recipe
Step 1: Prepare Those Witch Hats
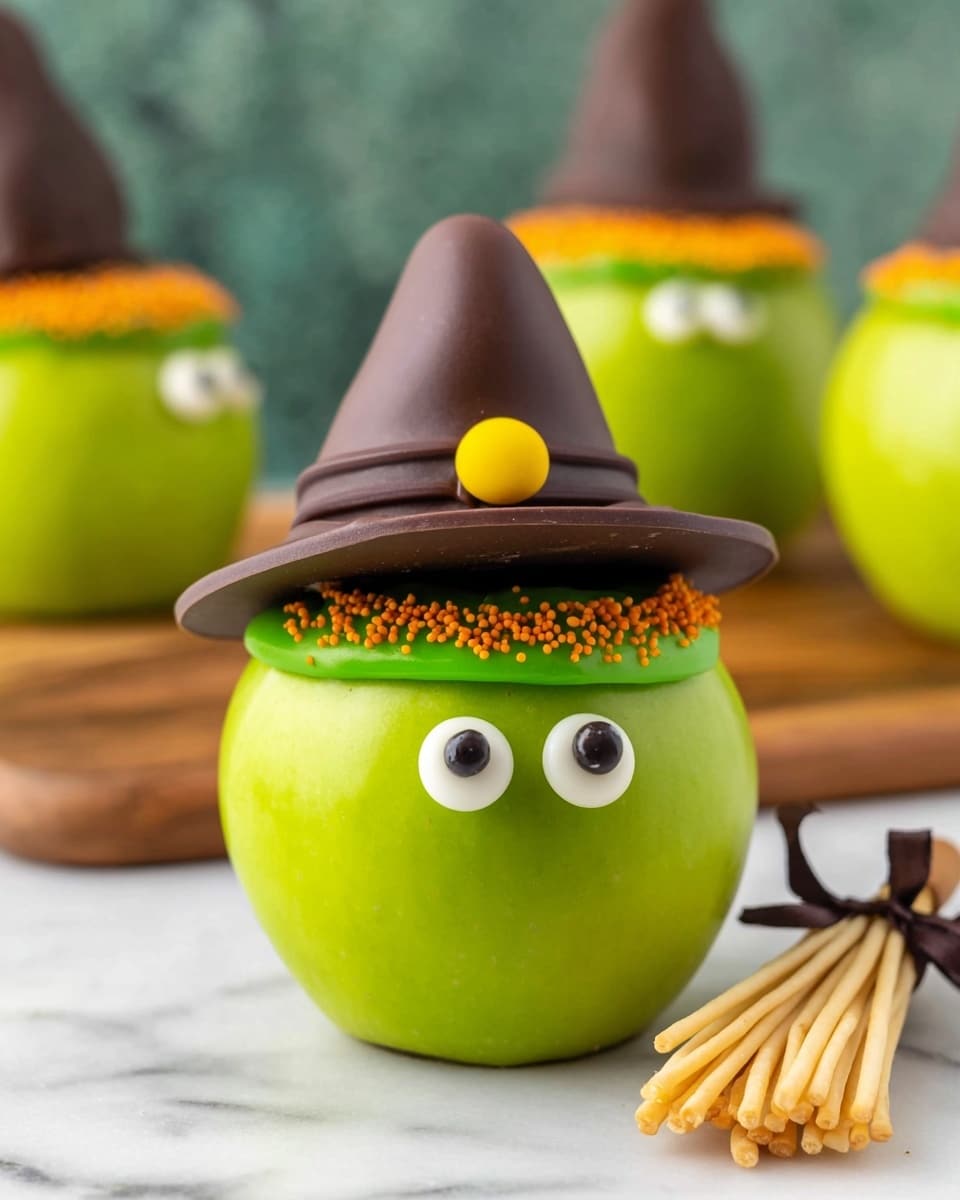
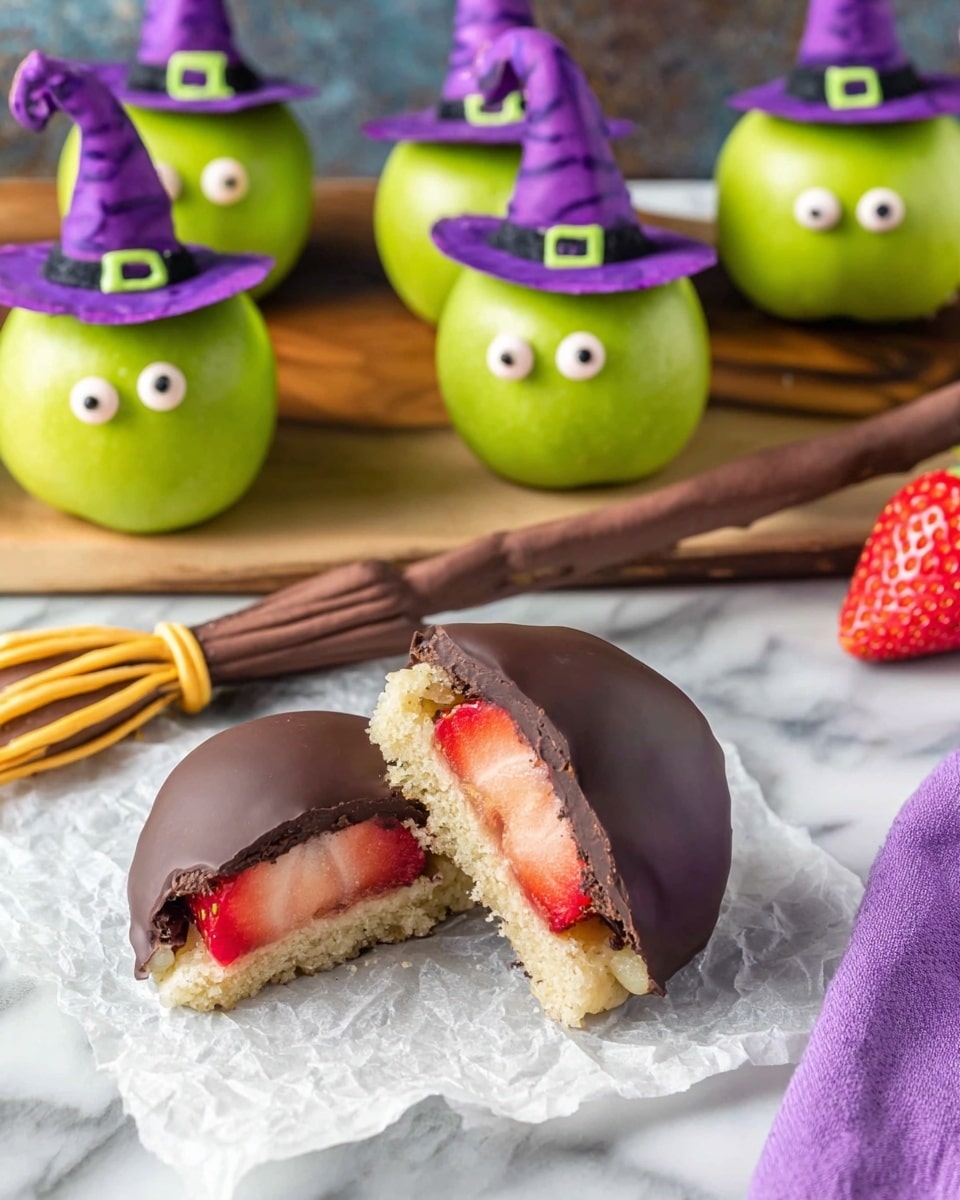
Start by trimming the tops of your strawberries so they have flat surfaces—this is super important because these will be the hats’ tops. Then, put a dot of white icing on each sugar cookie and firmly press the strawberry on top, cut side down. This little trick keeps the hats secure. Next, melt your dark chocolate and carefully spoon it over the strawberries, creating a smooth chocolate coat. Set them on a non-stick surface or parchment paper and pop them into the fridge for a few minutes so the chocolate hardens quickly without losing that shine.
Step 2: Get the Apples Ready to Stand Tall
No one likes a wobbling witch! Trim a small slice off the bottom of each green apple so they have a nice flat base to rest on. This prevents rolling and keeps your whole creation looking neat. Then use white icing dots where you want the candy eyes to stick on. Place the candy eyes carefully on the wet icing and press gently so they adhere.
Step 3: Top the Apples with Hats and Decorate
Spread a very thin layer of white icing on top of each apple, just enough to glue on the chocolate-covered strawberry hats. Don’t use too much or the hat might slide off. Now the fun decorating begins: pipe a colorful icing ring where the strawberry meets the cookie on the hat, pop a mini M&M in the front, and sprinkle with your Halloween-themed sprinkles. Chill for at least 30 minutes so everything sets firm.
Step 4: Craft Your String Cheese Brooms
Slice each string cheese stick in half. Then, peel or cut small slices about ¾ up to create the bristles of the broom—this is my favorite part because it looks so cute and “fluffy.” Press a chocolate Pocky stick about half an inch into the uncut end as the broom handle. Slice Twizzlers in half lengthwise and gently tie each piece around the top as the broom knot. Trim any excess to keep it tidy.
Tips from My Kitchen
- Work quickly with melted chocolate: It sets fast and can get lumpy if you keep reheating, so melt in short bursts and stir often.
- Use a small offset spatula or spoon for smoother chocolate coats: I find this helps get an even finish on the strawberry hats.
- Thin icing layers are key: Less is more when attaching hats so they don’t slide off—trust me, I learned this the hard way!
- Dry hands for candy placement: When you place the candy eyes and M&Ms, make sure your hands are dry so icing doesn’t get smudged.
How to Serve Halloween Witch Apples Recipe
Garnishes
I love finishing these witch apples with a sprinkle of extra Halloween confetti sprinkles around the serving platter—it adds a festive vibe that delights both kids and adults. Sometimes I’ll toss a few edible glitter bits over the hats for a little magical shimmer, which always gets compliments!
Side Dishes
Since this recipe is pretty filling and sweet, I usually pair it with light, savory sides like popcorn seasoned with pumpkin spice or roasted pumpkin seeds. For parties, a big bowl of spiced cider is a perfect pairing, complementing the fruity flavors without overwhelming the palate.
Creative Ways to Present
One of my favorite presentation ideas is placing the witch apples on a bed of crinkly green tissue paper or faux moss to mimic a witch’s garden. You can also stick a few mini cauldrons or plastic spiders around the platter to set the spooky mood, making them the centerpiece of your Halloween table!
Make Ahead and Storage
Storing Leftovers
If you have leftovers (and you very well might!), store these in an airtight container in the fridge. I recommend eating them within three days for the best texture and flavor—after that, the apples can start to soften and the chocolate loses its crispness.
Freezing
I haven’t tried freezing witch apples because the apples’ texture changes after thawing, turning mushy, which isn’t as fun. So if you want to save time, I suggest prepping the hats and brooms ahead and assembling fresh on the day you plan to serve.
Reheating
Since these are best served chilled or at room temperature, reheating isn’t necessary. If you want the chocolate hats to be softer, you can let them sit at room temp for about 15-20 minutes before serving—just keep an eye so they don’t melt!
FAQs
-
Can I use different apples for the Halloween Witch Apples Recipe?
Absolutely! While green apples work best because of their tartness and color, you can definitely try red or even Gala apples. Just keep in mind that sweeter apples will change the flavor profile, making the overall treat sweeter.
-
What can I substitute for candy eyes if I can’t find them?
If candy eyes aren’t available, mini chocolate chips, white chocolate buttons with a dab of black icing, or even small round candies can work as creative alternatives.
-
Can I make the witch hats without chocolate?
Yes! You can skip the chocolate coating and just secure the strawberry hats with icing. It won’t have the glossy finish but still looks adorable and saves time.
-
How far in advance can I prepare the Halloween Witch Apples Recipe?
You can prep the hats and brooms a day ahead and assemble the apples on the day of serving to ensure freshness and best appearance.
Final Thoughts
This Halloween Witch Apples Recipe is such a joy to make and share – it’s playful and festive yet simple enough to whip up even during a busy week. I love how it brings together the kids and adults alike, sparking smiles and a little kitchen magic. So next time Halloween rolls around, grab these ingredients, invite your favorite helpers, and have a blast crafting your own little witchy snacks. I promise, you’ll be glad you did!
Print
Halloween Witch Apples Recipe
- Prep Time: 15 minutes
- Cook Time: 0 minutes
- Total Time: 45 minutes
- Yield: 6 servings
- Category: Snack
- Method: No-Cook
- Cuisine: American
- Diet: Vegetarian
Description
Create spooky and delicious Halloween Witch Apples featuring green apples topped with chocolate-covered strawberry witch hats, candy eyes, colorful icing decorations, and string cheese broomsticks for a fun, festive treat perfect for Halloween parties or family snacks.
Ingredients
Witch Hats
- 6 strawberries washed
- 6 sugar cookies
- 1 cup dark melting chocolate
- 12 large candy eyes
Witch Apples
- 6 green apples, stems removed, washed
- 6 mini yellow M&Ms
- Halloween colored sprinkles
- ¼ cup white icing
- ¼ cup orange icing
- ¼ cup purple icing
- ¼ cup green icing
String Cheese Brooms
- 3 sticks of string cheese
- 6 chocolate Twizzlers
- 6 chocolate Pocky sticks
Instructions
- Prepare Strawberry Witch Hats: Using a small knife, cut the tops off each strawberry to create a flat even surface. Place a dot of white icing on each sugar cookie, then firmly place the strawberry cut side down onto the icing, forming the witch hat base.
- Melt and Coat Strawberries: In a small bowl, melt the dark chocolate according to package instructions. Spoon melted chocolate over the strawberry hats completely, then set them on a non-stick surface. Chill in the refrigerator to speed hardening for a few minutes.
- Prepare Apples: Cut a small slice off the bottom of each green apple to create a flat base and prevent rolling. Using white icing, place small dots on the apples where you want to attach the candy eyes, then press 2 candy eyes onto each apple.
- Assemble Witch Hats on Apples: Spread a very thin layer of white icing around the top of each apple. Place a chocolate-covered strawberry witch hat on top; ensure the icing layer is thin enough to keep the hat secure and prevent sliding.
- Decorate Hats: Pipe a ring of colored icing (white, orange, purple, or green) around the base of each hat. Place a mini yellow M&M on the front of each hat in the icing, then sprinkle Halloween colored sprinkles over the icing bands. Chill assembled apples in the refrigerator for at least 30 minutes to set the icing.
- Create String Cheese Brooms: Cut each string cheese stick in half. Thinly slice or peel about ¾ of each half vertically to create a broom bristle effect. Insert one chocolate Pocky stick about ½ inch into the uncut end for the broom handle.
- Add Twizzler Ties: Cut each chocolate Twizzler in half lengthwise. Tie a half around the top of each string cheese broom stick, being careful not to pull too tight to avoid breaking. Trim any excess Twizzler ends.
- Serve: Serve the witch apples and string cheese brooms chilled or at room temperature for a festive Halloween snack everyone will enjoy.
Notes
- Store the witch apples in an airtight container in the refrigerator for up to 3 days to keep fresh.
- You can customize icing colors to match your Halloween theme with green, orange, purple, black, brown, yellow, or red.
- Substitute chocolate Twizzlers with licorice Twizzlers if preferred.
- Chocolate-covered pretzel sticks can replace chocolate Pocky sticks as broom handles.
- Ensure the strawberry tops are cut evenly to create stable hats that sit well on sugar cookies.
Nutrition
- Serving Size: 1 serving
- Calories: 220 kcal
- Sugar: 25 g
- Sodium: 100 mg
- Fat: 10 g
- Saturated Fat: 6 g
- Unsaturated Fat: 3 g
- Trans Fat: 0 g
- Carbohydrates: 30 g
- Fiber: 3 g
- Protein: 3 g
- Cholesterol: 10 mg

