
Spooky Halloween Chocolate Covered Oreos Recipe
If you’re looking for a fun and festive treat that’s sure to impress all your Halloween guests, you’re going to love this Spooky Halloween Chocolate Covered Oreos Recipe. Believe me, these spooky little delights are not only adorable but ridiculously easy to whip up—even if you haven’t been near the kitchen since last Halloween! Stick with me, and I’ll share all my tips and tricks so your Oreos turn out perfectly coated, irresistibly decorated, and totally spooky-fun.
Why This Recipe Works
- Simple Ingredients: Only a handful of ingredients that you probably already have or can find easily for quick prep.
- Layered Decor: Using multiple candy melts lets you create detailed spooky designs that impress every time.
- Customizable Fun: You can easily switch colors, sprinkles, or themes to fit your Halloween vibe perfectly.
- Kid-Friendly & Crowd-Pleaser: These are a hit for all ages—perfect for parties or a cozy night in with friends.

Ingredients & Why They Work
The key to jaw-dropping Spooky Halloween Chocolate Covered Oreos Recipe is the balance between simple ingredients and creative presentation. Plus, each candy melt color brings its own magic—turning plain Oreos into spooky treats straight out of a haunted kitchen. I always pick quality candy melts because they melt smoothly and harden with a nice gloss, which is important for dipping.
- Oreos: The base of our treat—classic, crunchy, creamy, and perfectly sized for dunking.
- White Candy Melts: These make the perfect “mummy” wrapping base and provide a clean canvas for decoration.
- Orange Candy Melts: Essential for Halloween vibes; think pumpkins and festive colors.
- Chocolate Chips or Black Candy Melts: For that spooky dark finish—adds contrast and depth to your designs.
- Green Candy Melts: Great for goblin or witchy touches that stand out against the dark and orange.
- Assorted Halloween Sprinkles like Candy Eyes: Nothing says spooky like eyes staring back at you—these add personality and fun.
Make It Your Way
I like to mix things up when I make this Spooky Halloween Chocolate Covered Oreos Recipe. Maybe I’ll go heavy on the eyeball sprinkles one year or add some edible glitter for a little witchy sparkle. Don’t be shy—these treats were made for creativity, so customize the colors and decorations to suit your party theme or personal style.
- Variation: One Halloween, I swapped orange candy melts for purple to match a haunted castle theme—my friends loved the unique twist!
- Dietary Mod: Use dairy-free candy melts and Oreos to make these treats allergen-friendly without losing flavor.
- Difficulty Level: If you want to keep it simple, dip them all in one color and add sprinkles; for a challenge, try intricate designs like mummy wraps or spider webs using melted candy melts drizzled on top.
Step-by-Step: How I Make Spooky Halloween Chocolate Covered Oreos Recipe
Step 1: Prepping Your Space and Melting Candy
First, line a baking sheet with parchment paper—trust me, this saves you lots of cleanup later. Next, melt your candy melts one color at a time in a microwave-safe bowl, heating in 30-second bursts and stirring gently in between. This slow melting helps avoid graininess and keeps your coating silky smooth. I usually start with white candy melts since they take center stage for mummy designs.
Step 2: Dipping the Oreos Like a Pro
Using a chocolate dipping fork or a regular fork, dip each Oreo into the melted candy, making sure you coat both sides thoroughly. Lift it up and gently tap or scrape the fork against the bowl’s edge to get rid of excess chocolate—that little step prevents pooling and keeps your treats looking neat. Place them on the parchment-lined baking sheet to set.
Step 3: Decorating and Chilling for That Spooky Finish
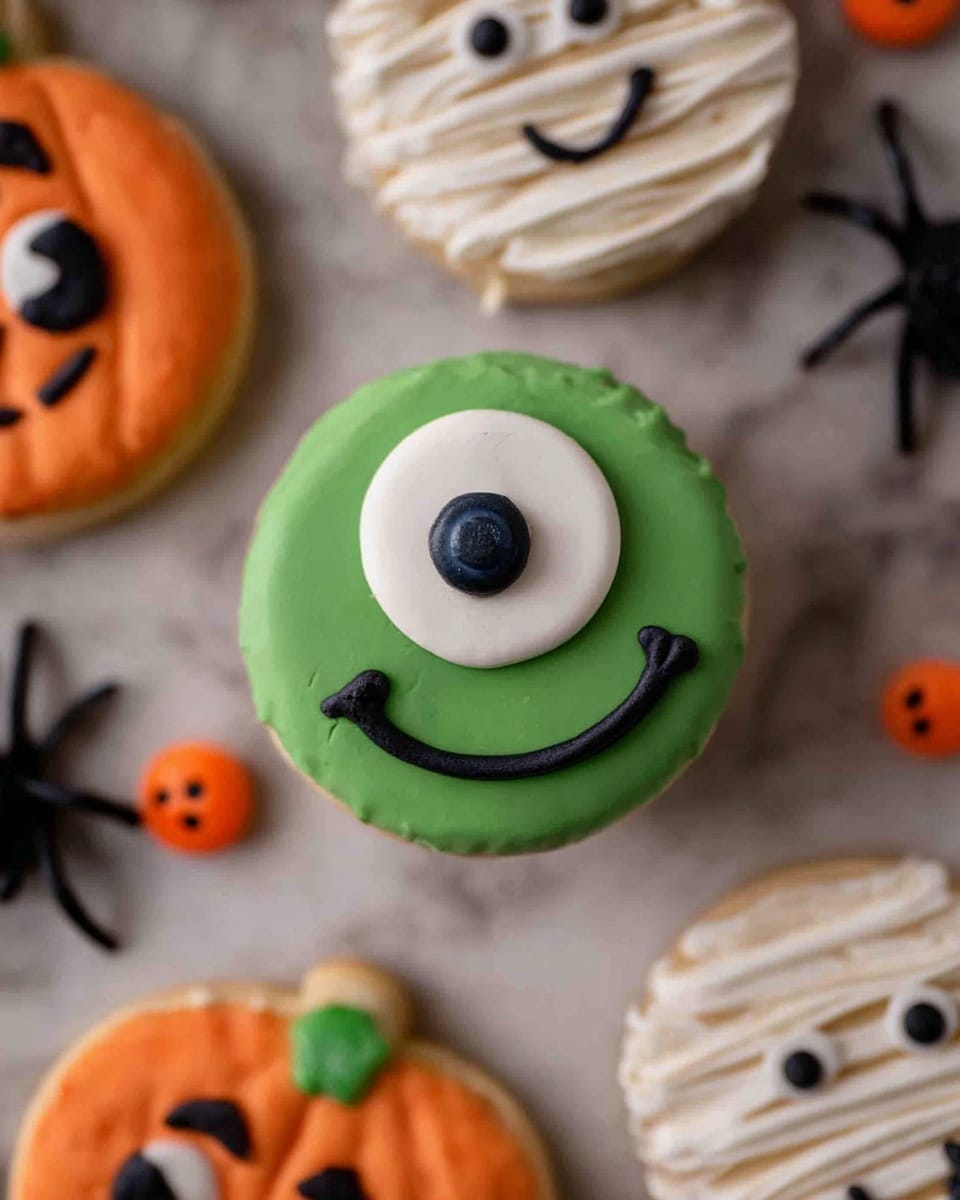
Once dipped, the fun part begins! For mummy Oreos, I press candy eyes onto the wet white coating, then chill them until firm. After chilling, I drizzle more white candy melt over to create that “wrapped mummy” effect and pop them back in the fridge. For other designs, sprinkle on your Halloween sprinkles right after dipping before chilling to secure the decorations.
Step 4: Repeat with Each Color
Repeat the dipping and decorating steps with your other colors—orange for pumpkins, black for spooky shadows, and green for witches or monsters. Clearing your dipping fork between colors helps keep the candy melts pure and vibrant. And lastly, chill everything fully (about 15-20 minutes) before serving to get that perfect snap.
Tips from My Kitchen
- Patience Pays Off: Take your time melting candy melts and dipping to avoid messy clumps and broken Oreos.
- Keep It Cool: Work in a cool room and chill dipped Oreos promptly to prevent melting or smudging of decorations.
- Use Candy Eyes Strategically: Press them gently onto wet coating so they stick without sinking or sliding off.
- Avoid Double-Dipping Traps: Clean your dipping tool between colors to keep each coating true and prevent weird color mixing.
How to Serve Spooky Halloween Chocolate Covered Oreos Recipe
Garnishes
I love stacking these Oreos on a pretty platter scattered with extra candy eyes and themed sprinkles—adds whimsical charm. Sometimes I throw in striped paper straws and little Halloween picks to encourage guests to grab easily without smudging their fingers. Fresh mint leaves or edible glitter can also add a special sparkle for a grown-up Halloween party.
Side Dishes
Pair these chocolate-covered Oreos with a warm autumn drink like spiced apple cider or a rich hot chocolate for a cozy contrast. A bowl of popcorn tossed with candy corn or pumpkin seeds makes a fun textural sidekick. You could even include some mini pumpkin cupcakes if you’re really going all out on the themed spread!
Creative Ways to Present
One Halloween, I arranged mine in a spiderweb shape using black licorice strings and drizzled thin white chocolate spiders on top—guests were fascinated! Another time, I presented the Oreos individually in mini clear bags tied with Halloween ribbons—perfect party favors. Get creative with serving trays that double as decorative pieces, like skull-shaped plates or orange-and-black tiered stands.
Make Ahead and Storage
Storing Leftovers
I store leftover Halloween chocolate covered Oreos in an airtight container at room temperature if it’s cool, or in the fridge if you want them crispier. Just make sure they’re completely set before stacking to avoid sticking or breaking. My favorite way is layering parchment paper between each layer to keep the decorations intact.
Freezing
Freezing works surprisingly well here. I pop mine in a freezer-safe container with parchment layers and they keep for up to a month. When you’re ready for a treat, just let them thaw in the fridge for a couple of hours before serving so they don’t get soggy or crack.
Reheating
Since these are no-bake, reheating isn’t really needed. If your candies look a bit dull after storage, a quick blast of warm air (like holding them near a warm but not hot oven) can refresh the shine—but be careful not to melt your decorations!
FAQs
-
Can I use regular chocolate instead of candy melts for this Spooky Halloween Chocolate Covered Oreos Recipe?
Absolutely! You can use regular white, milk, or dark chocolate, but candy melts are specially formulated to melt smoothly without seizing and harden nicely with a glossy finish—making decorating a little easier. If using regular chocolate, tempering or adding a bit of shortening can help achieve the right texture.
-
How long do these chocolate covered Oreos last?
Stored properly in an airtight container at room temperature, they’ll stay fresh for up to 1 week. Refrigeration can extend this by a few days but might make the coating less crisp. Just be sure to keep them separated with parchment paper.
-
What’s the best way to avoid cracking the chocolate coating?
Let the melted candy cool slightly before dipping, and don’t tap off the excess too aggressively. Chill the Oreos on a flat surface and avoid temperature swings (like moving straight from warm to cold environments) to keep the coating smooth and crack-free.
-
Can kids help with making these?
Definitely! Kids love decorating with sprinkles and candy eyes. Just handle the melting and dipping yourself for safety, but let them have fun with the creative part—it’s a perfect Halloween activity.
Final Thoughts
This Spooky Halloween Chocolate Covered Oreos Recipe has become a favorite in my home because it combines the nostalgia of Oreos with the whimsy and fun of Halloween. It’s the kind of treat that sparks smiles, lasts long enough to share stories, and invites creativity in the kitchen. I genuinely hope you try making these—you’ll have a blast, and everyone’s going to be asking for seconds (and the recipe!). Happy haunting and happy baking!
Print
Spooky Halloween Chocolate Covered Oreos Recipe
- Prep Time: 20 minutes
- Cook Time: 0 minutes
- Total Time: 20 minutes
- Yield: 36 servings
- Category: Dessert
- Method: No-Cook
- Cuisine: American
Description
Create festive Spooky Halloween chocolate covered Oreos using colorful candy melts and fun Halloween-themed decorations. These treats are perfect for Halloween parties and easy to prepare with simple dipping and decorating techniques.
Ingredients
Oreos
- 1 package (36 count) Oreos
Candy Melts
- 6 oz white candy melts or white chocolate
- 6 oz orange candy melts
- 6 oz chocolate chips or black candy melts
- 6 oz green candy melts
Decorations
- Assorted Halloween sprinkles such as candy eyes, sprinkles
Instructions
- Prepare the workspace. Line a baking sheet with parchment paper and set aside to place dipped Oreos as you decorate.
- Melt the candy melts. In a microwave-safe bowl, melt the first color of candy melts or chocolate you plan to use. Microwave in 30-second increments, stirring in between, until smooth and fully melted. It is best to melt and use one color at a time.
- Dip the Oreos. Using a chocolate dipping fork or similar utensil, dip each Oreo into the melted candy melts to coat completely. Flip the Oreo to coat both sides, then lift it out and tap the fork on the bowl’s edge to remove excess coating.
- Place and decorate. Place the coated Oreos onto the prepared baking sheet. Decorate immediately with Halloween sprinkles, candy eyes, or other decorations depending on your desired design.
- Create mummy Oreos. For mummy designs, dip Oreos in white candy melts, press candy eyes onto the surface, then chill to set. After chilling, drizzle additional melted white candy melts over the Oreos to create a layered mummy effect, then chill again until firm.
- Repeat. Continue dipping and decorating all Oreos using the desired colors and decoration themes for a festive assortment.
Notes
- Use candy melting forks or toothpicks for easier dipping and decoration application.
- If candy melts become too thick, add a small amount of vegetable oil to thin the consistency.
- Work quickly when decorating so the candy melts don’t harden before adding sprinkles.
- Chill decorated Oreos in the refrigerator to speed up setting time.
- Store finished Oreos in an airtight container at room temperature for up to 3 days for best freshness.
Nutrition
- Serving Size: 1 Oreo
- Calories: 150 kcal
- Sugar: 15 g
- Sodium: 90 mg
- Fat: 8 g
- Saturated Fat: 4 g
- Unsaturated Fat: 3 g
- Trans Fat: 0 g
- Carbohydrates: 20 g
- Fiber: 1 g
- Protein: 1 g
- Cholesterol: 0 mg
