Pan Fried Chicken Strips Recipe
I’m so excited to share this Pan Fried Chicken Strips Recipe with you—it’s one of those go-to meals that feels both fancy and totally doable on any weeknight. The seasoning blend creates such a delicious, crispy crust on the outside while keeping the chicken juicy inside. Honestly, it’s comfort food at its finest with a crispy twist that makes it perfect for family dinners or casual lunch gatherings.
Whenever I make these chicken strips, I love how quickly they come together without sacrificing flavor or texture. Whether you’re feeding picky eaters or just craving a golden, crispy protein, this Pan Fried Chicken Strips Recipe delivers every time. Plus, it’s super customizable and easy to master, so you’ll feel confident making it your own in no time.
Why This Recipe Works
- Perfect Crispy Coating: The double dredging with seasoned flour and egg creates that irresistible crunchy crust.
- Juicy & Tender Inside: Cooking at the right temperature locks in moisture so the chicken stays succulent.
- Quick & Easy Prep: You can get this on the table in under 30 minutes, ideal for busy days.
- Flexible & Customizable: The seasoning mix is balanced to please most palates but easy to tweak to suit your taste.
Ingredients & Why They Work
This Pan Fried Chicken Strips Recipe uses simple pantry staples that come together to deliver a crispy, perfectly seasoned crust with juicy chicken inside. Each ingredient plays a role, so I love explaining why they’re here and what to look for when shopping.
- Flour: This is your base for the breading; I prefer all-purpose for that classic crispiness that holds the seasoning.
- Kosher Salt: Crucial for flavor depth—don’t skip it! It enhances every other seasoning.
- Garlic Powder: Gives a subtle savory note without overpowering the chicken.
- Onion Powder: Adds a slightly sweet and aromatic flavor that complements garlic well.
- Freshly Ground Pepper: For mild heat and earthiness; fresh grind makes a noticeable difference.
- Paprika: Not just for color—paprika adds a warm, smoky touch that’s irresistible once fried.
- Egg: Acts as a glue to stick the flour coating to the chicken ensuring an even crust.
- Chicken Breasts: The heart of the recipe; cutting them into strips makes for perfect bite-sized pieces that cook evenly.
- Cooking Oil: I use non-GMO canola oil for its neutral flavor and good frying properties.
Make It Your Way
I love how easy it is to tweak this Pan Fried Chicken Strips Recipe to fit whatever mood I’m in or what ingredients I have on hand. You can season it hotter, swap out spices, or even change the cooking oil to suit your preferences.
- Variation: Sometimes I add a pinch of cayenne pepper or smoked chipotle powder for a smoky kick—trust me, it amps up the flavor without being overpowering.
- Gluten-Free: Swap the all-purpose flour for a gluten-free alternative like rice flour or a gluten-free blend for a crisp coating safe for gluten sensitivities.
- Oil Choices: You can try avocado or peanut oil for a different flavor profile and higher smoke points if you prefer.
- Chicken Cuts: For something juicier, try this method with chicken tenders or thinly sliced thighs—the key is uniform thickness for even cooking.
Step-by-Step: How I Make Pan Fried Chicken Strips Recipe
Step 1: Prep Your Ingredients Like a Pro
Start by heating your oil in a 12-inch cast iron skillet over medium heat until it hits around 350°F. If you don’t have a candy thermometer, a good test is dropping a pinch of flour in the oil—it should sizzle immediately without smoking. Meanwhile, whisk together the flour, salt, garlic powder, onion powder, black pepper, and paprika in a shallow dish, and beat your egg in a small bowl. Then slice your chicken breasts into strips about 1-inch thick for even cooking.
Step 2: Coat with Love
Here’s where the magic happens: First, roll your chicken strips in the seasoned flour until lightly coated. Next, dip each strip into the beaten egg, then back into the flour. I always roll them a final time in the flour before frying to build up a nice breading that crisps beautifully.
Step 3: Fry to Golden Perfection
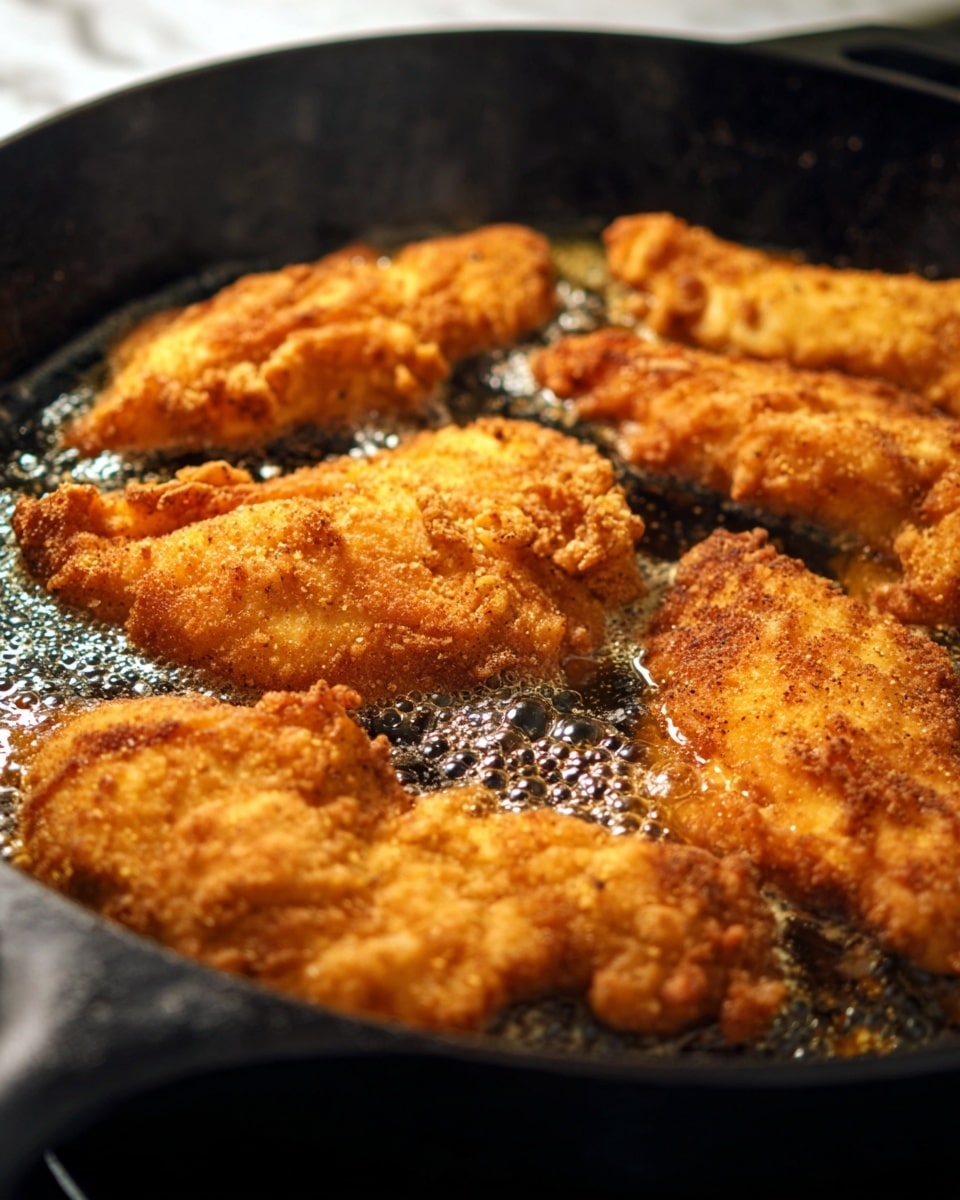
Gently place each strip in the hot oil—you don’t want to crowd the pan or the temperature will drop, making the crust soggy. Cook for about 4 minutes on one side until golden brown, then flip carefully and fry another 3 to 4 minutes. Use a meat thermometer if you have one; you’re aiming for an internal temperature of 160°F to ensure it’s juicy and safe to eat.
Step 4: Drain & Serve
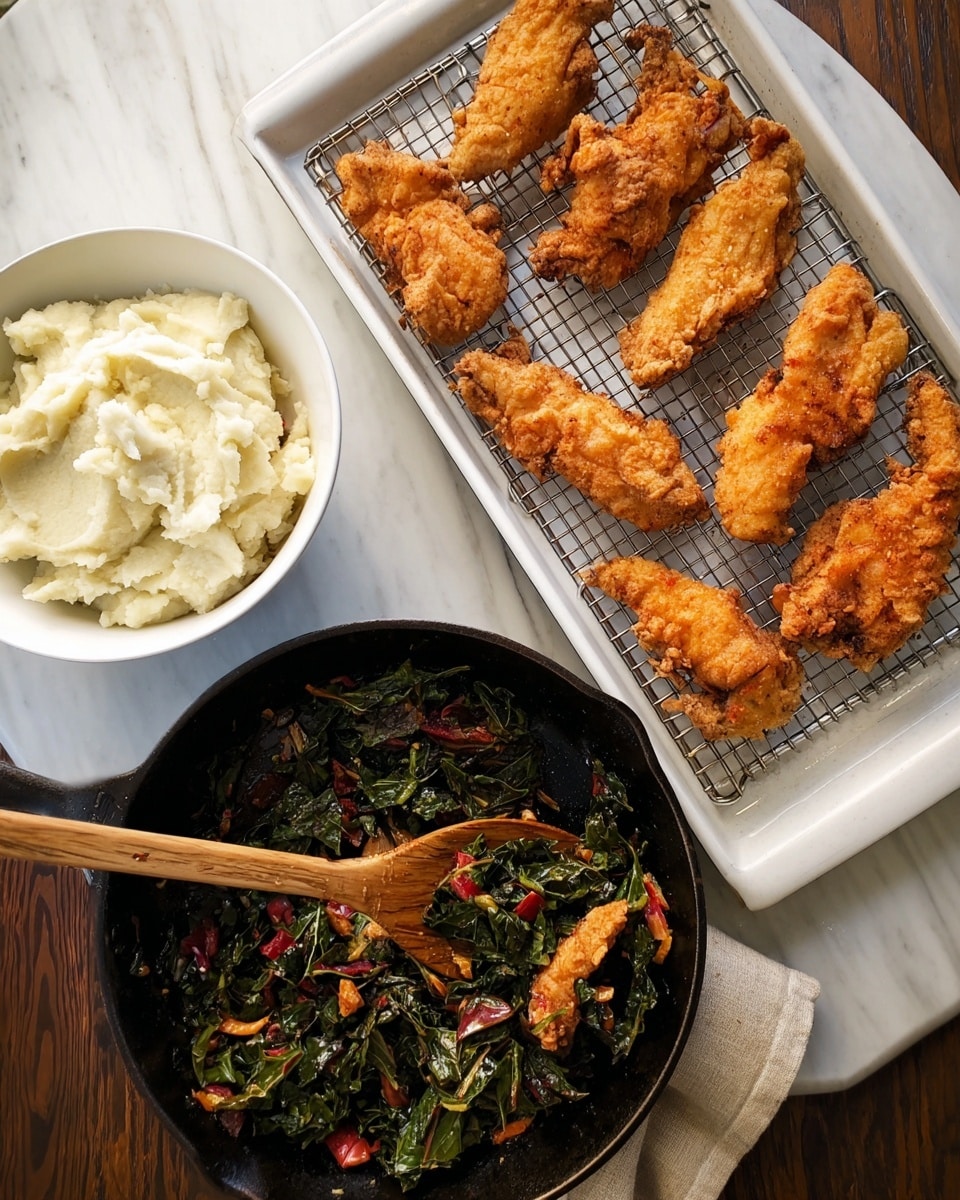
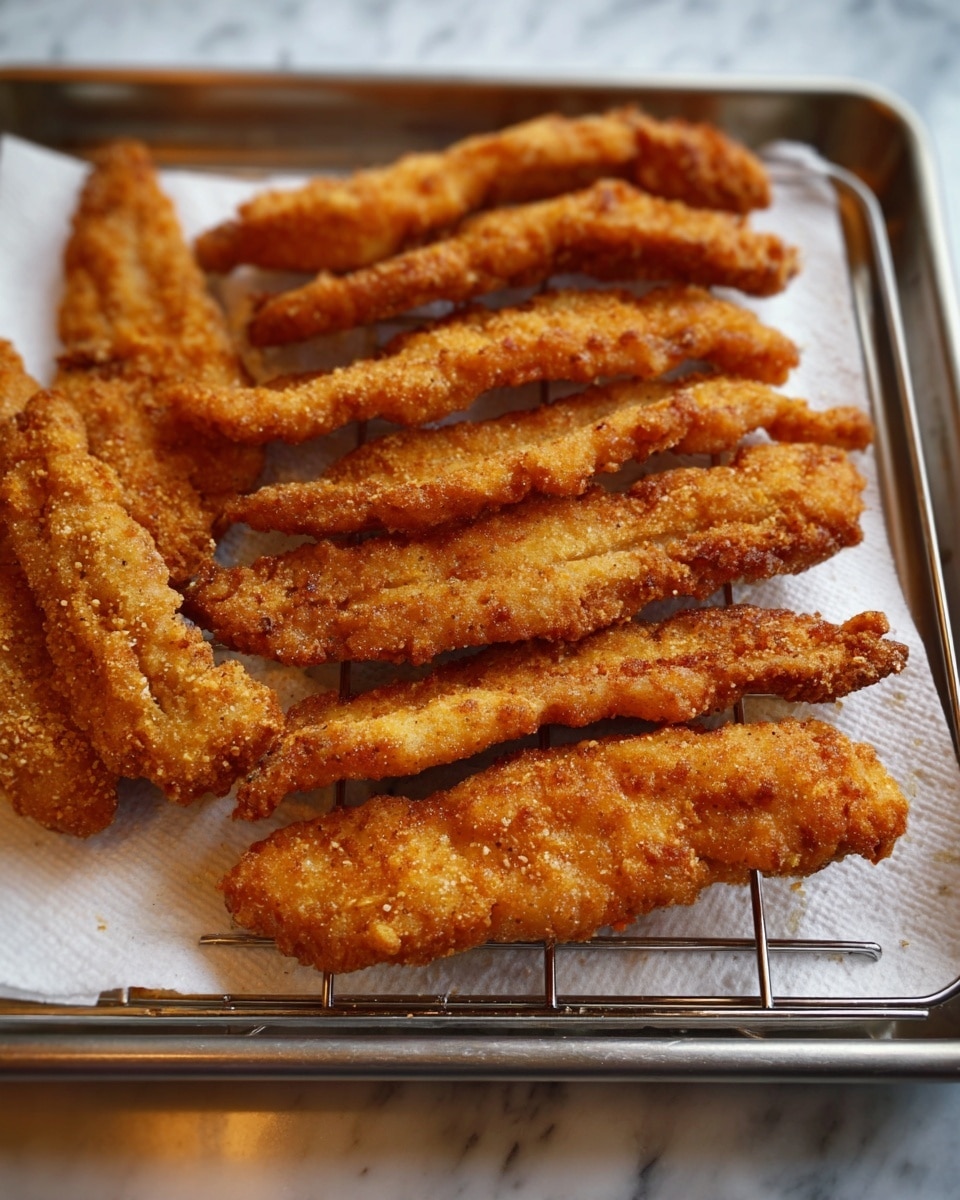
Transfer your golden chicken strips to a cooling rack set on a baking sheet with paper towels underneath. This helps the excess oil drain away so the strips stay crispy, not greasy. Serve immediately or keep them warm in a low oven until you’re ready—this trick really comes in handy when you’re making a big batch.
Tips from My Kitchen
- Temperature Control: Keeping your oil at 350°F is key to that crispy crust without overcooking the chicken.
- Patience: Don’t rush the flip! Let one side get fully golden before turning to avoid tearing the crust.
- Cut Even Strips: Try using a ruler or guide when slicing chicken for uniform cooking and presentation.
- Drain on Rack: Using a wire rack keeps your chicken from sitting in oil and keeps the coating crispier longer.
How to Serve Pan Fried Chicken Strips Recipe
Garnishes
I usually garnish with a sprinkle of fresh parsley or chopped chives—it adds a lovely pop of color and a fresh brightness against the savory strips. Sometimes I’ll squeeze a little fresh lemon juice over the top for a subtle zing that cuts through the richness.
Side Dishes
These chicken strips pair wonderfully with classic sides like crispy French fries or a refreshing coleslaw. I also love serving them alongside a simple mixed green salad or roasted vegetables for a lighter balance. And of course, dipping sauces like ranch, honey mustard, or a spicy sriracha mayo always steal the show.
Creative Ways to Present
For a fun twist, serve the chicken strips in soft flour tortillas with slaw and your favorite sauce for a quick chicken strip taco. I’ve also plated them buffet-style with an assortment of dips and colorful veggie sticks for parties, making them both tasty and a crowd-pleaser visually.
Make Ahead and Storage
Storing Leftovers
I store any leftover chicken strips in an airtight container in the fridge for up to 3 days. Placing a paper towel beneath them helps absorb extra moisture so they don’t get soggy.
Freezing
Freezing works great with this Pan Fried Chicken Strips Recipe. After frying and cooling completely, I flash freeze the strips on a tray before transferring them to a freezer bag. They freeze well for up to 2 months and reheat nicely without losing crunch.
Reheating
To reheat, I pop the strips in a preheated oven or toaster oven at 375°F for about 10 minutes. This restores their crispiness better than microwaving, which tends to make the crust soggy.
FAQs
-
Can I use chicken thighs instead of breasts for this Pan Fried Chicken Strips Recipe?
Absolutely! Chicken thighs have more fat and stay juicier, which many people prefer. Just be sure to slice them into uniform strips so they cook evenly, and watch cooking time as thighs might need a couple extra minutes to reach a safe internal temperature.
-
What oil is best for pan frying chicken strips?
Choose an oil with a high smoke point and neutral flavor like canola, vegetable, peanut, or avocado oil. I stick with non-GMO canola oil because it’s affordable and doesn’t interfere with the seasoning’s flavors.
-
Why do I need to double coat the chicken in flour?
Double coating helps build a thicker, crunchier crust that holds up well in the hot oil. The egg wash acts like a glue between layers of flour, resulting in a crisp golden exterior with a tender bite inside.
-
How can I make this recipe gluten-free?
Simply swap the all-purpose flour for a gluten-free flour blend or rice flour. Just make sure you check your seasoning blends for any hidden gluten ingredients to keep it safe.
-
Can I bake these chicken strips instead of frying?
You can, but the texture will be different. Baking yields a lighter, less crunchy coating. If you try baking, spray the strips lightly with oil and bake at 425°F on a wire rack for about 20 minutes, flipping halfway through.
Final Thoughts
This Pan Fried Chicken Strips Recipe has become such a comfort staple in my kitchen because it’s simple, quick, and always satisfying. I love sharing it with friends who want a dependable way to get crispy, juicy chicken that’s full of flavor without complicated steps. You’ll enjoy the texture, the balance of seasoning, and how easy it is to make ahead or customize. Give it a try—I bet it’ll become a family favorite in your home too!
Print
Pan Fried Chicken Strips Recipe
- Prep Time: 15 minutes
- Cook Time: 10 minutes
- Total Time: 25 minutes
- Yield: 4 servings
- Category: Main Course
- Method: Frying
- Cuisine: American
Description
Crispy and flavorful pan fried chicken strips coated in a seasoned flour breading, perfect for a quick and satisfying main course or snack. These chicken strips are cooked to juicy perfection in a cast iron skillet with non-GMO canola oil for a delicious homemade treat.
Ingredients
For the Chicken Strips
- 2/3 cup flour
- 2 tsp kosher salt
- 1 1/2 tsp garlic powder
- 1 1/2 tsp onion powder
- 3/4 tsp freshly ground pepper
- 3/4 tsp paprika
- 1 egg
- 2 chicken breasts
- 1 cup cooking oil (non-GMO canola oil)
Instructions
- Heat the oil: Warm the cooking oil in a 12-inch cast iron skillet over medium heat until it reaches 350°F, confirmed with a candy thermometer, to ensure perfect frying temperature.
- Prepare the breading mix: In a shallow dish, whisk together the flour, kosher salt, garlic powder, onion powder, freshly ground pepper, and paprika until well blended. Crack the egg into a small bowl and beat it with a fork.
- Coat the chicken strips: Cut the chicken breasts into strips. Roll each strip first in the seasoned flour mixture until lightly coated, then dip into the beaten egg, and roll again in the flour mixture for a thorough coating. Repeat a final roll in the flour to add extra breading and place the strips on a plate or cutting board.
- Fry the chicken strips: Carefully place the coated chicken strips in the hot oil. Fry for 4 minutes on one side, then flip with tongs or a fork and cook for an additional 3 to 4 minutes until the internal temperature reaches 160°F and the strips are golden brown.
- Drain and serve: Set a cooling rack over a baking sheet lined with paper towels. Transfer the cooked chicken strips onto the rack to drain excess oil. Serve immediately or keep warm in the oven until ready to eat.
Notes
- Use a candy thermometer to maintain the oil temperature for crispy, well-cooked strips.
- Adjust flour and egg quantities if preparing more than 8 strips for even coating.
- Canola oil is recommended for its neutral flavor and high smoke point, but vegetable oil can be substituted.
- Use a cast iron skillet for even heat distribution and perfect frying results.
- Ensure chicken strips reach an internal temperature of 160°F for safe consumption.
Nutrition
- Serving Size: 1 serving
- Calories: 350 kcal
- Sugar: 1 g
- Sodium: 600 mg
- Fat: 20 g
- Saturated Fat: 3.5 g
- Unsaturated Fat: 15 g
- Trans Fat: 0 g
- Carbohydrates: 18 g
- Fiber: 1 g
- Protein: 30 g
- Cholesterol: 90 mg

