Peanut Butter Bars Recipe
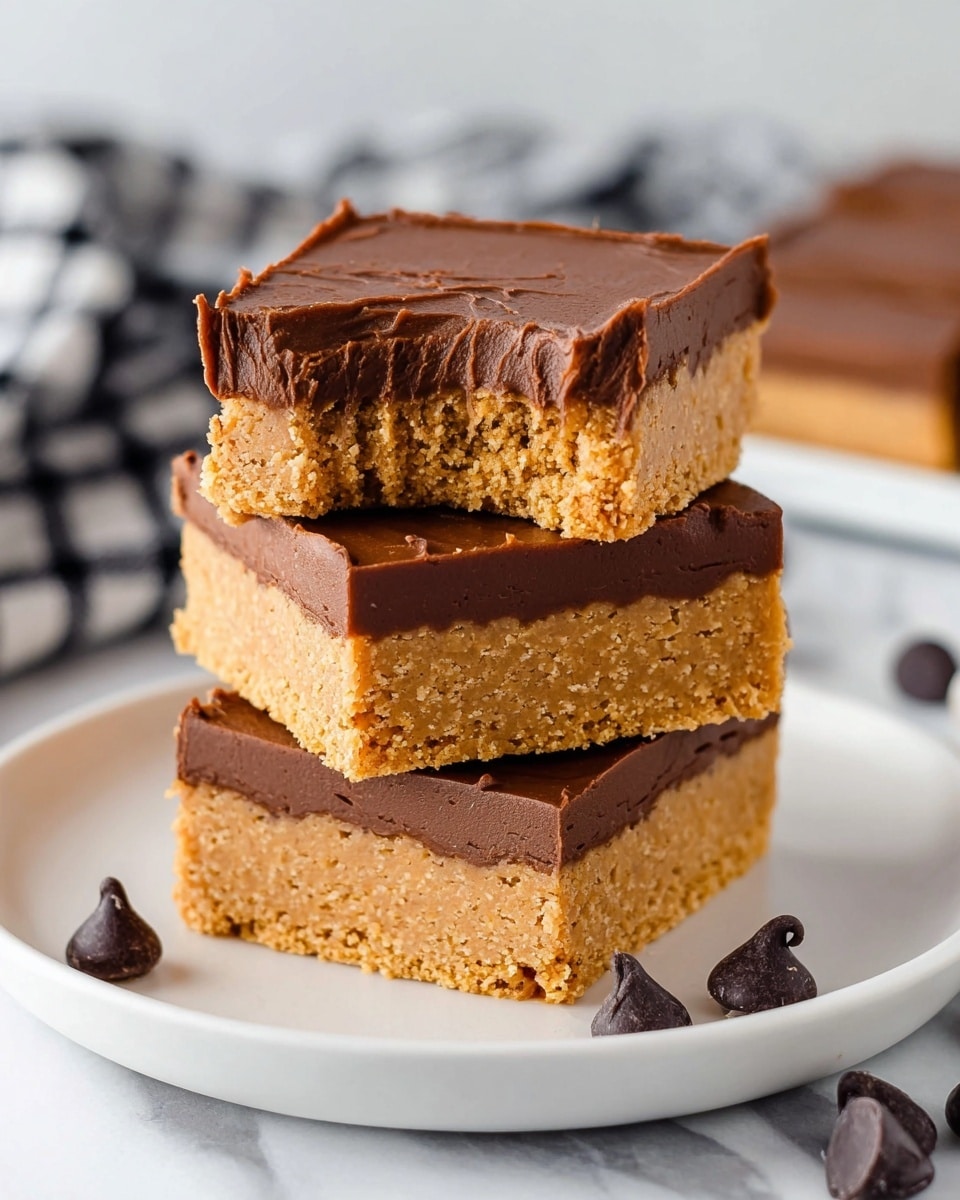
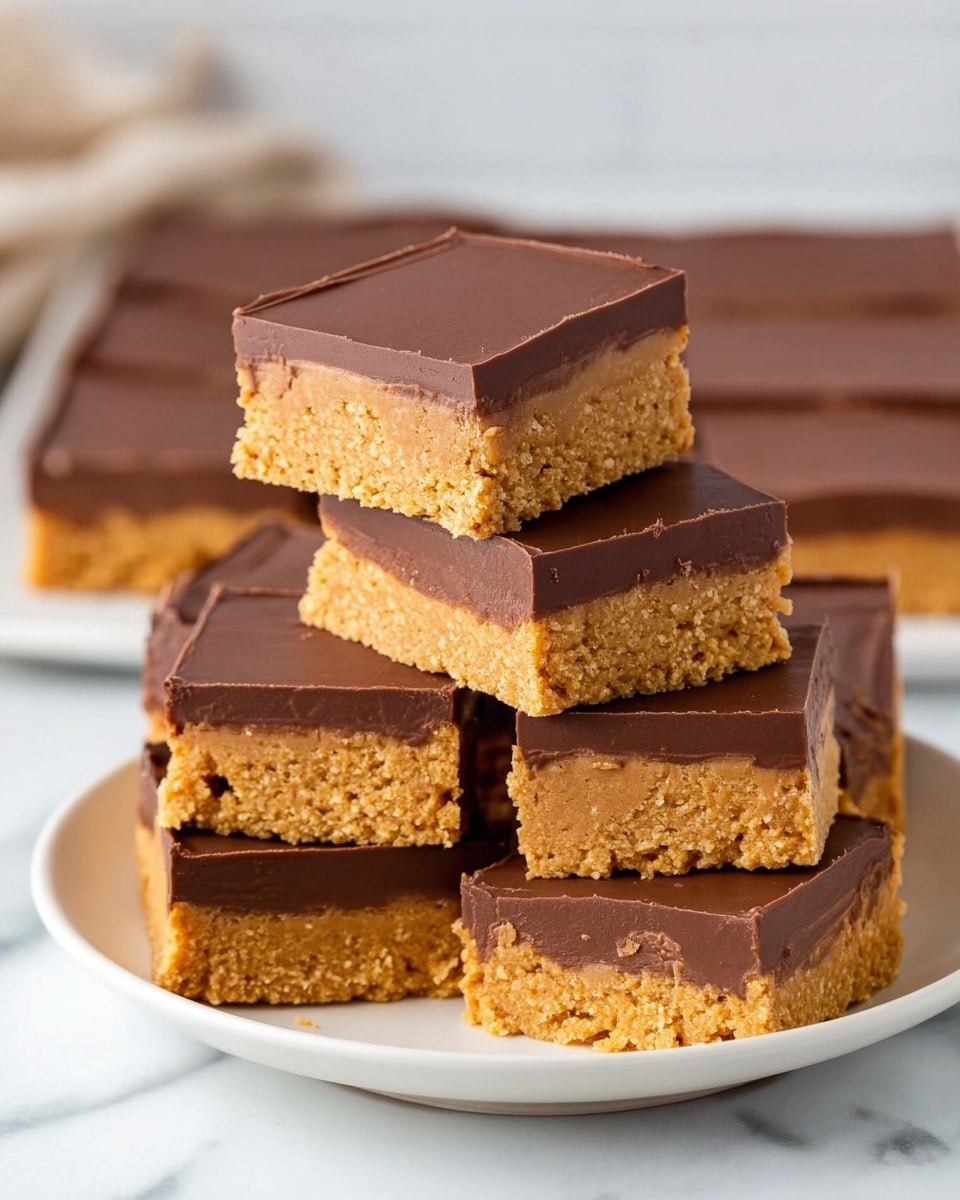
Let me tell you about a Peanut Butter Bars Recipe that quickly became a go-to treat whenever I need something indulgent yet easy to whip up. These bars have that perfect blend of creamy peanut butter and rich chocolate with a subtle crunch from the graham crackers-it s comfort food that hits just the right spot. Whether you’re making them for a quick after-school snack or a casual get-together, these bars always impress without taking forever in the kitchen.
What makes this Peanut Butter Bars Recipe stand out is how simple it is to put together, but the flavors are anything but basic. I ve shared this recipe with friends who were skeptical at first, but they always come back asking for more. Plus, no baking fussing with complicated techniques-just mix, chill, and enjoy. I think you ll love how versatile and delightful these bars are, just like I do.
Why You’ll Love This Recipe
- Super Simple: No baking needed, just mix, melt, chill, and you re good to go.
- Perfect Texture: Creamy peanut butter paired with crunchy graham crackers makes each bite delightful.
- Crowd-Pleaser: Great for parties, potlucks, or just a treat for yourself that disappears fast.
- Customizable: Easy to tweak with different chocolates or nut butters to match your taste.
Ingredients You’ll Need
The beauty of this Peanut Butter Bars Recipe is that it calls for straightforward, pantry-friendly ingredients you probably already have. Each one plays a crucial role in creating that luscious texture and balanced flavor-you can t rush these components!
- Butter: Melted butter adds richness and helps bind the graham cracker base.
- Graham crackers: Crushed to provide a slightly crunchy, sweet foundation for the bars.
- Powdered sugar: Blends smoothly to sweeten without graininess.
- Creamy peanut butter: This star ingredient brings the classic nutty, smooth flavor you crave.
- Semi-sweet chocolate chips: For that perfect chocolate layer that complements peanut butter perfectly.
Variations
I love making this Peanut Butter Bars Recipe just as written, but sometimes I like to switch things up depending on the occasion or what I have on hand. Don t hesitate to try your own twists-you might discover a new favorite version!
- Add Crunch: Toss in some chopped peanuts or pretzels into the peanut butter layer for extra texture-I m a big fan of the salty crunch it adds.
- Chocolate Swap: Use milk chocolate or dark chocolate chips if you prefer a sweeter or more intense cocoa flavor.
- Nut Butter Alternatives: Try almond butter or cashew butter to create a new flavor profile that s just as good.
- Vegan Version: Use dairy-free butter and vegan chocolate chips to make this recipe plant-based.
How to Make Peanut Butter Bars Recipe
Step 1: Prepare Your Pan and Mix the Base
Start by lining a 9×9 baking dish with parchment paper-it makes taking the bars out so much easier later. Next, toss the melted butter, powdered sugar, and crushed graham crackers into a bowl. I usually use a hand mixer to get it nice and smooth, but if you re feeling old school, a sturdy whisk will do. Then stir in 1 ¼ cups of creamy peanut butter until everything is well combined and holds together when you press it.
Step 2: Press the Peanut Butter Mixture Into the Pan
Once the base is ready, spread it evenly in your lined pan. Press down firmly but gently-this helps it set up well in the fridge instead of crumbling apart when you cut the bars later. I find using the back of a spatula works perfectly for this.
Step 3: Melt the Chocolate and Peanut Butter Topping
In a heat-safe bowl, combine the chocolate chips and remaining 3 tablespoons of peanut butter. Heat in 30-second bursts in the microwave, stirring every time to avoid scorching. You want a smooth, glossy mixture that spreads easily over the peanut butter base. If you prefer, you can do this gently on the stovetop using a double boiler setup.
Step 4: Spread and Chill
Pour the melted chocolate and peanut butter over your base and smooth it out with a spatula. Now, this is the hardest part-pop the whole thing into the fridge and chill for at least an hour. This helps everything firm up so your bars cut perfectly without melting or sticking.
Step 5: Cut and Serve
After chilling, let the bars sit about 10 to 15 minutes at room temperature before slicing-this makes cutting cleaner with less cracking. Use a sharp knife, and wipe it clean between cuts for the best results. Then, serve these delightful bars and watch them disappear quickly!
Pro Tips for Making Peanut Butter Bars Recipe
- Don’t Skip Parchment Paper: It makes lifting bars out without breaking easier, trust me from experience.
- Smooth Melting: Stir well between microwave bursts to avoid burnt spots in your chocolate.
- Press Firmly: Compress the peanut butter base well to keep your bars from crumbling when sliced.
- Cutting Trick: Warm your knife under hot water and dry it before cutting for cleaner edges.
How to Serve Peanut Butter Bars Recipe
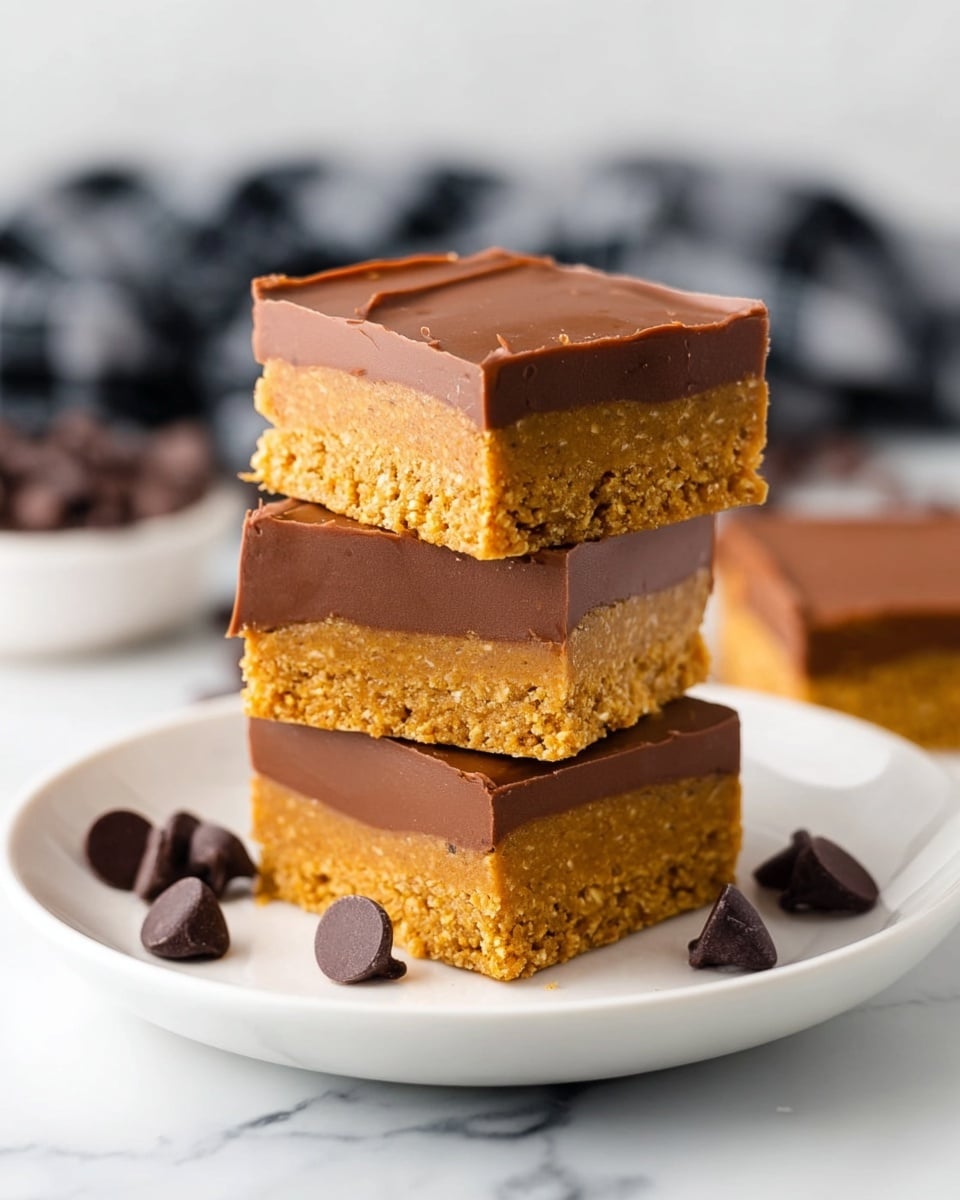
Garnishes
I love sprinkling a few crushed peanuts or a pinch of flaky sea salt over the chocolate layer for an extra flavor punch and texture contrast. Occasionally, a drizzle of melted white chocolate adds a pretty swirl and a touch of sweetness that everyone notices.
Side Dishes
These peanut butter bars pair beautifully with a cold glass of milk or a hot cup of coffee-you can t go wrong either way. For a party spread, I often serve them alongside fresh fruit or a light vanilla yogurt dip to balance the richness.
Creative Ways to Present
For birthdays or special occasions, I ve lined a decorative tray with colorful parchment and stacked these bars pyramid-style. Wrapping each bar in wax paper tied with twine creates adorable individual treats perfect for gifting or lunchboxes.
Make Ahead and Storage
Storing Leftovers
I store leftover peanut butter bars in an airtight container in the fridge-this keeps them firm and helps the chocolate stay glossy for up to a week. Just be sure to separate layers with parchment paper to prevent sticking.
Freezing
If you want to stash extras, wrap individual bars tightly in plastic wrap and freeze them in a sealed freezer bag. They hold up well this way for up to a month. When you re ready to enjoy, just thaw in the fridge overnight.
Reheating
Leftover peanut butter bars taste best chilled or at room temperature, but if you prefer a softer bite, pop one in the microwave for about 10 seconds. Just be careful not to overheat or you ll risk melting the chocolate topping too much.
FAQs
-
Can I use crunchy peanut butter instead of creamy?
Yes! Using crunchy peanut butter adds a nice texture to the bars, but keep in mind it might change the smoothness of the base slightly. If you love extra crunch, go for it-I often use crunchy peanut butter when I want that added bite.
-
Is it necessary to chill the bars for a full hour?
Chilling for at least an hour really helps the bars set properly so they cut clean and don t fall apart. If you re in a rush, 40 minutes might work, but the texture won t be as firm. I ve found that patience really pays off here.
-
Can I substitute something for the graham crackers?
You can try crushed digestive biscuits or even vanilla wafers as alternatives. They ll give the base a slightly different flavor but still provide the crunch and structure you need for the bars.
-
How do I prevent the chocolate topping from cracking?
Make sure to spread the chocolate layer evenly and allow the bars to come to room temperature for 10-15 minutes before cutting. Sudden temperature changes can cause cracking, so warming your knife before slicing also helps create smooth cuts.
Final Thoughts
This Peanut Butter Bars Recipe has been one of my favorite quick dessert hacks because it s dependable and delicious every single time. I hope you give it a try and see how easy and rewarding it is to make your own homemade bars that taste way better than store-bought. If you re anything like me, you ll enjoy having this recipe in your back pocket for when a sweet craving strikes-or when you want to impress friends with minimal effort!
Print
Peanut Butter Bars Recipe
- Prep Time: 10 minutes
- Cook Time: 0 minutes
- Total Time: 1 hour 10 minutes
- Yield: 16 servings
- Category: Dessert
- Method: No-Cook
- Cuisine: American
Description
These Peanut Butter Bars are a delicious no-bake treat featuring a buttery graham cracker crust combined with creamy peanut butter and topped with a smooth, rich chocolate layer. Perfect for satisfying your sweet tooth with minimal effort, they are chilled to set and cut into convenient portions.
Ingredients
Base
- 3/4 cup butter, melted
- 2 cups graham crackers, crushed
- 2 cups powdered sugar
- 1 1/4 cups creamy peanut butter
Topping
- 2 1/2 cups semi-sweet chocolate chips
- 3 tablespoons creamy peanut butter
Instructions
- Prepare Baking Dish: Line a 9×9 inch baking dish with parchment paper and set aside to prevent sticking and make removing bars easier.
- Mix Base Ingredients: Using a stand mixer or handheld mixer, combine the melted butter, powdered sugar, and crushed graham crackers thoroughly until well blended.
- Add Peanut Butter to Base: Stir in 1 ¼ cups of creamy peanut butter into the mixture just until fully incorporated, forming a sticky and cohesive base.
- Form Base Layer: Evenly press and spread the peanut butter mixture into the bottom of the prepared baking dish, smoothing it out for an even layer.
- Melt Chocolate Topping: In a heat-safe bowl, combine the semi-sweet chocolate chips with the remaining 3 tablespoons of creamy peanut butter. Heat in 30-second intervals in the microwave, stirring well between each until the mixture is smooth and fully melted.
- Top Base with Chocolate: Spread the melted chocolate and peanut butter mixture evenly over the peanut butter base layer in the dish.
- Chill to Set: Place the baking dish in the refrigerator and chill for 1 hour to allow the bars to firm up properly.
- Serve: Remove from refrigerator and let bars sit at room temperature for 10 to 15 minutes before cutting into 16 squares and serving.
Notes
- For easier slicing, use a sharp knife and warm it slightly in hot water, then dry before cutting the bars.
- Ensure the chocolate chips and peanut butter are fully melted together to create a smooth and shiny topping.
- Store leftover bars in an airtight container in the refrigerator for up to one week for optimal freshness.
- Use creamy peanut butter for best texture and spreading; chunky varieties may alter consistency.
- The bars can be wrapped individually and frozen for up to a month; thaw at room temperature before serving.
Nutrition
- Serving Size: 1 bar (approx. 2-inch square)
- Calories: 220
- Sugar: 18g
- Sodium: 95mg
- Fat: 15g
- Saturated Fat: 6g
- Unsaturated Fat: 8g
- Trans Fat: 0g
- Carbohydrates: 20g
- Fiber: 1.5g
- Protein: 4g
- Cholesterol: 25mg

